Facebook Ads (Meta Ads) offer a variety of targeting options to help you reach your audience, who are the exact people your product is designed for. This way, you only spend money on the audience you want to reach.
There are many features for selecting and targeting audiences on Facebook. However, you do need to understand how to use these options effectively without accidentally harming your campaigns. In this article, I will share everything you need to know about ad targeting options on Facebook. Here are the topics we will cover:
- Creating a Facebook Ads target audience
- Custom audiences
- Lookalike audiences
- Detailed audience targeting
- Facebook Ads targeting options
- Five tips for setting up targeting on Facebook
Accessing detailed targeting settings
When creating a new campaign, all targeting options are initially located at the ad group settings level. Click Audience controls to start setting up audiences.
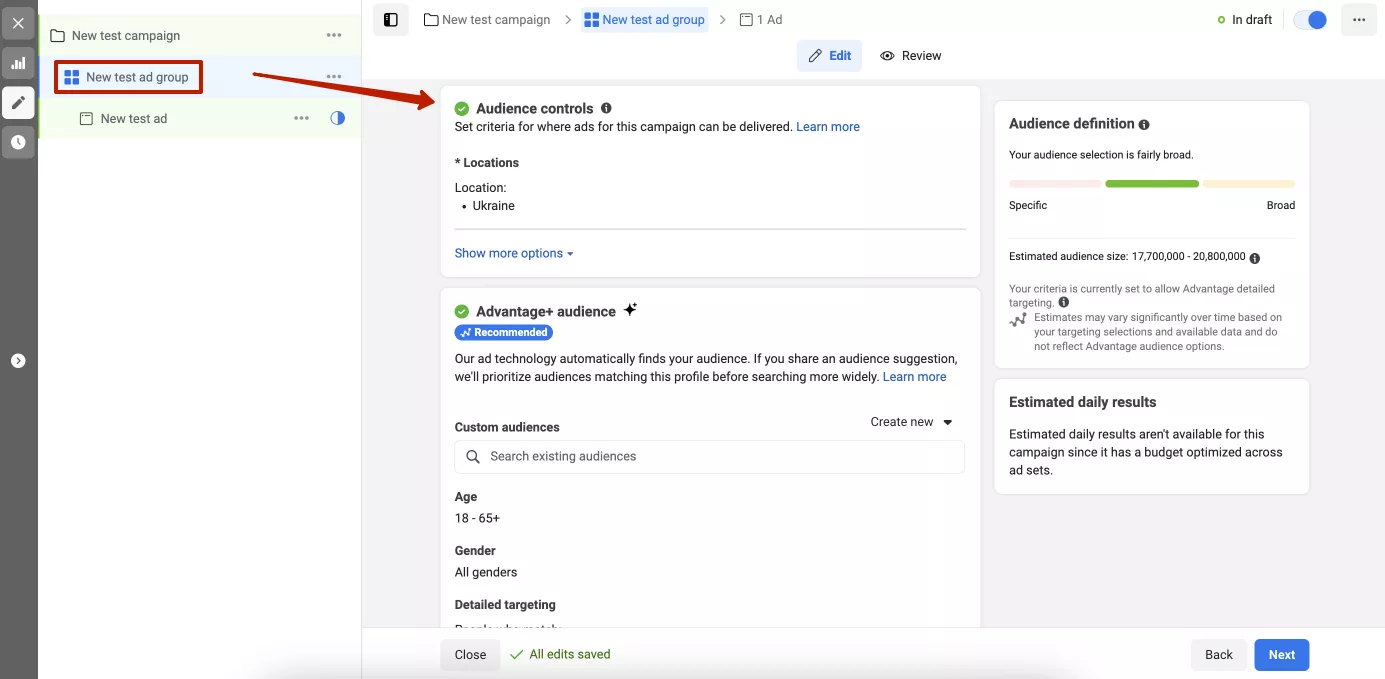
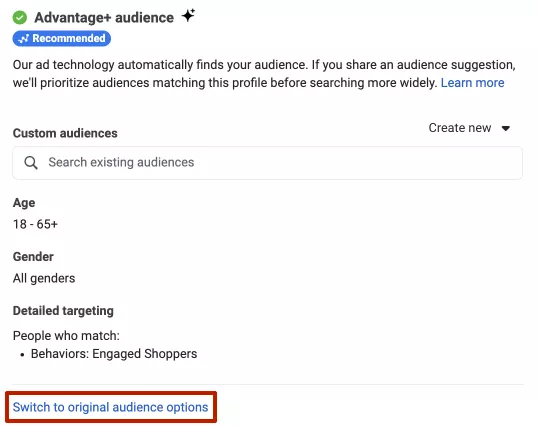
The targeting settings are limited at the initial stage because the Advantage+ audience feature is enabled. By enabling this option, you fully allow the system to find your audience by specifying only the minimum audience settings.
To access the detailed settings, we need to disable the automatic audience selection by clicking Switch to original audience options.
The page is now updated with a full set of targeting tools.
Creating a Facebook Ads target audience
Before you set up targeting parameters, you need to understand the types of audiences available on Facebook and how they are created. There are three main types of audiences:
- Custom audience
- Lookalike audiences
- Detailed audience targeting
They differ in what exactly the targeting is based on. Let’s take a closer look at each of them and analyze where and how to create them.
Custom audiences
These are audiences created from people who have already interacted with your business based on the parameters you set. You can create these audiences when you set up targeting at the ad group level.
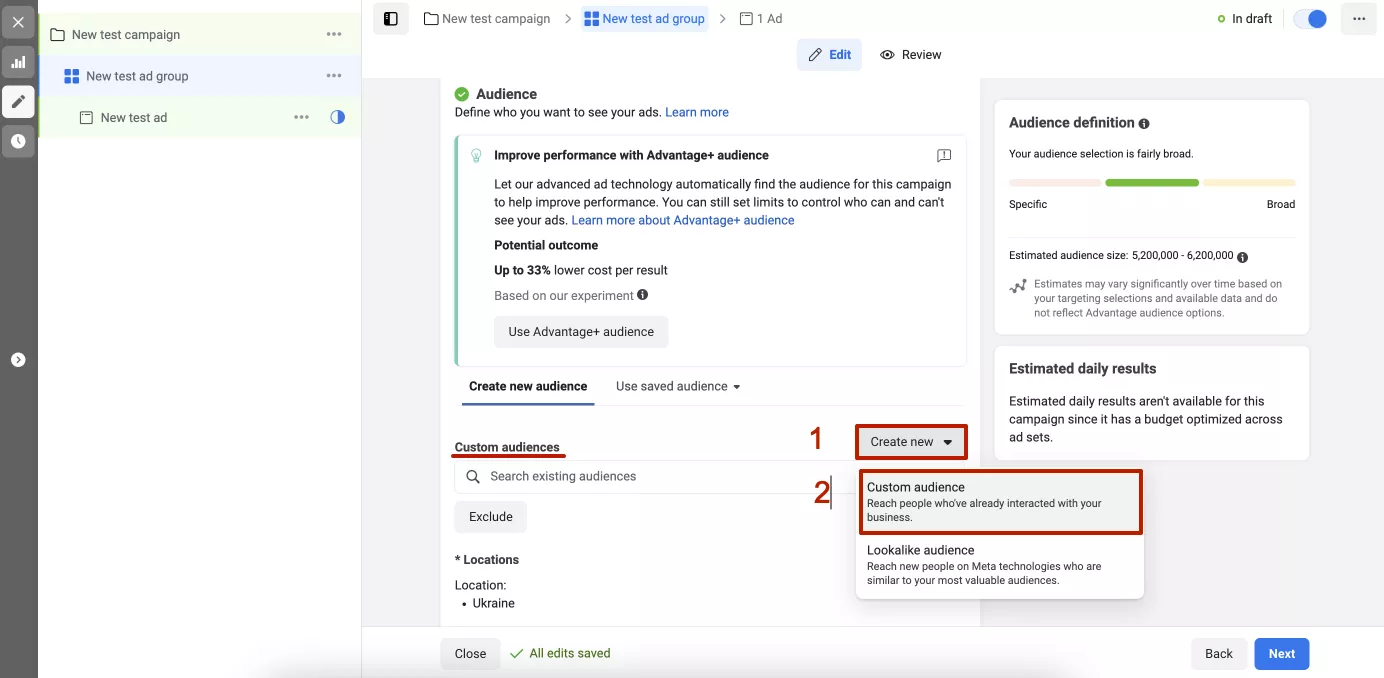
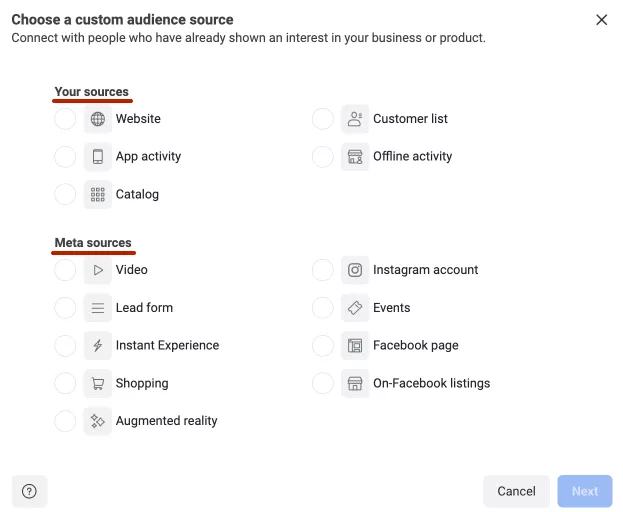
A window will open where you can select the sources that your audience has interacted with. These can be your sources, such as your website, in-app actions, customer contacts, catalog or offline stores, or Meta sources. Meta sources allow you to create an audience from people who have interacted with your ads or from followers of your Facebook or Instagram pages.
These audiences are often referred to as remarketing audiences. They allow you to target users who are already familiar with your company by performing a certain action, such as visiting your website or app, or subscribing.
To get started, I recommend choosing one of the most effective targeting audiences — your website visitors. However, to choose this source, you must first set up Facebook Pixel on your website.
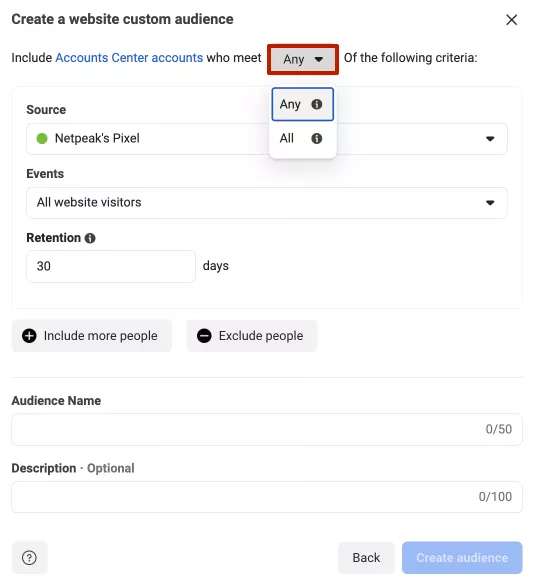
The next step is to set up the parameters of this audience. In the new form, the first thing to note is the logic of the criteria. The default setting is “Any,” which means this audience will include accounts that match at least one of your criteria.
However, you can change the logic and select “All.” This option includes only accounts that meet all of the criteria you set.
It is important to note that choosing “All” makes the audience narrower than “Any.”
For this example, I leave it as “Any” and continue with the settings. All settings are conditionally divided into three blocks. The first block (1) is setting the parameter. The second (2) is adding a parameter or adding an exception parameter. The third (3) is the identifier of the new audience.
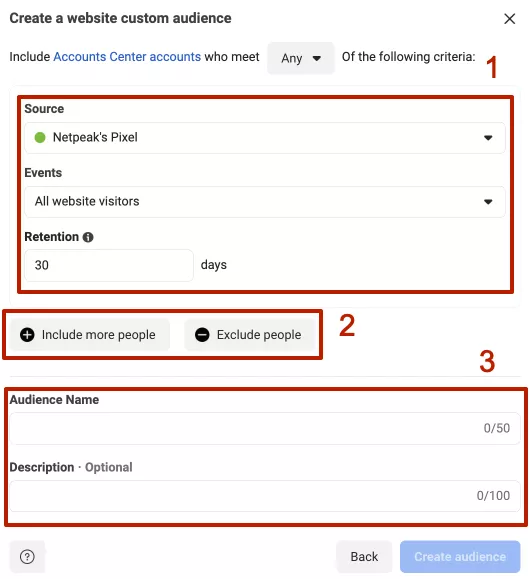
The first block contains the main parameters of the criterion. For the source, I choose the Facebook Pixel installed on the website. Next, the event parameter is a choice between website visitors and events added to the site (from your events).
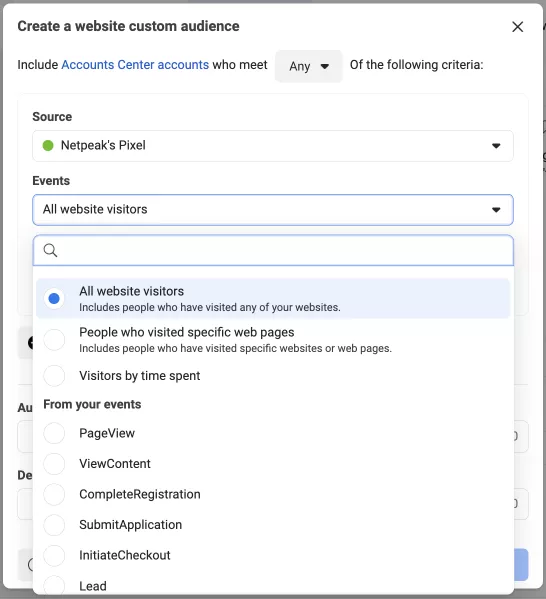
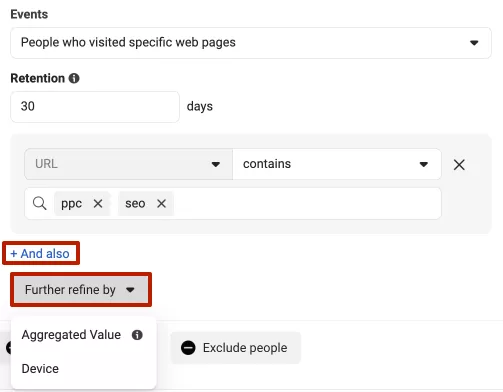
If you select All Website Visitors, the audience will include visitors to all websites where the selected Facebook Pixel is installed. The People who visited specific websites option allows you to add a parameter to configure the URL the user should have visited. If necessary, enter a URL that contains, does not contain, or equals a specific page address.
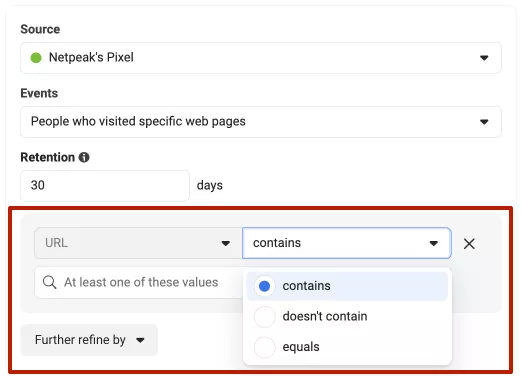
After entering the values for the link, you can add another link simultaneously using the +And also button. Refine the audience parameters using the Further refine by function, which allows you to select the frequency at which the event occurred and the device from which it occurred.
The last option is Visitors by time spent through the Percentile parameter, and you can also add specific web pages to it. The percentile specifies the percentage of people that you want to include in the audience based on the amount of time spent on the site.
You can choose a percentile of 5%, 10%, or 25%, where 5% represents the smallest but most active audience of users.
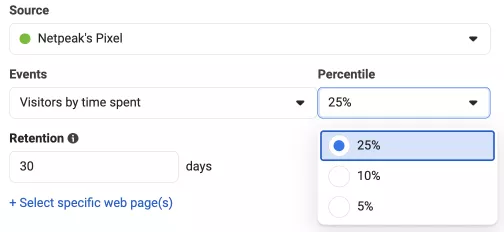
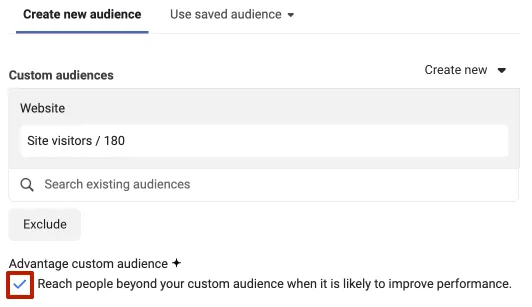
The last parameter in this block is Retention, where you specify the number of days the collected accounts will remain in the audience. You can choose up to 180 days.
Next is the second block of settings, which is quite straightforward. You can add an audience matching criterion or an exclusion criterion. Don’t forget about the set criteria logic that I described earlier. It is important for the settings to work correctly and for the audience to not be too narrow.
In the last block, enter the name of the audience and its description, if necessary.
Name your audiences by their basic settings so that you can easily find them later or understand what they represent without looking at the settings.
For example, if you have chosen website visitors with a pageview event with PPC services and retention of 180 days as a resource, the audience should be named accordingly as “Website visitors / PPC / 180d.”

There is another way to create custom audiences. To do this, open the Meta Ads Manager side menu, select All tools, and click Audiences.
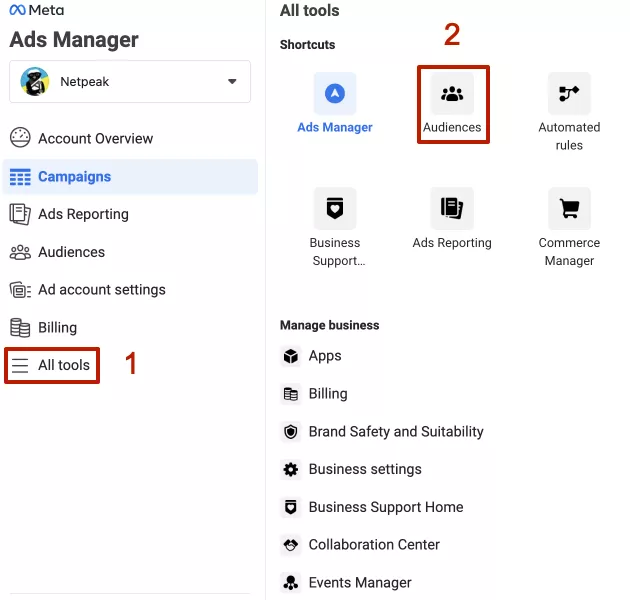
Next, click Create new > Custom audience. Here, you will find all the audiences you have created and saved.
Lookalike audiences
The next type is lookalike audiences. They are created based on other audiences (already created custom audiences) and allow you to reach new people with similar interests. They are also created in a new campaign or the Audiences tool.
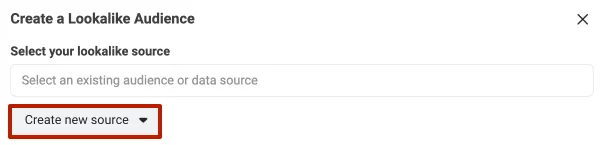
Let’s take a look at creating and customizing them. Click Create new > Lookalike audience. First, you must select a source, either existing audiences or data sources. Data sources are pixel events on your website or in a product catalog. Existing audiences are pre-created custom audiences.
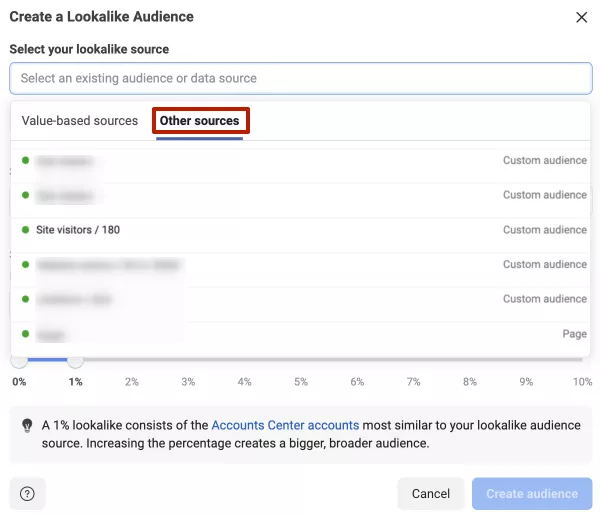
Click Create new source to create a new custom audience.
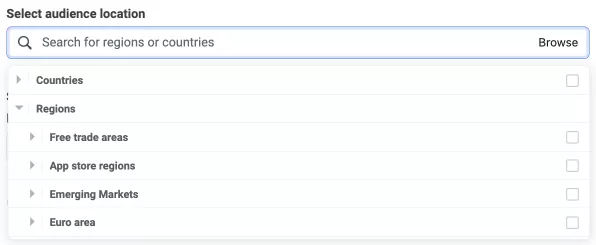
The next configuration step is to select the audience location in terms of country or region.
And the last step is to select the audience size. A higher percentage will give you a larger audience, but this audience will be less similar. Conversely, an audience with a size of 1% will be small, but it will have the highest similarity to your source. You can also select the Number of lookalike audiences and create multiple audiences with different similarity settings.
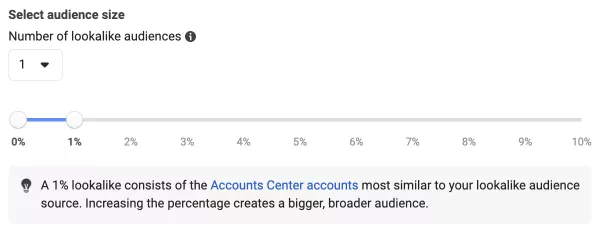
At the bottom, you will see the name of your lookalike audience and its estimated reach.

Detailed audience targeting
The last type of audience is the one created based on the detailed targeting settings. It can include other audiences, such as custom or lookalike audiences, or it can be created based on the detailed targeting settings only. These settings are located just below the audience selection when you create a new test ad group.
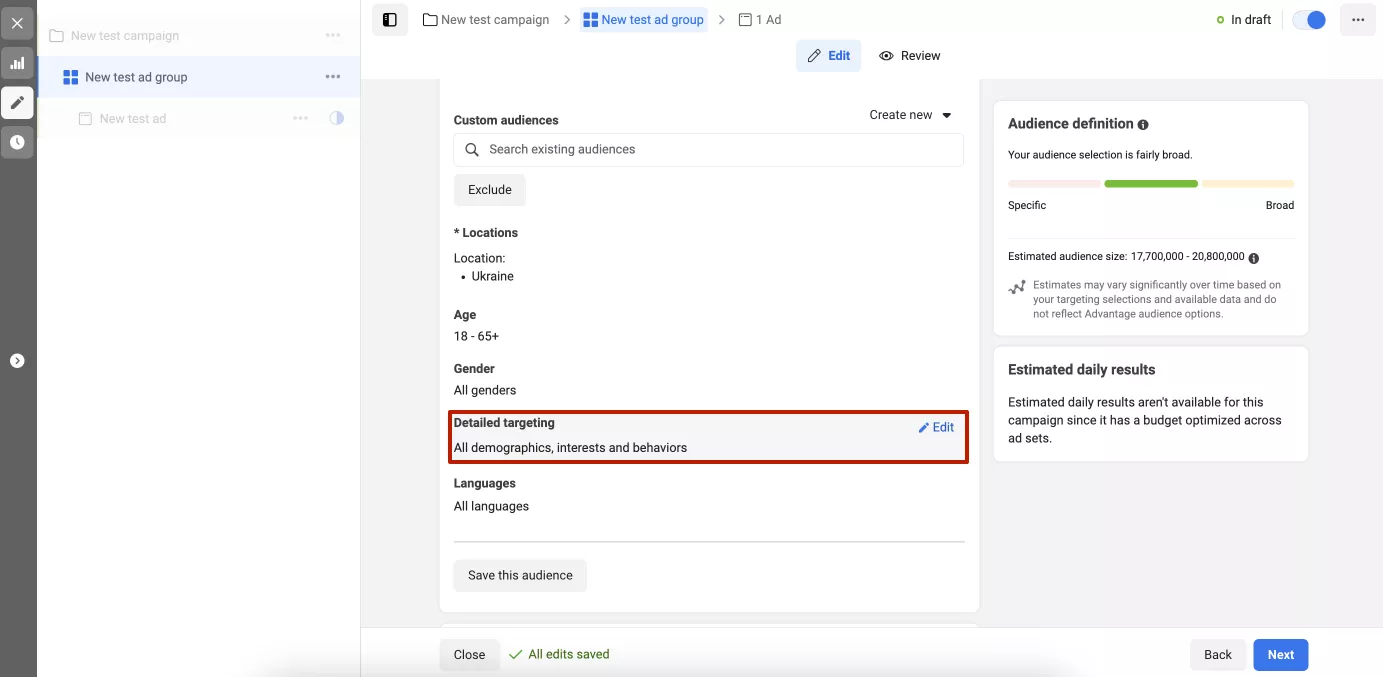
Click Edit to begin the setup process. Detailed targeting allows you to add demographic, interest, and behavioral data.
For more information on detailed targeting, see the next section.
Facebook Ads targeting options
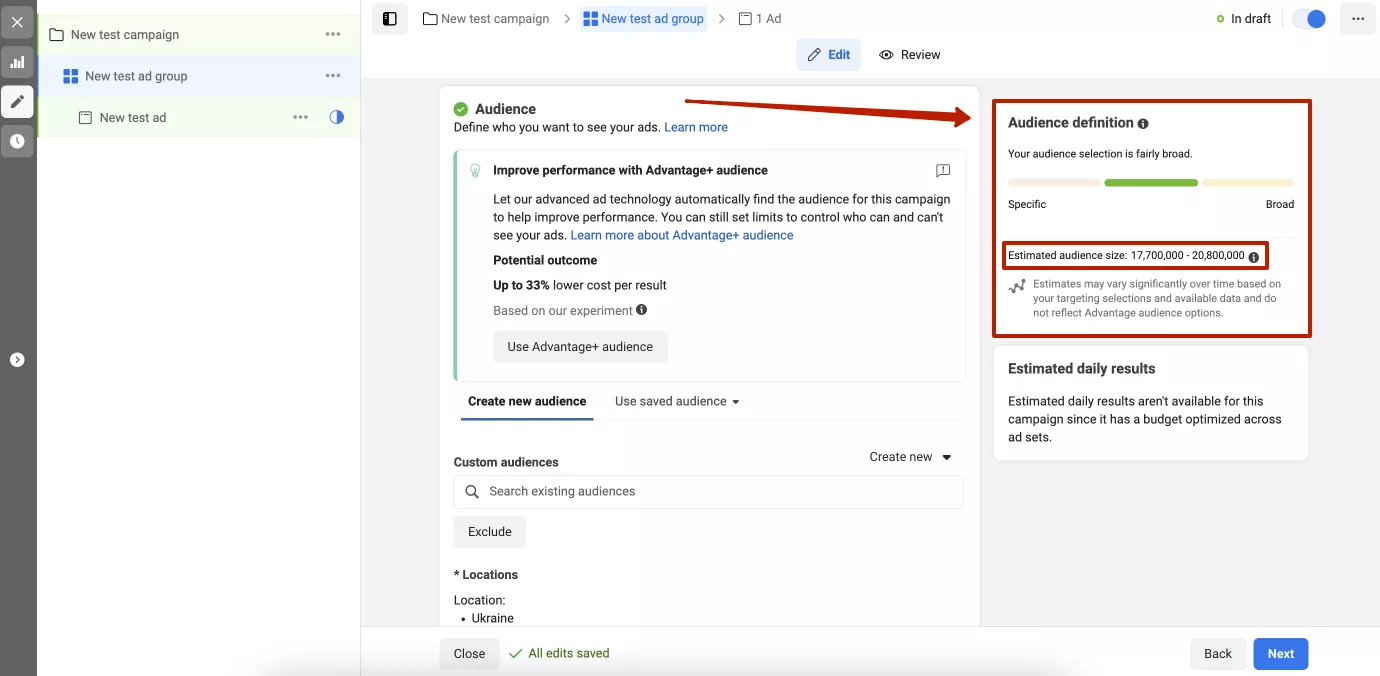
Now, let’s address the main focus of this article, which is the targeting parameters. First of all, I would like to draw your attention to the “Audience definition” indicator, which is located to the right of the settings. Keep an eye on this indicator to avoid creating an audience that is too specific or too broad for your campaign.
The settings are all located at the ad group settings level. Let’s take a look at each setting, starting with the Audiences option.
Audiences
The first step is to create a new audience or use a saved one.
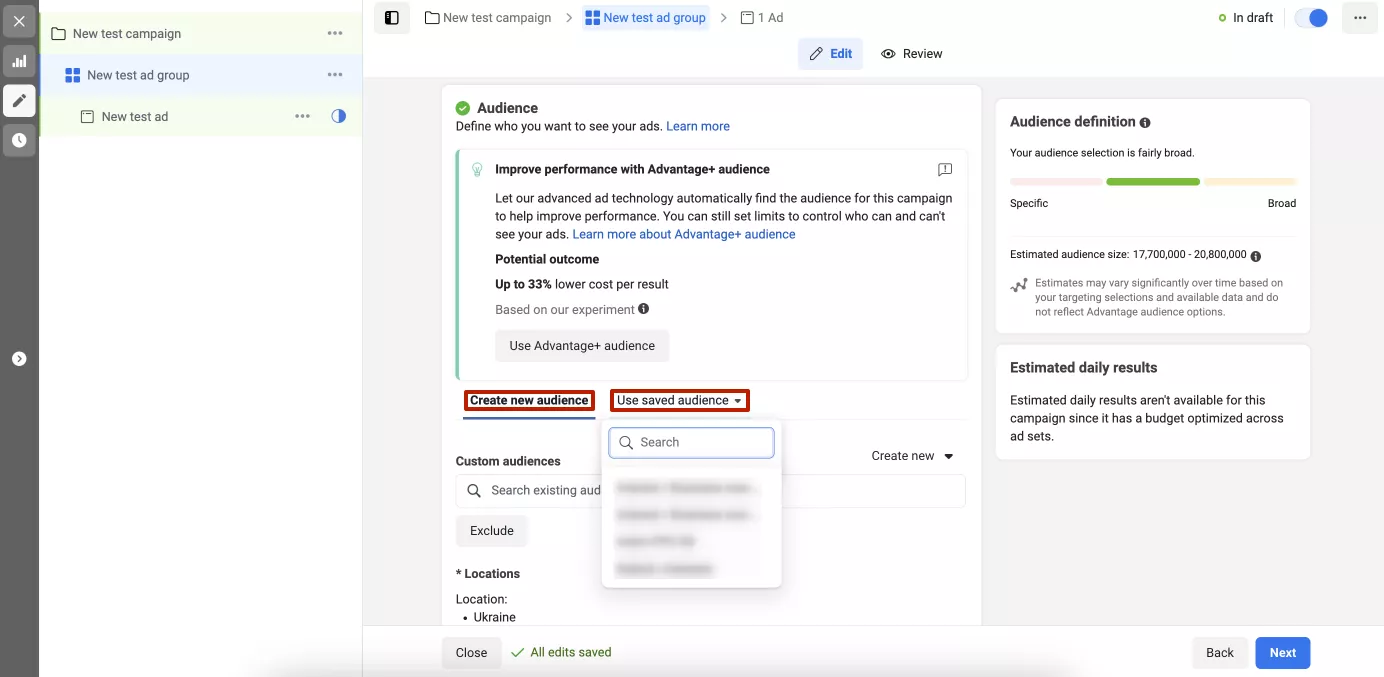
Saved audiences appear whenever you create and save at least one audience to your list.
For example, after configuring all the parameters in a new group, you’ll see the Save this audience button before the Locations option. Click it to save the audience with all its settings. It will appear in the Audiences tool. Use it the next time you create a campaign.
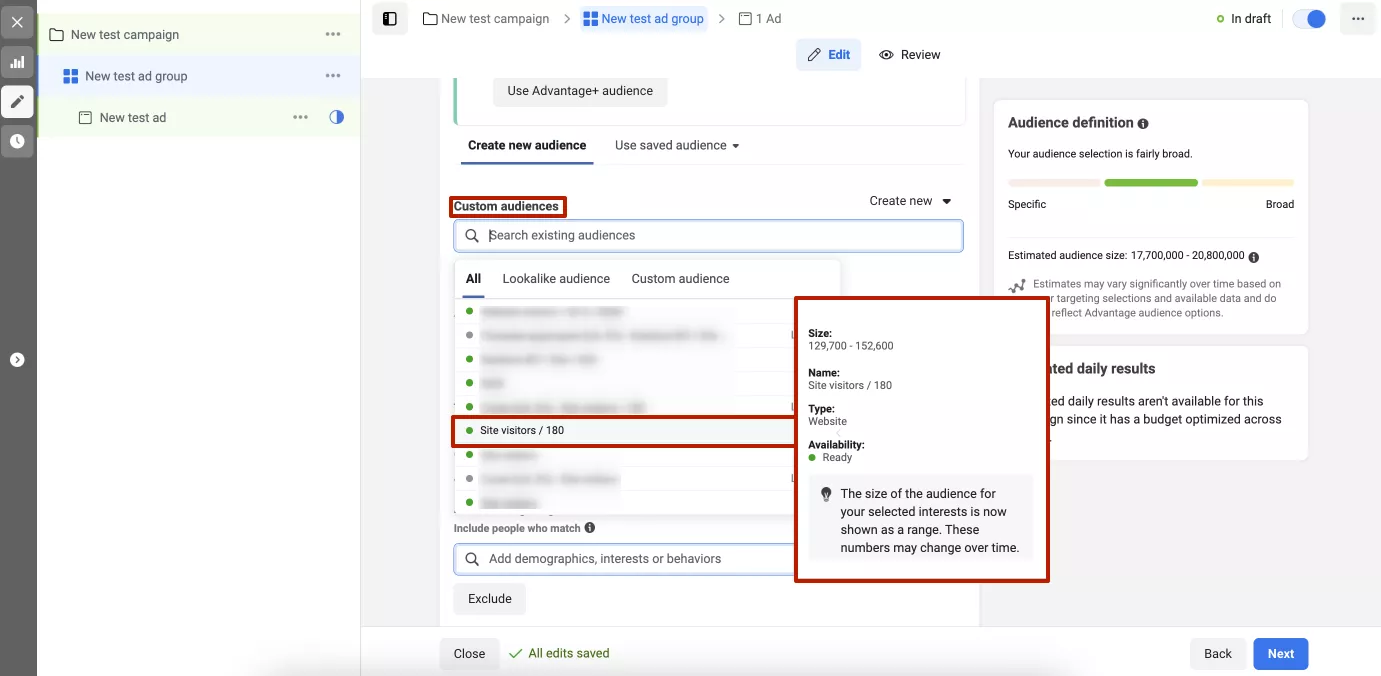
The default setting is now Create new audience. Below, you can create a new audience or choose from saved audiences. Add custom and lookalike audiences you’ve created before. Hover over them to see key information, such as size, name, type, and availability.
After you’ve selected the audience, Facebook will offer to turn on advanced Advantage settings. These will include your audience and search for people similar to them who meet the criteria. While this feature increases the size of the audience, it is not always effective.
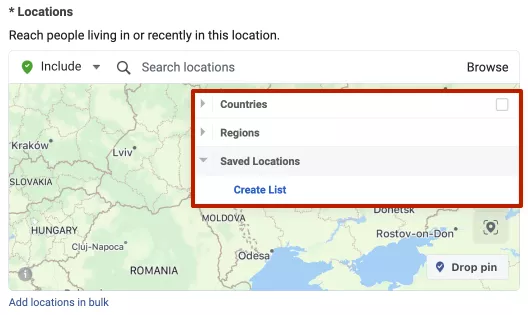
Locations
Click the Edit button to start working with the location setting. Add or remove specific locations, and add multiple locations at once.
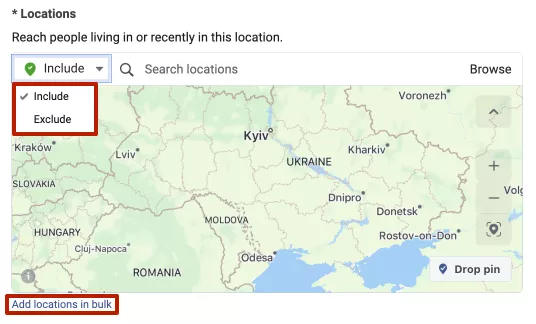
Click Browse to select locations by country, region, or saved locations. You can also create a new saved location right away.
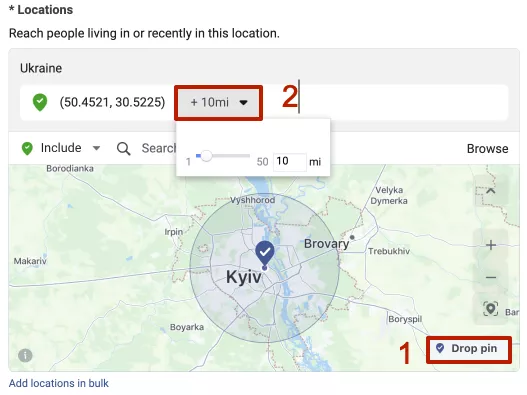
It is also possible to place a point on the map using the Drop pin button and set the radius of the distance from this point.
For targeting, enter the following data:
- Specific countries
- States/regions
- Cities
- Zip codes
- Addresses
- The entire world or certain regions
Age
The next targeting parameter is age. Facebook allows you to target people between the ages of 18 and 65+.

Gender
Another simple option is gender. Choose from three targeting options: men, women, or all.

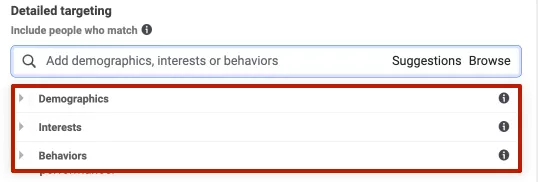
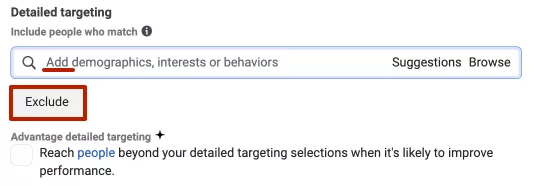
Detailed targeting
Setting up detailed targeting allows you to target three main user parameters: behaviors, demographics, and interests. You can add or exclude any of these parameters.
Just like with special audiences, Facebook offers Advantage, which is a detailed targeting feature. This feature allows the system to go beyond the set audience in order to effectively attract new users.
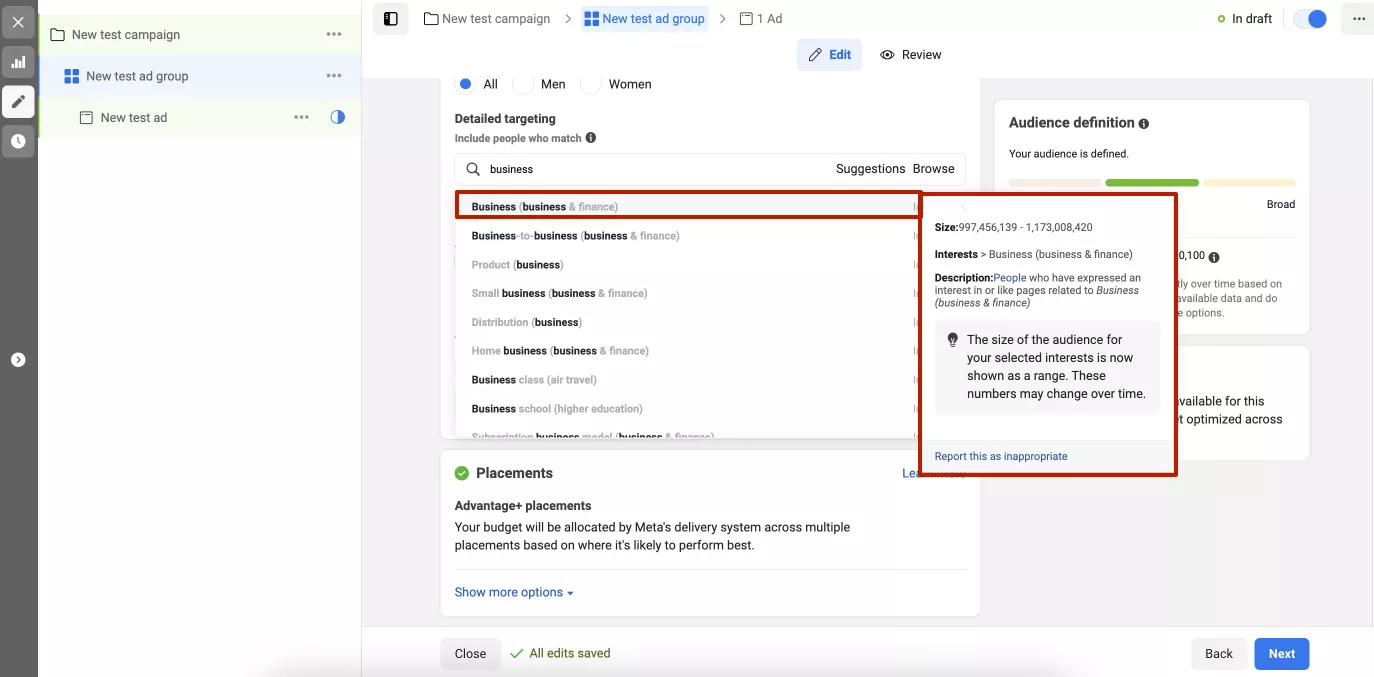
Click Browse to see a list of options.
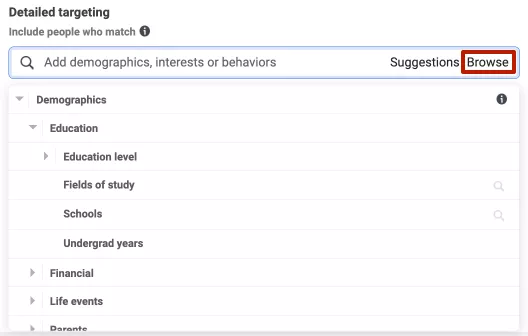
Alternatively, you can start entering the necessary data about your audience to see the list of suggestions. When you hover over each criterion, you’ll see a brief summary of the approximate size of your audience.
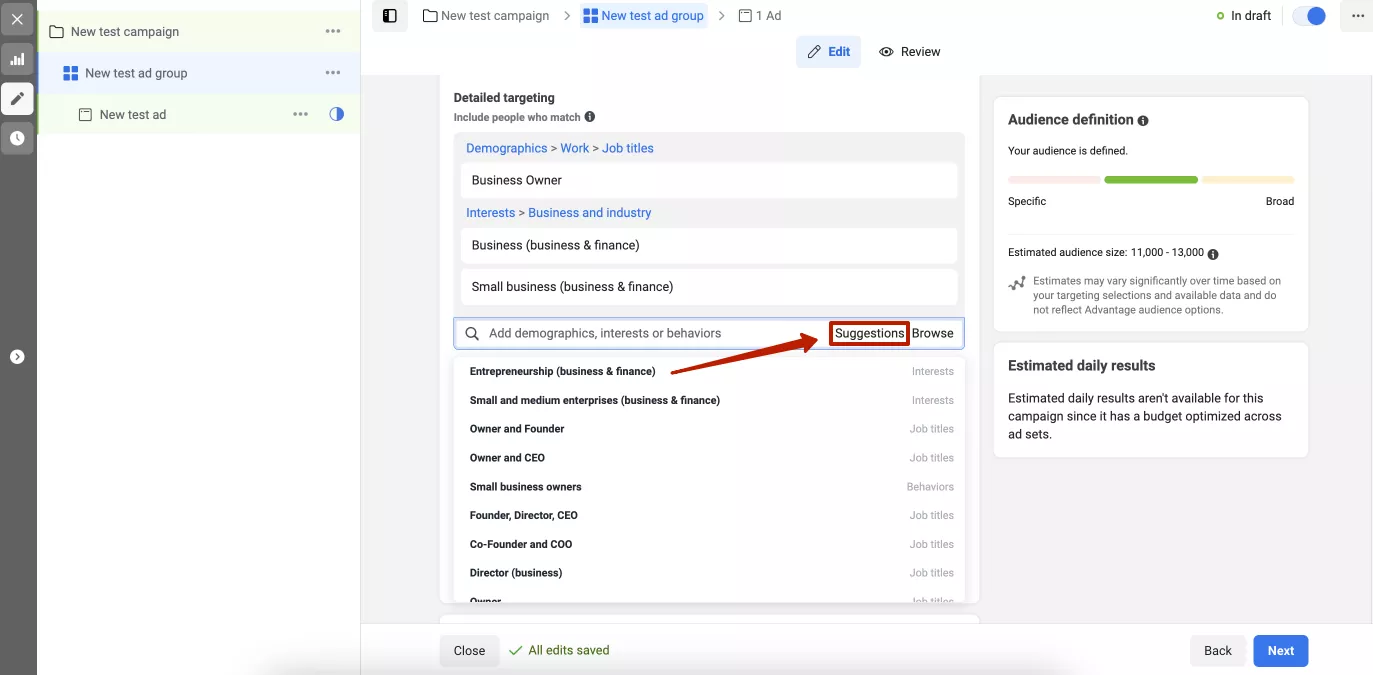
You can then combine behaviors, demographics, and interests to create a thorough portrait of your audience. That’s why this targeting option is called detailed.
If you have already selected several options for targeting your audience, click Suggestions to see the list of similar options that you may find useful and make your search easier.
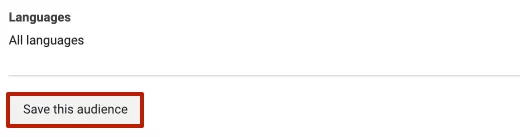
Language
The next-to-last targeting option is the language selection. The default setting is “All languages.” When editing, you can add up to 48 different languages.
I recommend that you keep the default settings. The system will still display ads to people who use the language spoken in your region, and it will not narrow down your target audience.
It is also a good idea to specify a language that is uncommon in your region if you want to target speakers of a different language. For example, if you want to target Ukrainians who currently live in Poland.

Once you have set this option, don’t forget to add the audience to your list of favorites.
Placements
By default, Facebook selects the Advantage+ placements option, which means that system algorithms will choose the best placements on their own. More people will see the ad, and the system will allocate the budget to the most effective places.
The other option is manual placements.
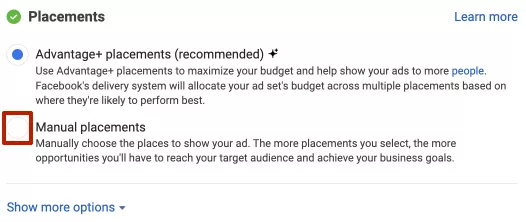
When you manually select a placement, the first thing you can change is the devices: all devices or either computers or smartphones. The next thing to select is the placement platform, where you should select only the platforms you need.
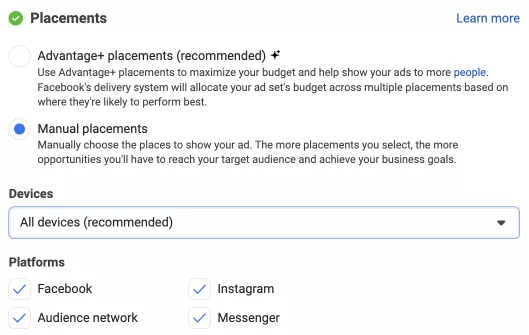
Below is a list of all the placements. Eliminate the unnecessary ones in each section.
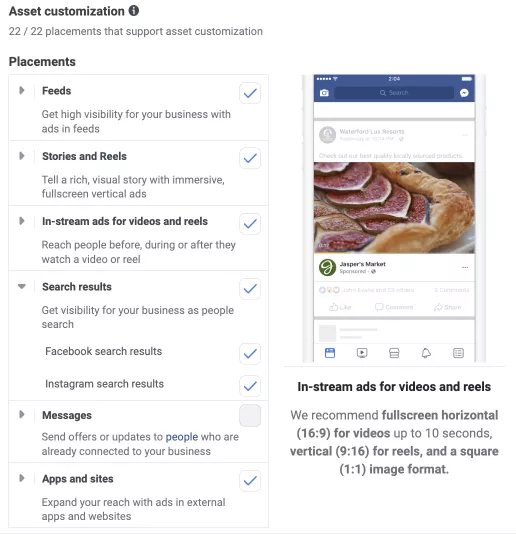
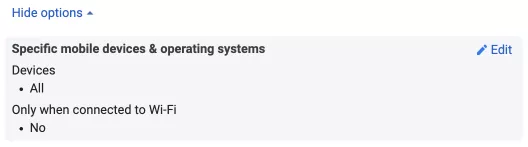
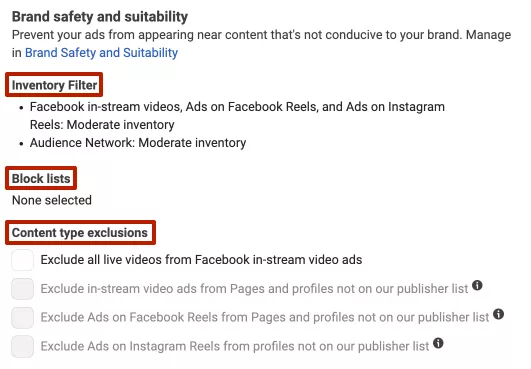
In addition, at the very bottom, just below the placements, there is the Show more settings button. Click it to add more specific settings. The first one is for mobile devices and operating systems.
The second block allows you to customize three parameters related to the security and compliance of branded content:
- The inventory filter allows you to select the type of content that appears next to your ads in specific locations.
- Block lists prevent ads from appearing in placements you consider inappropriate for your brand.
- Content type exclusions allow you to exclude your ads from appearing on videos from certain pages or profiles or in certain placements. These are the pages and profiles not on the Facebook Publisher Allow list, which have enabled monetization.
Five targeting tips for Facebook ads
Tip #1: Target competitor audiences with Audience Insights.
Audience Insights is a powerful tool that provides information about your Facebook audience. It provides you with valuable data to create and test new audience segments.
How to open this tool:
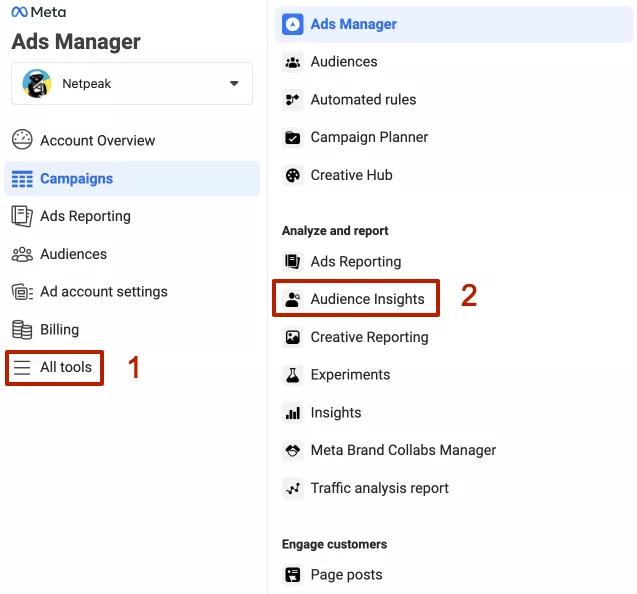
- Go to the Facebook Ads Manager side menu and select All tools.
- Scroll down and find Audience Insights in the Analyze and report section.
You can see information about your current audience here, and you can also learn about Facebook’s entire potential audience.
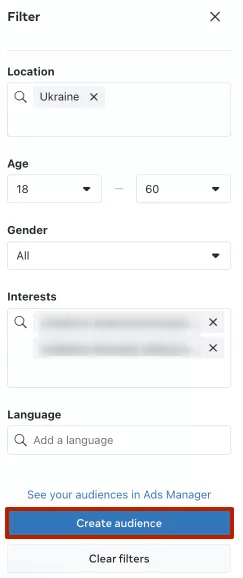
Find new segments by targeting competitor audiences.
To do this, go to Potential audience, open the filter, and enter your audience’s basic demographics: location, age, gender, language, and interests. This is necessary to start building an audience similar to your target one.
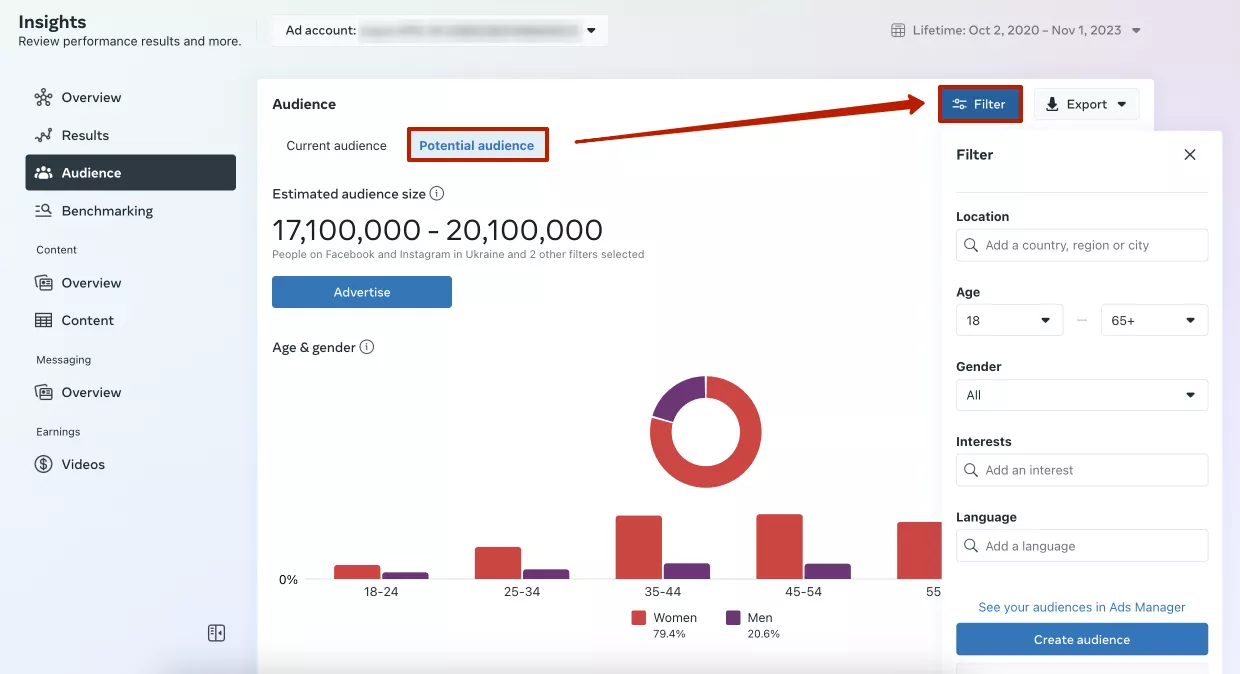
This allows you to see what pages the audience is interested in, the gender or region ratio, etc.
Not all competitors are shown in Interests, but some of the largest companies will be shown.
Review the parameters of your competitor audience and create your own based on their followers. Click Create Audience at the bottom of the filter menu to quickly save it.
The tool allows you to view information about your potential audience. Use the filters to customize it and start testing.
Note that you shouldn’t rely entirely on the data provided by this tool, as it’s not designed to identify and target your audience. For example, the method of analyzing competitors may not be suitable for small businesses.
Also, such a tool does not guarantee that the new test audience will bring you high conversion rates with the same efficiency.
Tip #2: Use custom audiences for remarketing.
Use custom audiences to create remarketing audiences based on data from various resources your target audience has interacted with. Test different remarketing audiences, mix and combine them, and keep the ones that work best by tracking their performance.
Remarketing audiences are used to encourage a customer who has already interacted with you in some way to take a targeted action, such as making a purchase.
Exclude remarketing audiences from non-remarketing ones.
Remember that people who are part of your remarketing audience may also be part of your other audiences, for example, if they share the same interests. In this case, you will not only show ads from different stages of the conversion funnel to the same user but also make your ads compete with each other.
Tip #3: Target the audience who have made recent purchases with Facebook ads.
Facebook allows you to target people who have clicked the Buy now button on an ad within the last week. To do this, add Engaged shoppers to your detailed targeting settings.
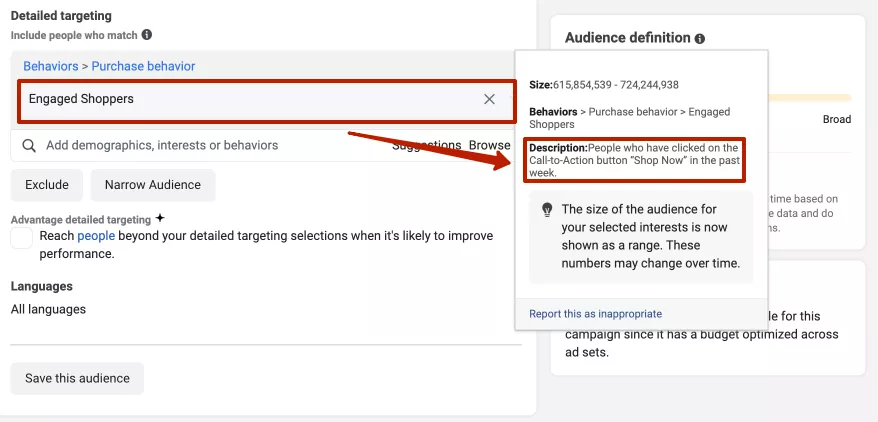
Focus on this audience’s most recent purchase and add the product topic to their interests to target people who frequently buy these products. This approach will help you find a more converting audience.
Tip #4: Use multi-level targeting.
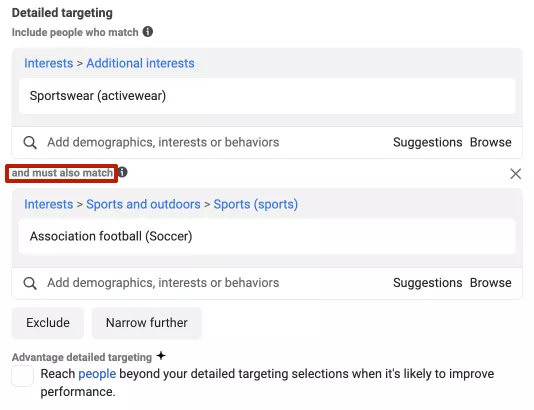
Detailed targeting capabilities allow you to create detailed profiles of your audience. Use this to create and test new audiences. You can also add a custom audience (one that has interacted with you) and add detailed targeting parameters to it at the same time as you set up the parameters for a new audience. This will allow you to further refine the parameters and make them unique.
But remember that using an audience and adding detailed targeting options narrow your overall reach. The system will only select people who match the settings.
Also, try combining two unique audiences. For example, if your product is sportswear, Add the general interest “sportswear” and use the “and” parameter to refine it with the interest “football association.” This way, you add ads aimed at selling football clothing and shoes.
Tip #5: Explore lookalike audiences.
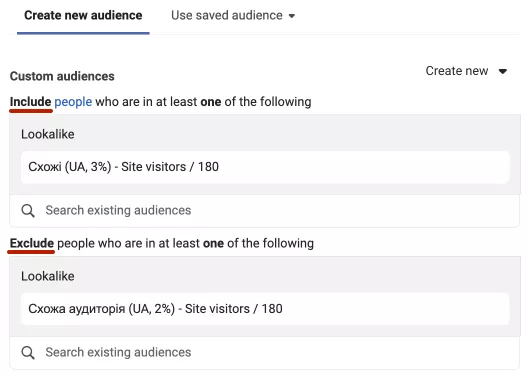
It is useful to test lookalike audiences by targeting different match percentages separately. Remember that the higher the match percentage, the broader and less similar the audience will be to the one you specified. In this case, add advanced targeting options to narrow and refine your lookalike audience.
For example, a 1% proximity audience is included in a 5% proximity audience. To ensure that advertising campaigns targeting these two audiences do not overlap, exclude the 1% proximity audience from the 5% proximity audience.
Exclusions allow you to set up audiences as follows: 2% included and 1% excluded. Or if you are aiming for something a little wider: 3% included and 2% excluded, and so on. This way you can create different audiences with one tool and run different ads on them.
In most cases, you don’t need to set up exclusions in lookalike audiences because their main value is in handling audience sizes.
In addition, you don’t need to set up exclusions when targeting audiences with inter-percentage ranges. This means that 1-2% and 1-3% audiences, for example, will be different.
Read our article on creating a marketing strategy to make your advertising even more effective.
Conclusions
As an advertising platform, Facebook offers a large number of targeting parameters. By being aware of them, you will make the most of all opportunities for effective customization and get better results from your ad campaigns.
Facebook Ads offers three main types of audiences:
- Custom audiences created based on a group of customers who have already interacted with you.
- Lookalike audiences created based on a percentage of similarity to another audience.
- Detailed audience targeting.
Facebook Ads ad targeting parameters include audience, location, age, gender, detailed targeting, language, and placement.
You can combine the audience and advanced targeting parameters in a variety of ways, while the other parameters remain basic.
The following tips will help you increase the effectiveness of your ad targeting:
- Use Facebook Audience Insights.
- Test custom audiences for remarketing and exclude non-remarketing audiences.
- Target people who have made recent purchases.
- Use precise and multi-level targeting options.
- Experiment with different percentages of similar audiences.

 2
2
 0
0
 2
2
Related Articles
How to Set Up Consent Mode in GA4 on Your Website with Google Tag Manager
Let's explore how to properly integrate consent mode in GA4, configure it for effective data collection, and at the same time comply with GDPR and other legal regulations
Display Advertising Effectiveness Analysis: A Comprehensive Approach to Measuring Its Impact
In this article, I will explain why you shouldn’t underestimate display advertising and how to analyze its impact using Google Analytics 4
Generative Engine Optimization: What Businesses Get From Ranking in SearchGPT
Companies that master SearchGPT SEO and generative engine optimization will capture high-intent traffic from users seeking direct, authoritative answers