Cross Domain Tracking in Google Analytics 4
If you have ever experienced setting up cross-domain tracking in Universal Google Analytics, you probably remember how complicated it was. Fortunately, the folks at Google understood this issue (at least, we'd like to think so), and the process of setting up cross-domain tracking in GA4 has now been made much simpler.
Earlier, you had to carefully add tags and dig into JavaScript to set up tracking. But today, everything can be implemented through the internal GA interface in a few steps. The new features will come in very handy for small businesses to promote themselves with ease. Unlike GA3 (Universal), there is no need to ask for help to achieve the correct configuration in GA4.
What is cross-domain tracking in GA4 and why set it up?
Cross-domain tracking allows you to increase the accuracy of user activity data. Tracking is necessary if you use a bunch of domains when promoting online or if users can easily get from one of your domains to another.
In a nutshell, the process of users traveling between domains looks as follows:
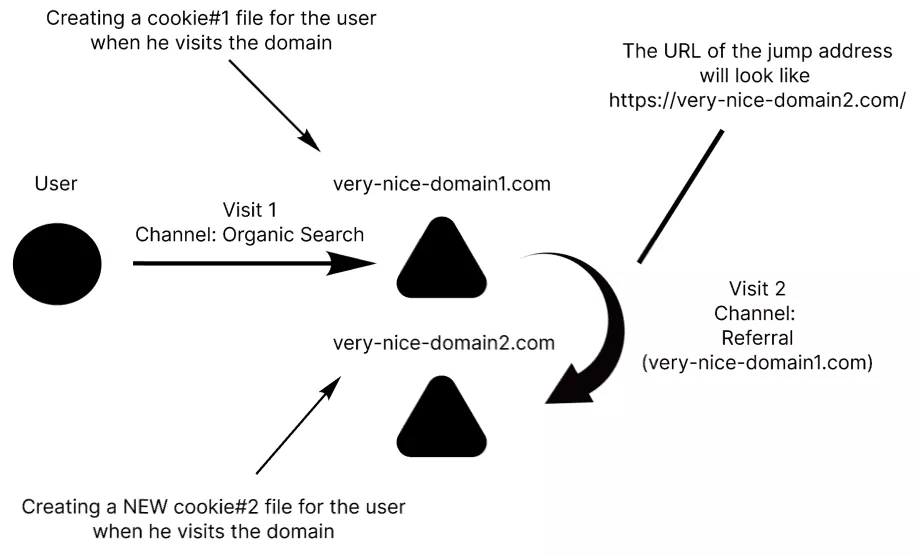
- Suppose a user goes to very-nice-domain1.com for the first time from a traffic source, let's say organic.
- Right after that, the user receives a unique _ga cookie from the Google Analytics counter, which is stored in the browser.
- After performing a series of actions, the user follows a link from very-nice-domain1.com to very-nice-domain2.com.
When going to very-nice-domain2.com, a clear _ga cookie is created. But the main problem is that it will be two separate visits — the visit to very-nice-domain2.com is considered as a referral. This means that the primary channel through which the user initially came to very-nice-domain1.com is lost. See the diagram below:
If you configure cross-domain tracking, the cookie for the user remains unchanged when they go from very-nice-domain1.com to very-nice-domain2.com. This is achieved by adding a special parameter "?_gl=1*blabla8*..." to the URL, so that GA4 saves all the necessary information, including the traffic channel. And then, the actions for the two domains will be considered as one visit.
See the changes in the scheme marked in red:
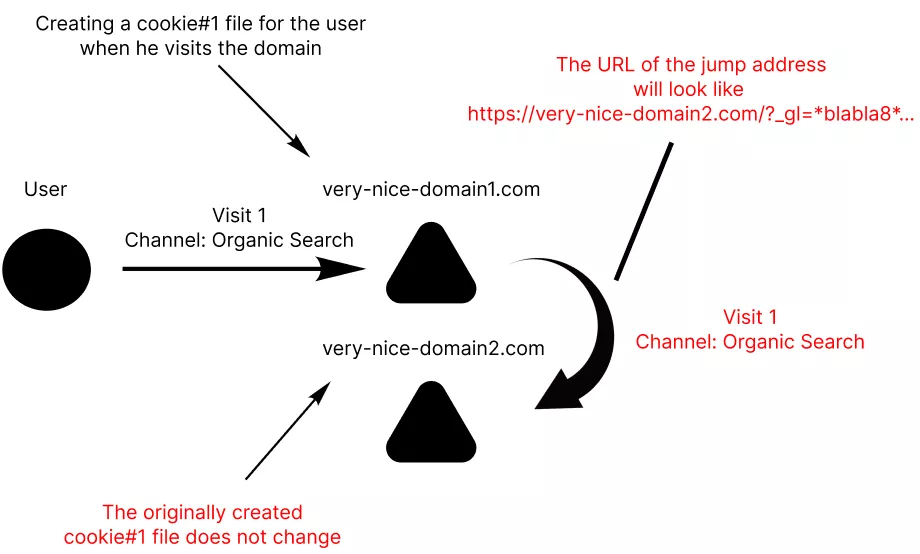
This way, web analytics counters will be able to correctly identify the same user, allowing you to track all relevant information without getting lost when moving between domains.
When do you need cross-domain tracking in GA4?
Let's say you run several promotional campaigns that drive traffic to very-nice-domain1.com. The domain introduces the user to content and presents your product or service.
If a user must go to very-nice-domain2.com for a conversion, you won't be able to monitor the effectiveness of certain promotion methods without cross-domain tracking. Because the source domain will be very-nice-domain1.com and the primary entry channel will be ignored.
Is cross-domain tracking in GA4 needed all the time?
Cross-domain tracking is not always needed. Let's say you're using subdomains for sections of your website, for example:
- blog.very-nice-domain1.com for a blog;
- shop.very-nice-domain1.com for an online store;
- forum.very-nice-domain1.com for a discussion board, etc.
In such cases, there's almost no need to set up cross-domain tracking. Web analytics counters will easily capture all required data after creating a cookie for your domain, including all subdomains.
Essentially, no additional settings are required in the case of subdomains. Google Analytics 4 will handle everything on its own. However, for comprehensive setup and optimization of your GA4 implementation, it's beneficial to consult with a specialized GA4 agency that can ensure your analytics setup aligns with your business goals and provides valuable insights.
When is it impossible to set up cross-domain tracking in GA4?
In certain situations, cross-domain tracking may not be possible.
- The domains that you want to track belong to different dataflow identifiers.
- You don't have edit permissions for the GA4 property of one of the domains.
How to set up cross-domain tracking in GA4
There are a few steps involved in setting up cross-domain tracking.
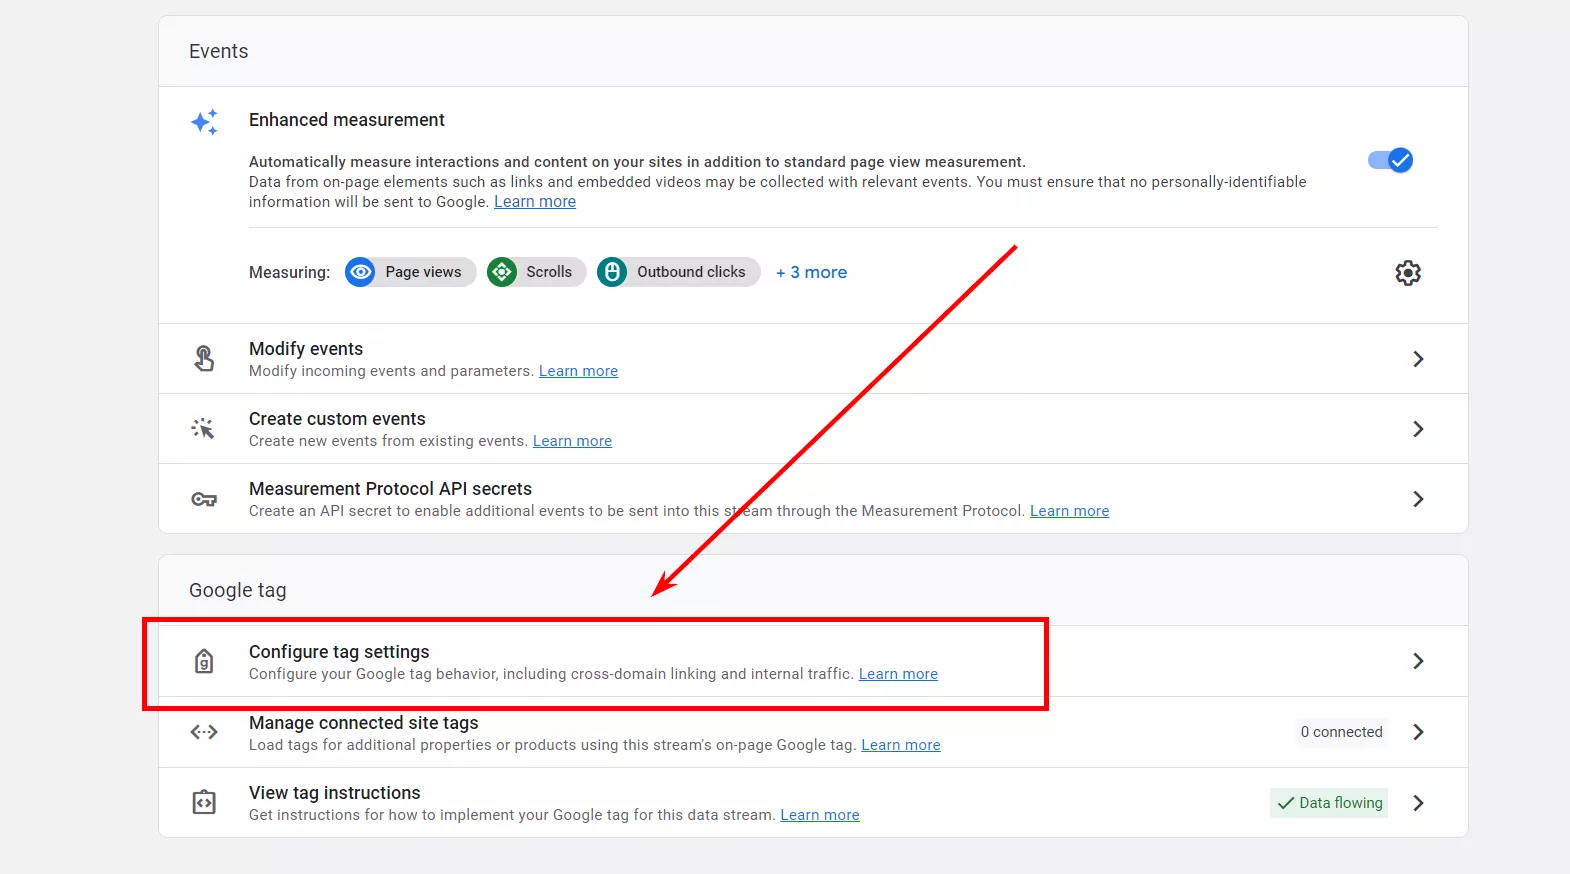
Step 1. In the main menu, select Admin > Data Streams and the dataflow you need.
Step 2. In a new dialogue box, go to the Google tag section below and select Configure tag settings.
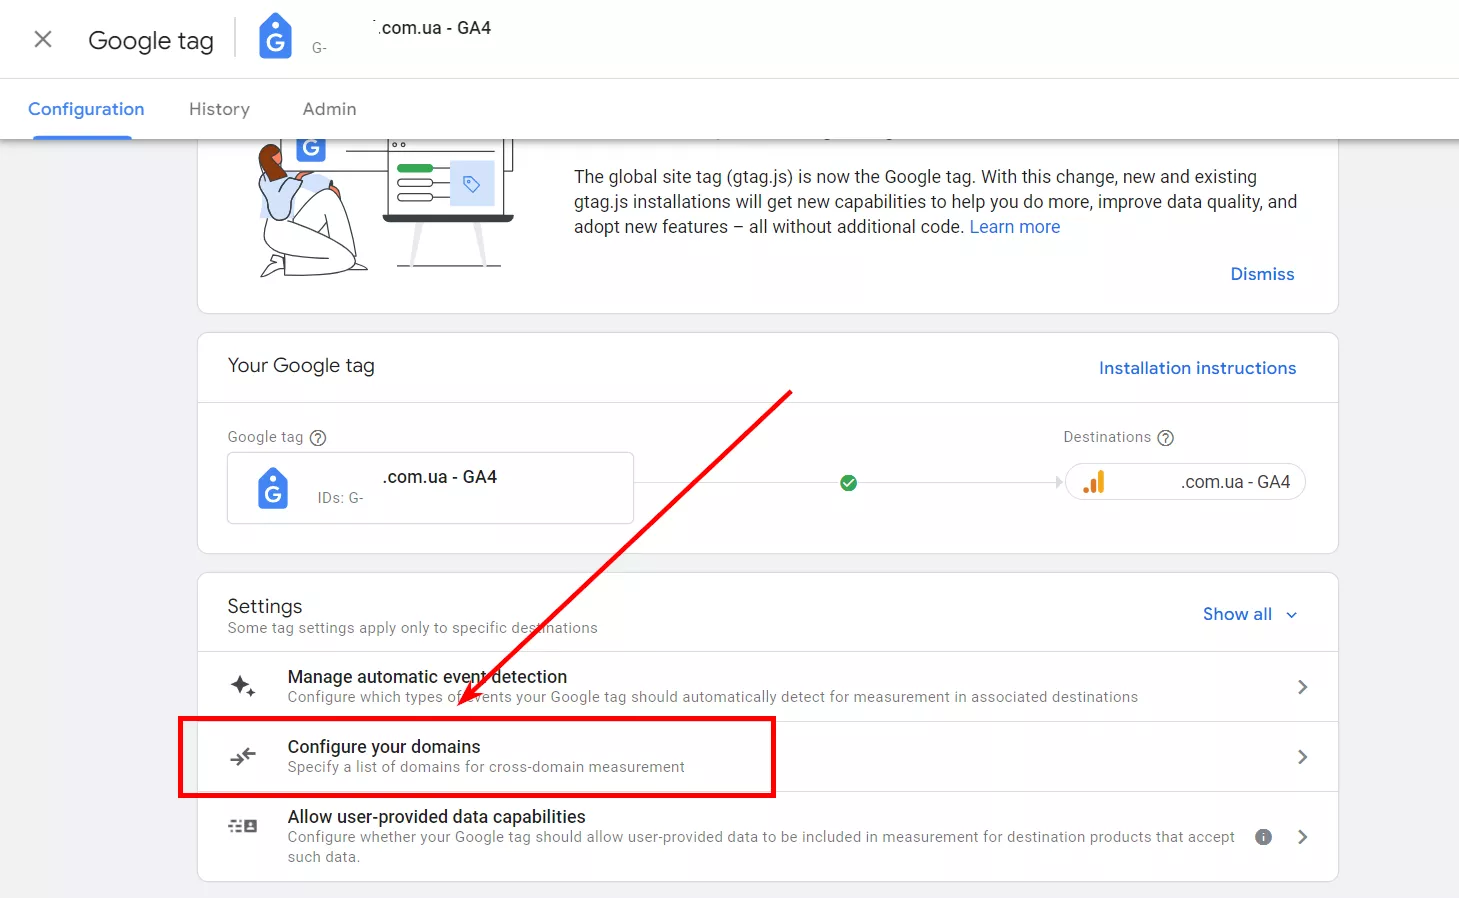
Step 3. Select Configure your domains.
Step 4. Set the required configuration. Leave the Match type fields unchanged (select Contains). And fill in the Domain fields with your domains.
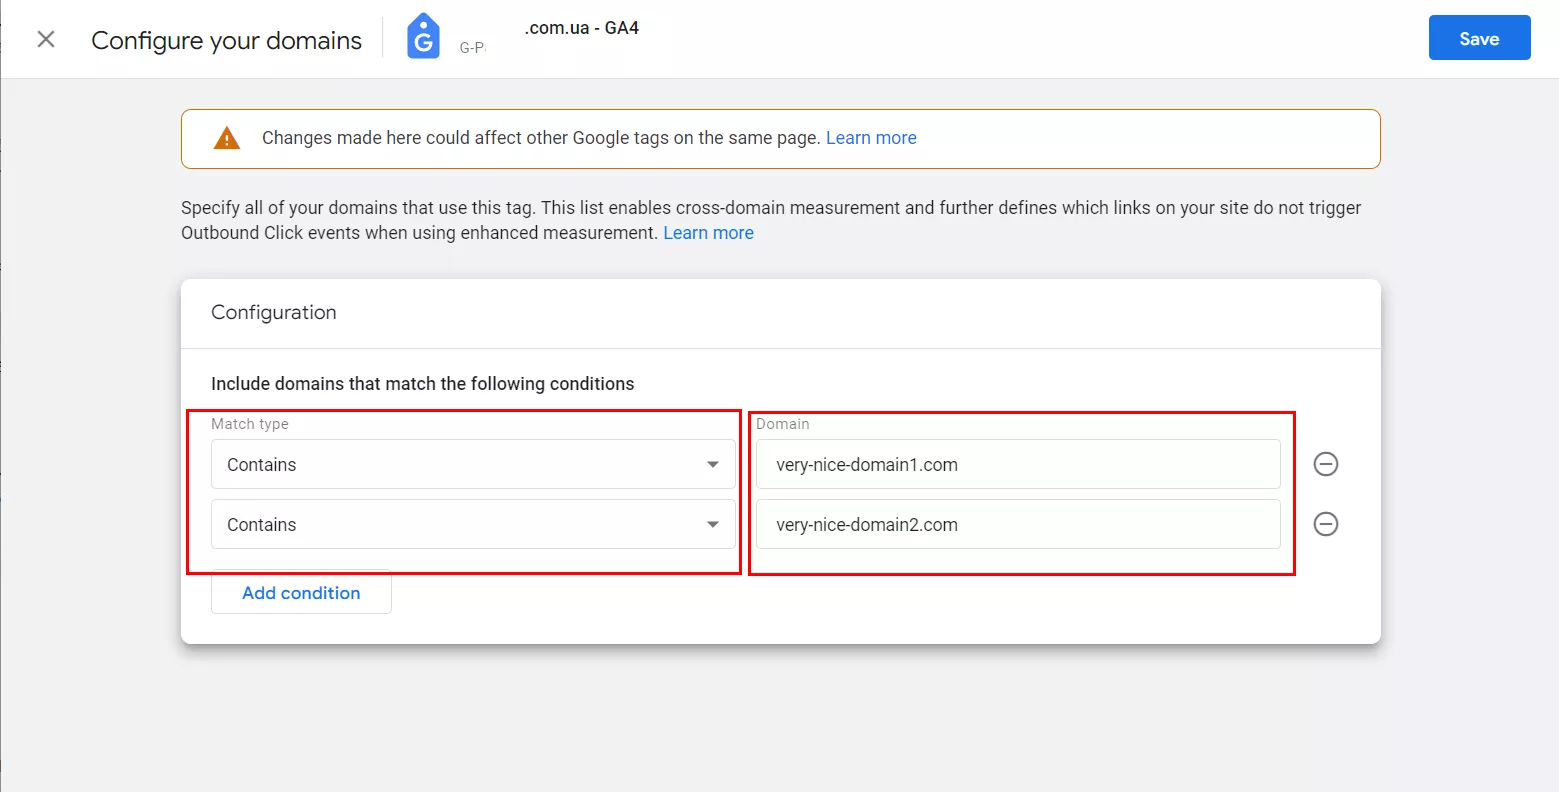
Step 5. Click Save.
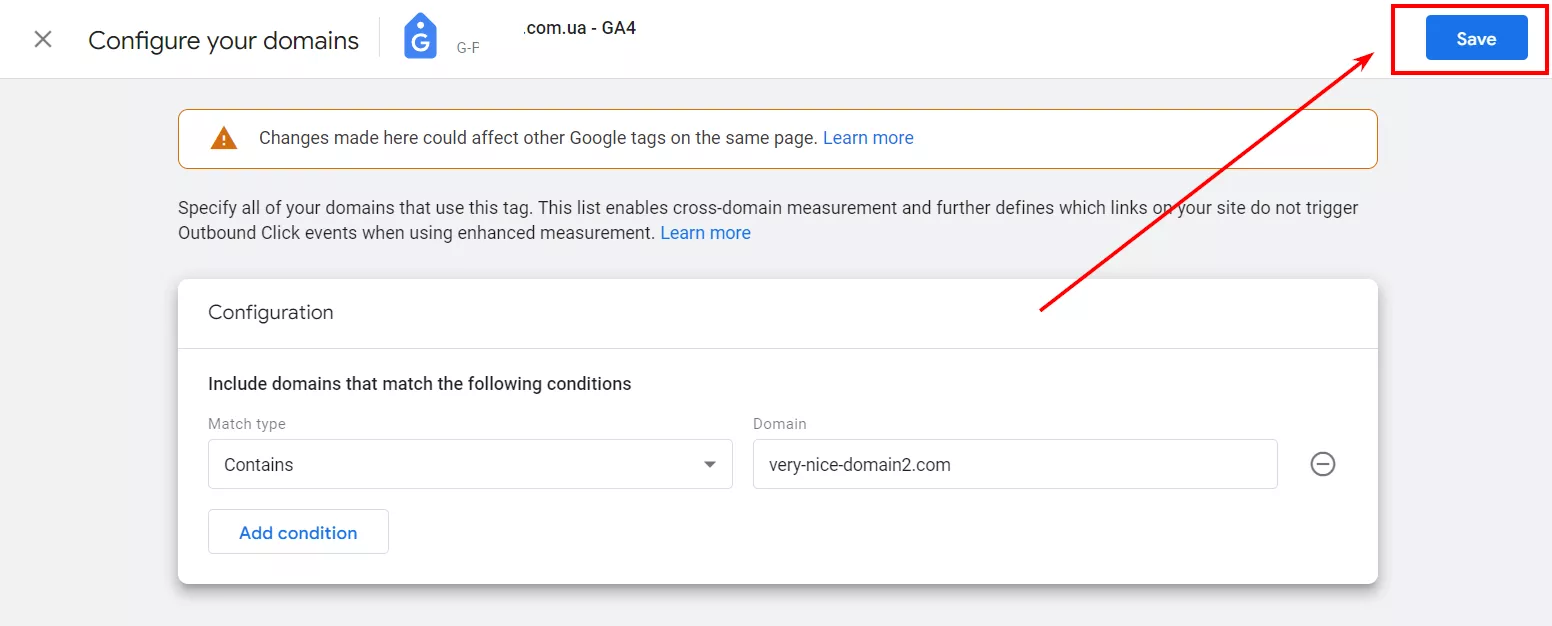
And that’s it, a five-step cross-domain tracking setup in GA4 is now complete. That's how easy it is, and everything is done through the interface without having to dig into a code.
An alternative way to set up cross-domain tracking in GA4
The method I've covered above is the easiest and most recommended by Google. However, if you don't trust the automatic setup, you can do a manual setup with the site code using the gtag.js function binding.
To configure cross-domain tracking of URLs pointing to a target domain, you must create a linker object in the site code. When you click on links pointing to target domains, the URL builder will automatically add its parameter to the URLs of those links.
It is worth mentioning that the builder parameter is only valid for two minutes. Therefore, it is added only during the click event. The linker object needs the domains parameter, which is an array with one or more domains. The code you insert into the site will add the linker parameter to the page links pointing to the target domain example.com.
To set up cross-domain tracking, use Google Tag Manager. Add the following linker command, and replace very-nice-domain1.com with your domain:
<script async src="https://www.googletagmanager.com/gtag/js?id=TAG_ID"></script>
<script>  window.dataLayer = window.dataLayer || [];
function gtag(){dataLayer.push(arguments);}
gtag('set', 'linker', {'domains': ['very-nice-domain1.com','very-nice-domain2.com']});
gtag('js', new Date());

gtag('config', 'TAG_ID');
</script>
You can also list multiple domains in the domain property. If the domain property contains at least one value, gtag.js will accept references to the default domain. So you can add multiple values to the domain property and use the same code for each domain.
In the GA4 code on your website, add the command gtag('set', 'linker', ...) before the corresponding config command. Otherwise, the tracking will not work.
See Google Help for more details.
How to check if tracking is properly configured
Wait 5-7 minutes after the setup is complete before you start testing.
Method 1: The most obvious way is by checking the URL.
- Go to the first domain.
- Click on the link leading to the second domain.
- After arriving at the second domain, check the address bar. If the settings are correct, the URL should contain the ?_gl= parameter.

Method 2: Using the developer tools.
- Go to the first domain in Incognito mode.
- Use Ctrl+Shift+C to open DevTools.
- Go to Application > Cookies > Domain.
- Copy the values for the _ga file.
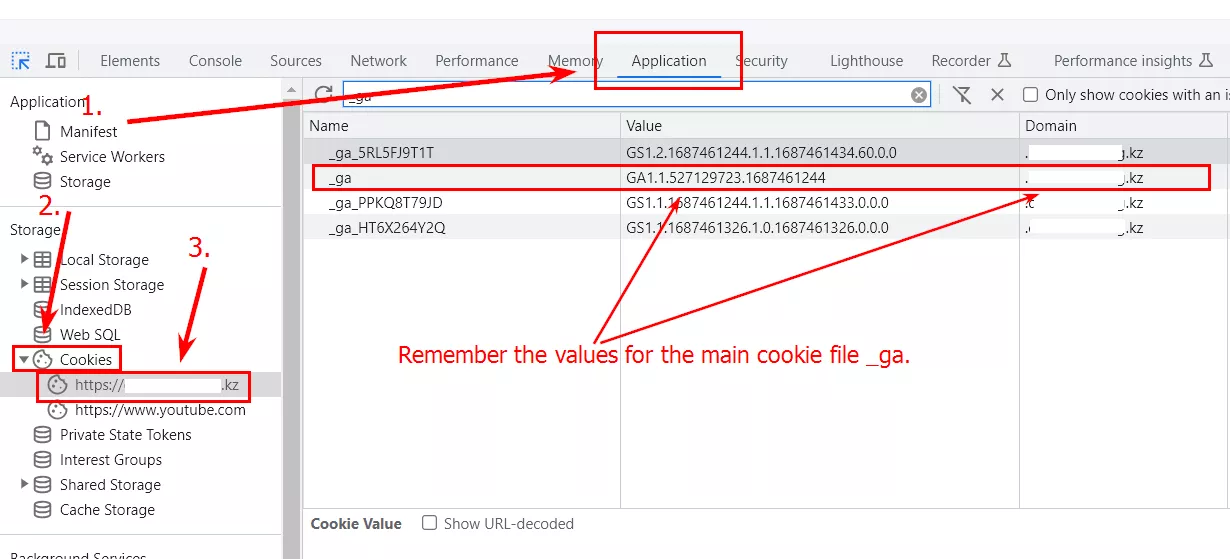
- Follow the link to the second domain.
- Go to the same sections in the DevTools and check the values of the _ga files. If they are identical, then the configuration is correct.
I recommend using both methods. The first one is a quick option, while the second one ensures that the _ga file is transferred between domains correctly.
Conclusions
- If you are using multiple separate overlapping domains, cross-domain tracking will help you get the most accurate data to shape future strategies and analyze current results.
- In cases where subdomains are used, no additional settings are required. GA4 algorithms will handle this task independently.
- To configure cross-domain tracking, you must have access to analytics resources at least at the editor level. On top of that, the tracked domains must belong to the same dataflow.
- Google recommends using the account’s internal interface to perform setup, but there is an option to implement it manually.
- Before verifying the settings, wait 5-7 minutes for the changes to take effect. Then, use both options described above in sequence.

 2
2
 1
1
 1
1
Recommended theme posts
Related Articles
How to Set Up Consent Mode in GA4 on Your Website with Google Tag Manager
Let's explore how to properly integrate consent mode in GA4, configure it for effective data collection, and at the same time comply with GDPR and other legal regulations
Display Advertising Effectiveness Analysis: A Comprehensive Approach to Measuring Its Impact
In this article, I will explain why you shouldn’t underestimate display advertising and how to analyze its impact using Google Analytics 4
Generative Engine Optimization: What Businesses Get From Ranking in SearchGPT
Companies that master SearchGPT SEO and generative engine optimization will capture high-intent traffic from users seeking direct, authoritative answers