This article will explain how to set up ecommerce tracking in Google Analytics 4 completely on your own and without employing the programmers. However the approach described in the article will work only provided you have Universal Analytics enhanced ecommerce code already installed on your site.
Introduction
On July 1 2023 Universal Analytics (UA) will be finally discontinued, it was launched 15 years ago and its time is coming to an end. Google Analytics 4 (GA4) is here to replace it and to serve as its successor. Sooner or later everyone will have to switch from UA to GA4 and it is better to start this transition now in order to have time to iron out all the problems that might appear while using new GA4.
One of the main challenges in this transition from UA to GA4 is to set up an ecommerce in GA4. The variables in GA4 ecommerce code are different from the variables of UA ecommerce code and in addition the variables in products array are also completely different.
|
Variable Name UA |
Its corresponding variable name in GA4 |
|
id |
transaction_id |
|
revenue |
value |
|
currencyCode |
currency |
|
products |
items |
|
and many other variables |
and many other variables |
Essentially all of it means that GA4 will not be able to read the data incoming from your standard UA ecommerce code since this data is written in language that GA4 can’t understand. So there are two ways to solve this and to set up ecommerce in GA4. The first one is more expensive - essentially you will have to employ the programmers to install new bits of ecommerce code that contain the needed variables.
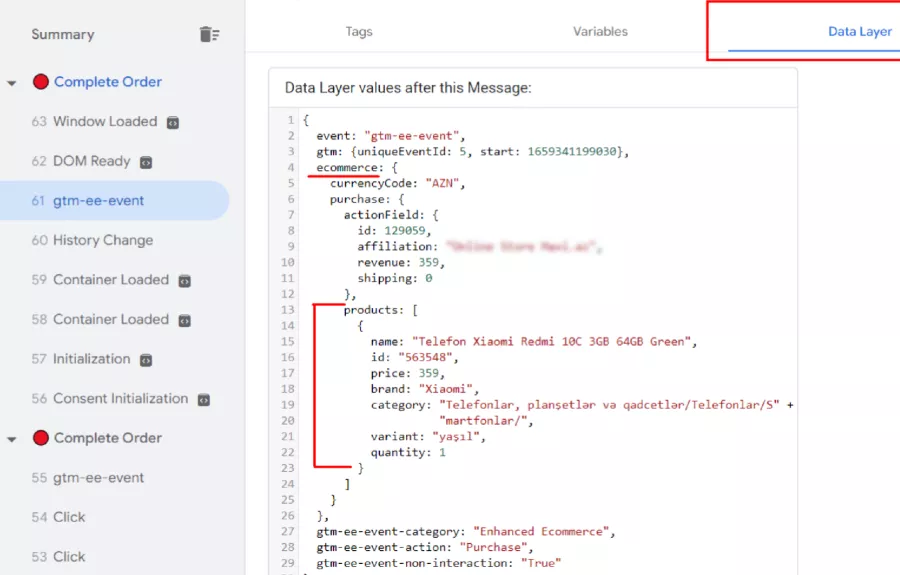
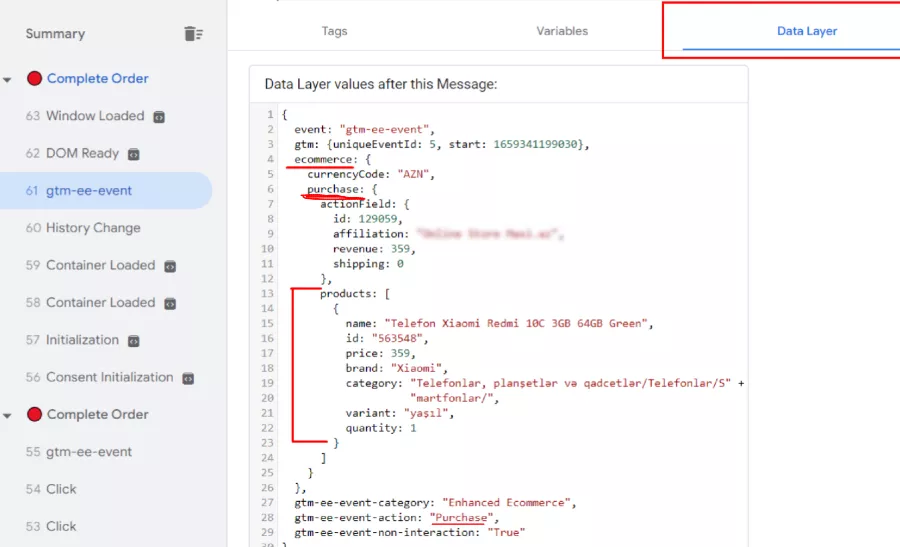
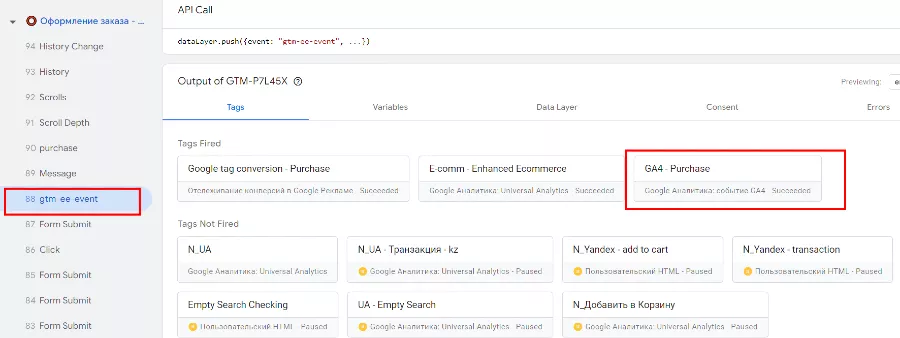
In this article we will concentrate on explaining the second approach which is less expensive and in the end is more quickly but it will work out only if you have enhanced ecommerce code already implemented on your site. To check whether the needed code is installed go to your Google Tag Manager (GTM), open the preview and navigate to the Data Layer of your purchase tag, find the code that appears in your Data Layer after you purchase something (you need the code that appears after the purchase and and not the code that appears after you added for example the product to the cart) - the code should look similar to the one shown on the screen below - it should contain products array, ecommerce code, purchase event.
GA4 Property and Configuration
Naturally to be able to set up GA4 ecommerce you need a GA4 property and GA4 configuration established on your site. It is easy and the process is explained in the following 2 steps. If you already have GA4 property and configuration then skip the following 2 steps.
1. Set up a GA4 property in Google Analytics
If you don’t have the GA4 property set it up. Here is the guide on how to do it.
2. Set up GA4 configuration in Google Tag Manager (GTM)
The GA4 configuration is needed to establish the connection between your GA4 property and your GTM. Go to Google Tag Manager.
2.1. In GTM create GA4 Configuration Tag
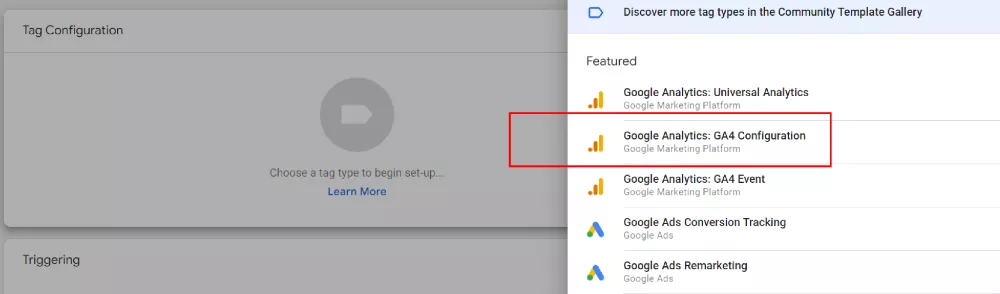
2.2. For your configuration tag you will need a measurement id. To find it go to GA4 property and follow the steps indicated on the screen and then press on your data stream.
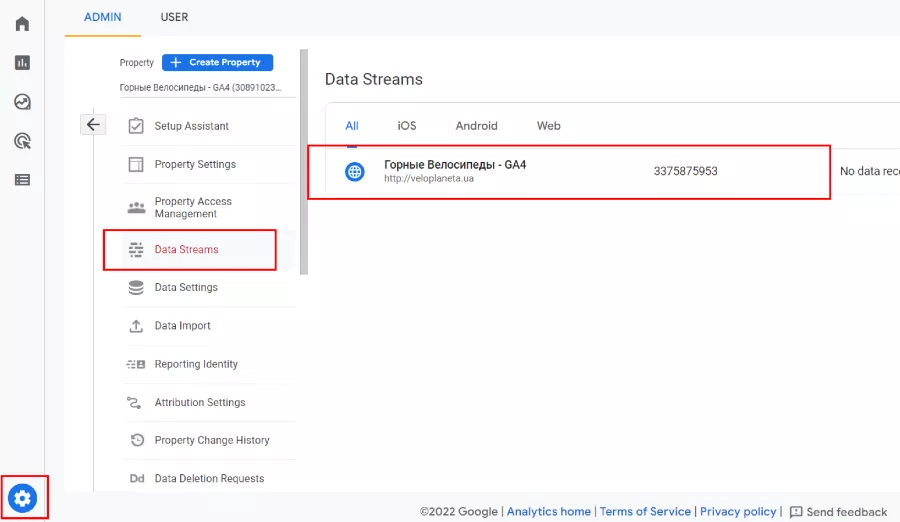
After you press on your data stream there in the upper right corner will be your measurement id. Copy this measurement ID to your GTM tag and in GTM set up a trigger that will activate your tag on all pages.
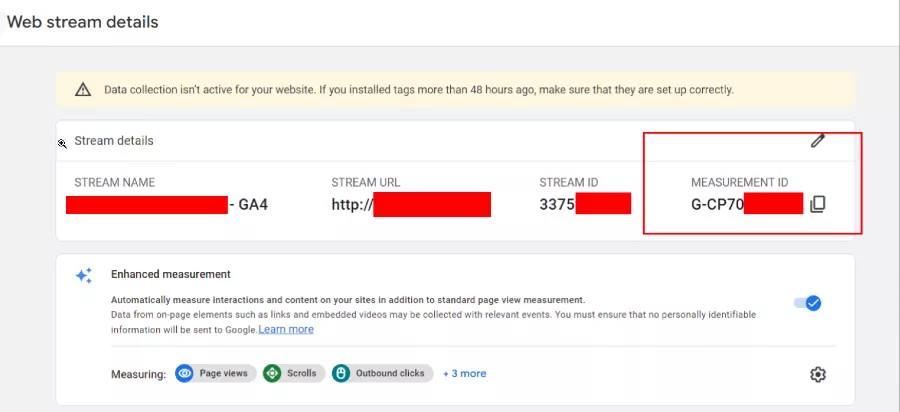
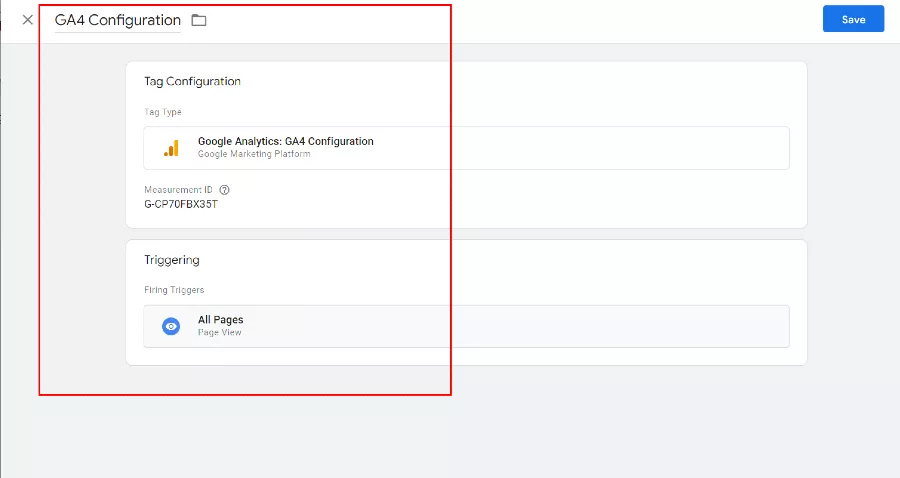
In the end your GA4 configuration tag should look like shown on the screen below. By creating this tag we were able to establish the connection between our GTM and our new GA4 property.
Setting up GA4 Ecommerce
Now let’s get down to the centerpiece of this article, that is let’s explain how using your enhanced ecommerce code you can single-handedly and without the help of the programmers set up a working GA4 ecommerce. Essentially to do this we will set up a tag that will contain the variables that GA4 will be able to understand (instead of an id variable there will be transaction_id variable for example) but the value for these new variables we will take directly from our old UA ecommerce data layer code using data layer variables.
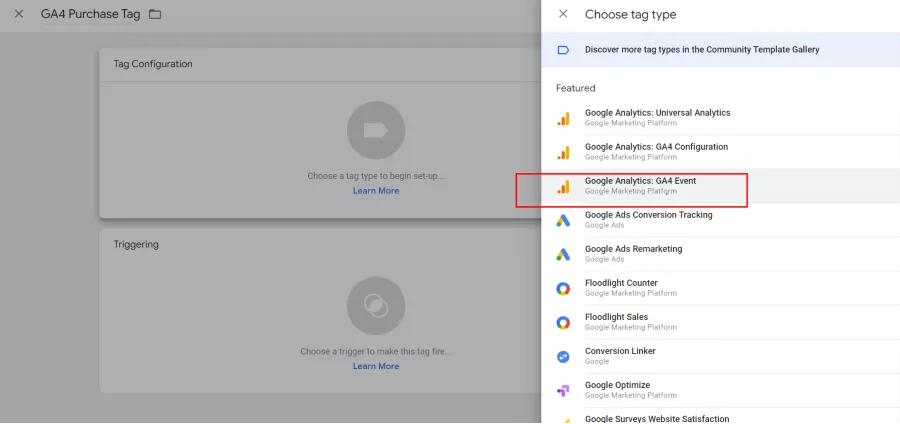
1. Create GA4 event purchase tag
Create new GA4 event purchase tag
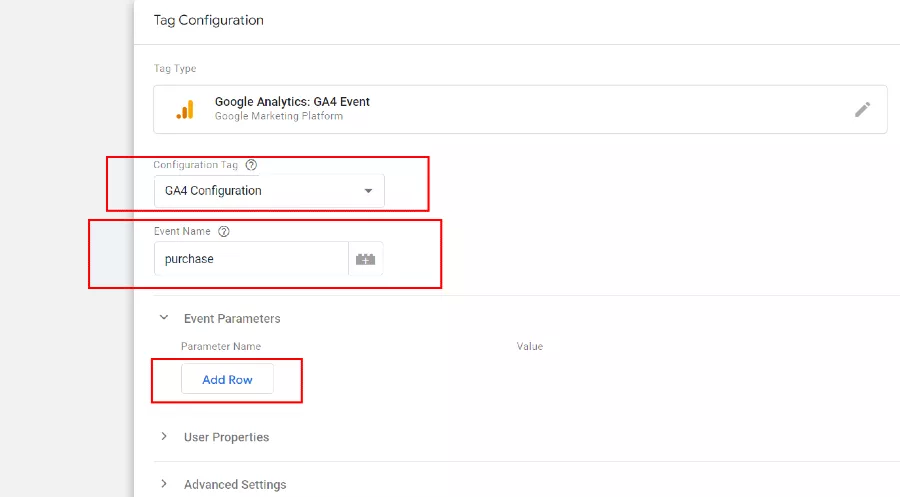
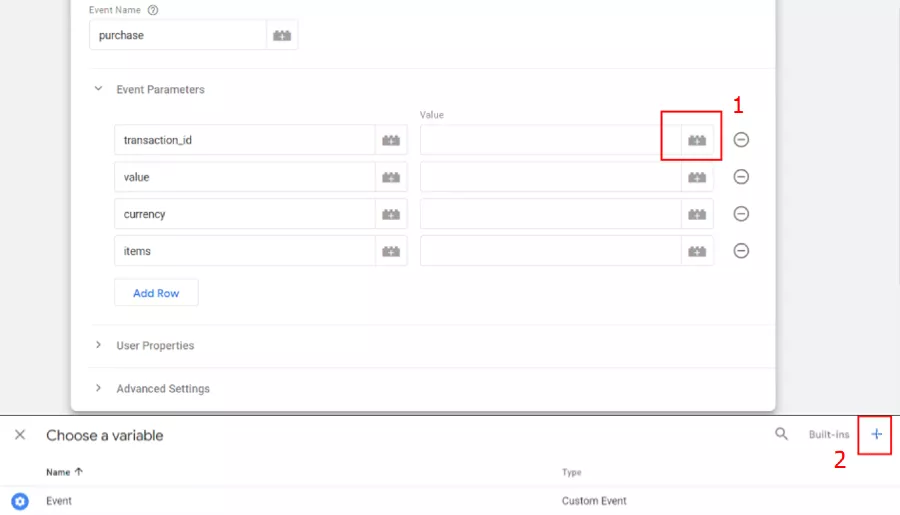
For your tag select your GA4 configuration that you created prior → Name your event purchase (it should be named exactly as purchase otherwise GA4 will not be able to read it) and then go to event parameters and add rows. At the moment your tag should look like this.
2. Add parameters to your GA4 purchase tag
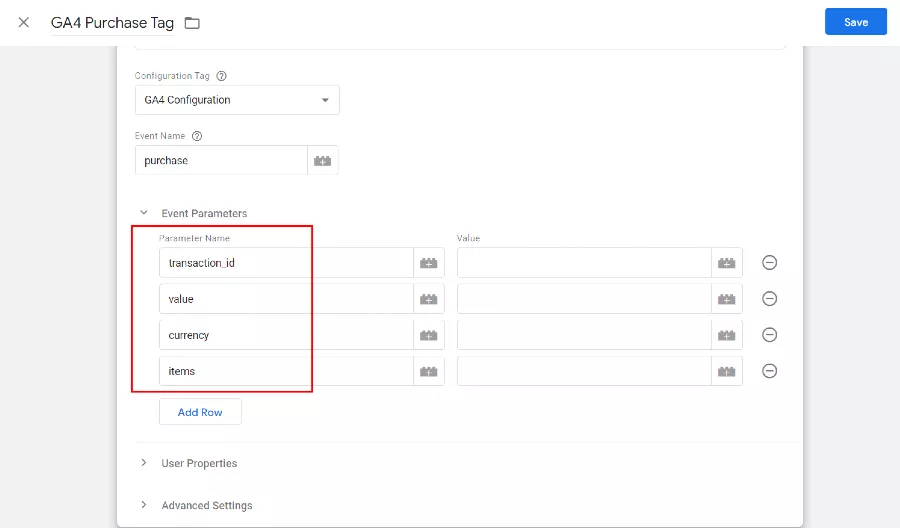
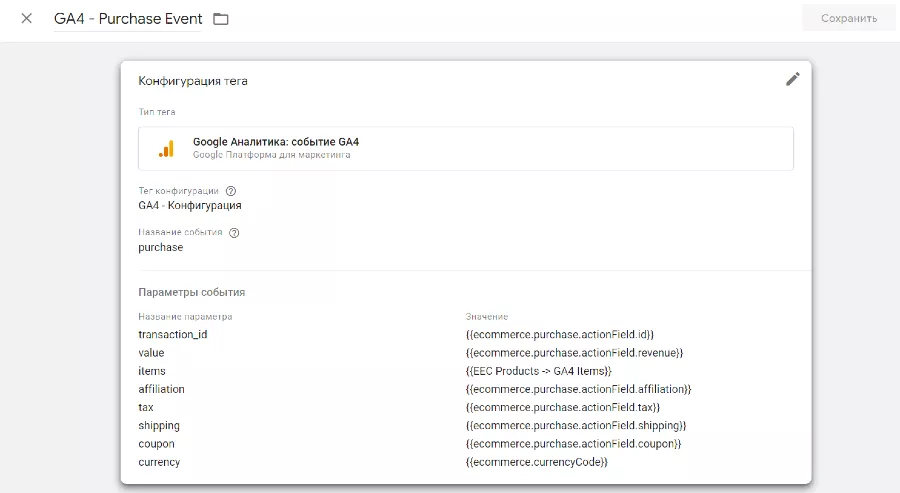
Now to this tag we should add the required parameters in this way our purchase tag will transmit not only the mere fact of the transaction but in addition other parameters that we will specify (for example the price of the purchased product, what product was purchased, its quantity and so on). Our event is called purchase and it has its own parameters that can be transmitted - the parameters for each GA4 event can be consulted here. For our purchase tag we should specify at least the parameters shown on the screen, they are absolutely essential.
3. Where to find value for your parameters
Now we should attribute value for these parameters. The tag has to know what value has to be assigned for the transaction_id parameter for example. Where will we get these values? - to do this open in another tab your old UA enhanced ecommerce code that is situated in the Data Layer and which appears when you make the purchase. Find your old enhanced ecommerce code (it should look similar to the code shown on the screen below)
4. How to specify value for your parameters
In your main tab press the button to add the variable for transaction_id parameter → press new variable → since the value that we need is situated in the Data Layer we need to create a Data Layer Variable (data layer variable can fetch the data from the data layer)

Now we should establish Data Layer Variable Name - open your old enhanced ecommerce code - essentially we have to build a way by which the algorithm will arrive at the value for transaction_id parameter → the value for transaction_id parameter is situated in id variable thus we should build the way to arrive there.
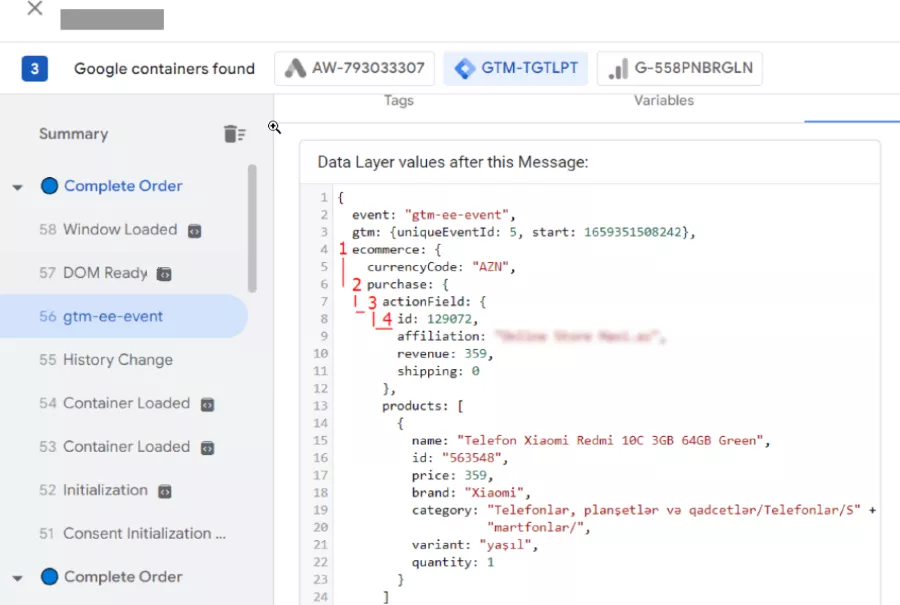
Thus the name for our transaction_id variable will be ecommerce.purchase.actionField.id. What it will do is that it will fetch the value from your id variable in your old enhanced ecommerce code and transmit this value to your new transaction_id parameter.
![]()
Repeat the same process for value and currency parameters.

4.1. Information regarding currency parameter
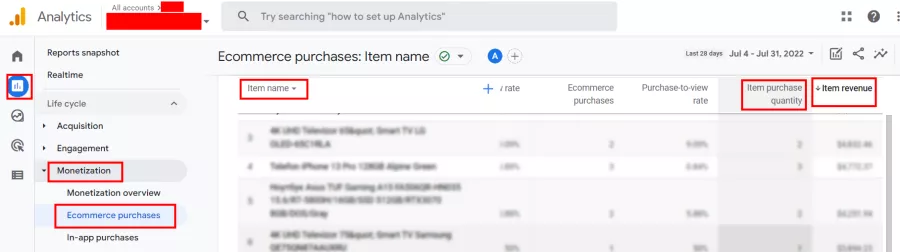
Regarding currency parameter. First of all it is worth mentioning that without specifying the value for this parameter, that is without specifying currency no data regarding the price of the purchased product will be transmitted to GA4. That is, in your reports you will be able to see the names of the products purchased (item names) but the price (item revenue) of the products purchased will not be transmitted if the currency is not specified. So if you ever wondered why the price of the purchased product is not transmitted that can be the reason.
![]()
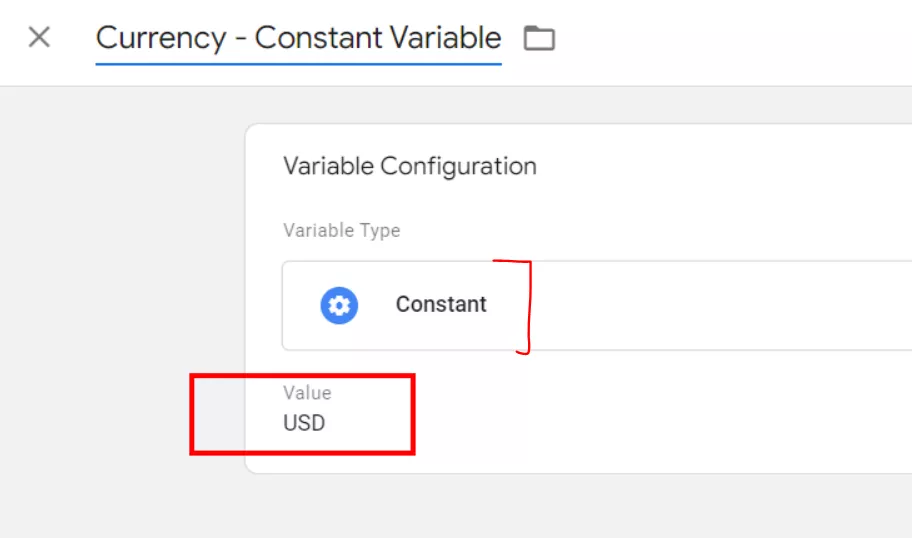
In addition it may happen that the currencyCode is not present in the Data Layer and thus you won’t be able to use a data layer variable (DLV) to fetch the data about currency. You can circumvent this problem by creating instead of DLV a constant variable. It can be done since currency most often doesn’t have a dynamic value and always remains the same. Just create a constant variable and specify a needed currency code.
5. What to do with items parameter
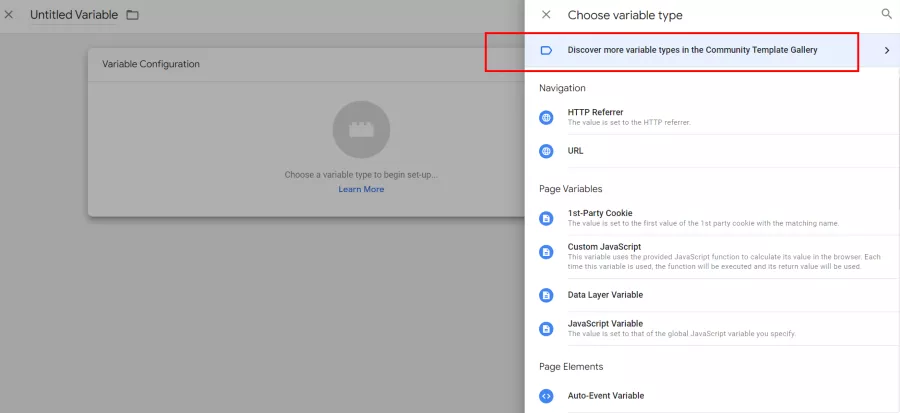
Items parameter is a special one, it essentially transmits all the data regarding a purchased product. The data which it can transmit can be seen here. Since it transmits many values - that is an array of values - the procedure that we used previously couldn’t be applied here. What we need is to transmit to the new items parameter all those values from old products array. To do this press the button to add the variable for items parameter → press new variable.
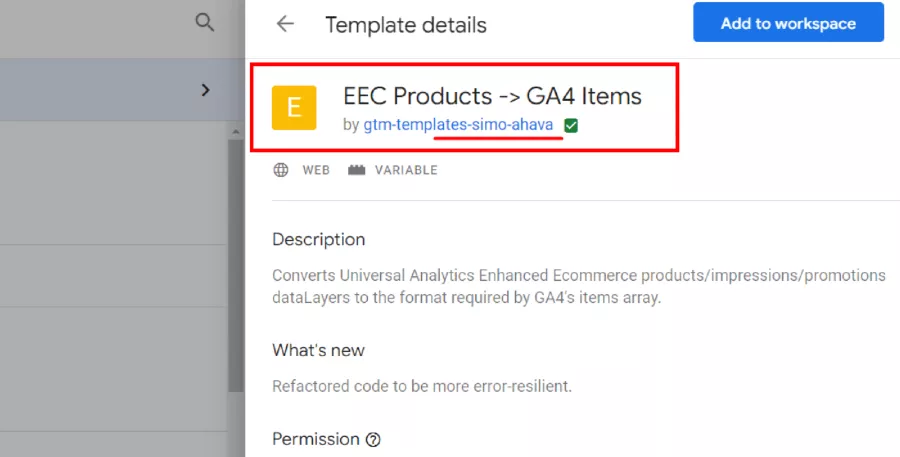
Press the following button, find the following template by SimoAhava and add it to workspace.
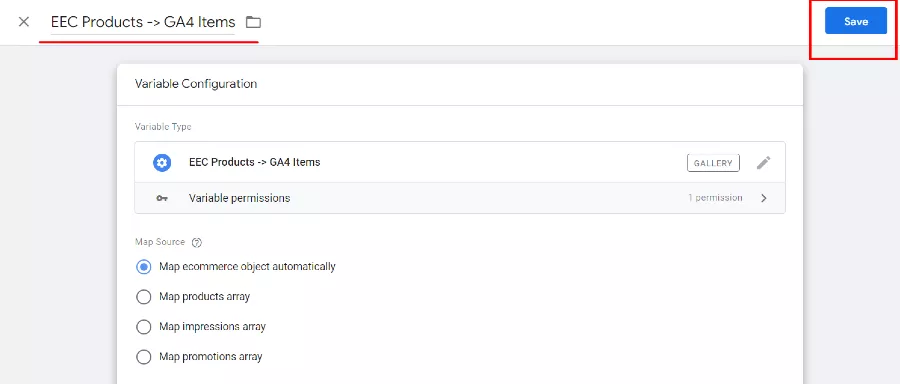
After you added this template to your workspace it will appear in your gallery, click and select it → give the name to the variable and save it.
What we did is essentially we used a third-party template to convert the product array from the old enhanced ecommerce code into the new items array. Name in an old array transformed itself into item_name, id into item_id, brand into item_brand and so on.
By now your GA4 purchase tag should look similar to the one shown on the screen below. There are many parameters in my tag but don’t be surprised, you only need the 4 parameters specified in step 2. But of course, if you want you can choose to use the other parameters.
6. Add trigger to your tag
Now you need to add a trigger to your tag, by adding a trigger you specify when this tag will fire. As a rule of thumb you ought to place for this tag exactly the same trigger that you used for your old tag that was sending information about the purchase to your Universal Analytics. After having added the trigger, save the tag. Now it is time to test it.
Testing the correctness of the set up
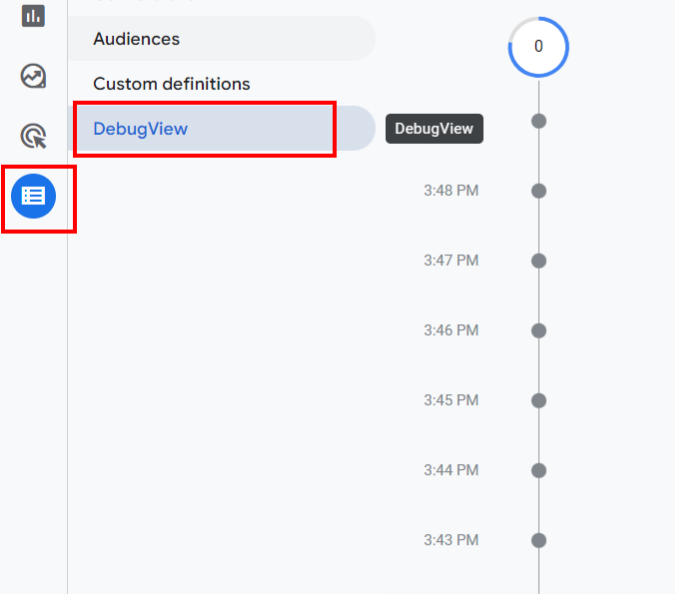
Go to your GA4 property → Configure → Debug View
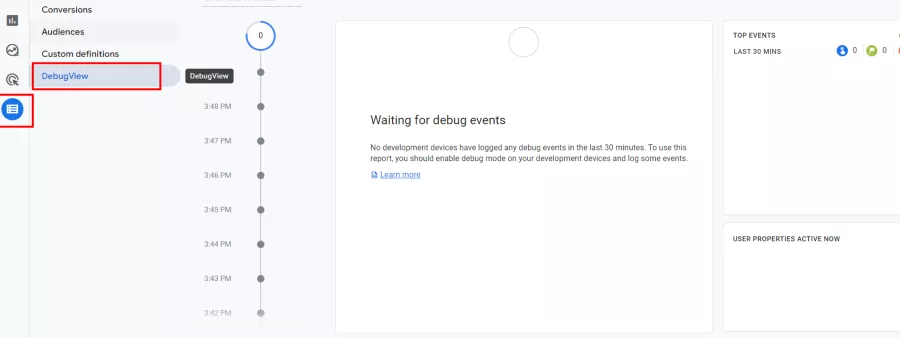
In another tab open your GTM and on the main page in the top right corner click preview → find whether your new purchase tag for GA4 fired (if it hasn’t fired at all check the trigger that you added to the tag - step 6)
In GA4 in Debug View you should find purchase event fired → apart from parametres there should be also an item array → there in parameters we can also find the parameters that we set up in steps 2-4. If in the debug view you saw the purchase together with items array and with parameters whose value is correctly transmitted it means that everything works.
![]()
7.1. If there are no items array present you have to check step 5 and check whether the template from step 5 was assigned to the correct parameter, that is whether it was assigned to items parameter.
7.2. If some of the parameters do not transmit value you have to check step 4. So for example if there is no value for the parameter transactio_id it means that the data layer variable that was assigned to this parameter was wrongly implemented and doesn’t fetch data from your data layer.
7.3. To be doubly sure that everything is set up correctly go to ecommerce purchases in your GA4 property and check whether the data about purchase was transmitted - whether the name of the product, the revenue, the quantity was transmitted correctly. The data there usually appears a couple of hours after the purchase.
Set up tags for other events
What was done in the previous steps should be repeated for other events. Apart from the purchase event you have to set up at least add_to_cart event and view_item event. Begin_checkout event and remove_from_cart event are also recommended to be set up. By setting up these events you will be able to see how much your product was viewed, then how many people added this product to their cart and how many people eventually bought it. To set these new events, repeat the same process described in the previous steps. In short simply create a new GA4 event tag → add parameters (you can just add items parameter - which is the most important one) → specify value for that parameter by simply adding the template from step 5 and add the trigger to the tag. For GA4 add to cart event tag for example add simply the trigger that was used in the old tag that was sending the data about the product added to cart to UA. Your add_to_cart tag will look like this.

The main things to remember
- If you have enhanced ecommerce you can set up ecommerce for GA4 by yourself without the help of the programmers.
- Parameters in UA and GA4 are different. GA4 can’t read parameters of UA ecommerce code, because of this we have to create new parameters that GA4 can read. In addition each parameter has value - parameter price for example has value $900. The value for new parameters we are taking from the old enhanced ecommerce code that is already in your data layer. To do this we use a data layer variable to fetch data from the data layer.
- It is pretty difficult to use a data layer variable to fetch the data for items parameter - instead it is better to use the third party template to do this (step 5).
- We have to set up at least those parameters for purchase event to transmit the data properly. For other events we can limit ourselves to using only items parameter.
- Control the correctness of your set up via Debug View in your Google Analytics 4 Property.

 8
8
 1
1
 6
6
Recommended theme posts
Related Articles
Display Advertising Effectiveness Analysis: A Comprehensive Approach to Measuring Its Impact
In this article, I will explain why you shouldn’t underestimate display advertising and how to analyze its impact using Google Analytics 4
Generative Engine Optimization: What Businesses Get From Ranking in SearchGPT
Companies that master SearchGPT SEO and generative engine optimization will capture high-intent traffic from users seeking direct, authoritative answers
From Generic to Iconic: 100 Statistics on Amazon Marketing for Fashion Brands
While traditional fashion retailers were still figuring out e-commerce, one company quietly revolutionized how U.S. consumers shop for everything from workout gear to wedding dresses