Google Tag Manager is a powerful tag management system that is used by a huge number of SEO specialists and digital marketers. One of its useful features is the import of a container file with a ready set of tags, triggers and variables, which makes it much easier to set up the necessary configurations.
What is GTM container import
Google Tag Manager allows you to import a container file (workspace or certain version) from one account to another.
For example, you have installed a GTM container on a website and configured all the necessary tags, triggers and variables. Now you have another site with a similar structure, but in a different niche. To avoid having to set up all the configuration manually in the new container, you can copy the container from the old account into a JSON file and use the import function to transfer it to the new account.
Of course, you will need to make changes to the new container related to unique identifiers in order for the tags to work correctly on the new site, but it will be much easier, than making a lot of routine actions.
So, the main practical use of import and export containers in GTM is to reduce the time it takes to perform multiple, identical actions by copying the configuration of tags, triggers and variables.
Web analytics underpins conversion optimization. What will CRO get you? Find out with Netpeak's calculator.

Why is GTM container import useful?
It is recommended to use the container import in the following cases:
- Using the same tags, triggers and variables in multiple GTM containers.
For example, you have an international company with several websites in different countries on different domains with their own GTM containers. You can either manually configure each of them by repeating the same steps many times, or configure all the necessary tags, triggers and variables once and use export-import option to transfer all the necessary components to the other containers, while making small adjustments (e.g. changing the Google analytics ID).
The second option is definitely more convenient. - Import new tags, variables and triggers shared with you.
For example, your colleague has created a great template that he uses for his projects and saves a lot of time. - Import ready-made solutions available online.
There are GTM recipes that are easy to find online and make working with GTM much easier. - Working in more than one GTM environment.
For example, you have different environments for developing and working website and need to transfer data from one environment to another.
In all cases, you will need the container file import.
What is a container file?
The container file is a JSON file (a file with a .json extension).
The are two types of container file:
- Workspace container file – contains all tags, triggers and variables used in a certain workspace. By default GTM adds the word 'workspace' in the container file name.
For example, GTM-MQ25JW_workspace1.json.
- Version container file – contains tags, triggers and variables of a specific workspace version. By default version is specified in the file name.
For example, GTM-MQ25JW_v5.json.
What information will be in the container file?
The container file includes tags, triggers and variables. Someone could send you this file, or you could download it over the Internet .
This file can also be modified, leaving only the required triggers, tags and variables in it. This way you can create standard container templates and use them to start setting up websites and share them with other GTM users. Container files can be compared with each other, modified, saved in the cloud services and imported back into GTM.
What is GTM recipe
If a container file contains specific tags, triggers and variables for a certain type of tracking, it is called a Google Tag Manager recipe.
These recipes allow you to set up standard common tags in a new GTM container in a few minutes.
With GTM recipes you can clean GTM Container or set up LinkedIn Tracking. There is a huge number of ready-to-use recipes all over the internet
Where can you get a container file?
The container file can be retrieved as follows
- export a workspace or container version using the “export container” option;
- use the ready-to use container file that was shared with you
If you already have a container file, you can go straight to importing. If you don't have it, here's how to create one.
How to create a GTM container file (export container)
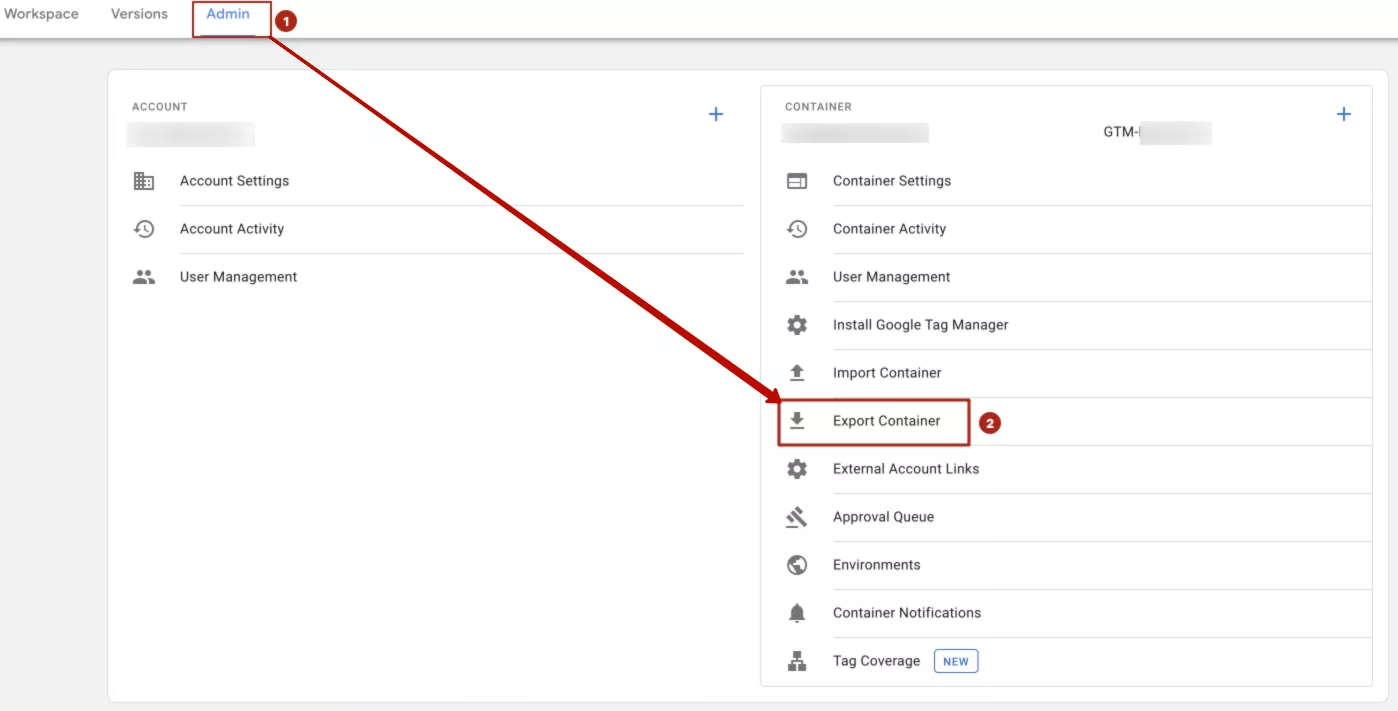
Step 1: Select the container from which you want to copy information, go to “Administration” → “Export container”.
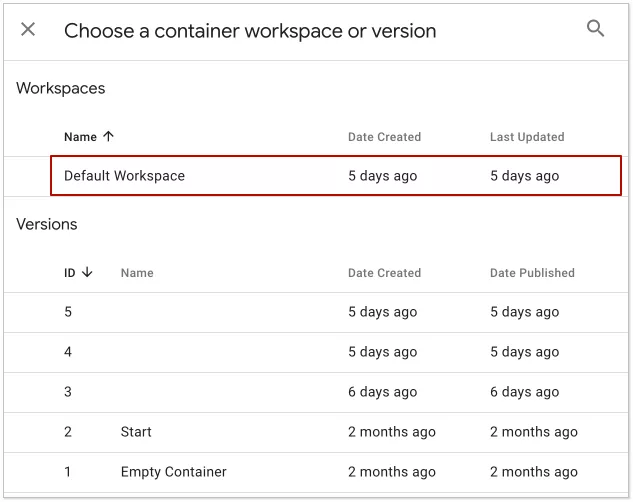
Step 2: Select workspace or version.
It depends on the purpose of the export:
- save the container;
- import components into another container;
- import an earlier version of the container.
There may be a variety of options.
Workspace import
If you need to copy all existing information in the container, select workspace.
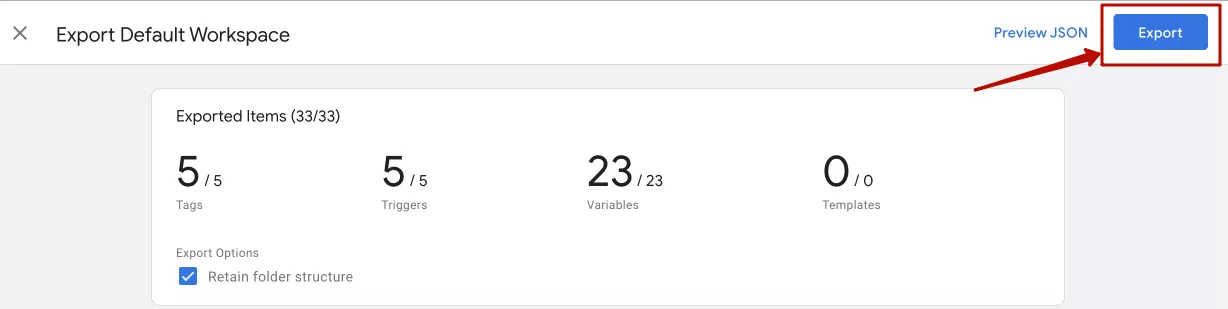
Step 3: The following information is available at this stage:
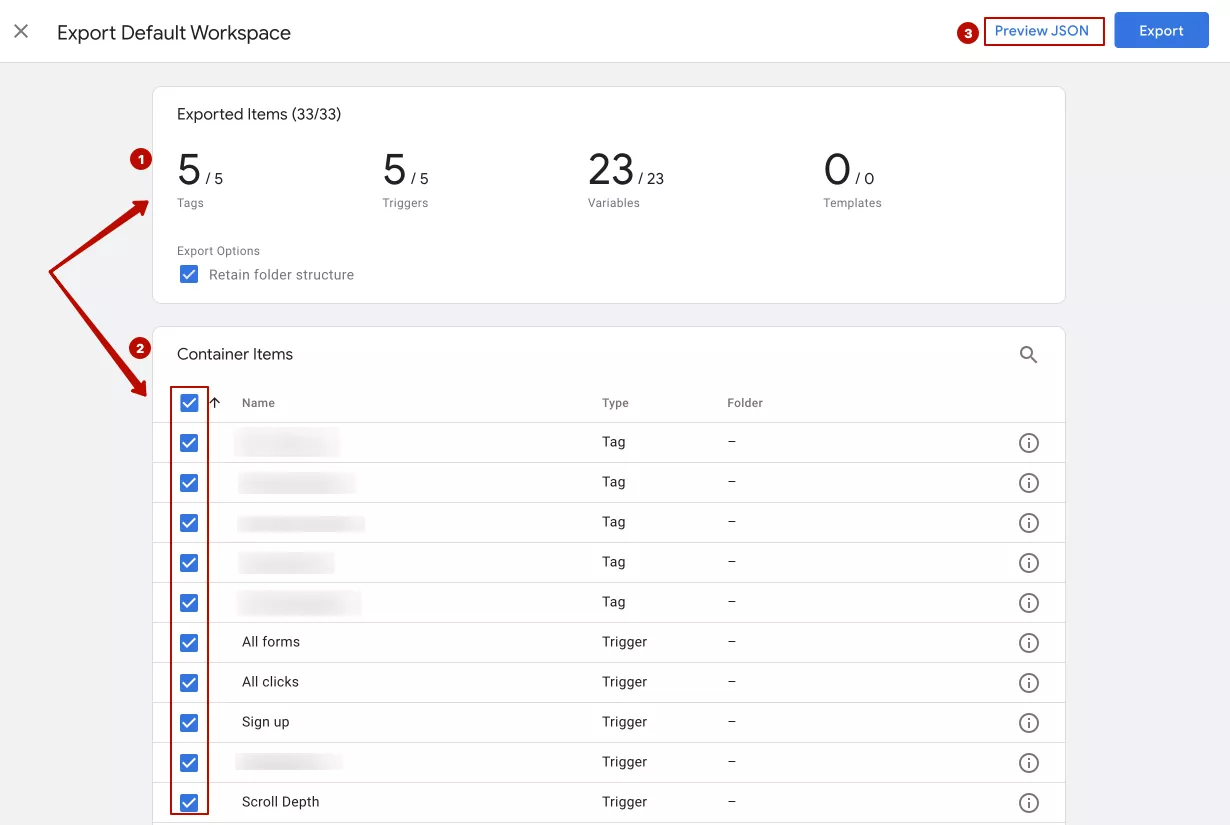
- Information about tags, triggers and variables that will be exported.
- You can select items to be added to the file or remove items that do not need to be exported.
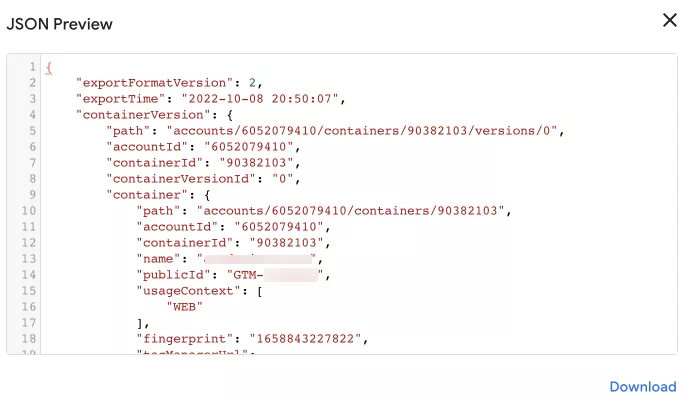
- As the container is imported in .json format, you can view the contents of such a file before exporting. It doesn't make much sense for beginners, but it will be useful for someone.
Step 4: When you have selected the required items, click on the “Export” button and you have the container file.
Certain version import
To export a specific version of a container, you need:
- Go to “Administration” → “Container export”.
- Select the certain container version.
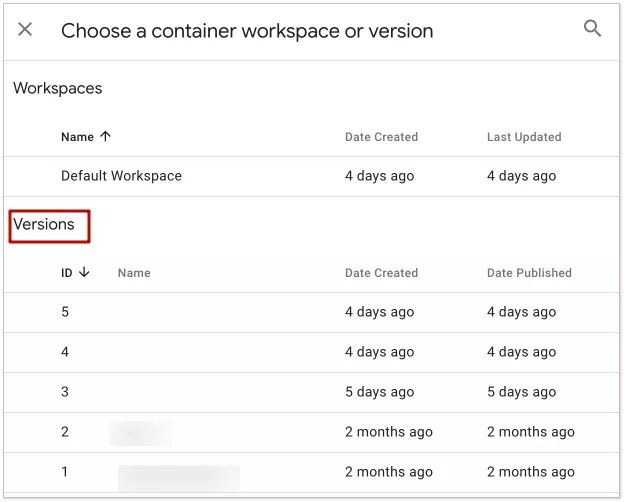
- Select tags, triggers and variables and press “Export”.
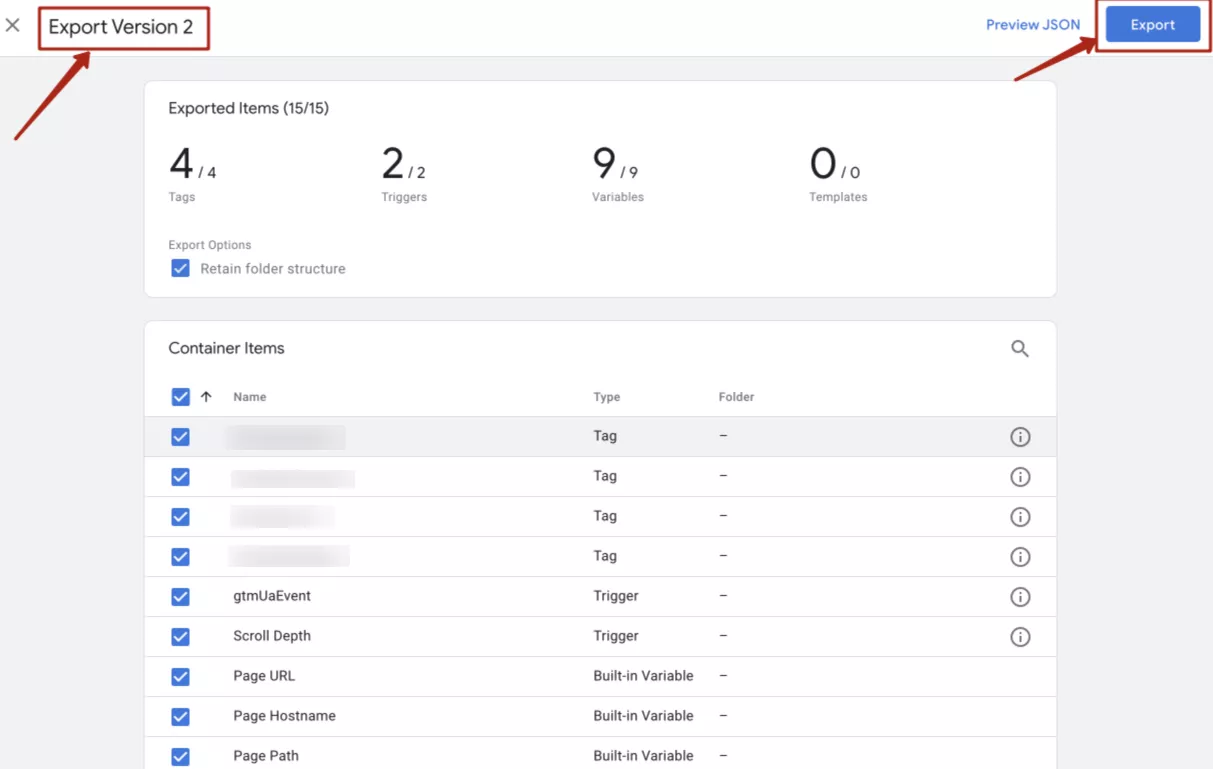
The GTM container file is ready and you can move on to importing it into another account.
How to import a gtm container?
Step 1: In the account into which you want to import the container data, go to “Admin” → “Import Container”.

Step 2: Choose the import options.
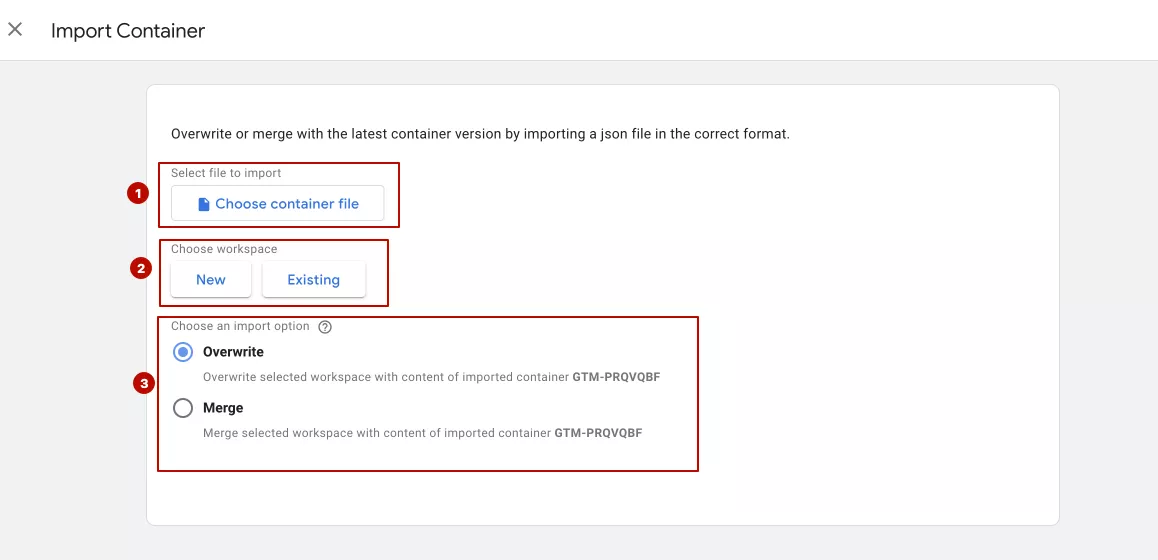
- Choose a container file. You need to select the file with the extension .json in which the container code is located.
- Choose the workspace that you want to import the file to. Then select the workspace – new or existing. If you are not going to use more than one workspace, just select an existing workspace or select a new workspace if you need.
- Import container options. The next important step is to choose the import option. You need to be very careful here. If you are going to import into a new container where no work has been done yet, either option is acceptable. But if the container contains tags, triggers and variables, there are two options:
- The “Overwrite” option will remove ALL existing tags, triggers and variables in the container and import whatever is stored in the container's JSON file (what you are trying to import). Example of using this option is a recipe which clears the GTM container.
- The “Merge” option will allow you to retain existing tags, triggers and variables and simply add new ones. It is recommended to choose this option if you already have tags, triggers and variables created in the container. This will avoid overwriting and deleting settings made previously.
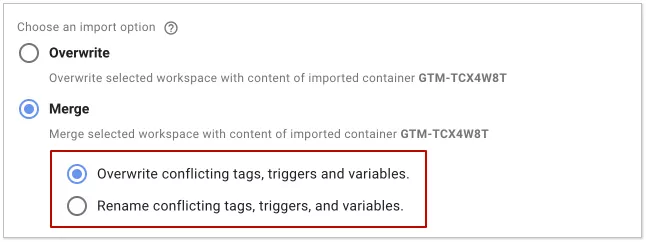
If you choose this option, you will have to decide what to do with conflicting tags, triggers and variables (with the same name).
A conflicting trigger is a trigger that has the same name as the imported trigger, but its contents are different.
Similarly, a conflicting variable is a variable that has the same name as the imported variable, but its contents are different.
Note: A tag is not considered conflicting if it has the same name as the imported tag and its contents also match the contents of the imported tag. The same is true for triggers and variables.
GTM offers you two options for conflicting components:
Rewrite. If a variable, tag or trigger in the new container has the same name but different contents, GTM will delete the old one and add the new one.
Rename. If a variable, tag or trigger in the new container has the same name but different contents, GTM will save the old one and rename the new one (think of it as if you were copying a folder on your laptop: the folder name will change to something like Copy Folder (2)).
Depending on which option you choose, Google Tag Manager will show a quick preview of how tags, triggers and variables will be saved or removed from the container.
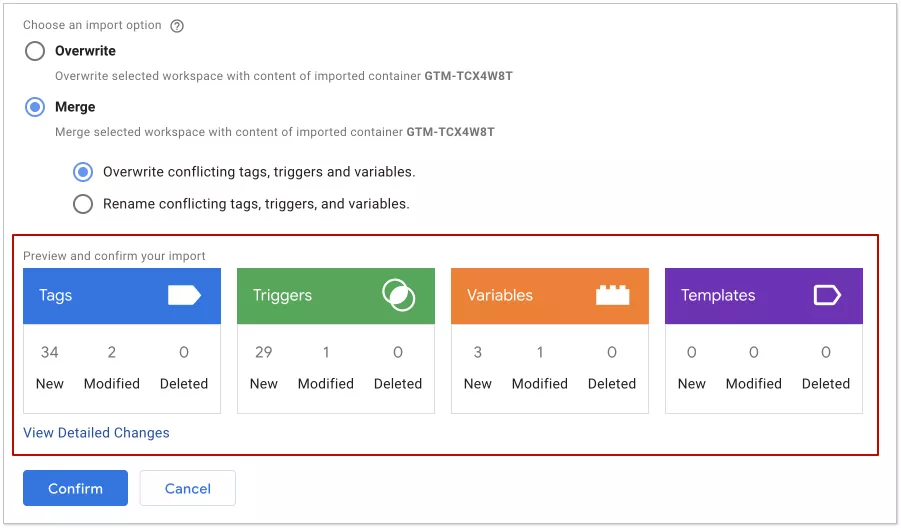
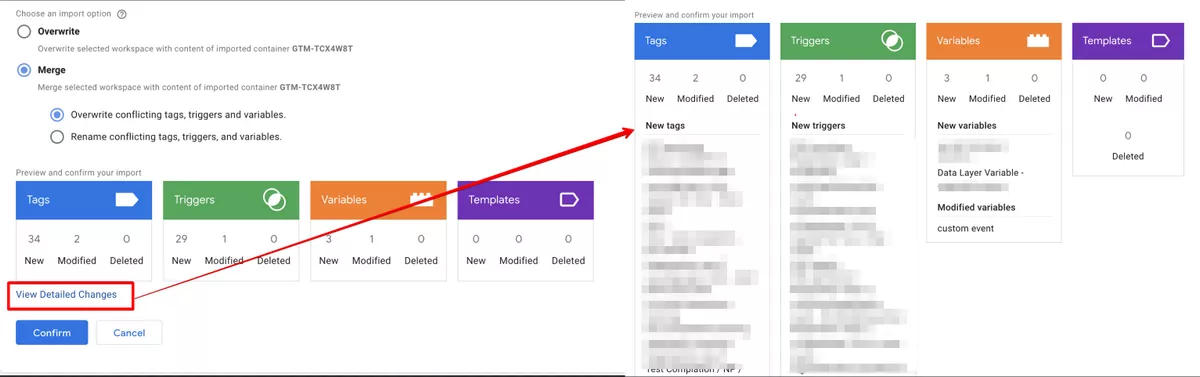
You can see a detailed list of changes by clicking on “View Detailed Changes”.
From the screenshot above, we can make the following conclusions:
- we are going to import 34 new tags, 2 tags will be modified (as we selected the “overwrite” option);
- we are going to import 29 new triggers, 1 trigger will be modified;
- we are going to import 3 new variables, 1 variable will be modified.
If everything is correct and everything suits you, press the “Confirm” button.
This completes importing the data into the container. Remember to publish the container so that the current configuration is available to users.
If you are importing a large amount of data, be sure to check all changes through the “Tag Manager Preview Mode” before publishing.
How to import a GTM recipe
If you want to import a GTM recipe, you will need to:
- Import the shared container file into the new workspace and then select the “overwrite” option. (Recommended)
- Import the shared container file into an existing workspace, and then merge the selected workspace with the contents of the imported container file.
If you use the “overwrite” option when importing a GTM recipe into an existing workspace, all your existing tags, triggers and variables in the selected workspace will be removed and replaced by the contents of the imported container. Be careful when selecting options as you may lose important data that was already in the container. GTM also allows you to restore a previous version if the data is lost.
Once the import is complete, click on the “Preview” button and test the updates you have just imported.
Features of GTM container import
For Universal Analytics
If you see an error message saying `YOUR_GA_TRACKING_ID`, then you need to change the Google Analytics ID in the imported container. This is really important because you need to replace the GA tracking ID in every GA tag in Google Tag Manager. Otherwise how will GTM know where to send the tracking data?
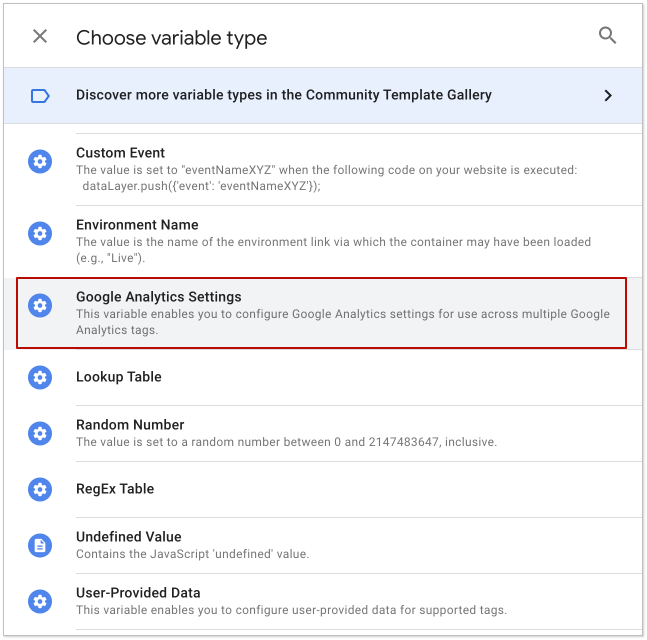
You can do this by using Google Analytics Settings Variable. This method is recommended as it will save you more time in the future.
To create a GA settings variable, go to “Variables” in your GTM account, scroll down to the “User Defined” section and click “Create”.

Select the type of variable.
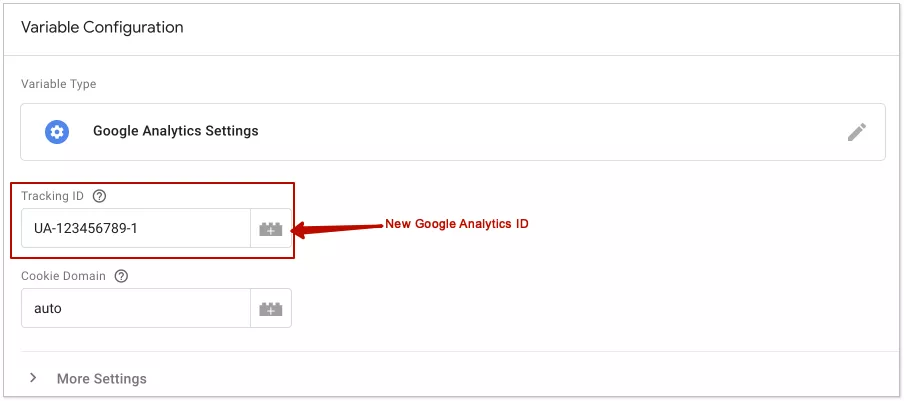
Now let's insert the variable into the GA tag you imported from the JSON file. First, open the GA tag. It might look something like this:
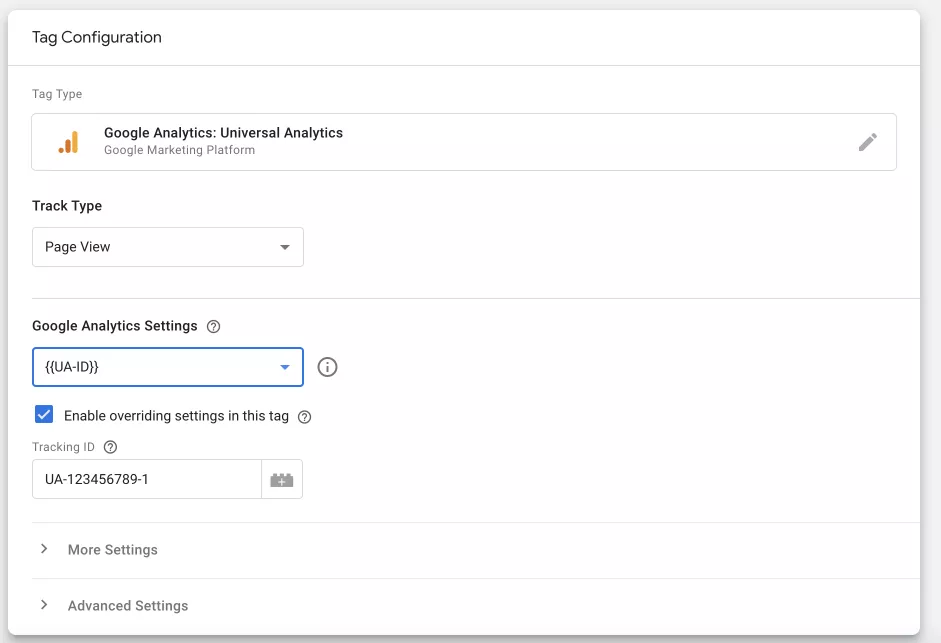
Some settings may be different, but it doesn't matter as we are only interested in two fields, the Google Analytics settings drop-down list and the checkbox that follows it.
- select “GA settings variable” from the “Google Analytics settings” drop-down list;
- uncheck “Enable overriding settings in this tag”.
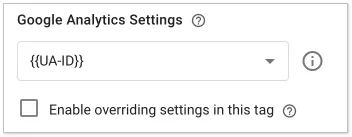
The final result should look like this (in your case the name of the GA settings variable will be different).
Create a variable with your GA ID.
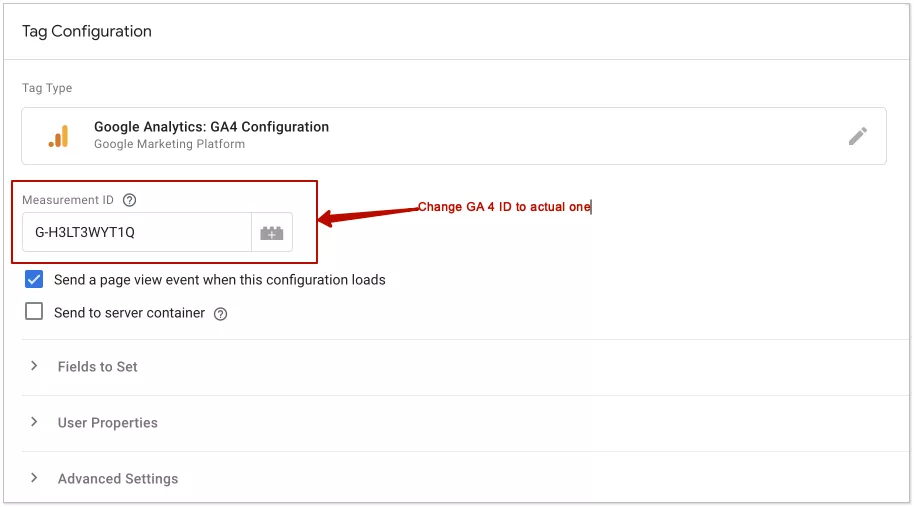
For Google Analytics 4
If the container file you imported uses Google Analytics 4, you will need to select an existing GA4 configuration tag. For example, the GA4 tracking tag might look like this:
Why don't I see the option to import a container?
If you do not see the option to import a container, it is likely that you do not have rights to edit the container.
Summary
GTM container import is a great way to create reusable tags and keep best practices in GTM accounts:
- With the Import Container function, you can set up dozens of tags, triggers and variables in a container tag at one time.
- With the Import Container feature you can share your GTM configurations (tags, triggers and variables) with any third party or company.
- What you are actually importing with the container import function is a container file (in JSON format), so you will need to prepare the container file before you start the import.
- You can create a container file by exporting from a GTM account or using the ready GTM recipe.
FAQ
- Q: What is a GTM container file?
A: GTM container file is a JSON file (with a .json extension) that contains a set of tags, triggers and variables and can be imported to GTM account.
- Q: Why is GTM container import useful?
A: GTM container import allows to use the same tags, triggers and variables in multiple GTM containers, import new tags, variables and triggers shared with you and use ready GTM recipes available online.
- Q: Where can I get a GTM container file?
A: You can get a GTM container file by exporting a workspace or container version using the “export container” option or using the ready-to use container file that was shared with you.

 14
14
 6
6
 8
8
Related Articles
Banner Ads: Definition and Information
Banners on website pages and more. Let's understand display advertising and where it can be launched
What Is a Top-Level Domain?
You will receive a cheat sheet that will help you choose the right domain name and avoid making insidious mistakes. You will also learn where to buy valuable and well-known TLDs
Google Play ASO: Ultimate Guide on App Store Optimization for Android in 2024
RadASO presents the main methods of app promotion on Google Play and useful lifehacks to choose the best ASO strategy for an Android app.