Standard ecommerce only collects data on completed transactions, while enhanced ecommerce provides significantly more data collection options. They can be used to set up the data transfer on product card impressions, order placement steps, and other user actions on the site.
I'll break down the nuances of setting up advanced e-commerce with Google Tag Manager.
Why do you need to set up advanced e-commerce?
Advanced eCommerce allows you to set up the users actions data transmission:
- Product Impressions.
- Product Clicks.
- Product Details Impressions.
- Adding a Product to a Product Cart.
- Removing a Product from a Product Cart.
- Checkout Steps.
- Checkout Options.
- Purchases.
- Refunds.
- Promotion Impressions / Indoor advertising shows.
- Promotion Clicks / Clicks on internal advertising.
Tracking any of these user actions can also be set up as part of standard Google Analytics reports, but it won't be as convenient to work with this data later.
Advanced e-commerce allows:
- Get data on the full sales cycle, from browsing products in the catalog to checkout.
- Track the in-house advertising effectiveness.
- Store this data in a single, convenient group of reports for further processing.
Google Analytics has a limit on the maximum data amount sent at once (~8000 bytes). That's why in all the codes you need to write data to Data Layer for no more than 15 products at once. If you need to send data on more items — break it into blocks of 15 products and send them in separate events.
Setting up Google Analytics and Google Tag Manager
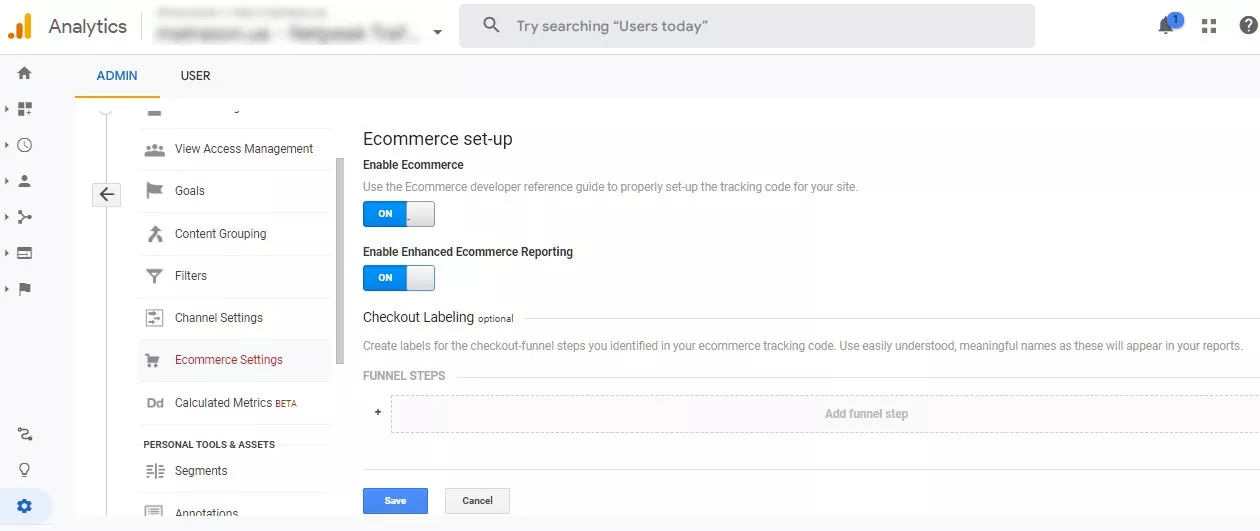
You need to activate the extended e-commerce reports in Google Analytics. To do this, in the “Administrator” section of the e-commerce settings, enable “Enhanced Ecommerce Reporting” option:
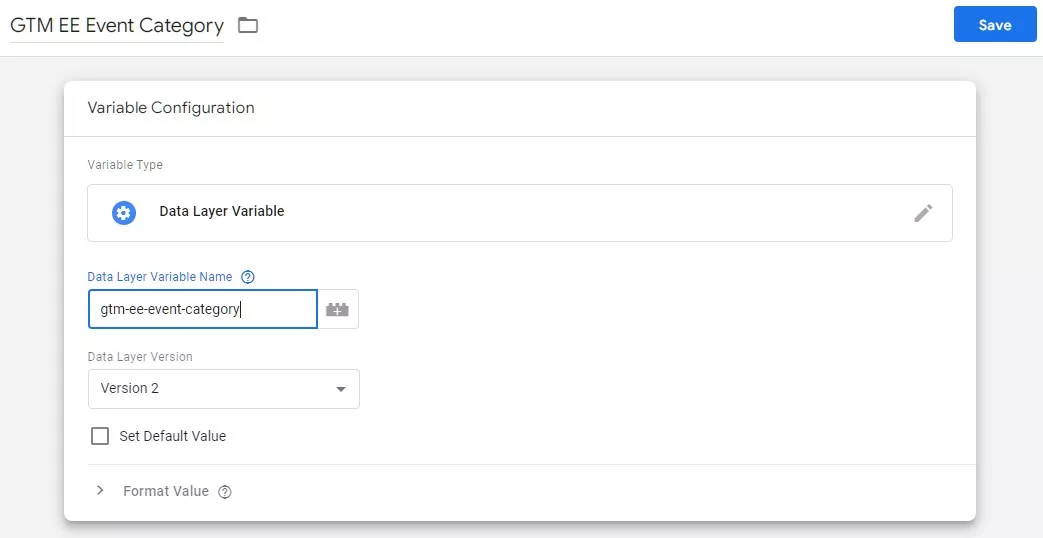
Next, configure GTM to read data from the Data Layer. To do this, we create three custom variables “Data Layer Variable”.
1. GTM EE Event Category
Variable name: GTM EE Event Category, variable name in dataLayer: gtm-ee-event-category.
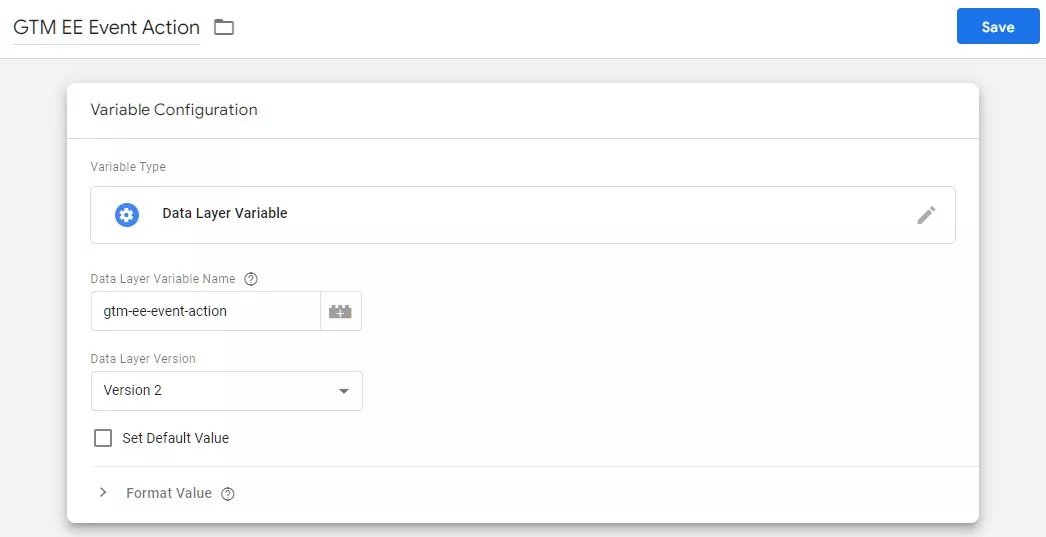
2. GTM EE Event Action
Variable name: GTM EE Event Action, variable name in dataLayer: gtm-ee-event-action:
3. GTM EE Event Non-Interaction
Variable name: GTM EE Event Non-Interaction, variable name in dataLayer: gtm-ee-event-non-interaction.
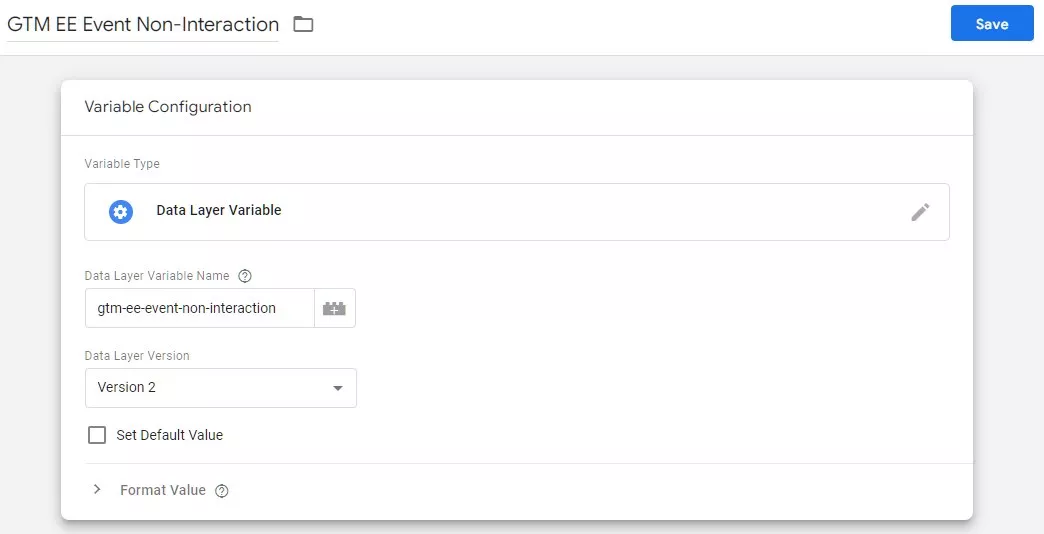
The values of the first two variables will be used as the category and action of the event sent to Google Analytics. The third one indicates whether the sent event will affect the bounce rate.
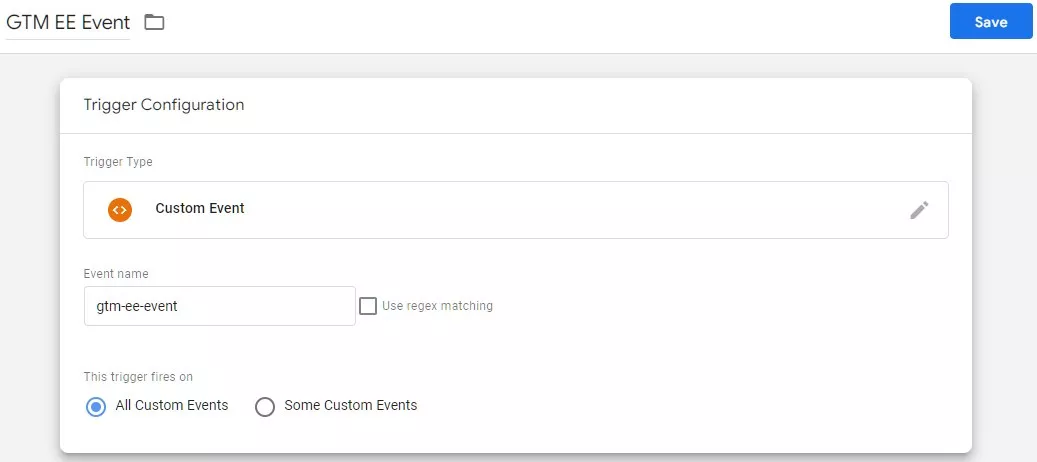
Create a trigger, which will activate the data sending
Trigger name: GTM EE Event, type: custom event. Event name: gtm-ee-event.
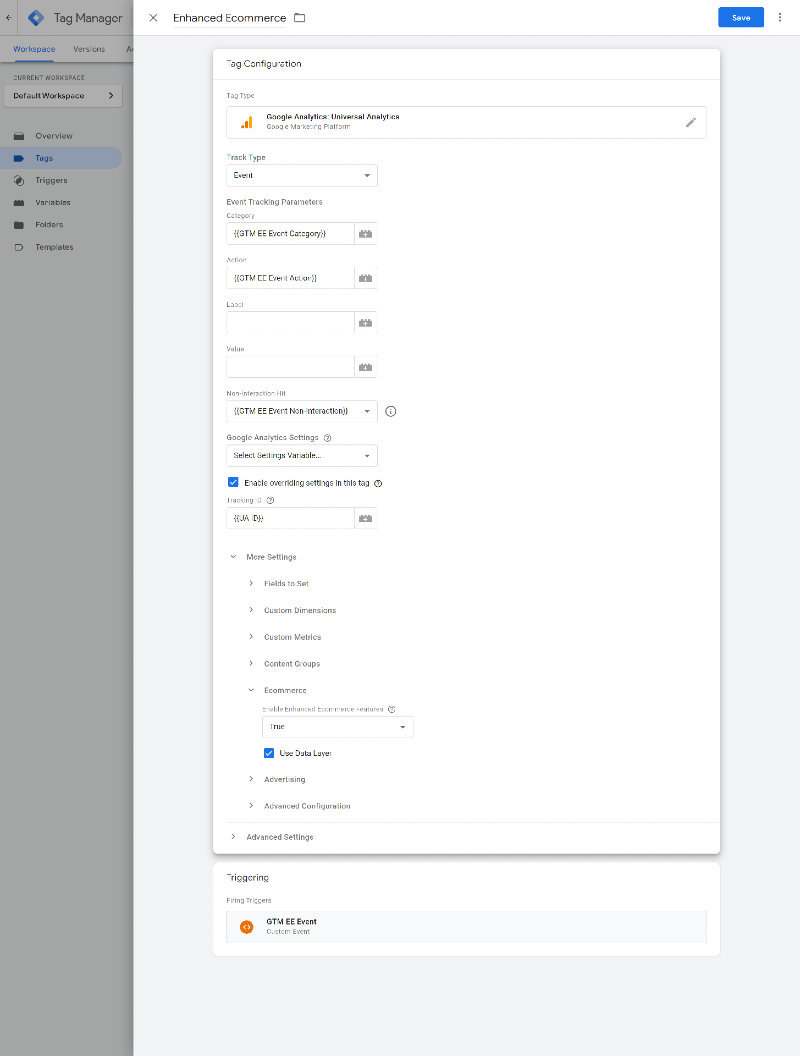
Create a tag that will send the data
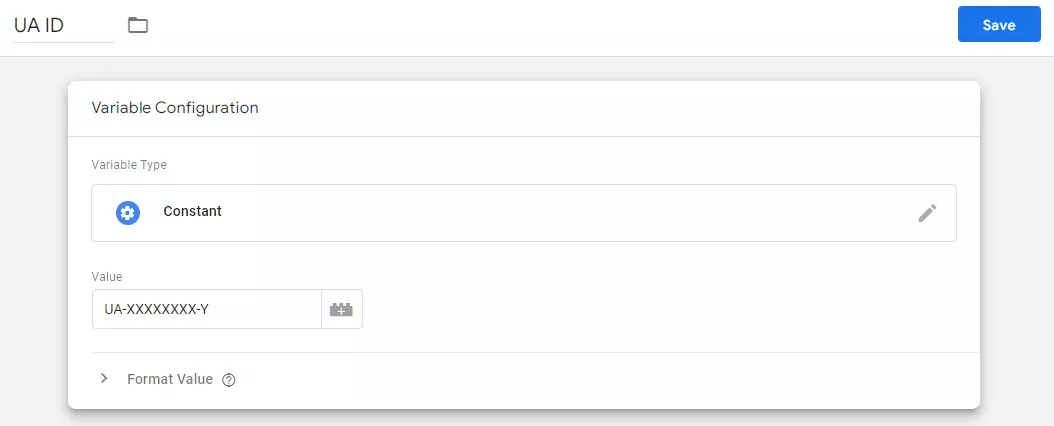
Tag name: Enhanced Ecommerce, type: Universal Analytics. Tracking ID: Specify the Google Analytics ID for the resource to which the data will be sent.
To simplify GTM configuration, you can create a custom variable constant in which you specify the resource ID:
Adding settings:
- tracking type: event;
- category: "GTM EE Event Category" variable;
- Action: "GTM EE Event Action" variable;
- Non-Interaction: "GTM EE Event Non-Interaction" variable.
Under "Advanced Settings" — "E-Commerce" check "Enable Advanced E-Commerce Functions" and "Use Data Level". As an activation trigger — specify "GTM EE Event".
Let's break down code examples for each of the extended e-commerce events.
1. Product Impressions
Track product impressions in any lists on the site: both product listings on the category page and cross-sell blocks ("Recommended Products", "Promotional Offers" and so on).
There are two options in this case:
- Simple — to send data about all products that are on the page.
- Sophisticated — send data only for those items that are in the visible area. When the user moves around the page, constantly check when new items are in the visible area and send data about them to Google Analytics.
Read how to see if an element is in the visible area.
Possible scenarios:
- The user went to the category page, there are 6 products in the visible area (two rows with 3 products in each), — we send data about the viewing of these 6 products.
- The user scrolled down the page; as a result the first row of items went out of the visible area, and instead the third row of items was visible.
- The user scrolled up the page, the third row of products disappeared, and the first row appeared again — no data is sent.
Example code in GTM:
<script>
window.dataLayer = window.dataLayer || [];
dataLayer.push({
  'ecommerce': {
    'currencyCode': 'USD',
    'impressions': [
     {
       'name': 'Product 1',
       'id': 'ID1',
       'price': '23.5',
       'brand': 'Brand 1',
       'category': 'Category 1/Subcategory 11',
       'variant': 'Variant 1',
       'list': 'List 1',
       'position': 1
     },
     {
       'name': 'Product 2',
       'id': 'ID2',
       'price': '14',
       'brand': 'Brand 2',
       'category': 'Category 2/Subcategory 21',
       'variant': 'Variant 3',
       'list': 'List 1',
       'position': 2
     }]
  },
  'event': 'gtm-ee-event',
  'gtm-ee-event-category': 'Enhanced Ecommerce',
  'gtm-ee-event-action': 'Product Impressions',
  'gtm-ee-event-non-interaction': 'True',
});
</script>
Example code in GTag:
<script>
gtag('event', 'view_item_list', {
  'items': [
    {
      'name': 'Product 1',
      'id': 'ID1',
      'price': 23.5,
      'brand': 'Brand 1',
      'category': 'Category 1/Subcategory 11',
      'variant': 'Variant 1',
      'list_name': 'List 1',
      'list_position': 1
    },
    {
      'name': 'Product 2',
      'id': 'ID2',
      'price': 14,
      'brand': 'Brand 2',
      'category': 'Category 2/Subcategory 21',
      'variant': 'Variant 3',
      'list_name': 'List 1',
      'list_position': 2
    }
  ]
});
</script>
Code description and variables
- currencyCode (string optional variable) — specifies the local currency according to ISO 4217.
- Supported currencies list. If the local currency differs from the one specified in the view settings, the conversion will be performed at the previous day rate.
- name (string mandatory variable) — product name.
- id (strict required variable) — product's identifier (SKU).
- price (optional string variable) — the price of one unit of the product. A dot is used as a decimal separator.
- brand (optional string variable) is the product brand.
- category (optional string variable) — category the product belongs to. You can specify a category hierarchy (up to 5 levels), separating levels with a slash: "Clothing/Menswear/Shirts".
- variant (optional string variable) — product's variant: any product parameter, which is changed without changing product's identifier (color, size, etc.).
- list (a string optional variable) — the list where the product was shown ("Promo items", "Top seller").
- position (optional variable, always an integer) — product position in the list. The left top position is number one.
- event (string variable) — the event which will trigger the enhanced ecommerce tag in GTM.
- gtm-ee-event-category (string variable) — Specifies the event category that will be sent to Google Analytics.
- gtm-ee-event-action (string variable) — Specifies the event action to be sent to Google Analytics.
- gtm-ee-event-non-interaction (string variable) — Specifies whether the sent event will affect the session failure rate. In this case it won't, because the user didn't perform the target action, but only viewed the products.
In the case of string mandatory variables, you must specify at least one of two values: the product name or its identifier. To send data on returns of certain products, their identifiers must be used.
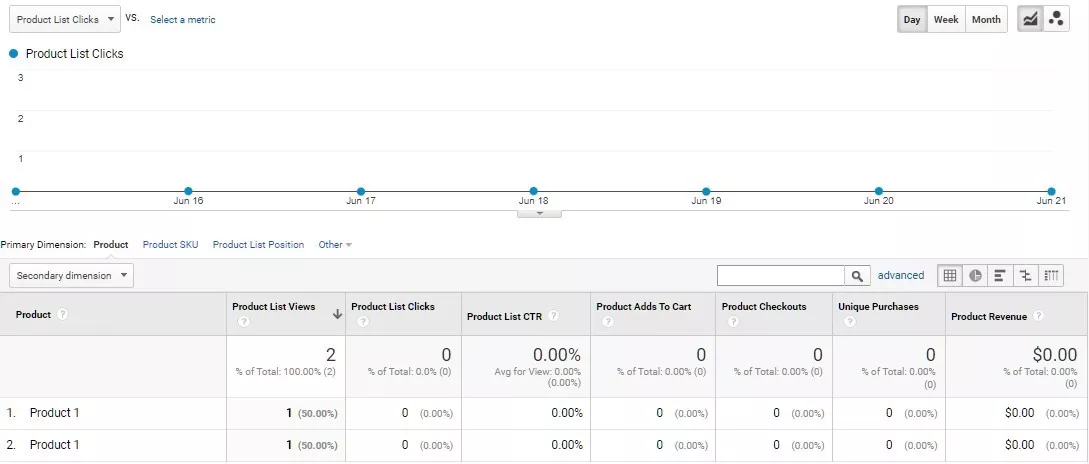
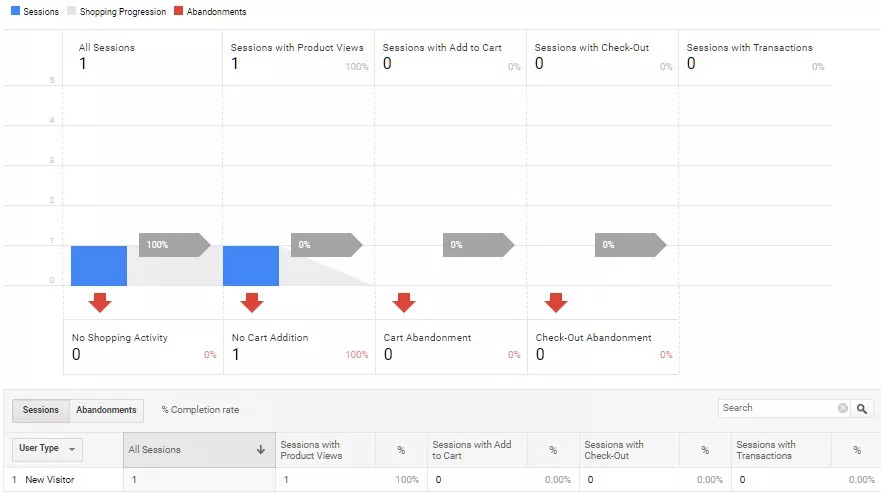
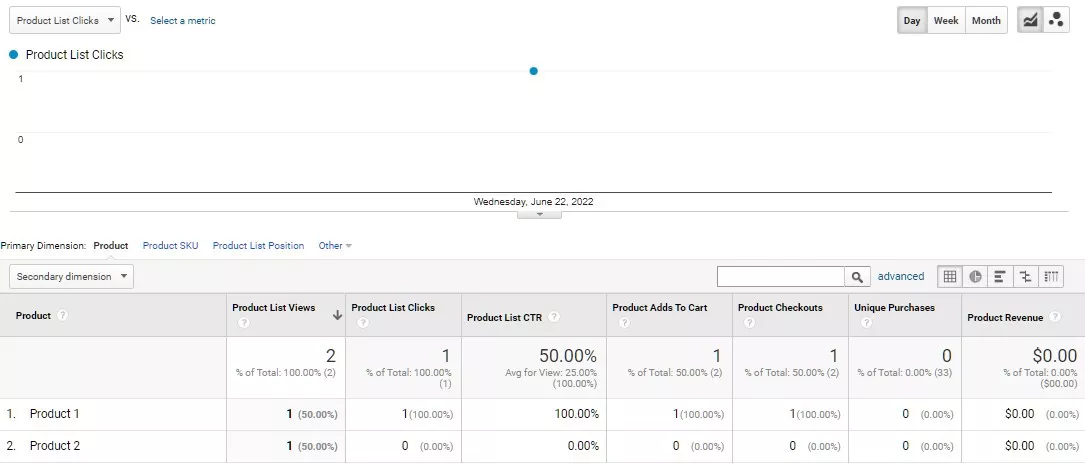
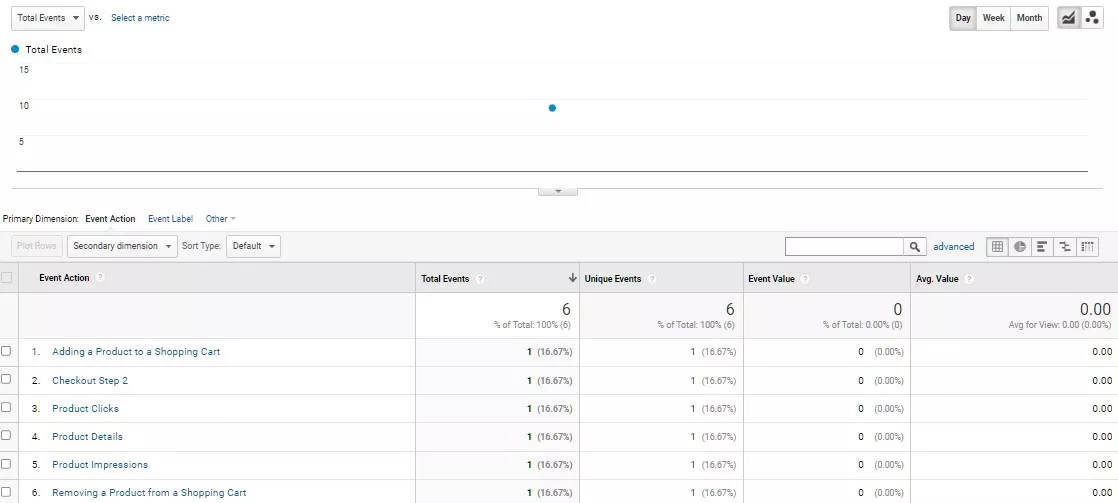
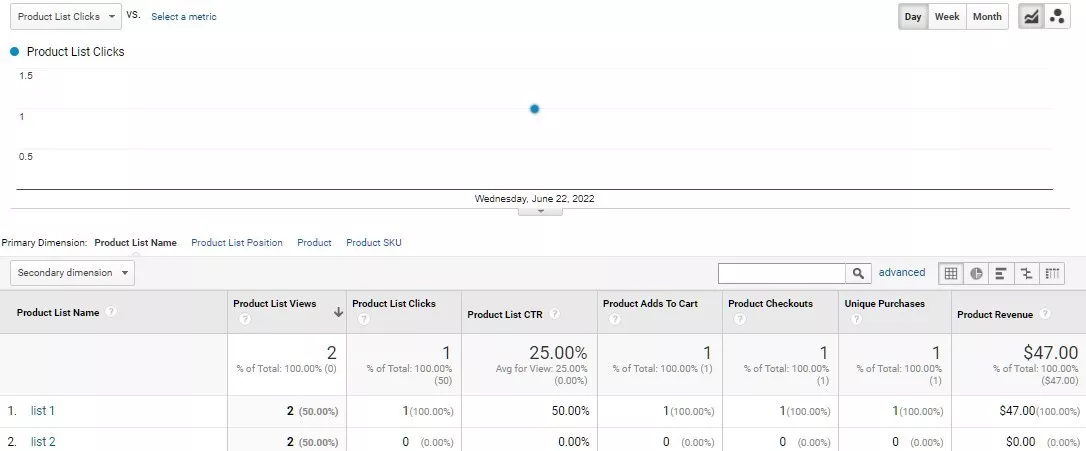
Result
By submitting this data, the Product List Performance report will show these results:
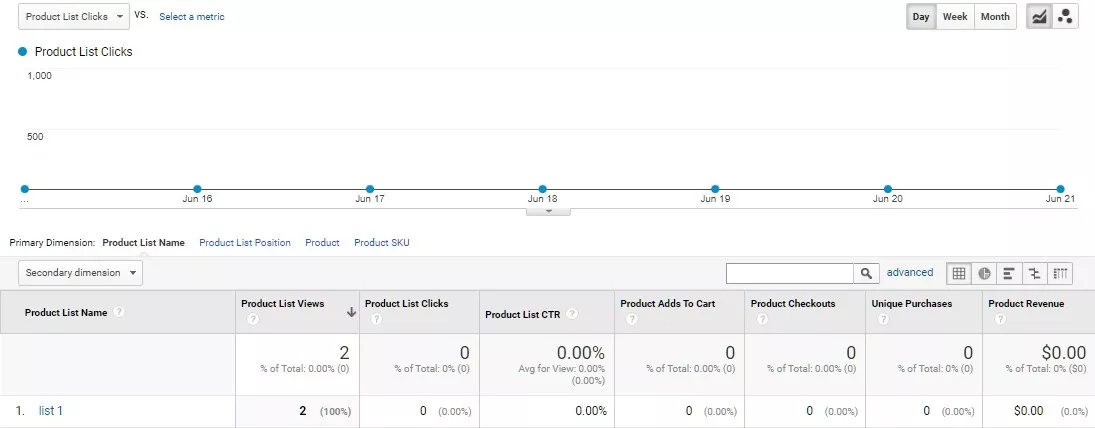
If you click on the list name and the additional parameter with the the first level category, we get:
2. Product Clicks
Tracking clicks on links to product cards. Data about the product that interested the user and the product list name in which it was shown are sent to Google Analytics. Here are the most common product lists examples:
- A products listing in the category.
- Site search results.
- Cross-sales blocks.
- Promotional goods lists.
Example code in GTM:
<script>
window.dataLayer = window.dataLayer || [];
dataLayer.push({
  'ecommerce': {
    'currencyCode': 'USD',
    'click': {
      'actionField': {'list': 'List 1'},
      'products': [{
       'name': 'Product 1',
       'id': 'ID1',
       'price': '23.5',
       'brand': 'Brand 1',
       'category': 'Category 1/Subcategory 11',
       'variant': 'Variant 1',
       'position': 1
      }]
    }
  },
  'event': 'gtm-ee-event',
  'gtm-ee-event-category': 'Enhanced Ecommerce',
  'gtm-ee-event-action': 'Product Clicks',
  'gtm-ee-event-non-interaction': 'False',
});
</script>
Example code in GTag:
<script>
gtag('event', 'select_content', {
  'content_type': 'product',
  'items': [
    {
      'name': 'Product 1',
      'id': 'ID1',
      'price': 23.5,
      'brand': 'Brand 1',
      'category': 'Category 1/Subcategory 11',
      'variant': 'Variant 1',
      'list_name': 'List 1',
      'position': 1
    }
  ]
});
</script>
Code description and variables
- list (string optional variable) — the product list name where the product the user clicked on is located. If the product doesn't belong to any list, you should send an empty string (in this case the reports will contain not set instead of the list name).
- All other variables are the same as before.
- In this case the event that affects the bounce rate is sent: the variable gtm-ee-event-non-interaction takes the value False.
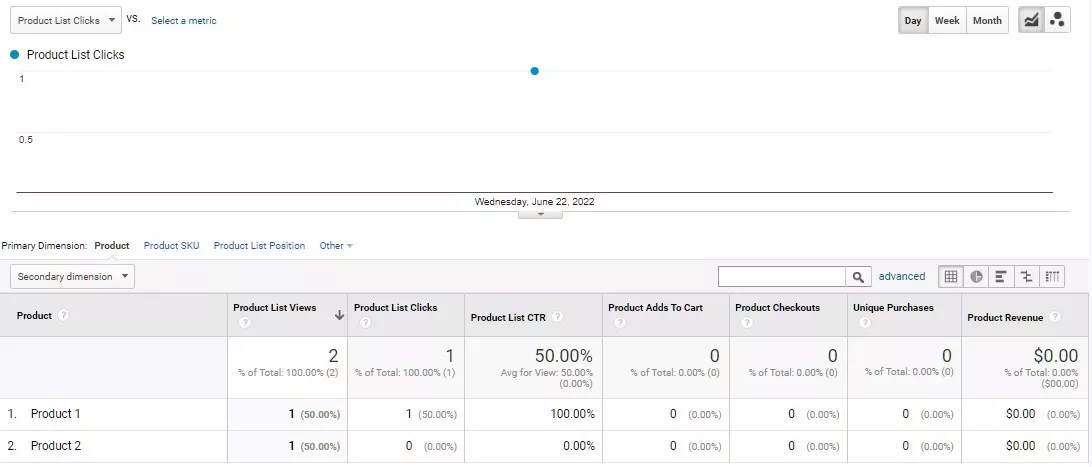
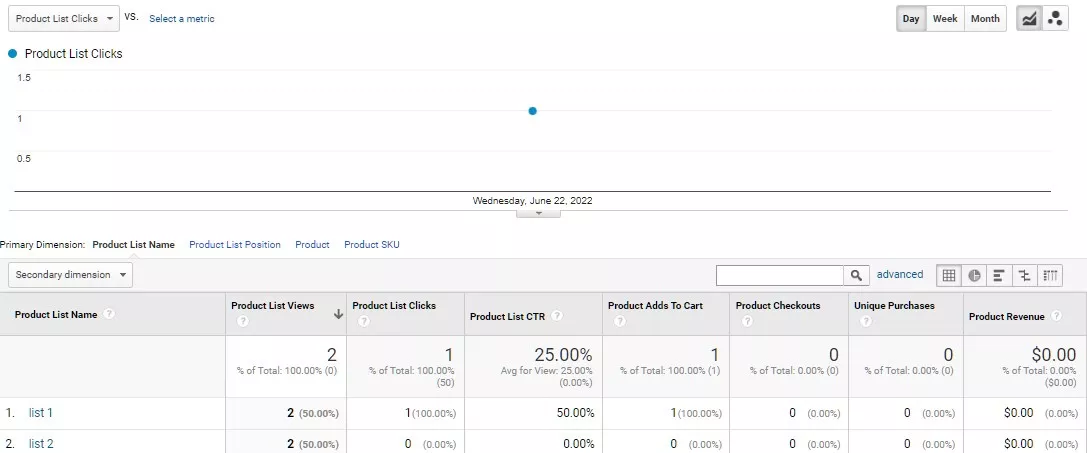
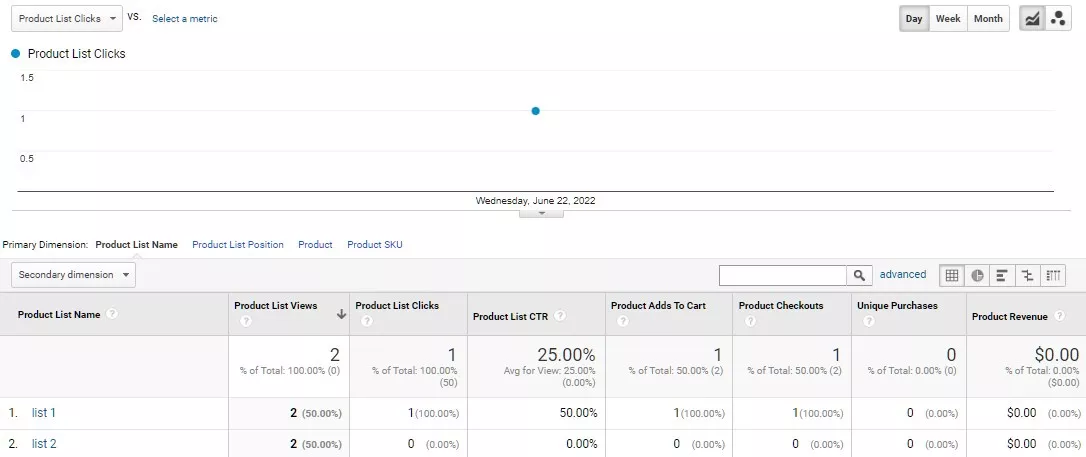
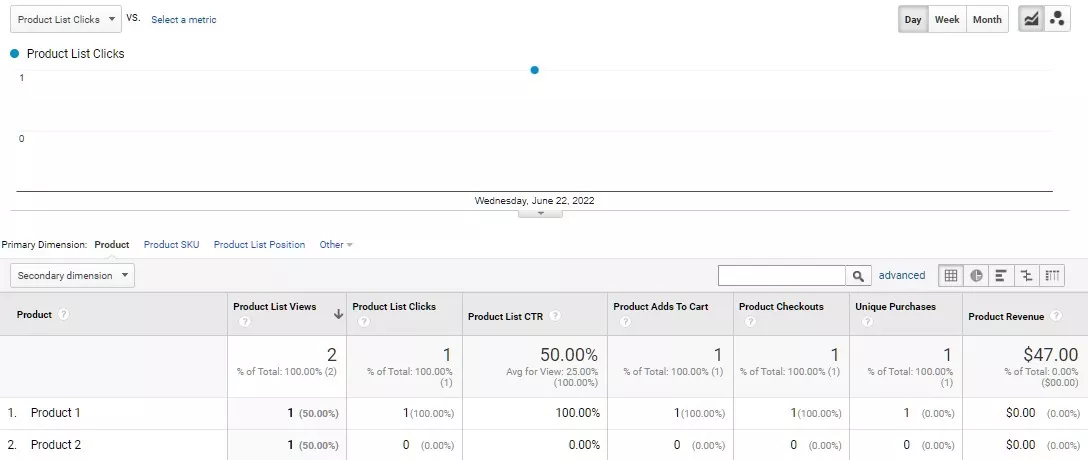
Result
After sending this data in the “Product List Performance” report, there will be changes in the "Products List Clicks" and "Product List CTR" metrics:
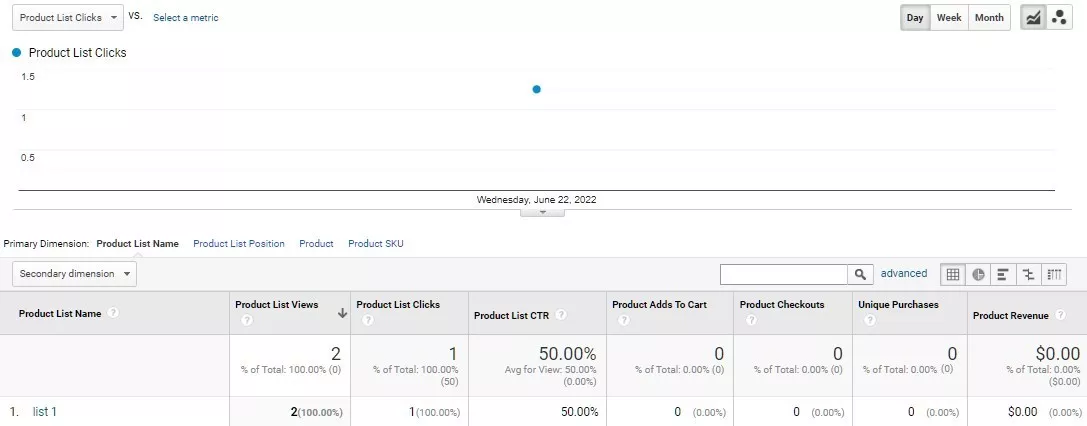
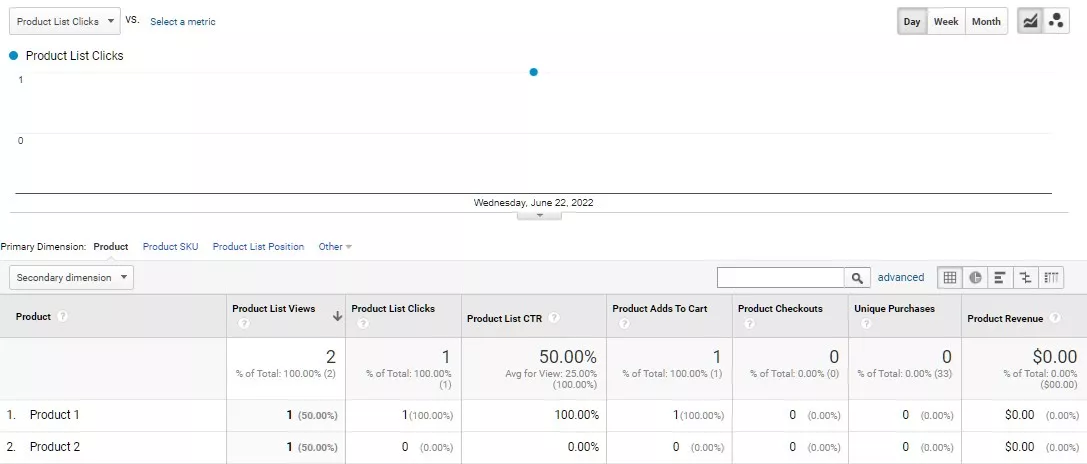
If you click on the products list name, we get information on which product you clicked:
3. Product Detail Impressions
Tracking product card impressions. The same product data is sent to Google Analytics as in the "Product Clicks" event, but without the product position in the list.
The main card product data can be sent along with additional product data (e.g., products in cross-sell blocks) in the same event.
The example shows how to send data about a product card view (detail array), and about two products in an additional List 2 block (impressions array).
Example code in GTM:
<script>
window.dataLayer = window.dataLayer || [];
dataLayer.push({
  'ecommerce': {
    'currencyCode': 'USD',
    'detail': {
      'actionField': {'list': 'List 1'},
      'products': [{
        'name': 'Product 1',
        'id': 'ID1',
        'price': '23.5',
        'brand': 'Brand 1',
        'category': 'Category 1/Subcategory 11',
        'variant': 'Variant 1'
      }]
    },
    'impressions': [
     {
       'name': 'Product 3',
       'id': 'ID3',
       'price': '17.75',
       'brand': 'Brand 2',
       'category': 'Category 1/Subcategory 12',
       'variant': 'Variant 1',
       'list': 'List 2',
       'position': 1
     },
     {
       'name': 'Product 4',
       'id': 'ID4',
       'price': '12.5',
       'brand': 'Brand 3',
       'category': 'Category 1/Subcategory 13',
       'variant': 'Variant 1',
       'list': 'List 2',
       'position': 2
     }]
  },
  'event': 'gtm-ee-event',
  'gtm-ee-event-category': 'Enhanced Ecommerce',
  'gtm-ee-event-action': 'Product Details',
  'gtm-ee-event-non-interaction': 'True',
});
</script>
Example code in GTag:
<script>
gtag('event', 'view_item', {
  'items': [
    {
      'name': 'Product 1',
      'id': 'ID1',
      'price': 23.5,
      'brand': 'Brand 1',
      'category': 'Category 1/Subcategory 11',
      'variant': 'Variant 1',
      'list_name': 'List 1',
      'list_position': 2
    }
  ]
});
gtag('event', 'view_item_list', {
  'items': [
    {
      'name': 'Product 3',
      'id': 'ID3',
      'price': 17.75,
      'brand': 'Brand 2',
      'category': 'Category 1/Subcategory 12',
      'variant': 'Variant 1',
      'list_name': 'List 2',
      'list_position': 1
    },
    {
      'name': 'Product 4',
      'id': 'ID4',
      'price': 12.5,
      'brand': 'Brand 3',
      'category': 'Category 1/Subcategory 13',
      'variant': 'Variant 1',
      'list_name': 'List 2',
      'list_position': 2
    }
  ]
});
</script>
Code description and variables
- All variables are the same as before.
- The sent event will not affect the bounce rate: the variable gtm-ee-event-non-interaction takes the value True.
- If the user gets to the product card from an external source, an empty value must be passed to the list variable.
Result
After sending this data, the "Product List Performance" report will show data on the second list:
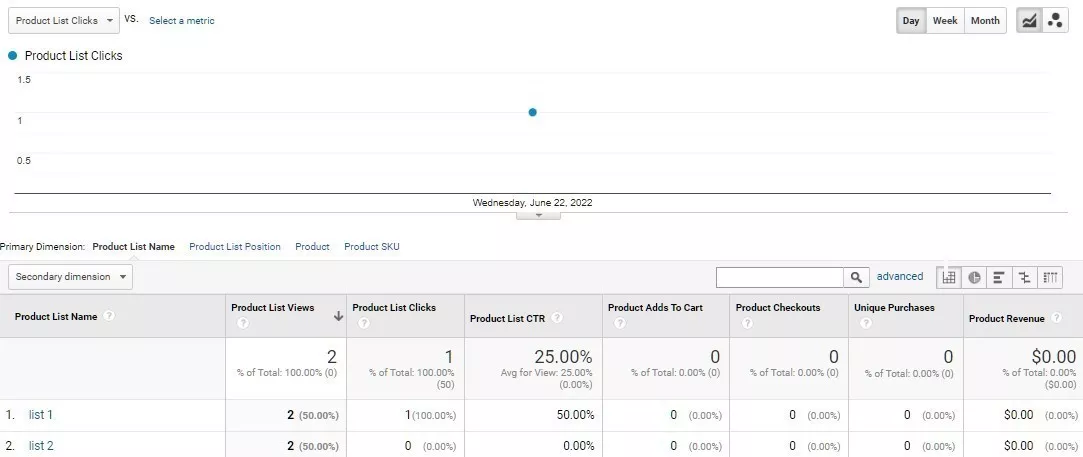
And to the goods on this list:

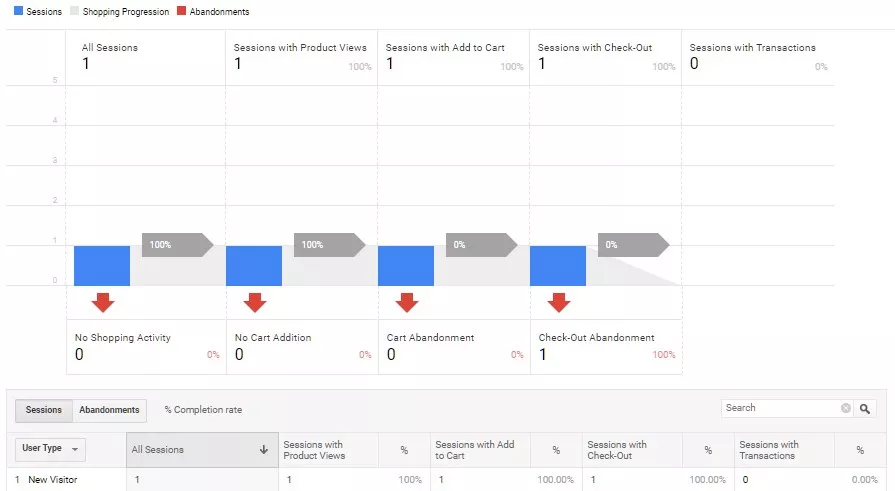
Also in the "Purchase Analysis" — "Shopping Behavior" report will appear a session with product card impressions:
At the time the screenshot was taken, the session had already ended, so the value of "No item added to cart" equals one.
4. Adding a Product to a Product Cart
Tracking of additions to cart by users regardless of where the action was performed: on the category page, on the product card or from the cart itself (for example, from the "Add-ons and Services" block).

Example code in GTM:
<script>
window.dataLayer = window.dataLayer || [];
dataLayer.push({
  'ecommerce': {
    'currencyCode': 'USD',
    'add': {
      'products': [{
        'name': 'Product 1',
        'id': 'ID1',
        'price': '23.5',
        'brand': 'Brand 1',
        'category': 'Category 1/Subcategory 11',
        'variant': 'Variant 1',
        'quantity': 3
       }]
    }
  },
  'event': 'gtm-ee-event',
  'gtm-ee-event-category': 'Enhanced Ecommerce',
  'gtm-ee-event-action': 'Adding a Product to a Shopping Cart',
  'gtm-ee-event-non-interaction': 'False',
});
</script>
Example code in GTag:
<script>
gtag('event', 'add_to_cart', {
  'items': [
    {
      'name': 'Product 1',
      'id': 'ID1',
      'price': 23.5,
      'brand': 'Brand 1',
      'category': 'Category 1/Subcategory 11',
      'variant': 'Variant 1',
      'quantity': 3
    }
  ]
});
</script>
Code description and variables
- quantity (optional variable, always an integer) — the number of items added to the cart.
- All other variables are the same as before.
- The sent event affects the bounce rate.
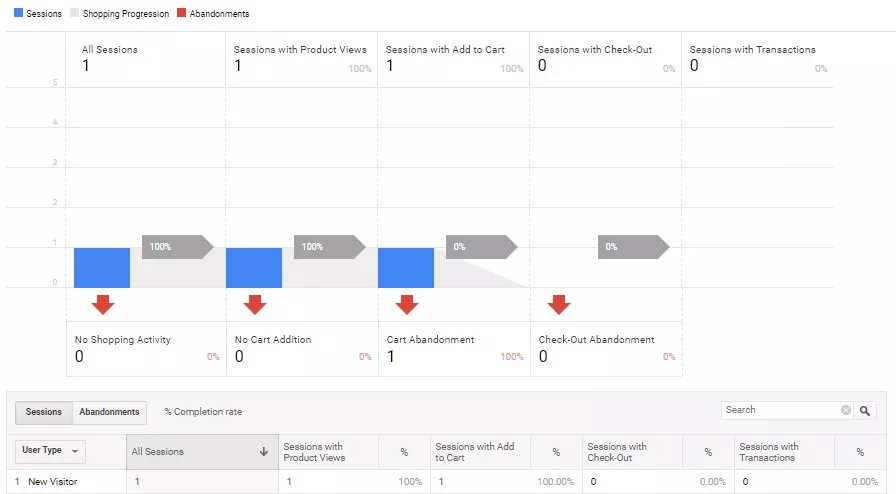
Result
After sending the data, the value of the indicator "Number of additions to cart" in the "Product List Performance" report changes:
If you click on the list name, you will get information about which of the items in the list was added to the cart:
A session with an item added to cart will appear in the Purchasing Analysis — Buying Behavior report:
5. Removing a Product from a Product Cart
Tracking items deleted from the cart. In the products array you should list all the items that the user removed from the cart. If the cart is completely cleared, all the items that were in it should be listed.
Example code in GTM:
<script>
window.dataLayer = window.dataLayer || [];
dataLayer.push({
  'ecommerce': {
    'currencyCode': 'USD',
    'remove': {
      'products': [{
        'name': 'Product 1',
        'id': 'ID1',
        'price': '23.5',
        'brand': 'Brand 1',
        'category': 'Category 1/Subcategory 11',
        'variant': 'Variant 1',
        'quantity': 1
      }]
    }
  },
  'event': 'gtm-ee-event',
  'gtm-ee-event-category': 'Enhanced Ecommerce',
  'gtm-ee-event-action': 'Removing a Product from a Shopping Cart',
  'gtm-ee-event-non-interaction': 'False',
});
</script>
Example code in GTag:
<script>
gtag('event', 'remove_from_cart', {
  'items': [
    {
      'name': 'Product 1',
      'id': 'ID1',
      'price': 23.5,
      'brand': 'Brand 1',
      'category': 'Category 1/Subcategory 11',
      'variant': 'Variant 1',
      'quantity': 1
    }
  ]
});
</script>
Code description and variables
- quantity (an integer optional variable) — the number of items removed from the cart.
- All other variables are the same as before.
- The sent event affects the bounce rate.
Result
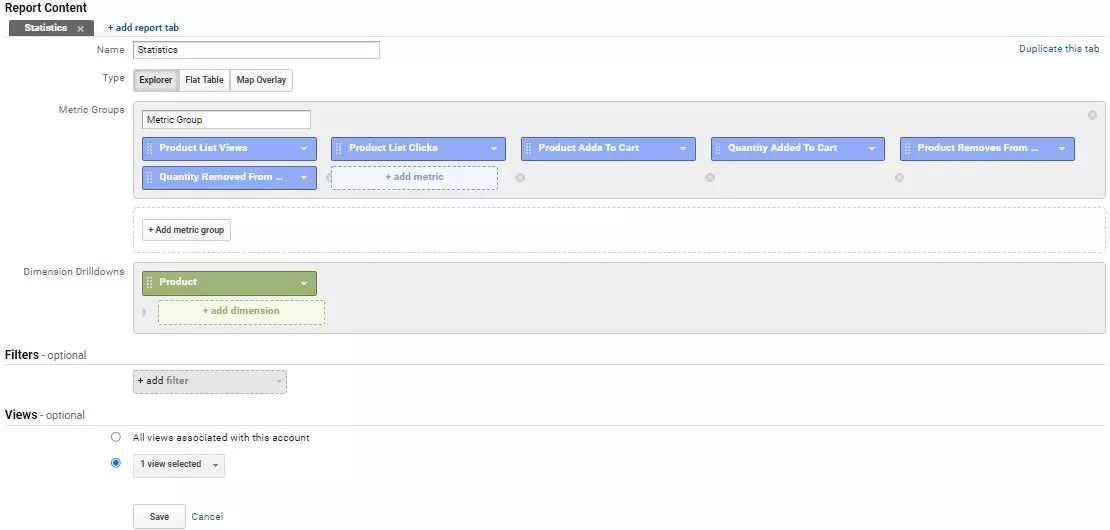
Standard reports do not display data on items removed from the cart, but you can create your own report with the following settings:
- Parameter.
- Product.
- Metric.
- Product list impressions.
- Product list click.
- Product Adds To Cart.
- Quantity Added To Cart.
- Product Removes From Cart.
- Quantity Removed From Cart.
Report settings:
Result:

The parameters "Number of items added to cart" and "Number of items removed from cart" show the numbers specified in the quantity variable of the corresponding events. And "Number of items added to cart" and "Number of items removed from cart" show the number of their corresponding events.
6. Checkout Steps
It's about tracking a user's movement through predefined checkout steps.
As an example, let's set up the following checkout funnel in Google Analytics (each step doesn't have to be a real page):
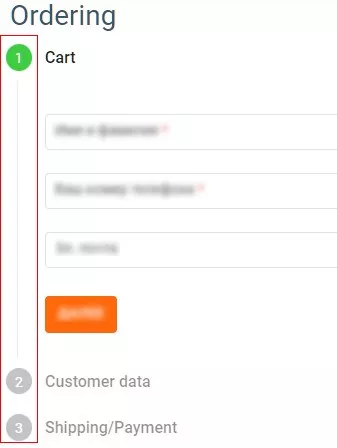
Step 1. Go to cart.
Step 2. Entering contact information.
Step 3. Selecting delivery option.
Step 4. Selecting payment option.
Step 5. Order confirmation.
Step 6. Thank You Page.
After the user performs the actions required at each step, data about this action should be sent to the Data Layer.
The actions for this funnel are:
- The user goes to the cart page.
- Successful sending the completed form with contact data.
- Successful sending data about the delivery method.
- Successful sending data on the payment method.
- Click on the "Confirm Order" button.
- The user is redirected to Thank You Page.
Example code in GTM:
<script>
window.dataLayer = window.dataLayer || [];
dataLayer.push({
  'ecommerce': {
    'currencyCode': 'USD',
    'checkout': {
      'actionField': {'step': 1},
      'products': [{
        'name': 'Product 1',
        'id': 'ID1',
        'price': '23.5',
        'brand': 'Brand 1',
        'category': 'Category 1/Subcategory 11',
        'variant': 'Variant 1',
        'quantity': 2
      }]
    }
  },
  'event': 'gtm-ee-event',
  'gtm-ee-event-category': 'Enhanced Ecommerce',
  'gtm-ee-event-action': 'Checkout Step 1',
  'gtm-ee-event-non-interaction': 'False',
});
</script>
Example code in GTag. First step:
<script>
gtag('event', 'begin_checkout', {
  'items': [
    {
      'name': 'Product 1',
      'id': 'ID1',
      'price': 23.5,
      'brand': 'Brand 1',
      'category': 'Category 1/Subcategory 11',
      'variant': 'Variant 1',
      'quantity': 2
    }
  ]
});
</script>
Next steps:
<script>
gtag('event', 'checkout_progress', {
  "checkout_step": 2,
  'items': [
    {
      'name': 'Product 1',
      'id': 'ID1',
      'price': 23.5,
      'brand': 'Brand 1',
      'category': 'Category 1/Subcategory 11',
      'variant': 'Variant 1',
      'quantity': 2
    }
  ]
});
</script>
Code description and variables
- step (integer optional variable) — step number in the funnel. At each step, you should assign a corresponding value to this variable, the same value should also be specified in the gtm-ee-event-action variable.
- The sent event affects the bounce rate.
Result
When sending an event about the order placement beginning (in this example — when the user gets to the cart page, step 1):
- A checkout session will appear in the "Purchase Analysis" — "Customer Behavior" report:
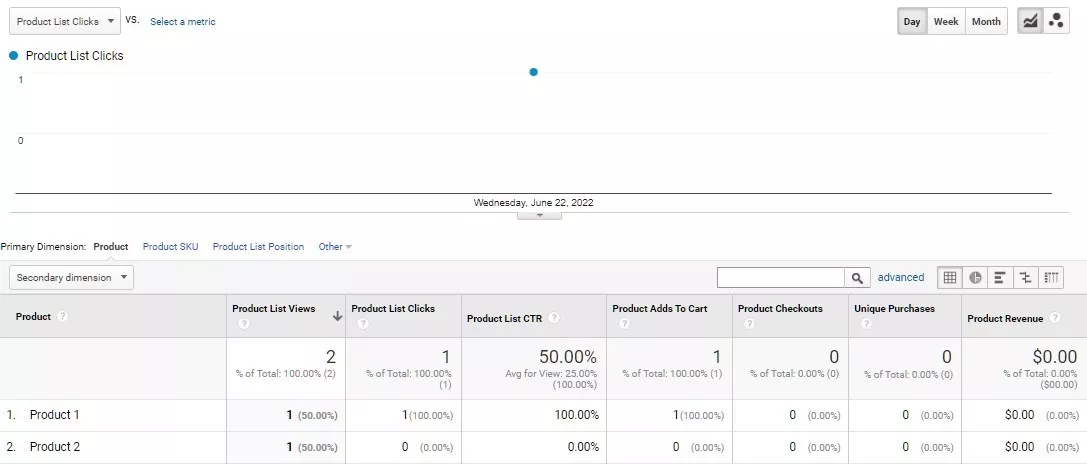
- The Product List Performance report will display data on the product list from which the ordering process was initiated (the indicator is the number of completed product purchases):
Clicking on the name, we get the same data, but in the goods section from this list:
If the user has successfully completed all steps of the funnel and placed an order, we get the following data in the "Purchase Analysis" — "Shopping behavior" report:
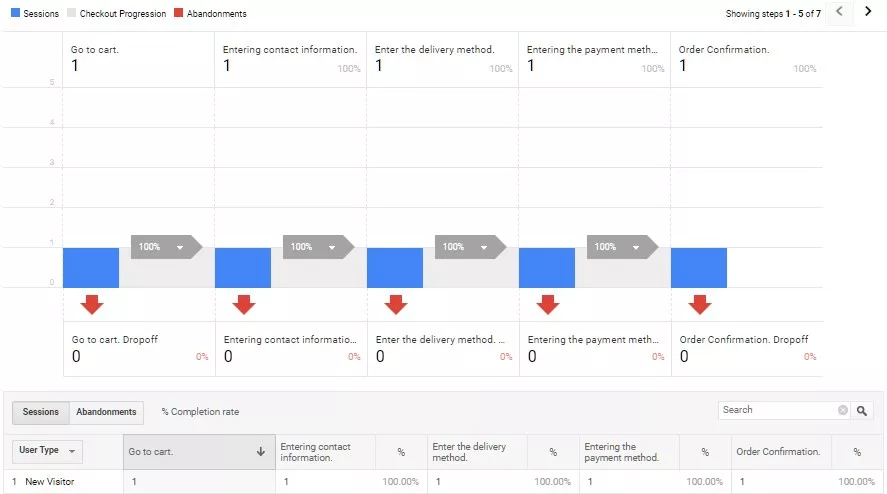
Step one-five
![]()
The sixth step and data on processed transactions
Transactions will appear after you send the data on purchases made.
If there were gaps at any of the stages, the "Purchase Analysis" — "Checkout Behavior" report will be like this (a gap at the delivery method selection stage):
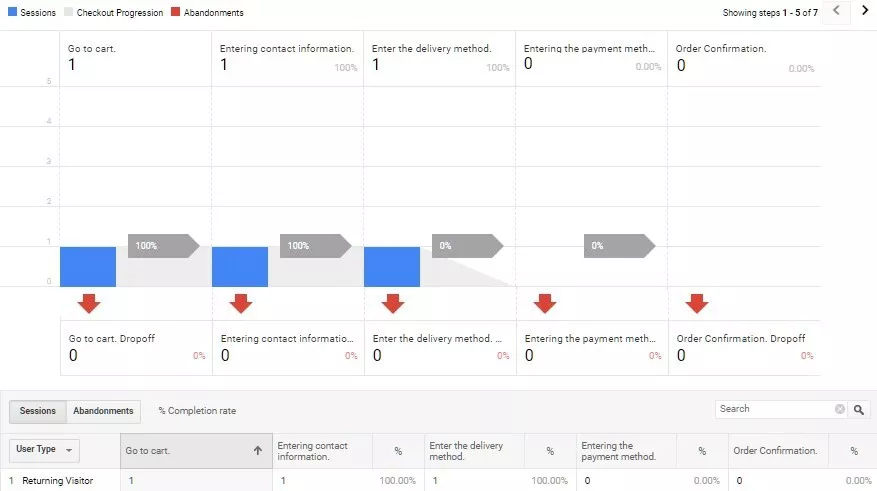
If the checkout was started from the second step, there will be no data on that checkout in the report:
The "Product Checkouts" parameter value is zero. At the same time, the event sent in the second step is in the reports:
7. Checkout Options
It's about tracking the choice of one of the options for placing an order at each step of the funnel.
For example, the site has the following delivery methods:
- Self-delivery.
- Delivery by "DHL".
- Delivery service InTme.
Example code in GTM for the "DHL" delivery scenario in step 3:
<script>
window.dataLayer = window.dataLayer || [];
dataLayer.push({
  'ecommerce': {
    'currencyCode': 'USD',
    'checkout': {
      'actionField': {'step': 3, 'option': 'DHL'},
      'products': [{
        'name': 'Product 1',
        'id': 'ID1',
        'price': '23.5',
        'brand': 'Brand 1',
        'category': 'Category 1/Subcategory 11',
        'variant': 'Variant 1',
        'quantity': 2
      }]
    }
  },
  'event': 'gtm-ee-event',
  'gtm-ee-event-category': 'Enhanced Ecommerce',
  'gtm-ee-event-action': 'Checkout Step 3',
  'gtm-ee-event-non-interaction': 'False',
});
</script>

<script>
window.dataLayer = window.dataLayer || [];
dataLayer.push({
  'ecommerce': {
    'currencyCode': 'USD',
    'checkout': {
      'actionField': {'step': 4, 'option': 'Bank card'},
      'products': [{
        'name': 'Product 1',
        'id': 'ID1',
        'price': '23.5',
        'brand': 'Brand 1',
        'category': 'Category 1/Subcategory 11',
        'variant': 'Variant 1',
        'quantity': 2
      }]
    }
  },
  'event': 'gtm-ee-event',
  'gtm-ee-event-category': 'Enhanced Ecommerce',
  'gtm-ee-event-action': 'Checkout Step 4',
  'gtm-ee-event-non-interaction': 'False',
});
</script>
And payment methods:
- By bank card.
- Cash.
- Cash on delivery.
Example code in GTag:
<script>
gtag('event', 'checkout_progress', {
  'checkout_step': 3,
  'checkout_option': 'DHL',
  'items': [
    {
      'name': 'Product 1',
      'id': 'ID1',
      'price': 23.5,
      'brand': 'Brand 1',
      'category': 'Category 1/Subcategory 11',
      'variant': 'Variant 1',
      'quantity': 2
    }
  ]
});
</script>
Example code for the bank card payment scenario in step 4:
<script>
window.dataLayer = window.dataLayer || [];
dataLayer.push({
  'ecommerce': {
    'currencyCode': 'USD',
    'checkout': {
      'actionField': {'step': 4, 'option': 'Bank card'},
      'products': [{
        'name': 'Product 1',
        'id': 'ID1',
        'price': '23.5',
        'brand': 'Brand 1',
        'category': 'Category 1/Subcategory 11',
        'variant': 'Variant 1',
        'quantity': 2
      }]
    }
  },
  'event': 'gtm-ee-event',
  'gtm-ee-event-category': 'Enhanced Ecommerce',
  'gtm-ee-event-action': 'Checkout Step 4',
  'gtm-ee-event-non-interaction': 'False',
});
</script>
Example code in GTag:
<script>
gtag('event', 'checkout_progress', {
  'checkout_step': 4,
  'checkout_option': 'Bank card',
  'items': [
    {
      'name': 'Product 1',
      'id': 'ID1',
      'price': 23.5,
      'brand': 'Brand 1',
      'category': 'Category 1/Subcategory 11',
      'variant': 'Variant 1',
      'quantity': 2
    }
  ]
});
</script>
Code description and variables
- option (string optional variable) — the option selected by the user at this or that step.
- The sent events will affect the bounce rate.
Result
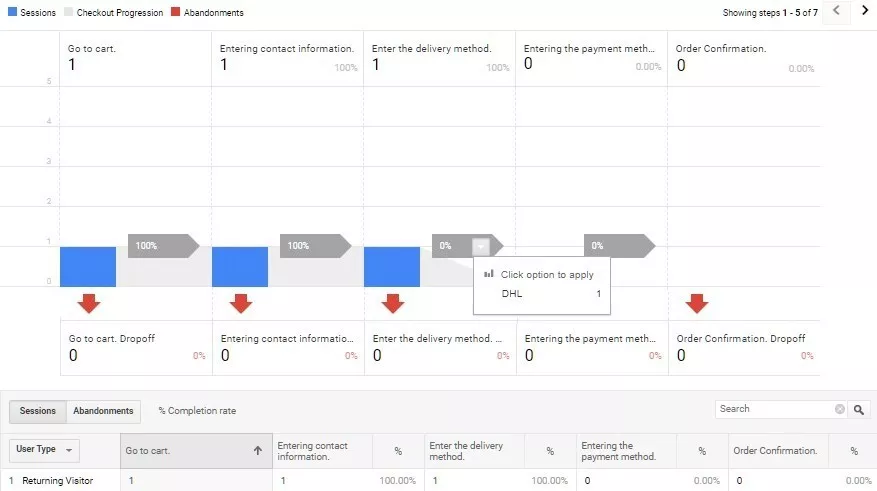
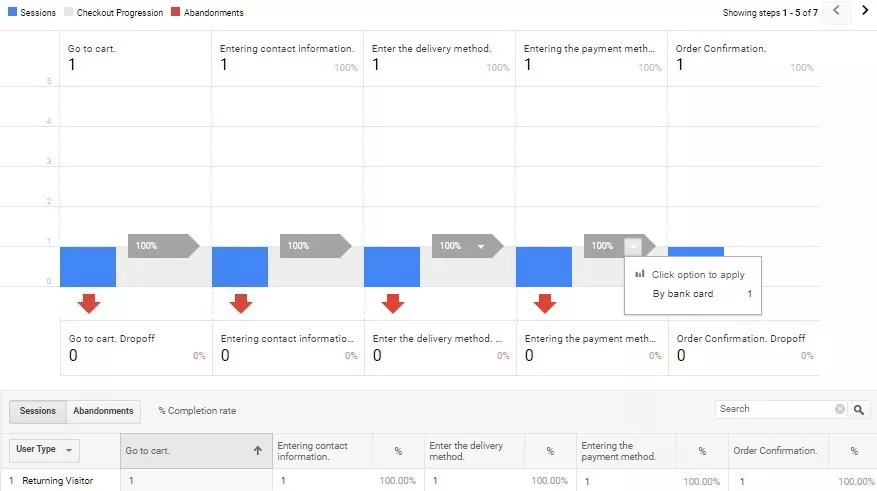
The data on the selected scenarios are displayed in the "Purchase Analysis" — "Checkout Behavior" report:
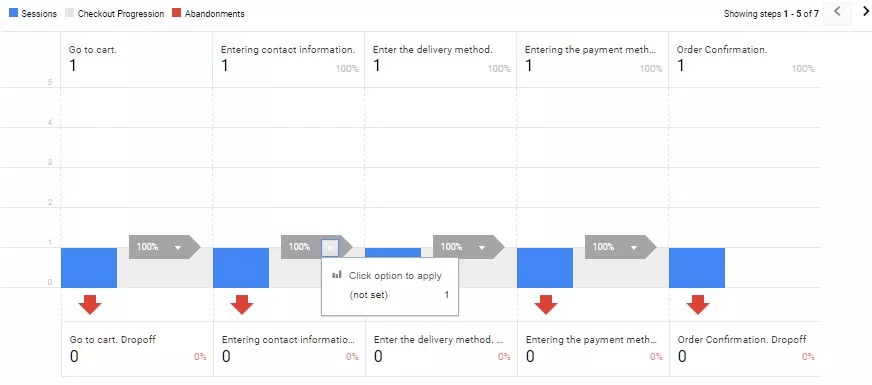
If an option has not been set, a "not set" will be displayed:
8. Purchases
Tracking transactions made through the site. Data is sent when the user reaches the "Thank you for your purchase" page.
Example code in GTM:
<script>
window.dataLayer = window.dataLayer || [];
dataLayer.push({
  'ecommerce': {
    'currencyCode': 'USD',
    'purchase': {
      'actionField': {
        'id': 'TID1',
        'affiliation': 'Online Store',
        'revenue': '91.4',
        'tax': '9.4',
        'shipping': '35',
        'coupon': 'Coupon 1'
      },
      'products': [{
        'name': 'Product 1',
        'id': 'ID1',
        'price': '23.5',
        'brand': 'Brand 1',
        'category': 'Category 1/Subcategory 11',
        'variant': 'Variant 1',
        'quantity': 2,
        'coupon': ''
       }]
    }
  },
  'event': 'gtm-ee-event',
  'gtm-ee-event-category': 'Enhanced Ecommerce',
  'gtm-ee-event-action': 'Purchase',
  'gtm-ee-event-non-interaction': 'False',
});
</script>
Example code in GTag:
<script>
gtag('event', 'purchase', {
  'transaction_id': 'TID1',
  'affiliation': 'Online Store',
  'value': 91.4,
  'currency': 'USD',
  'tax': 9.4,
  'shipping': 35,
  'coupon': 'Coupon 1',
  'items': [
    {
      'name': 'Product 1',
      'id': 'ID1',
      'price': 23.5,
      'brand': 'Brand 1',
      'category': 'Category 1/Subcategory 11',
      'variant': 'Variant 1',
      'quantity': 2,
      'coupon': ''
    }
  ]
});
</script>
Code description and variables
- id (string mandatory variable) — the unique transaction identifier.
- affiliation (string optional variable) — the store or branch where the transaction was made.
- revenue (optional string variable) — total amount of the transactions, including shipping cost and tax. If no value is specified, the amount will be calculated based on the cost and items number in the transaction.
- tax (string optional variable) — the sum of all taxes for this transaction.
- shipping (optional string variable) — the delivery cost of the order.
- coupon (optional string variable) — a coupon or a promo code that was used at checkout. Can be specified both for the entire order and for individual products.
- Sent events will affect the bounce rate.
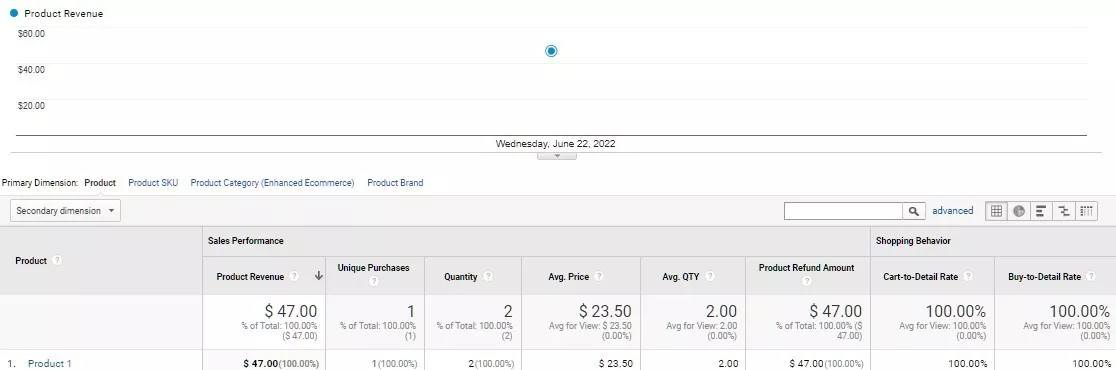
Result
In the "Product performance" report will appear information on sales by products:
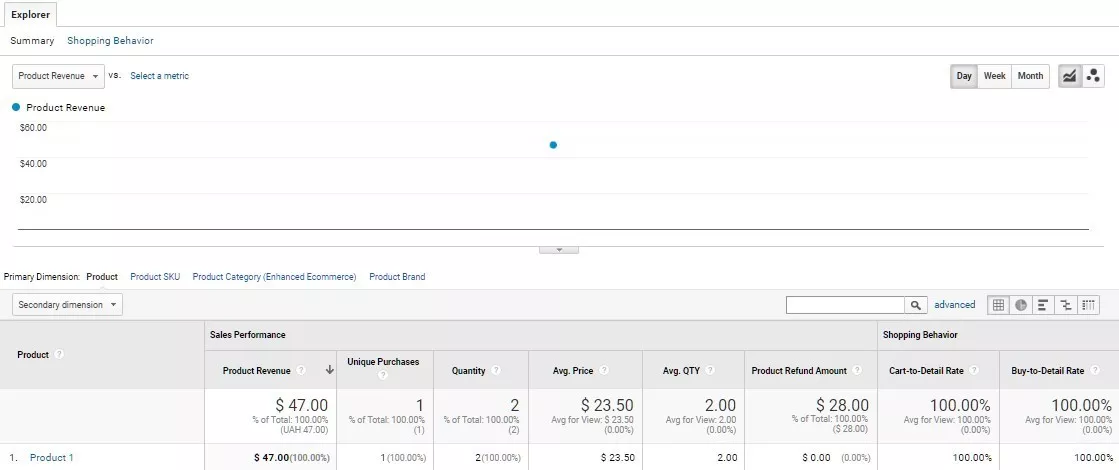
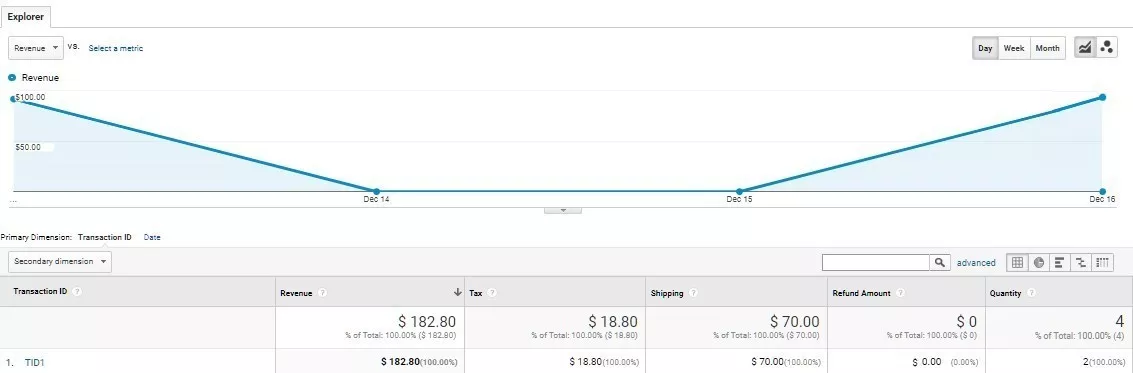
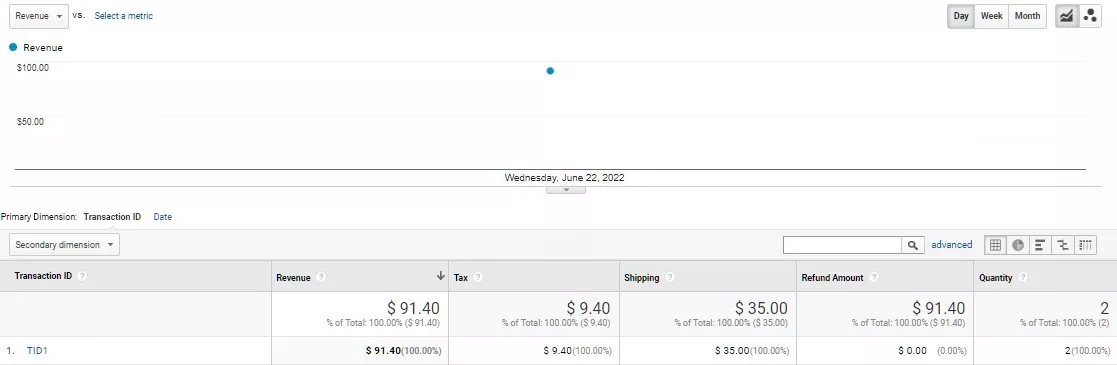
The "Sales Performance" report displays all sent data by transactions:
![]()
When you click on the ID, the products in that transaction are displayed:
![]()
The Product List Performance report contains data on which product was purchased from which list:
When you click on the name we get the same data, but in the goods section of this list:
The "Marketing" — "Order Coupon" report will show data on the use of coupons/promocodes within the order:
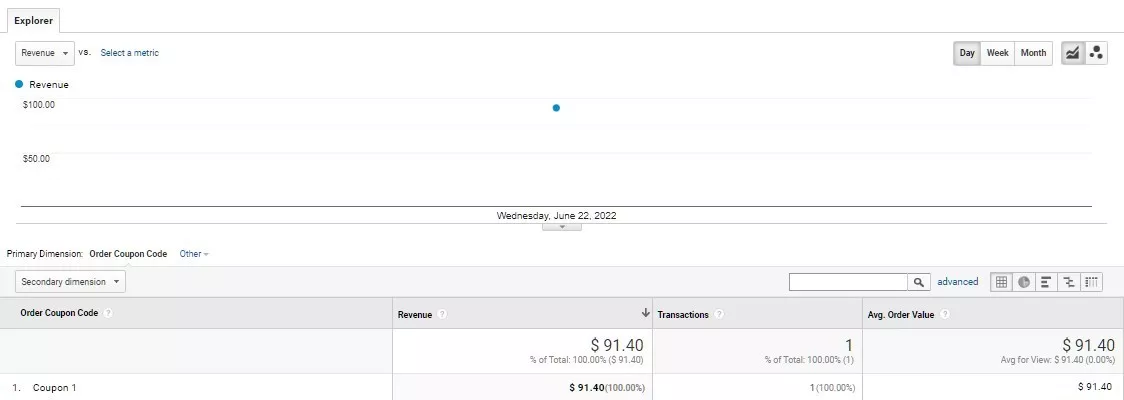
The "Income" value in this case is equal to the full transaction amount:
![]()
In the report "Marketing" — "Product Coupon" will appear data on the use of coupons/promocodes in the context of products:
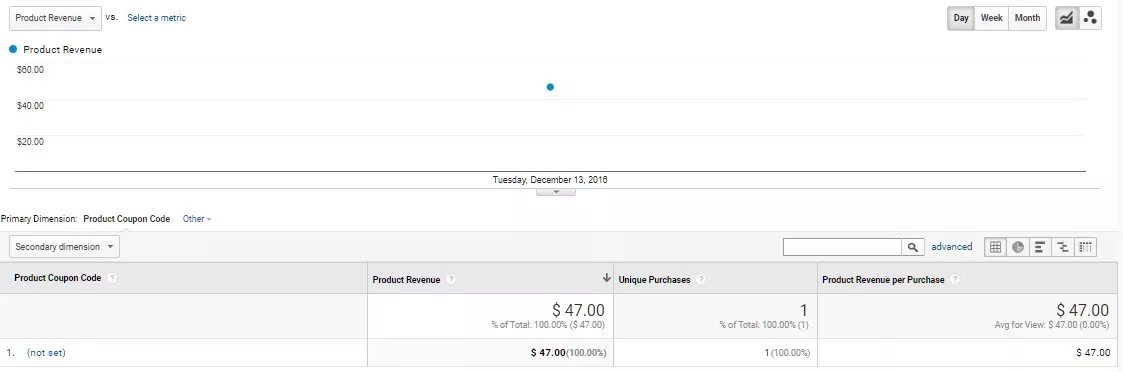
The value of the "Product Income" indicator is equal to the similar indicator in the "Product Performance" report.
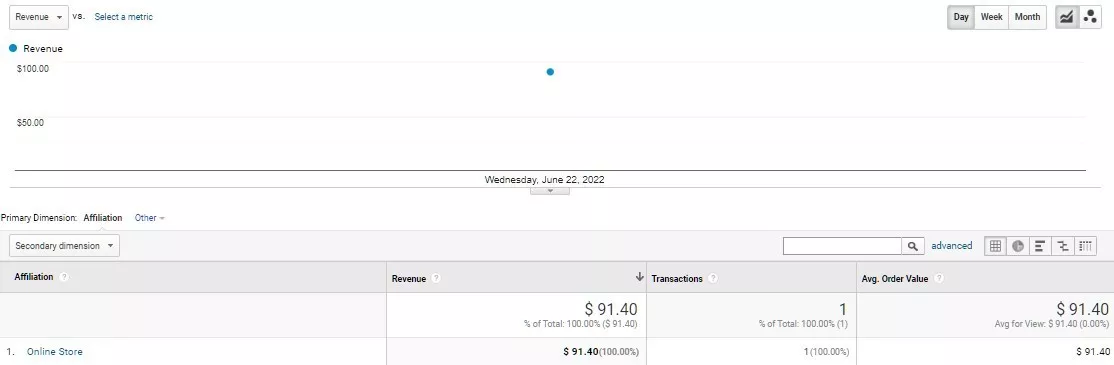
The "Marketing" — "Affiliate Code" report shows data on stores branches where transactions were made (names are taken from the affiliation variable):
Within the same session, the same transaction is not counted a second time:
![]()
However, there are two corresponding events:
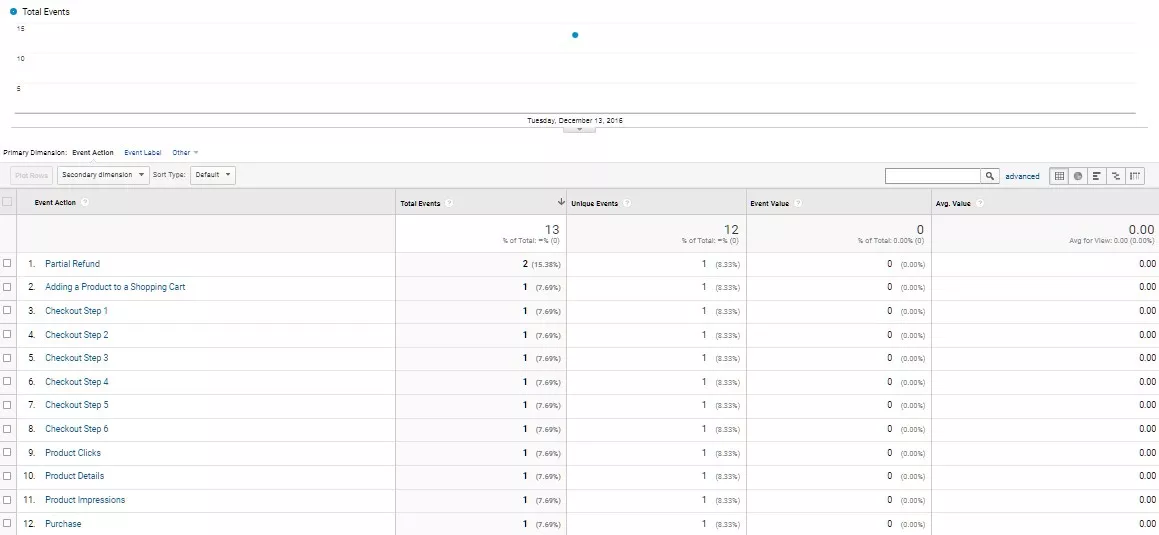
If you send transaction data with the same identifier to analytics, the corresponding figures will be added together:
This is why it is very important that when you reload the page this code is not displayed again.
9. Refunds
This is about tracking cancelled transactions or returning certain items. Cancelled transactions are possible if no more than six months have passed since the transaction date. If the specified transaction ID is not found, the request will be ignored.
If the site does not have transaction cancellation functionality, this data can be sent directly from the internal system using Measurement Protocol.
Full refund
If you cancel the purchase completely, it is enough to specify the transaction ID.
Example code for a complete transaction cancellation from a previous event in GTM:
<script>
window.dataLayer = window.dataLayer || [];
dataLayer.push({
  'ecommerce': {
    'refund': {
      'actionField': {'id': 'TID1'}
    }
  },
  'event': 'gtm-ee-event',
  'gtm-ee-event-category': 'Enhanced Ecommerce',
  'gtm-ee-event-action': 'Full Refund',
  'gtm-ee-event-non-interaction': 'False',
});
</script>
Example code in GTag:
<script>
gtag('event', 'refund', { 'transaction_id': 'TID1' })
</script>
Code description and variables
- id (string mandatory variable) — the cancelled transaction identifier.
- The events sent will affect the bounce rate.
Result
In the Product List Performance report, the data does not change:

In the report "Product Performance" the value of the indicator "Product Refund Amount" has been changed:
In the "Sales Performance" report the value of the "Refund Amount" indicator has been changed:
In this case, this value is the same as the income indicator for this transaction.
Returns of certain items
When returning certain products, you must specify the transaction ID, the ID and the quantity of each of the returned products in that transaction.
Example code in GTM for a transaction with TID2 and a product with ID2 (the second product from the Product Impressions event):
<script>
window.dataLayer = window.dataLayer || [];
dataLayer.push({
  'ecommerce': {
    'refund': {
      'actionField': {'id': 'TID2'},
      'products': [
            {'id': 'ID2', 'quantity': 1}
       ]
     }
  },
  'event': 'gtm-ee-event',
  'gtm-ee-event-category': 'Enhanced Ecommerce',
  'gtm-ee-event-action': 'Partial Refund',
  'gtm-ee-event-non-interaction': 'False',
});
</script>
Example code in GTag:
<script>
gtag('event', 'refund', {
  'transaction_id': 'TID2',
  'items': [
    {
      'id': 'ID2',
      'quantity': 1
    }
  ]
});
</script>
Code description and variables
- id in the actionField (string required variable) — transaction identifier in which the products are returned.
- id in the products array (string required variable) — identifier of the returned products.
- quantity (mandatory variable, always an integer) — returned products number.
- The sent events will affect the bounce rate.
Result
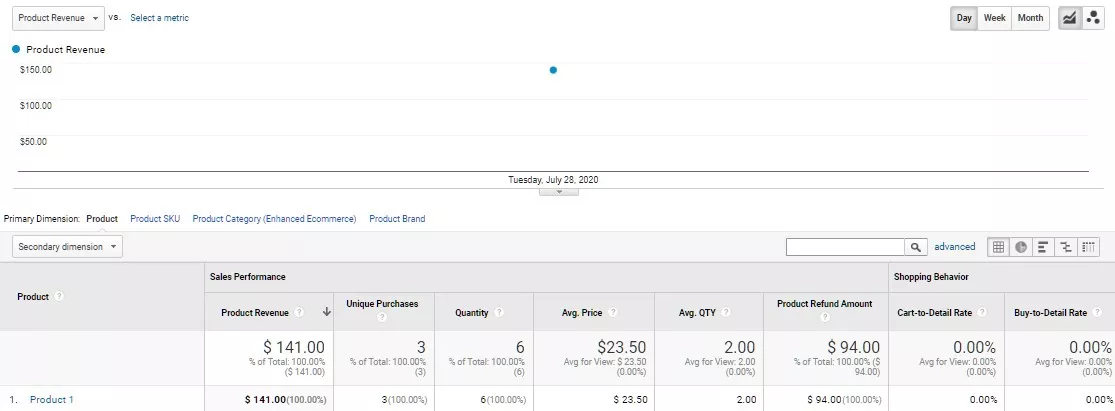
In the “Product Performance” report, the “Product Refund Amount” value became equal to the one item price, since only one item was returned:
In the "Sales Performance" report, the "Refund Amount" value indicator is equal to the price per unit of the product:
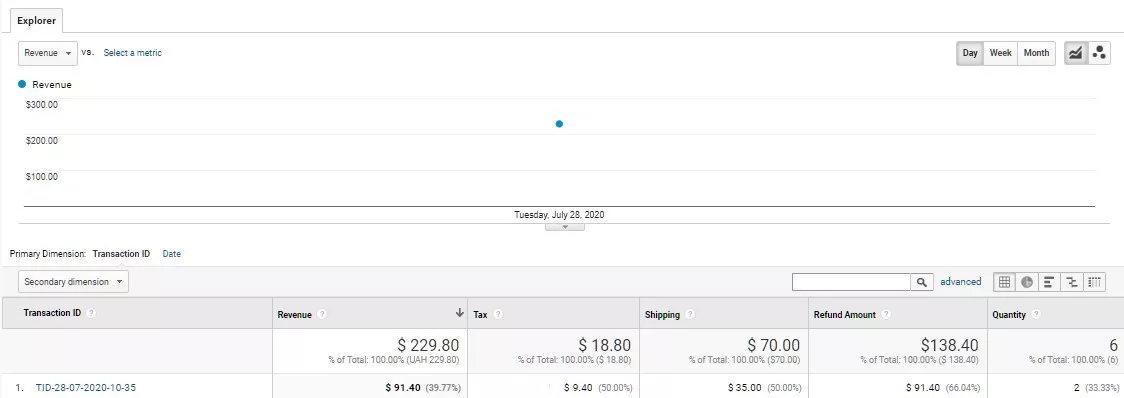
For a full refund, it was equal to the full transaction value.
10. Promotion Impressions
Tracking allows you to get data about the number of times an internal advertising campaign's banner has been displayed.
The implementation is similar to the Product Impressions event: either we send data on all the internal ad elements on the page, or only those that have been caught in the visible area.
Actions with popups are completely similar to banners.
Example code in GTM:
<script>
window.dataLayer = window.dataLayer || [];
dataLayer.push({
  'ecommerce': {
    'promoView': {
      'promotions': [
      {
        'id': 'PromoID1',
        'name': 'Promo 1',
        'creative': 'Banner 1',
        'position': 'slot1'
      },
      {
        'id': 'PromoID2',
        'name': 'Promo 2',
        'creative': 'Banner 1',
        'position': 'slot2'
      }]
    }
  },
  'event': 'gtm-ee-event',
  'gtm-ee-event-category': 'Enhanced Ecommerce',
  'gtm-ee-event-action': 'Promotion Impressions',
  'gtm-ee-event-non-interaction': 'True',
});
</script>
Example code in GTag:
<script>
gtag('event', 'view_promotion', {
  'promotions': [
    {
      'id': 'PromoID1',
      'name': 'Promo 1',
      'creative_name': 'Banner 1',
      'creative_slot': 'slot1'
    },
    {
      'id': 'PromoID2',
      'name': 'Promo 2',
      'creative_name': 'Banner 1',
      'creative_slot': 'slot2'
    }
  ]
});
</script>
Code description and variables
- id (string mandatory variable) — the ID of the shown internal advertising campaign.
- name (string mandatory variable) — the name of the shown internal advertising campaign.
- creative (string optional variable) — name of the element of the shown internal advertising campaign.
- position (string optional variable) — position of the element of the shown internal advertising campaign.
- Sent events will not affect the bounce rate.
In the case of the mandatory variable, you must specify at least one of two values: the company name or its identifier.
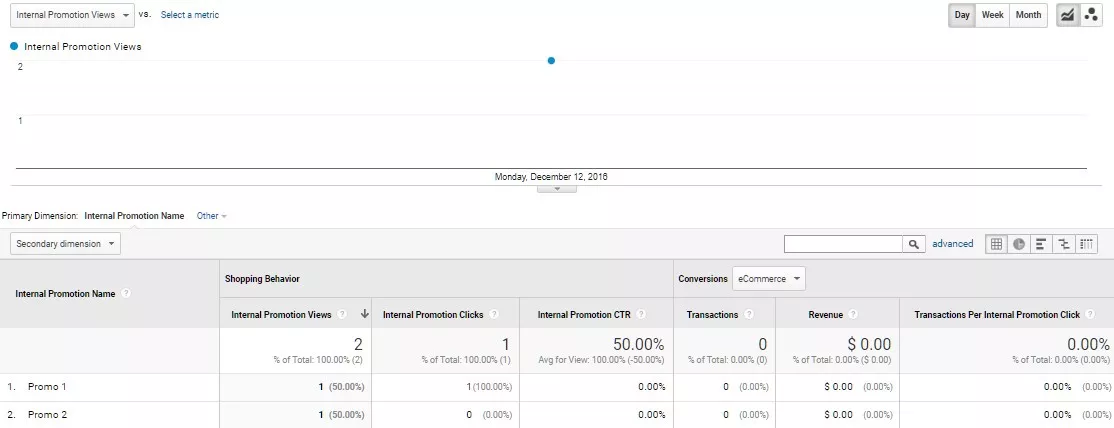
Result
When you send the data in the report "Marketing" — "Internal Promotion" we get the numbers of banner impressions in the context of internal campaigns:

11. Promotion Clicks
It's about sending data about clicks on banners of an internal advertising campaign. The data obtained will allow you to determine the most effective banners and their location on the pages of the site.
Example code in GTM:
<script>
window.dataLayer = window.dataLayer || [];
dataLayer.push({
  'ecommerce': {
    'promoClick': {
      'promotions': [{
        'id': 'PromoID1',
        'name': 'Promo 1',
        'creative': 'Banner 1',
        'position': 'slot1'
      }]
    }
  },
  'event': 'gtm-ee-event',
  'gtm-ee-event-category': 'Enhanced Ecommerce',
  'gtm-ee-event-action': 'Promotion Clicks',
  'gtm-ee-event-non-interaction': 'False',
});
</script>
Example code in GTag:
<script>
gtag('event', 'select_content', {
  'promotions': [
    {
      'id': 'PromoID1',
      'name': 'Promo 1',
      'creative_name': 'Banner 1',
      'creative_slot': 'slot1'
    }
  ]
});
</script>
Code description and variables
- id (string mandatory variable) — the ID of the clicked internal advertising campaign.
- name (string mandatory variable) — the clicked internal advertising campaign name.
- creative (optional string variable) — the clicked element name of the internal advertising campaign.
- position (string optional variable) — the clicked element position of the internal advertising campaign.
- The sent events will affect the bounce rate.
In the case of a mandatory string variable, at least one of two values should be specified: the name of the campaign shown, or its identifier.
Result
After sending this data, the "Marketing" — "Internal Promotion" report will change the values of "Clicks (internal campaign)" and "CTR (internal campaign)":
In order for the data on sales in the context of internal advertising campaigns to appear in this report, in the events Product Impressions, Product Clicks and Product Details you must specify the corresponding campaign name in the List variable.
The Product Clicks event code will look like this:
<script>window.dataLayer = window.dataLayer ||
[];dataLayer.push({ 'ecommerce': {
'currencyCode': 'USD',   'click': {
'actionField': {'list': 'Promo 1'},
'products': [{      'name': 'Product 1',
'id': 'ID1',      'price': '23.5',
'brand': 'Brand 1',      'category':
'Category 1/Subcategory 11',      'variant': 'Variant 1',
'position': 1     }]   } }, 'event': 'gtm-ee-event',
'gtm-ee-event-category': 'Enhanced Ecommerce',
'gtm-ee-event-action': 'Product Clicks',
'gtm-ee-event-non-interaction': 'False',});</script>
When submitting ordering data (Purchases) in the promo variable, you do not need to specify the advertising campaign name.
The report "Marketing" — "Internal Promotion" will have the following data:
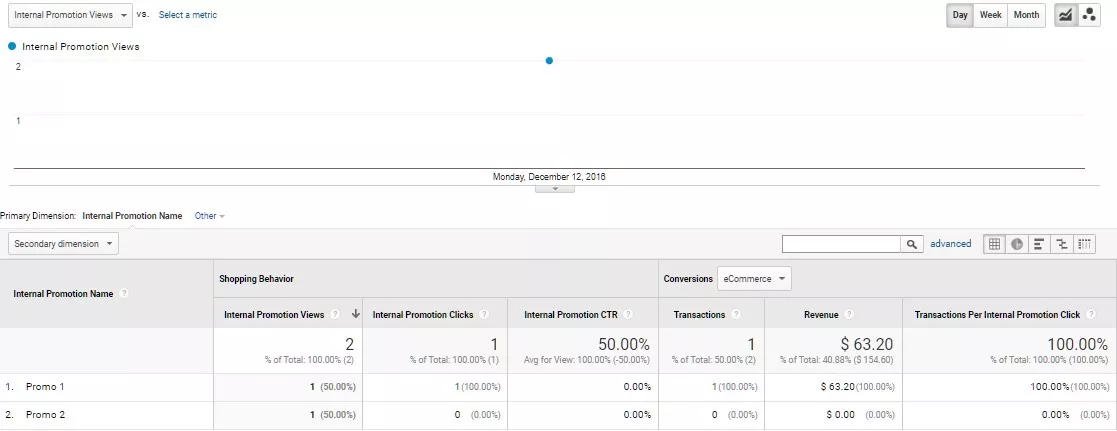
The executed transaction parameters:
![]()
Remember
What you can find out by setting up all advanced e-commerce events:
- How users move through the configured sales funnel.
- How the product attractiveness changes for users when it's displayed in different lists or on different positions in the same list.
- Which banners are most effective at a given location on the page.
- What options bundles selected by users at checkout are the most popular.
- Which product option is most frequently purchased or returned.
- Identification of products which cards are most frequently clicked on, but less frequently added to cart and/or purchased.
All data is displayed in reports for this type of data, and if standard reports are not enough — you can create your own and group in it an individual parameters and indicators set, as in the item "Removing goods from the cart”.

 8
8
 2
2
 6
6
Recommended theme posts
Related Articles
Display Advertising Effectiveness Analysis: A Comprehensive Approach to Measuring Its Impact
In this article, I will explain why you shouldn’t underestimate display advertising and how to analyze its impact using Google Analytics 4
Generative Engine Optimization: What Businesses Get From Ranking in SearchGPT
Companies that master SearchGPT SEO and generative engine optimization will capture high-intent traffic from users seeking direct, authoritative answers
From Generic to Iconic: 100 Statistics on Amazon Marketing for Fashion Brands
While traditional fashion retailers were still figuring out e-commerce, one company quietly revolutionized how U.S. consumers shop for everything from workout gear to wedding dresses