How to Set Up Form Submission Tracking in Google Analytics 4
Trying to set up form submissions as conversions, but not sure which method is best for your website?
I have prepared a step-by-step guide on how to set up form submission conversion events using Google Analytics and Google Tag Manager.
At the end of the article, you’ll find a helpful tool to check that the tags you’ve set up work correctly in Google Tag Manager. And it works even if you haven’t implemented the GTM code on your site yet.
The main ways of tracking form submissions
Each website may have a unique solution for tracking form submission events, as it depends on how the form is built into the site code and how the data is submitted. These are some common methods of setting up form submission tags:
- Using the form submission trigger in Google Tag Manager.
- Tracking conversions from the thank you popup.
- Using the ajaxSuccess method.
- Tracking conversions on a separate “thank you” page.
- Tracking conversions by form submission click.
To choose the best method from these five, you should first test the results of the form submission. That is, go to the site and fill in the form as your user would, and see what happens on the site after it has been submitted.
This can be done using the preview mode in GTM and/or a real-time report or using DebugView in GA4, and it will help to choose the most suitable option for your site.
Let me explain the other two in more detail.
1. Setting up form submission conversion tracking in GA by using a “thank you” page
If a new “thank you” page opens on your website when the form is submitted, congratulations. You can now set up events quickly and easily.
Important. The URL of your “thank you” page must be completely unique. This means that there should only be one page with this address on the site, and no one can get to it without filling out a form.
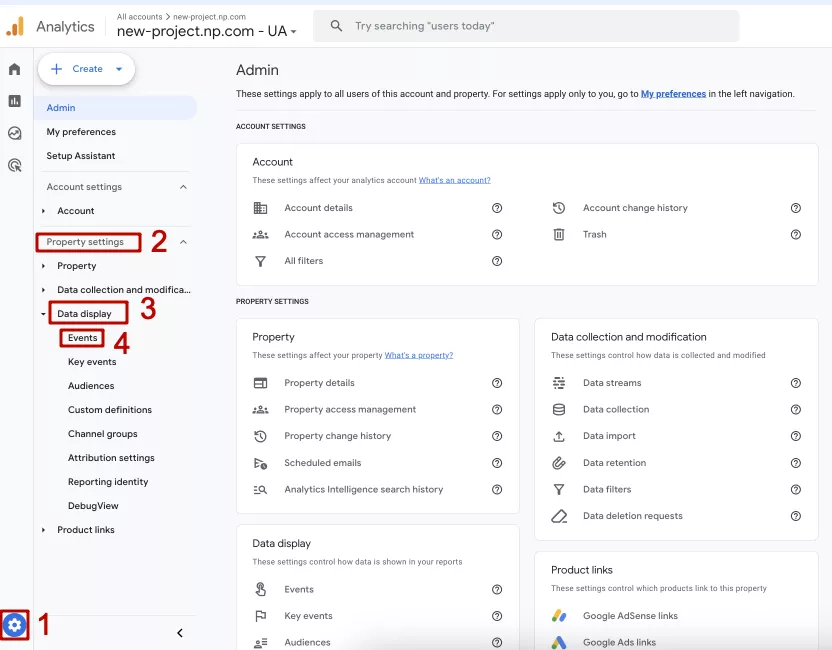
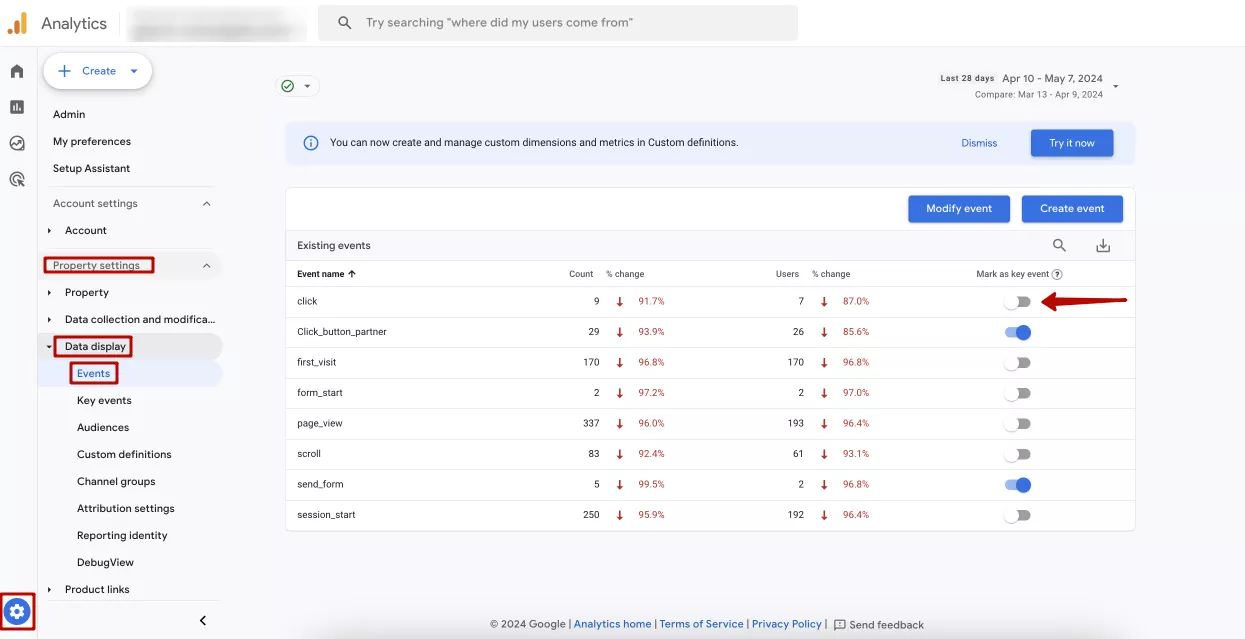
You can do this directly in Google Analytics 4 without using GTM. Go to the Admin tab in your Google Analytics 4 account. In the Property settings section, click on Data display and Events.
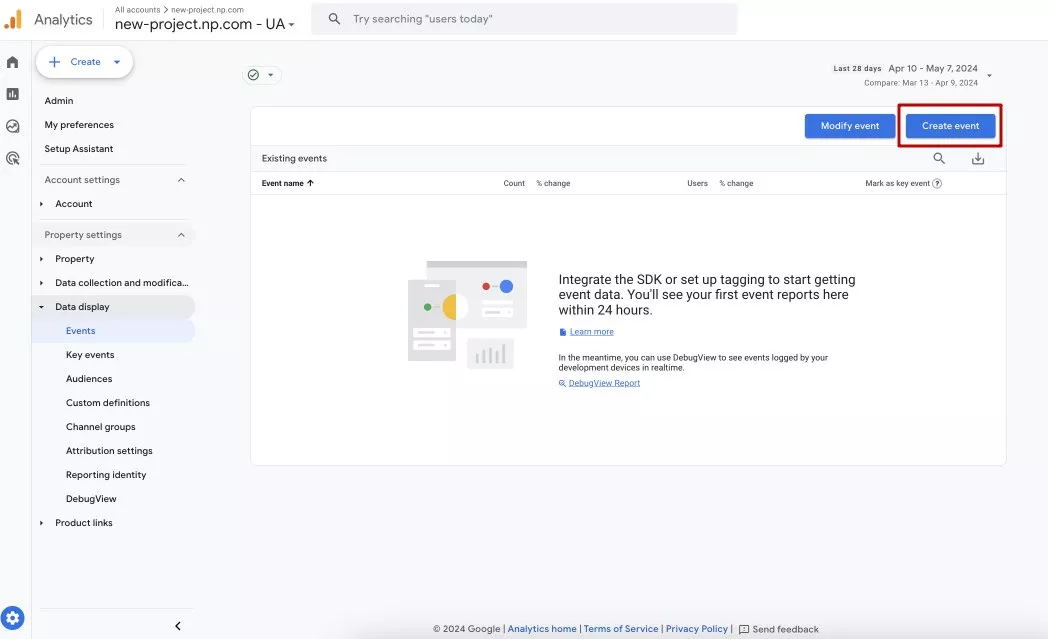
Click Create event.
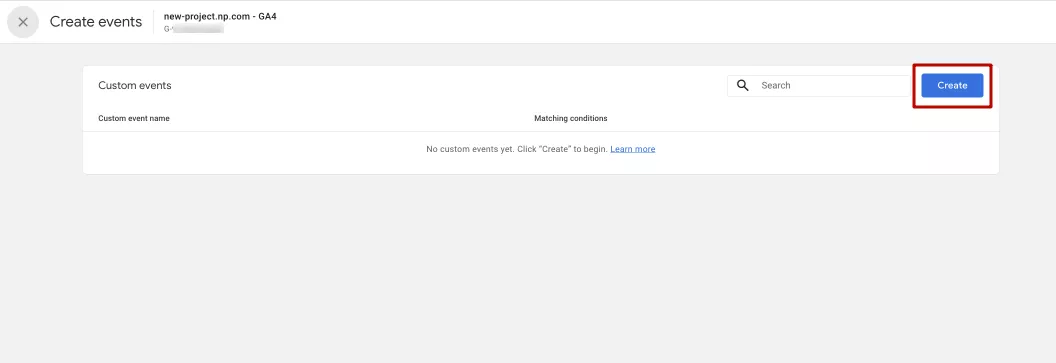
Next click Create.
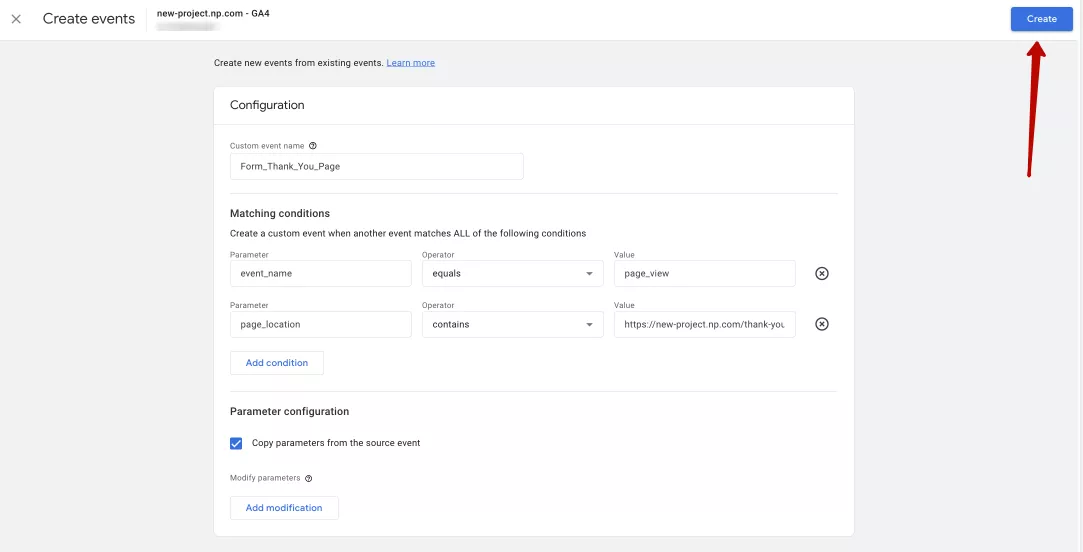
Now enter a name for the event. You can either choose one of the names recommended by Analytics for default events or enter your own.
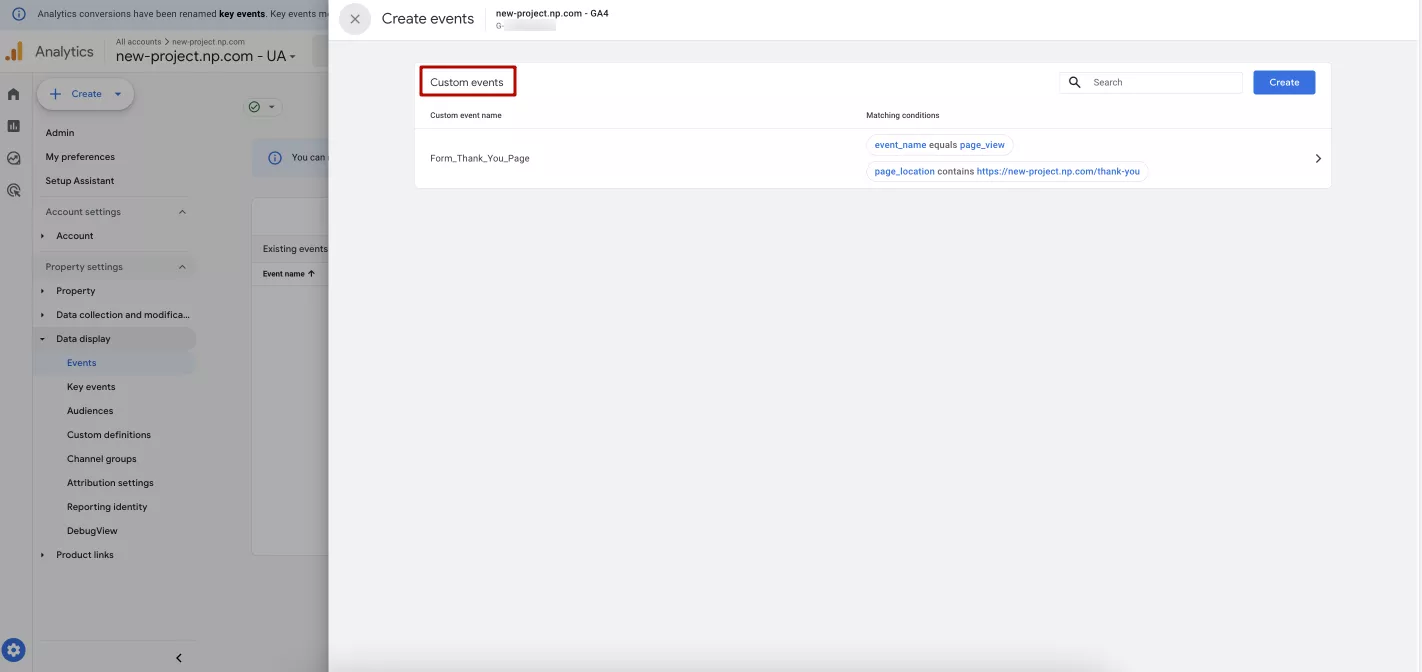
A name similar to “generate_lead” would be appropriate. In the example, I added the name “Form_Thank_You_Page” to clarify what the event will do.
Now, let’s add two conditions to trigger the event:
- Add the parameter event_name, the operator equals, and the value page_view.
- Add the parameter page_location, the operator contains, and the value thank-you/thank_you, which would be a unique part of the link, or the full link address.
Finally, click Create, and the event is created.
Next, let me show you how to mark the created events as conversions, so you can check how they’re performing in a real-time report or using DebugView.
Note that a new event will appear in the custom events table but won’t appear in existing events until Analytics processes the event. It may take some time for the event data to appear in reports.
Check out our glossary for key online advertising definitions to enhance your marketing knowledge!
2. Setting up conversion tracking with a form submission click
In this method, there are three ways to set a trigger: the button text, the button class from the code (class is a parameter set in the code for a specific element on the page), and the button class from the GTM preview mode.
If your site has a thank you popup or just a thank you message that appears next to the form, it will not change the URL of the page after the user submits their data. In such situations, this second method may be appropriate.
This method is also suitable for you if you don’t have a separate thank you page if GTM cannot identify the form submission event or the form at all on the page, or if the element visibility event does not work.
That said, I do not recommend this method. It’s better to ask the developers to fix the form code on the site so that the previous methods from the list can be used, as they are more accurate in terms of results. However, this option can be a good last resort if you can’t contact the developers.
Is the visibility setting for an element on a page not working? This happens when the “thank you” text is hidden in the page code. This means that it is always present on the page and only changes its status to “visible” when submitted.
So in GTM, you should set up an event when the Submit form button is clicked. I would add that the button should contain the text that users click on when they submit a form on your site.
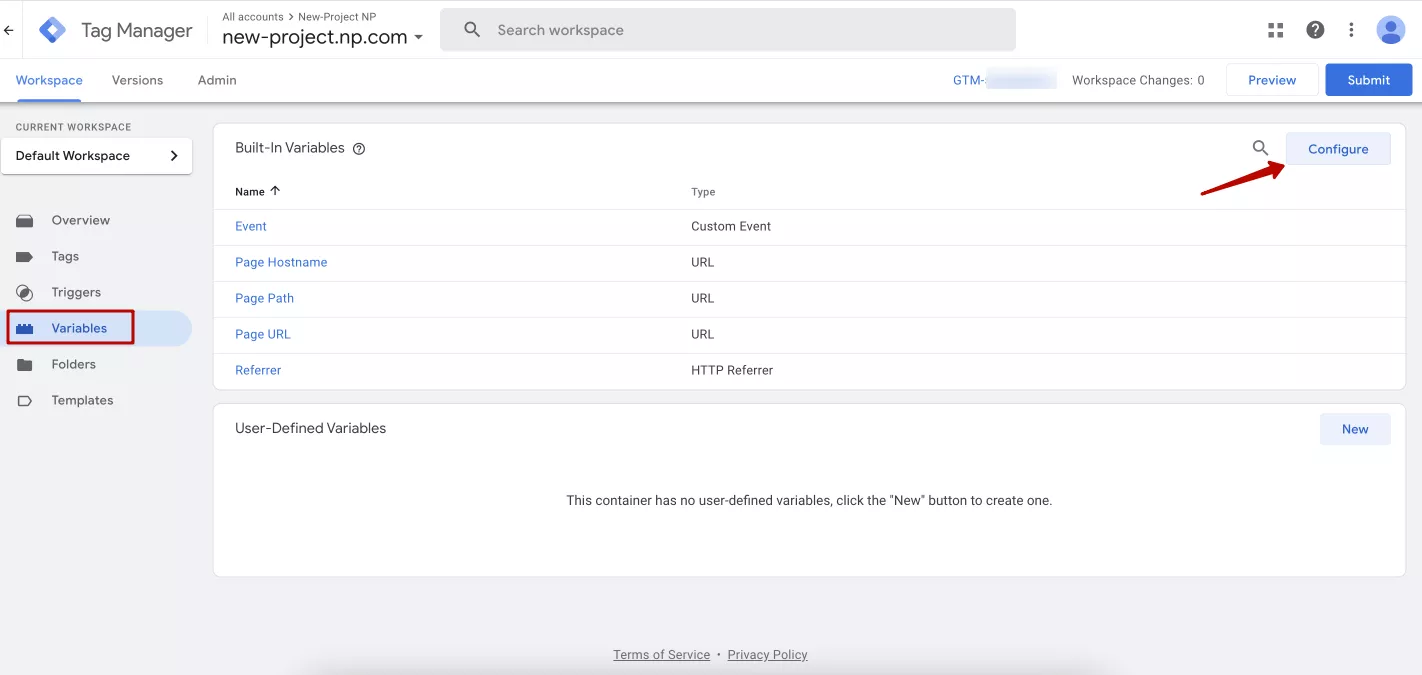
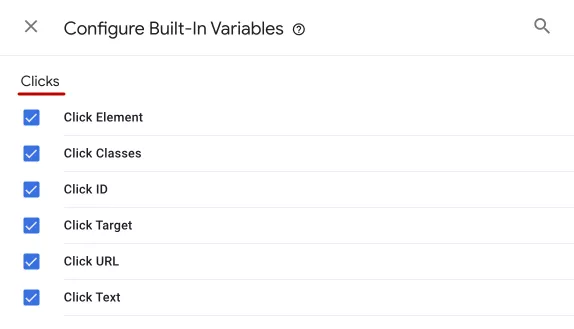
To get started, go to Variables in GTM and make sure you have added all the variables from the Clicks subsection.
In a new window, scroll down to Clicks and check all the items in this subsection.Go to Triggers and click New.
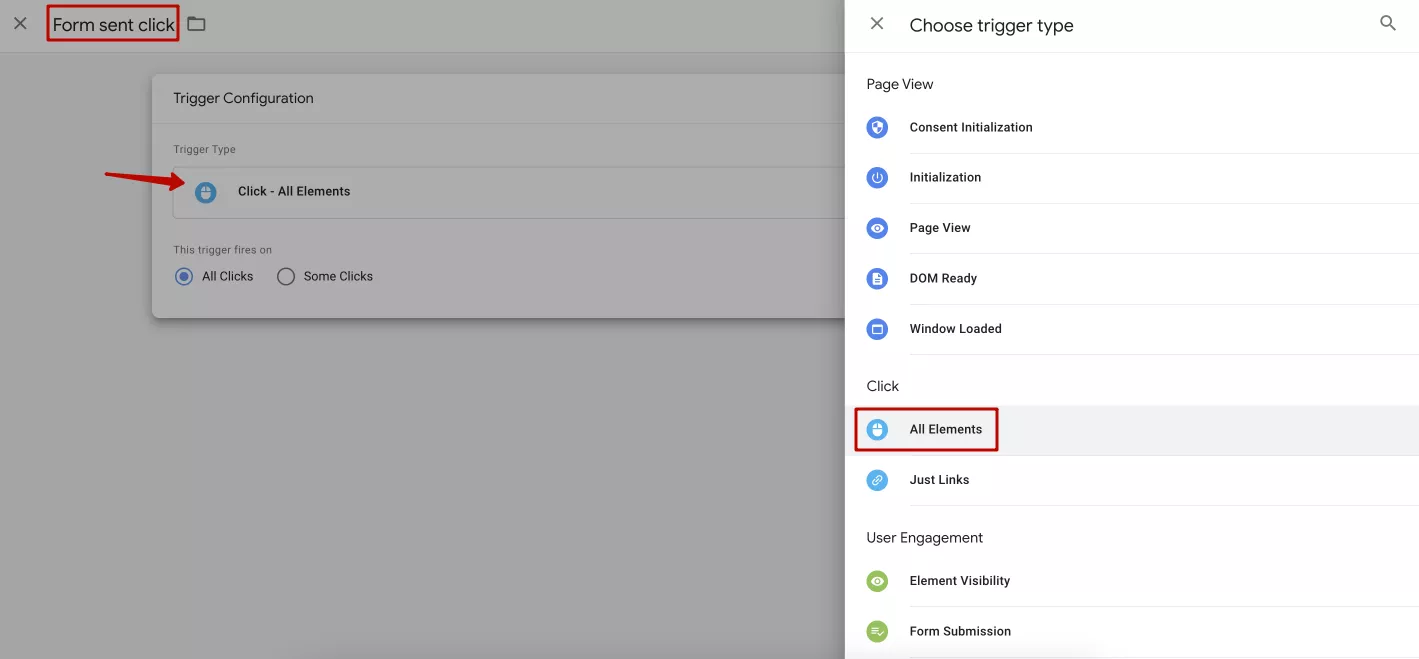
Name the new trigger and select the Click – All Elements type.
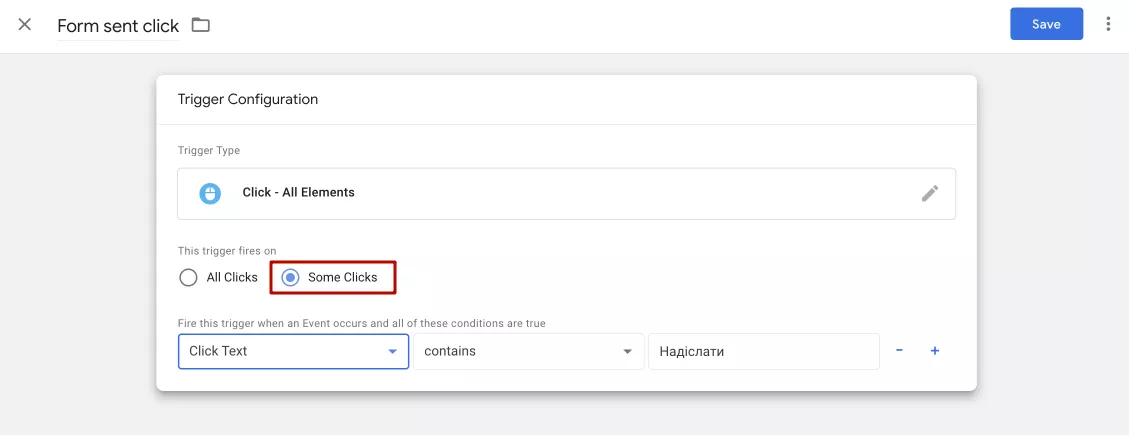
Next, select Some clicks. Here, you need to specify a value that will identify this trigger. If it is unique and not repeated in other forms on your website, you can add the text of the button.
Remember to preview this tag once you have created it to make sure it works correctly.
If the click-on-text tag doesn’t work, you can switch to the click class, but it requires you to find out the class of the button on your page. To do this, right-click on the page, open the page code by clicking Inspect, and extract the class of this element from there.
If this doesn’t help, try getting the class from the preview mode in GTM. Click on the appropriate button and see what happens.
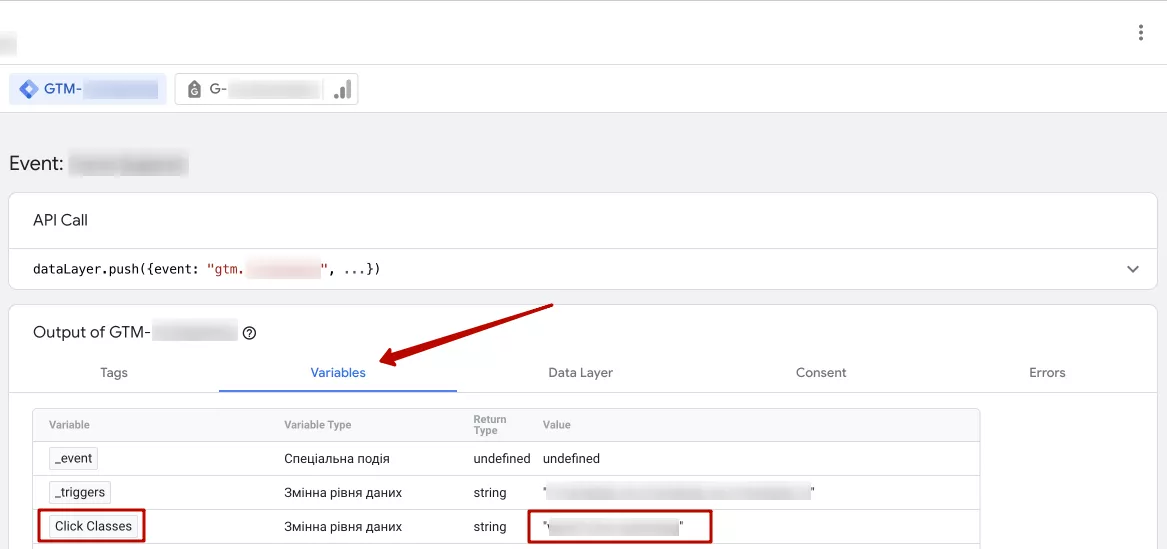
Open the click, go to the Variables tab, and grab the click classes from there.
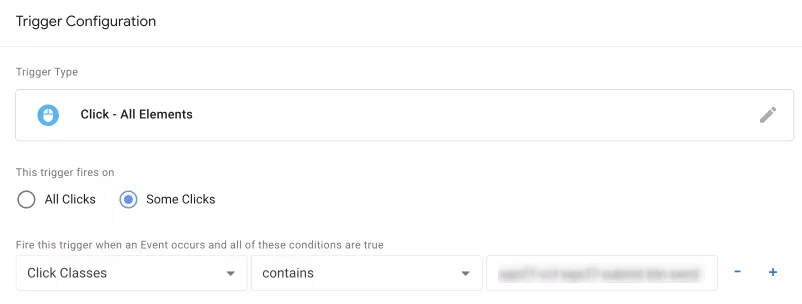
In this case, the trigger settings for the click class will look as follows.
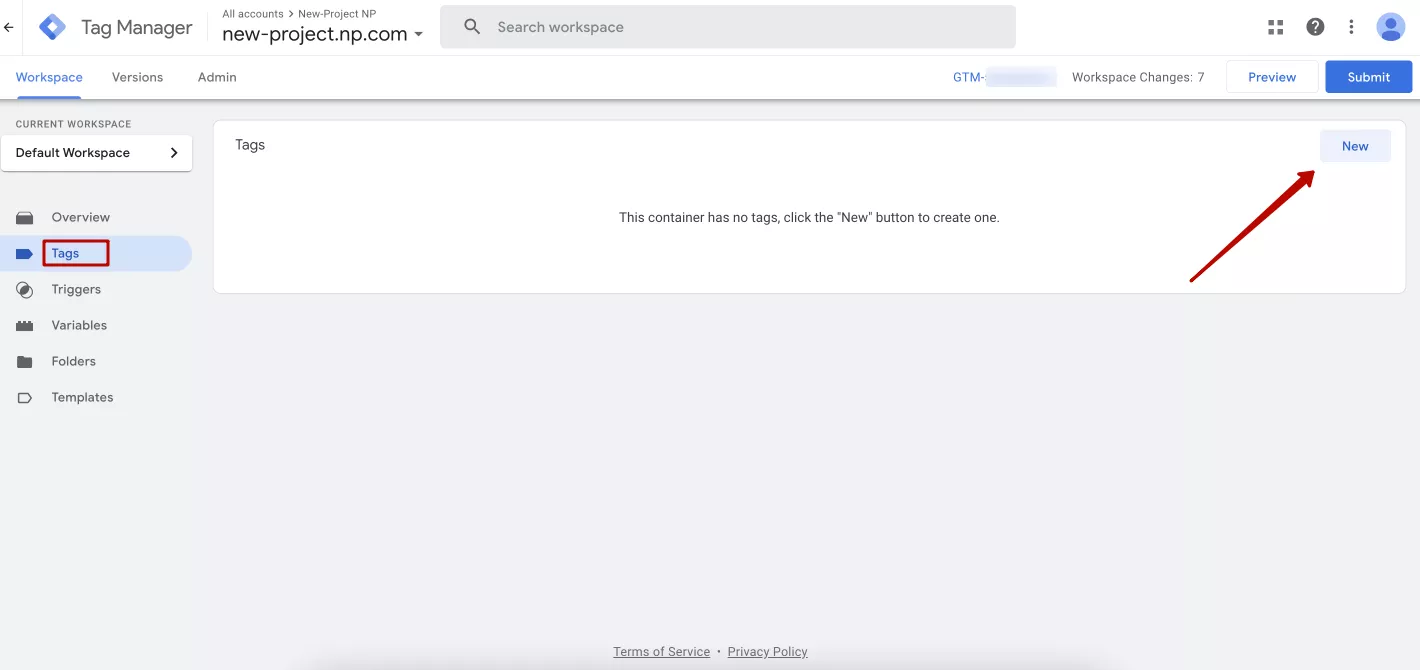
These are the three ways of setting up a trigger for the form submit button. To test its performance, create a tag by going to Tags and clicking on New.
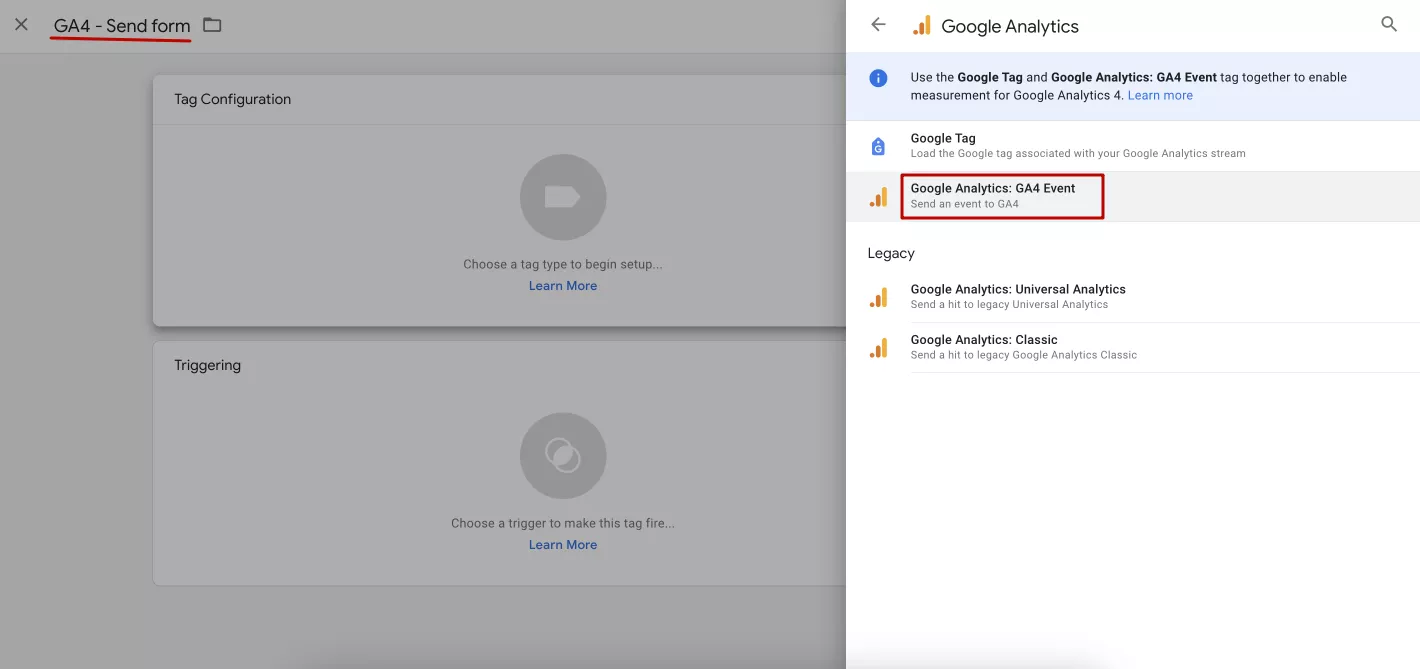
Enter a name and select the Google Analytics tag configuration: GA4 Event.
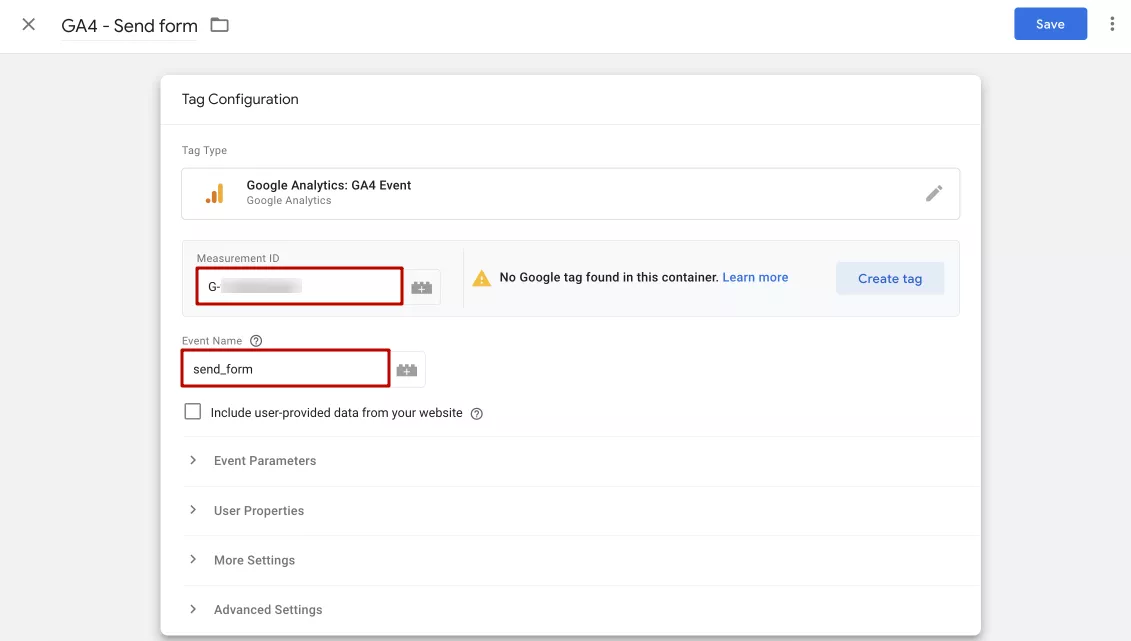
Next, enter the Analytics data stream ID and a name for your event as usual.
The examples were taken from a test account that did not have a Google Tag set up. That’s why you see a message saying it wasn’t found. To avoid this warning message, you should have it set up before creating events.
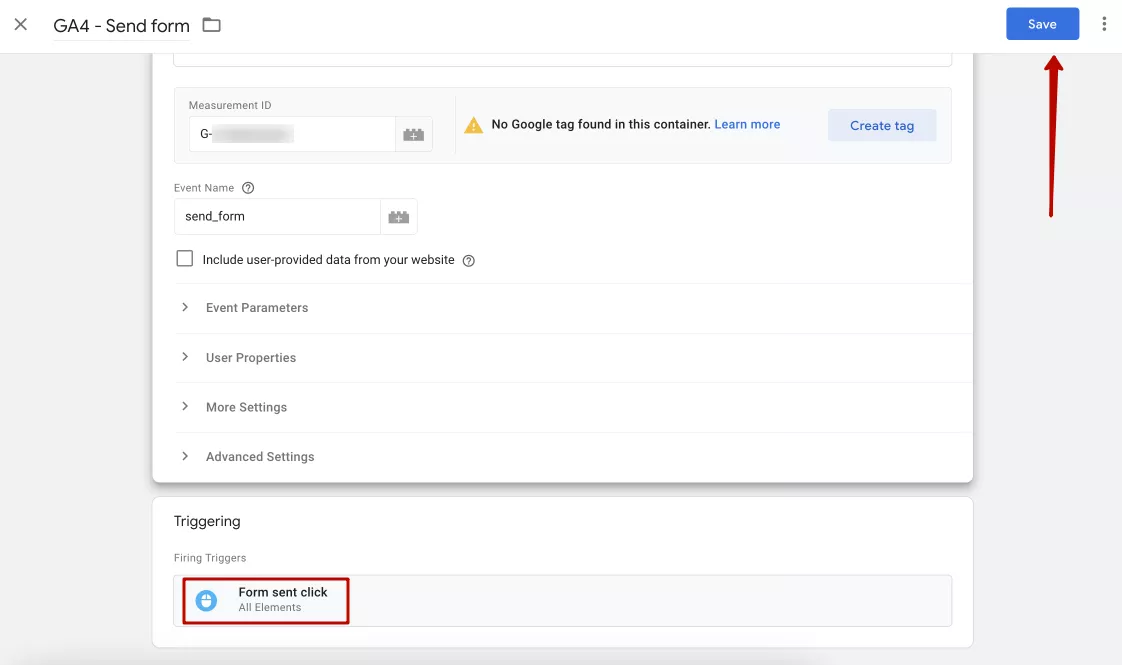
Scroll down, set the preconfigured trigger, and click Save in the top right corner.
The configuration is now complete. Switch to Preview mode to check if your tag is triggered with these settings. If not, make changes to the trigger using one of the three ways described above, and try again.
Setting up a generated event as a conversion in GA4
The easiest way to mark generated events as conversions is to go to Events in Google Analytics 4, as described above. In the Mark as key event column, turn on the toggle button for the event you want to mark.
Sometimes you must wait for the events you have created to be pulled.
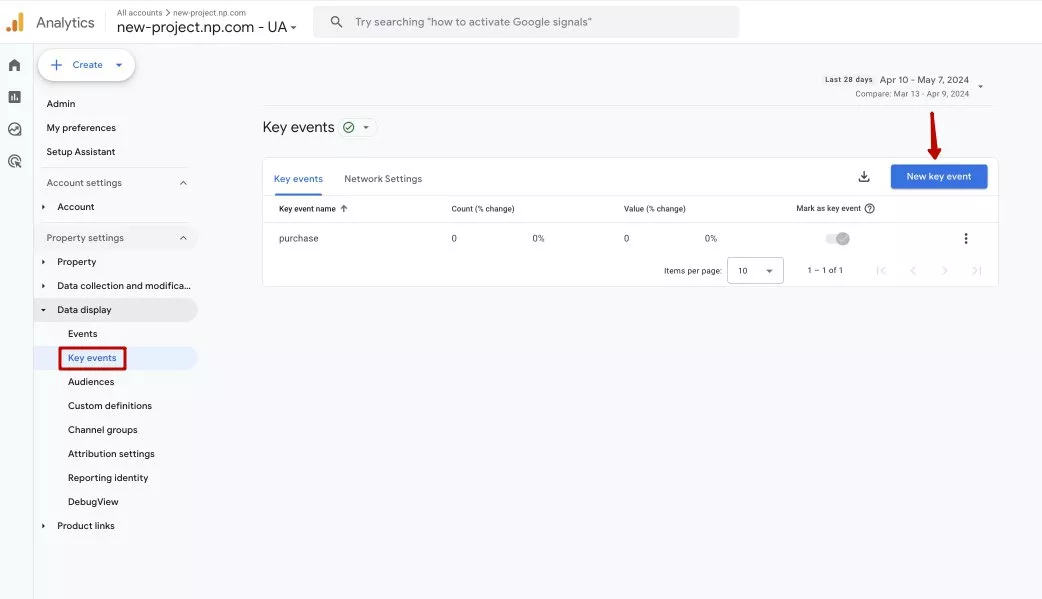
Another option is to do this directly in the Key events section. Click Data display – Key events – New key event.
Enter a name for the key conversion event (similar to the name of the custom event you created earlier) and click Save.
Analytics takes time to process newly created events, so you’ll need to wait a little.
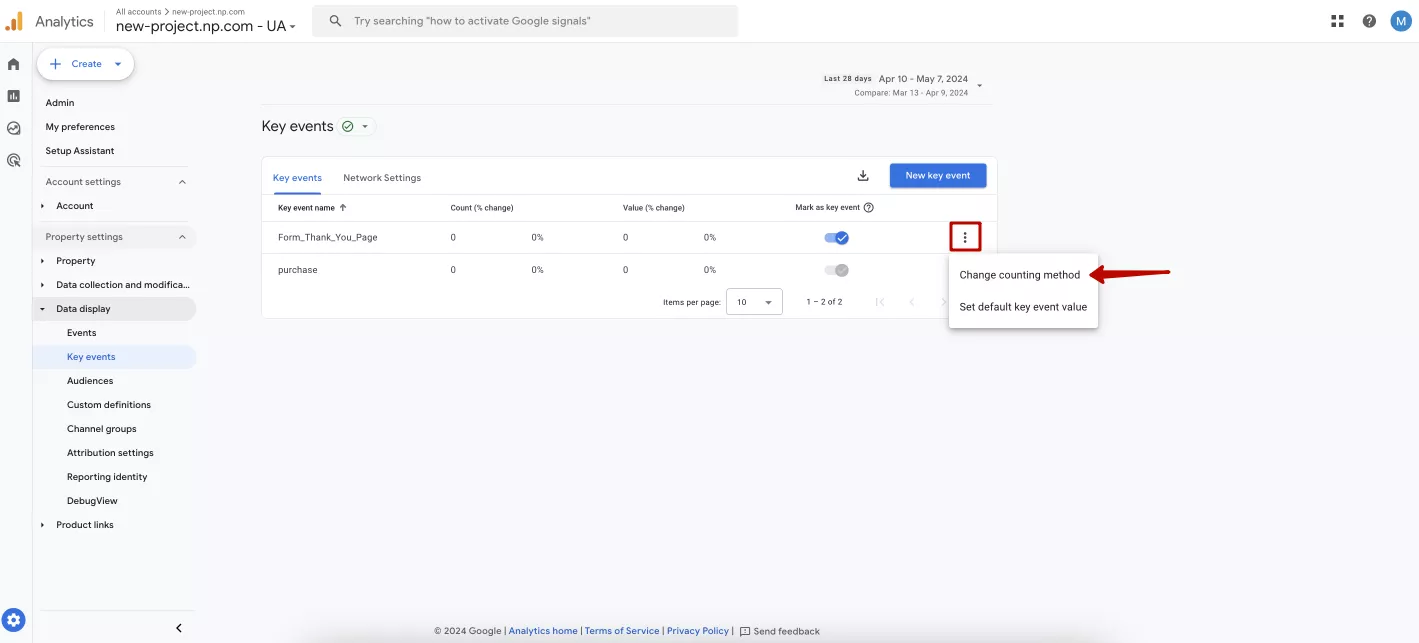
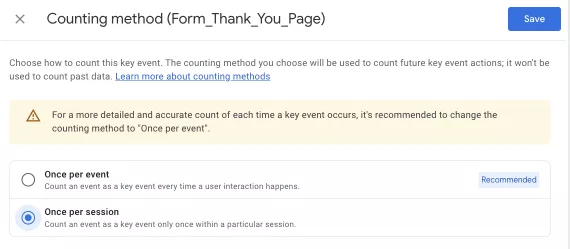
You can also click on change counting method in the created event.
The default is to count conversions once per event. But it may be useful to switch to once per session, for example, if you want to receive one form from the user instead of two accidentally sent forms.
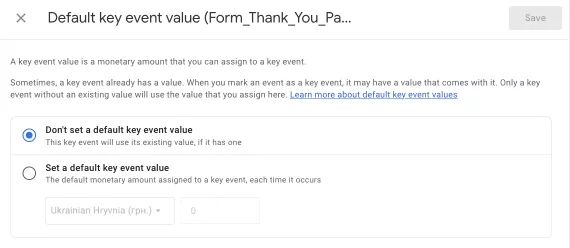
In the counting method settings, you can also add the value of the generated lead. This is useful for reports that show the total value of key events received.
Launching test events on your own or another website
The tool I mentioned at the beginning of this article is the Google Chrome extension Adswerve Data Layer Inspector+. It is an alternative to the well-known Tag Manager Injector, which is no longer available.
Add this extension to your browser, click on it, and check the “Inspect” box.
Next, open the Advanced Options – Add Functionality drop-down list and click on Insert GTM Container.
New fields will open. Enter the ID of your GTM container without the “GTM” part, only the actual values, and the website domain without “https://” where you check the configured events.If you want to test multiple sites at once, tick the box next to RegEx and enter them in the format “site1|site2”.
Then click on Save Settings & Reload Page, and your tag container will be installed on the sites you specified.
Next, go to the GTM container and activate preview mode.
In the top right corner, you will see a message that the container is installed.
In the bottom right corner, you will see a message about your GTM container.
Tip: These steps can be used as a training exercise. To try out the new settings, you can create events on any web page.
However, remember that this is only a test view. The changes will not affect the website’s performance or actual code. Everything you see only happens inside your own browser.
Conclusions
There are many ways to create a form submission event, depending on how the form is configured and what happens after it is submitted. These are the most common methods:
- Use a form submission trigger in Google Tag Manager.
- Track conversions from a “thank you” popup.
- Use the ajaxSuccess method.
- Track conversions on a separate “thank you” page.
- Track conversions by form submission clicks.
However, if you don’t have GTM, you can still set up form submission conversions directly in Google Analytics 4, either by tracking conversions on a separate page or tracking form submission clicks.
For the latter, form submission click-through conversions can be set up in one of three ways:
- By button text.
- By button class from page code.
- By button class from the preview mode in GTM.
You can also set the calculation method and value when marking a conversion event in Google Analytics 4.
Finally, if you want to check if the tags are working correctly, use the Adswerve DataLayer Inspector+ extension.
This tool allows you to check the events configured in the Google Tag Manager container. You can configure this without changing any code on your site or any other site.
Recommended theme posts
Related Articles
Display Advertising Effectiveness Analysis: A Comprehensive Approach to Measuring Its Impact
In this article, I will explain why you shouldn’t underestimate display advertising and how to analyze its impact using Google Analytics 4
Generative Engine Optimization: What Businesses Get From Ranking in SearchGPT
Companies that master SearchGPT SEO and generative engine optimization will capture high-intent traffic from users seeking direct, authoritative answers
From Generic to Iconic: 100 Statistics on Amazon Marketing for Fashion Brands
While traditional fashion retailers were still figuring out e-commerce, one company quietly revolutionized how U.S. consumers shop for everything from workout gear to wedding dresses

