If you want to measure site traffic, conversions, and the success of your advertising strategies, you need to have web analytics. The most affordable and widely used tools for this purpose are Google Analytics and Google Tag Manager.
In this article, I will explain how to create a GA4 and GTM account from scratch and start working with these tools.
Here is an overview of the topics I will cover:
- Creating an account in GA4.
- Creating a data stream in GA4.
- How to provide access to GA4.
- How to set up Google Tag Manager and link it to GA4.
- How to share access to GTM.
Creating an account in GA4
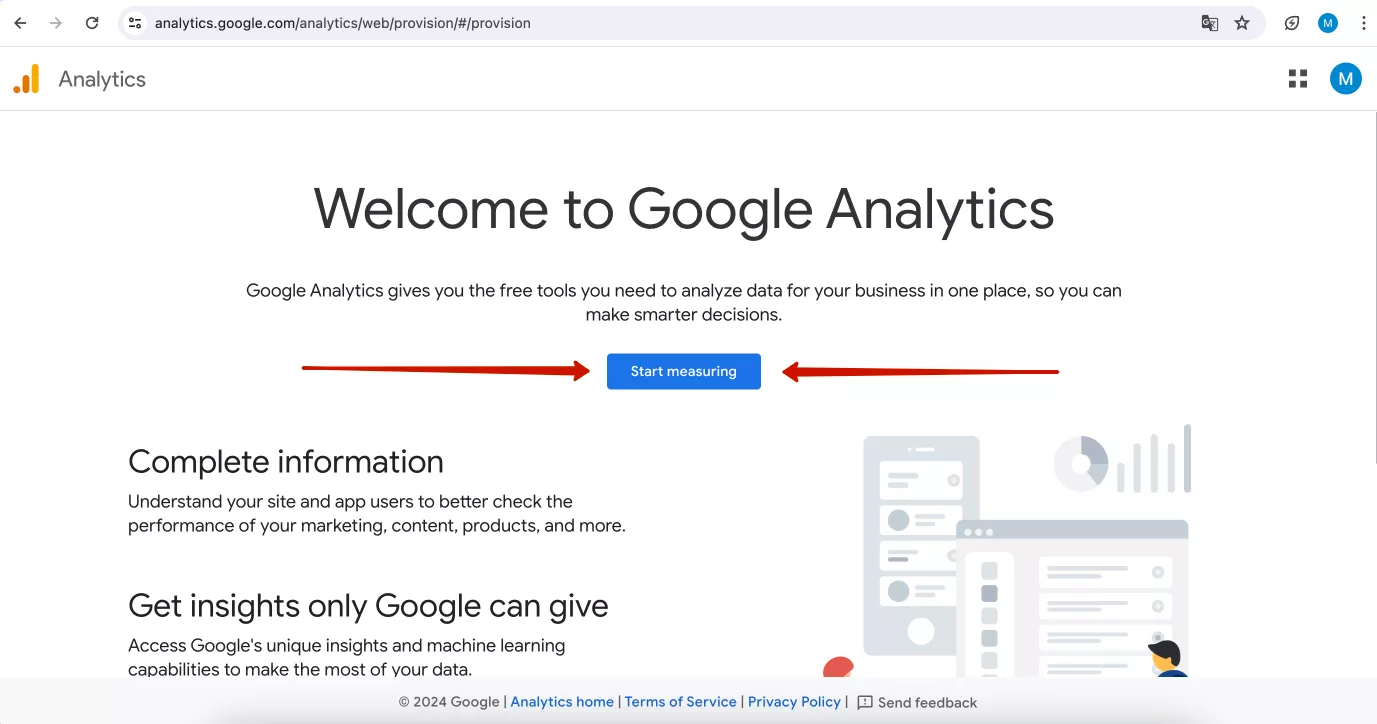
Go to Google Analytics, and create a new Google account or sign in with an existing one. Next, click Start measuring.
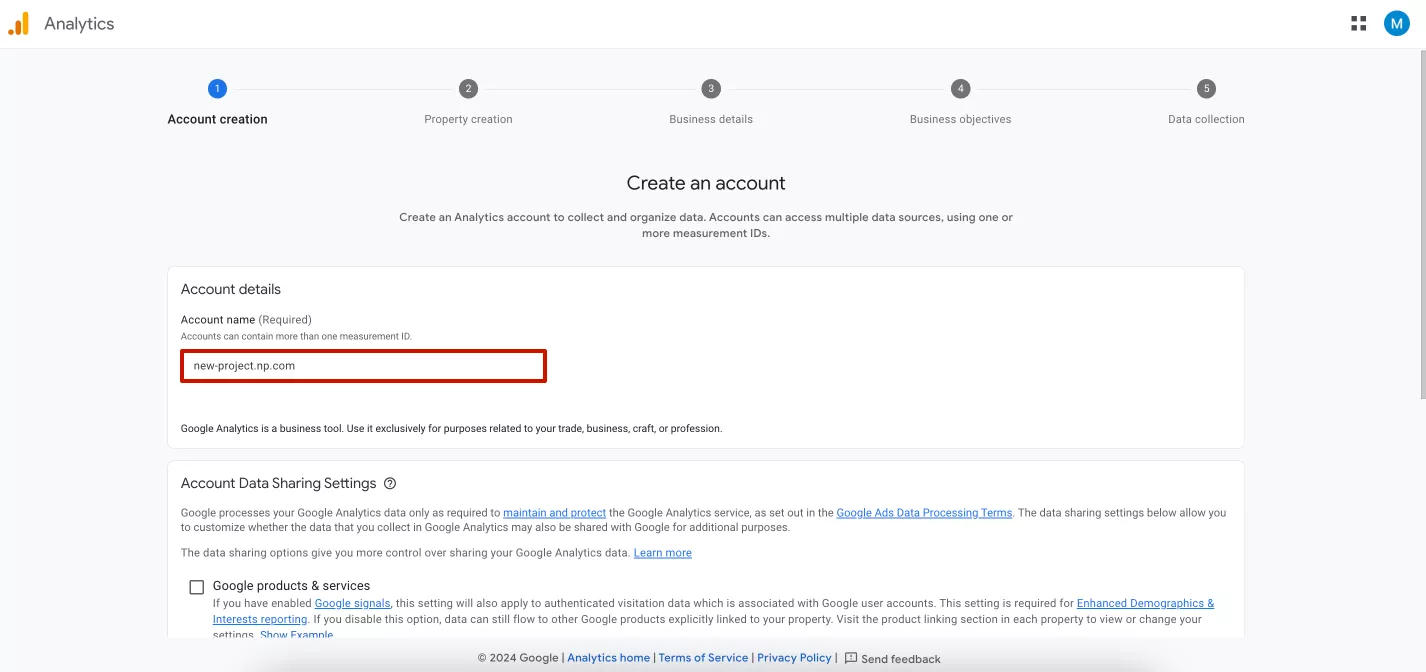
This will open the page to begin registering a new GA4 account. The first step is to enter your account name and specify data sharing settings.
I recommend naming your account after your company name or website domain.
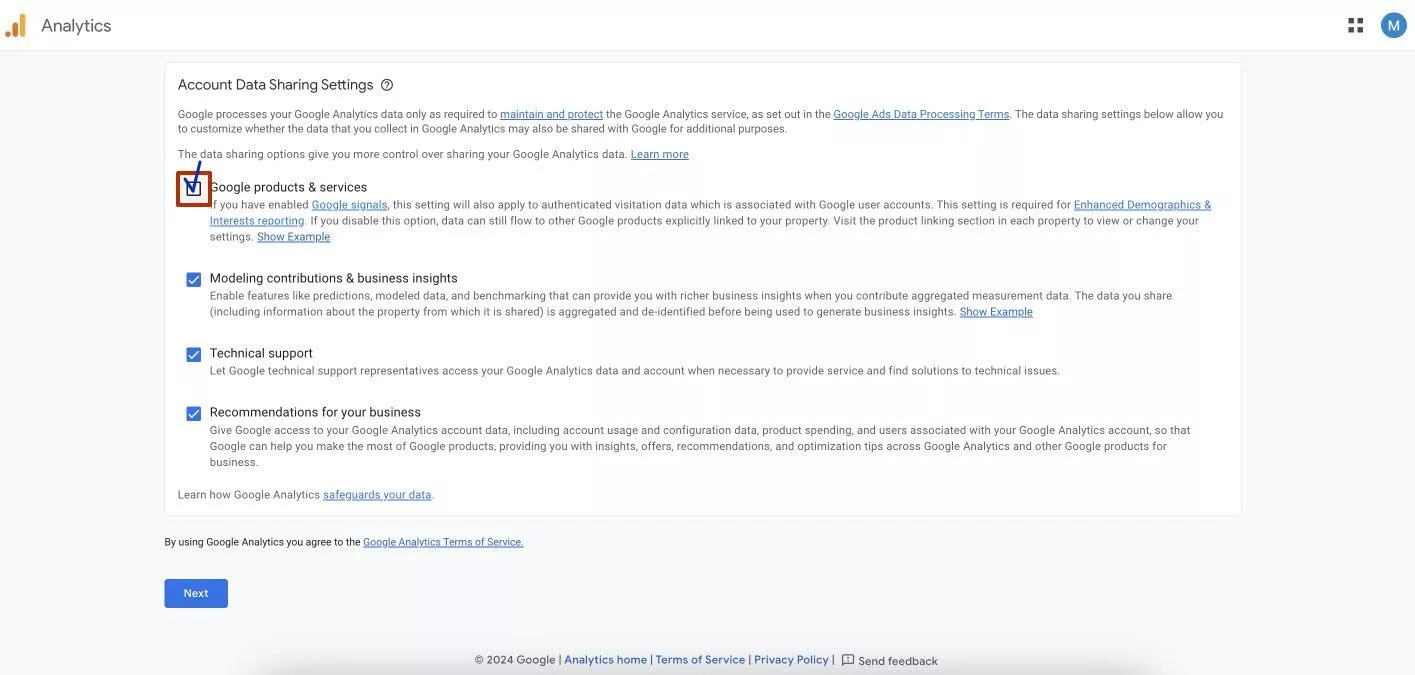
Below are the data sharing options, with several items enabled by default. I recommend that you also select the “Google products & services” option. This will give you access to advanced reports on demographics and interests.
If necessary, you can change the data access settings in an existing account.
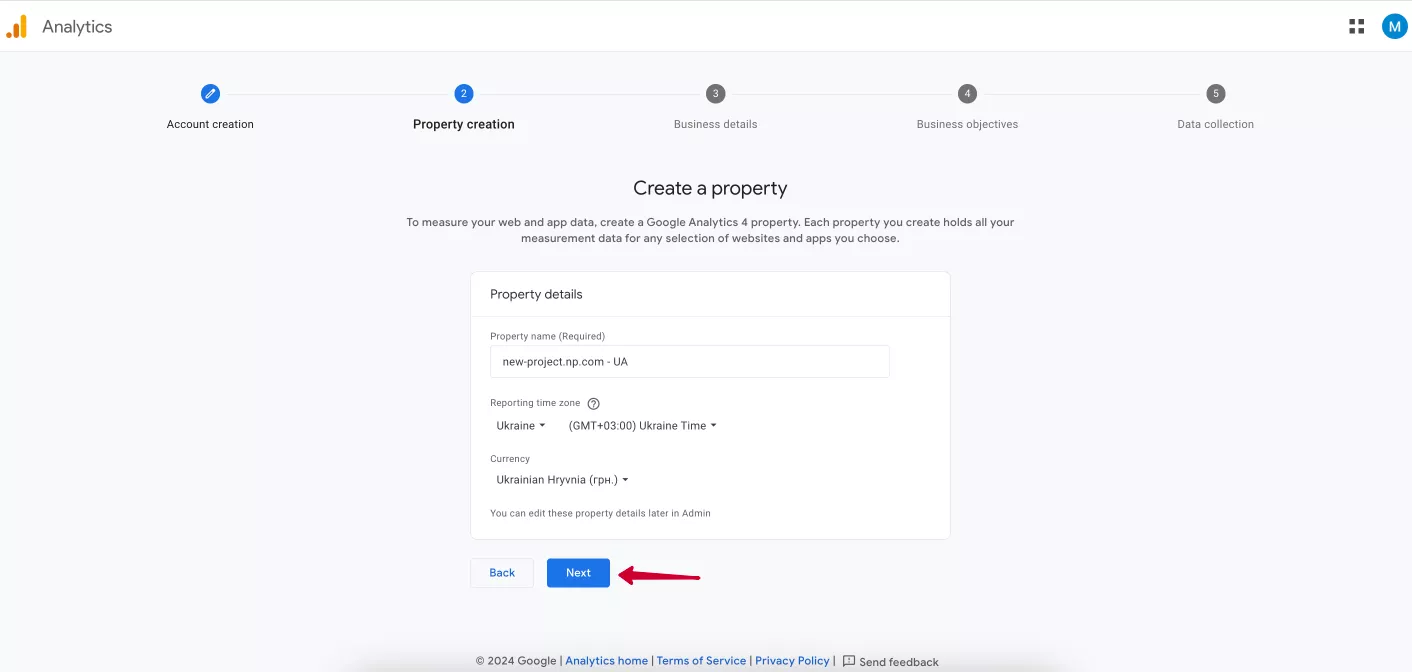
Click Next and proceed to the next step — creating a Google Analytics 4 property. Enter a name, and select the appropriate time zone and currency.
For your convenience, you can include your website's domain or subdomain in the property name or add the country code this property is intended for, such as FR for France. Select the country relevant to you, and its time zone will be displayed in the reports. Also, select the currency you use for your business. The latter should be done correctly to avoid conversion fees.
When all fields are completed, click Next to proceed to the third step.
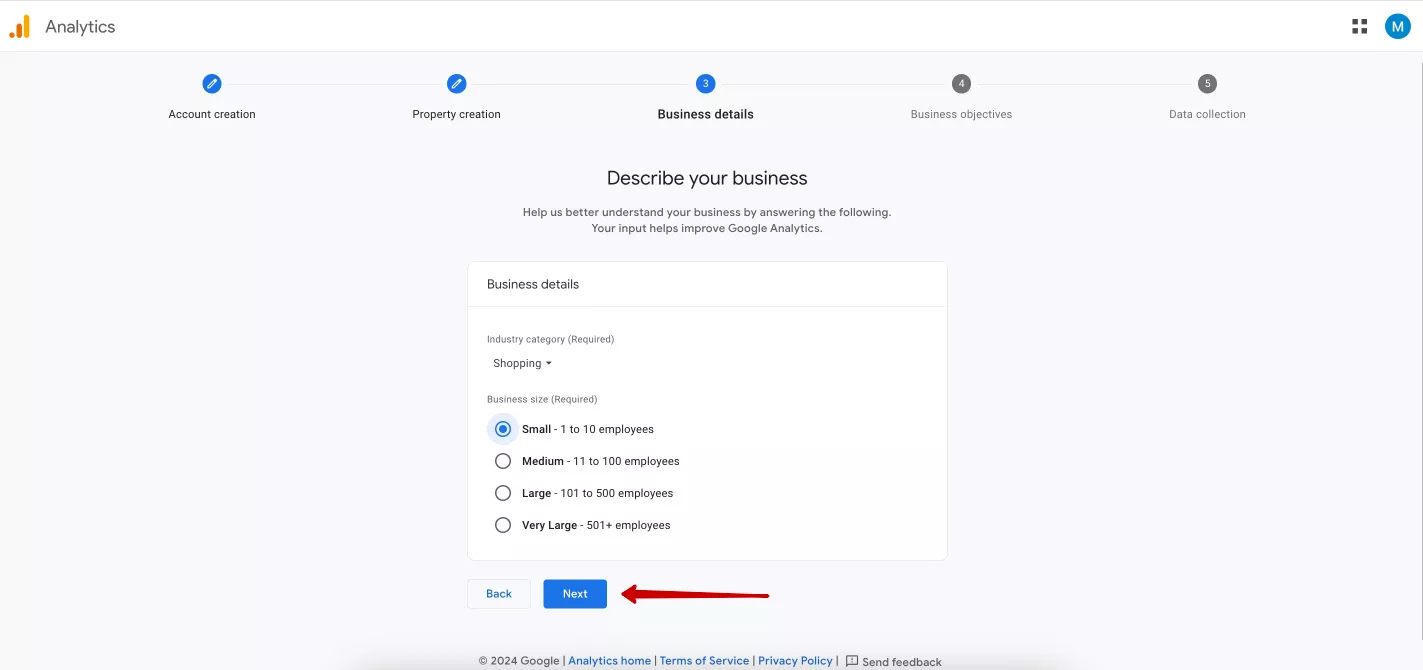
Enter your business information, such as industry category and business size. Choose what works best for you — this information does not affect your account in any way, as it is just statistics for Google.
Click Next again. The fourth step is to select business objectives.
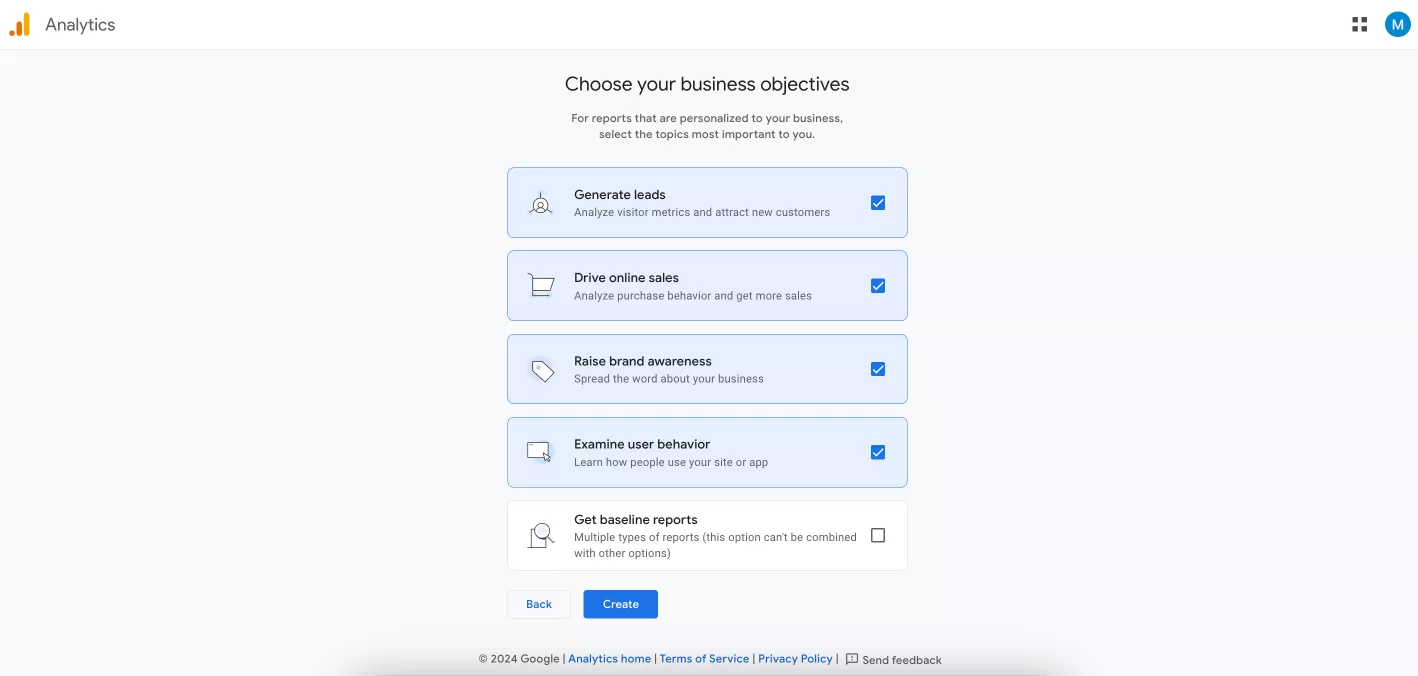
This choice affects the number and types of reports displayed in the account. You can select all of the first four options or just the last one, which includes the basic set of reports.
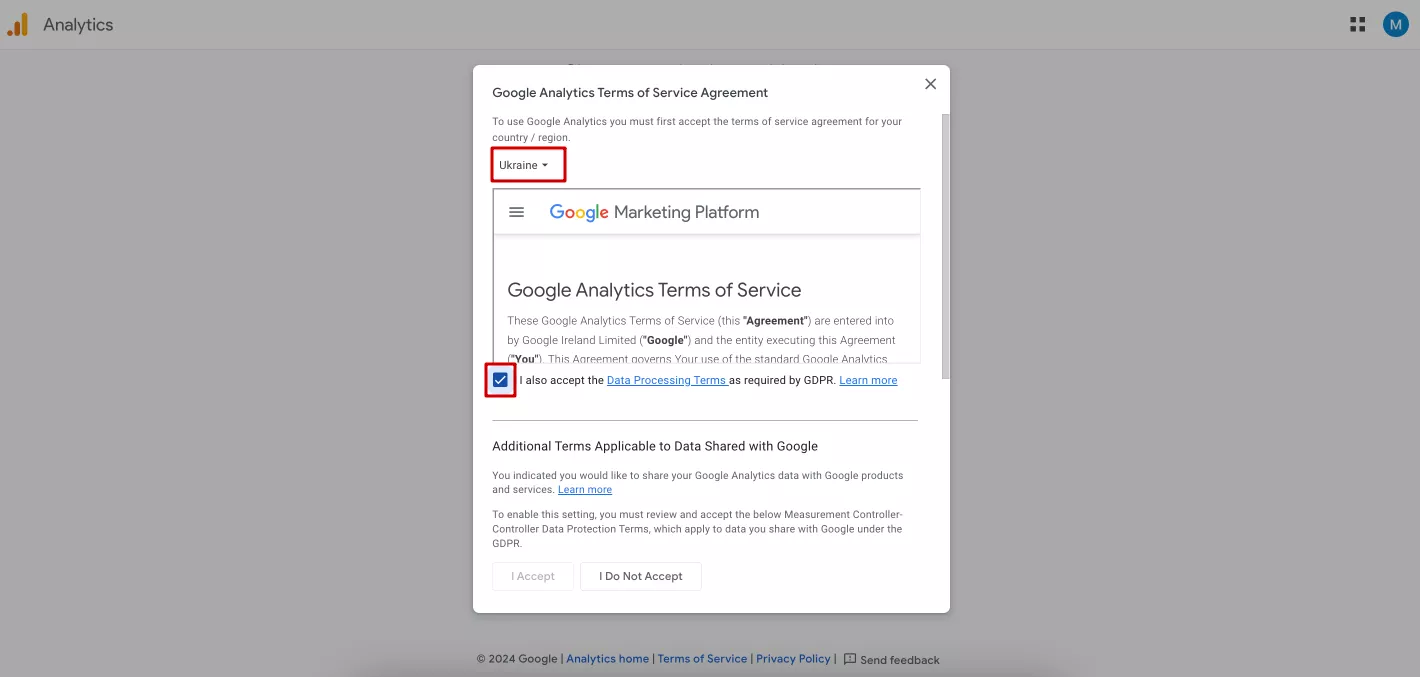
After selecting business objectives, click Create. In a new window, accept the Terms of Service.
After reviewing the terms, select the country for which the terms are accepted at the top of the window. Check the box to accept the terms.
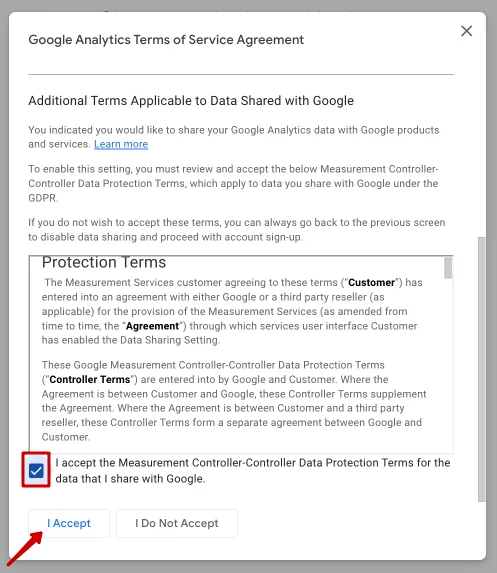
Scroll down to the bottom of the window to accept the second item of the Terms and Conditions. This will activate the "I Accept" button in the lower left corner. Click on it.
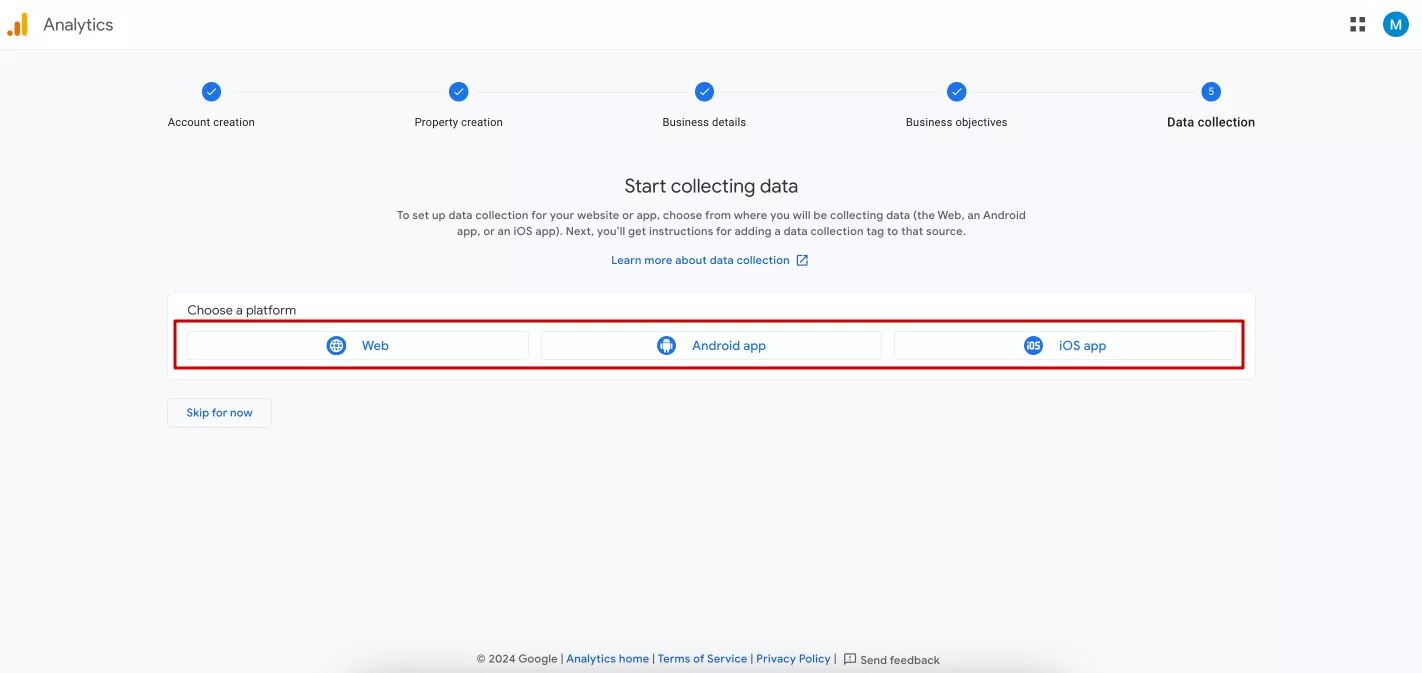
After that, you have the option to configure the site or application data stream immediately by selecting its source, either a website or an application. Alternatively, you can skip this step and come back to it later. I'll click Skip for now and show you how to configure this in your account.
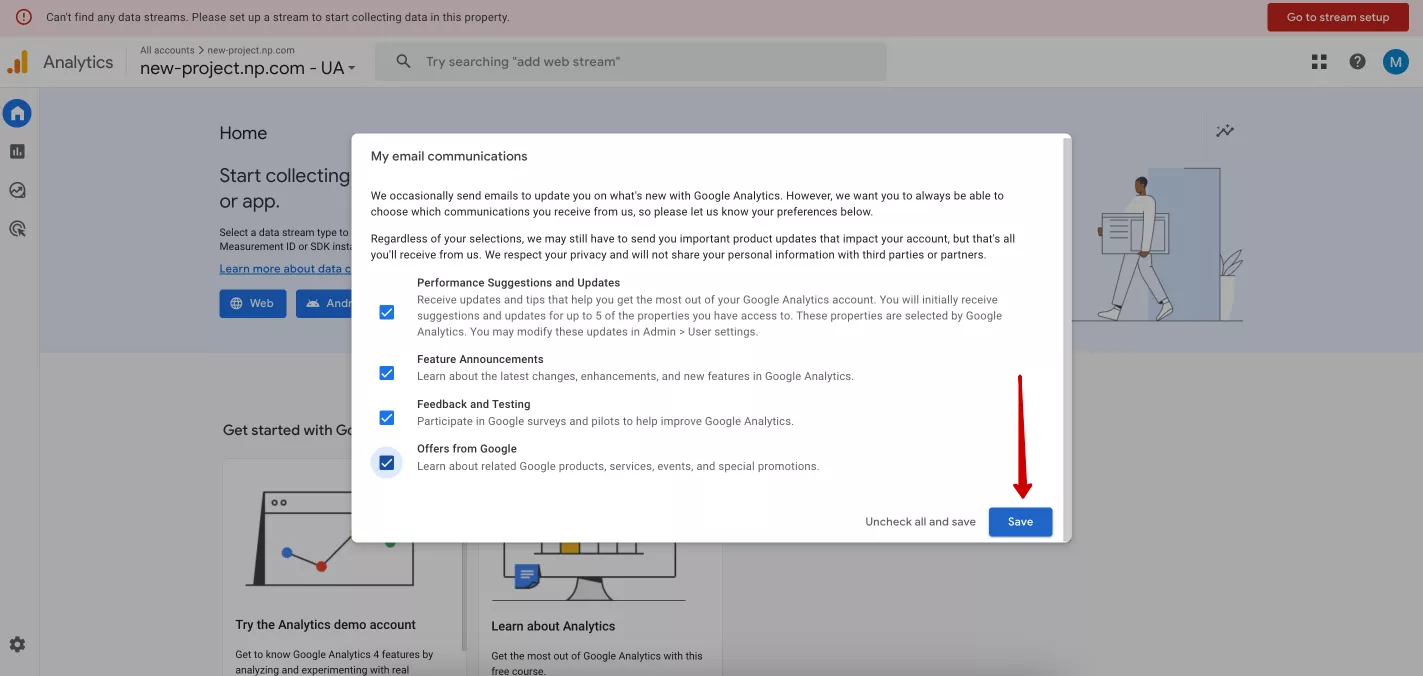
The final step in the registration process is to set up your email newsletter preferences. Click Continue to Home. In the new window, select the messages you want to receive and click Save.
Congratulations, the registration is complete! Now, we need to set up the data stream that I mentioned earlier.
Explore our glossary for essential web analytics definitions to sharpen your data insights!
Creating a data stream in GA4
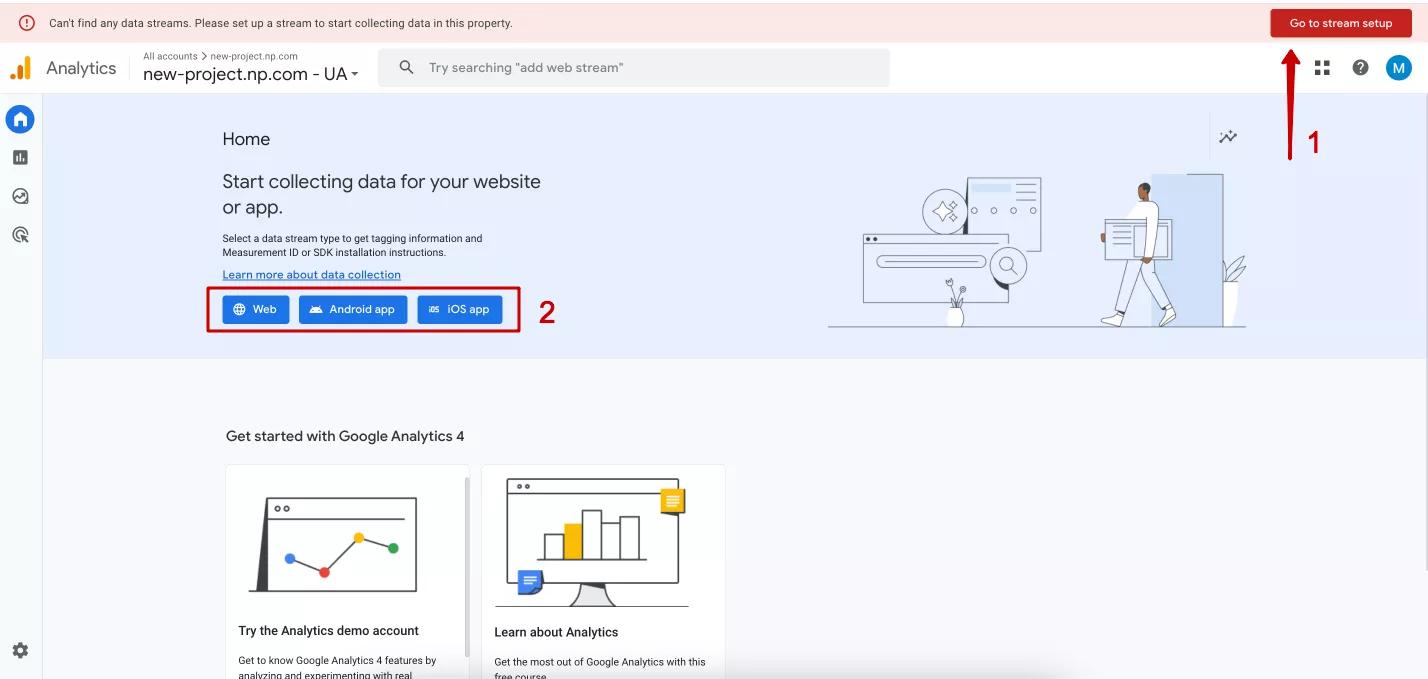
You can add a new site to Google Analytics 4 directly from the homepage using the buttons at the top of the screen or below.
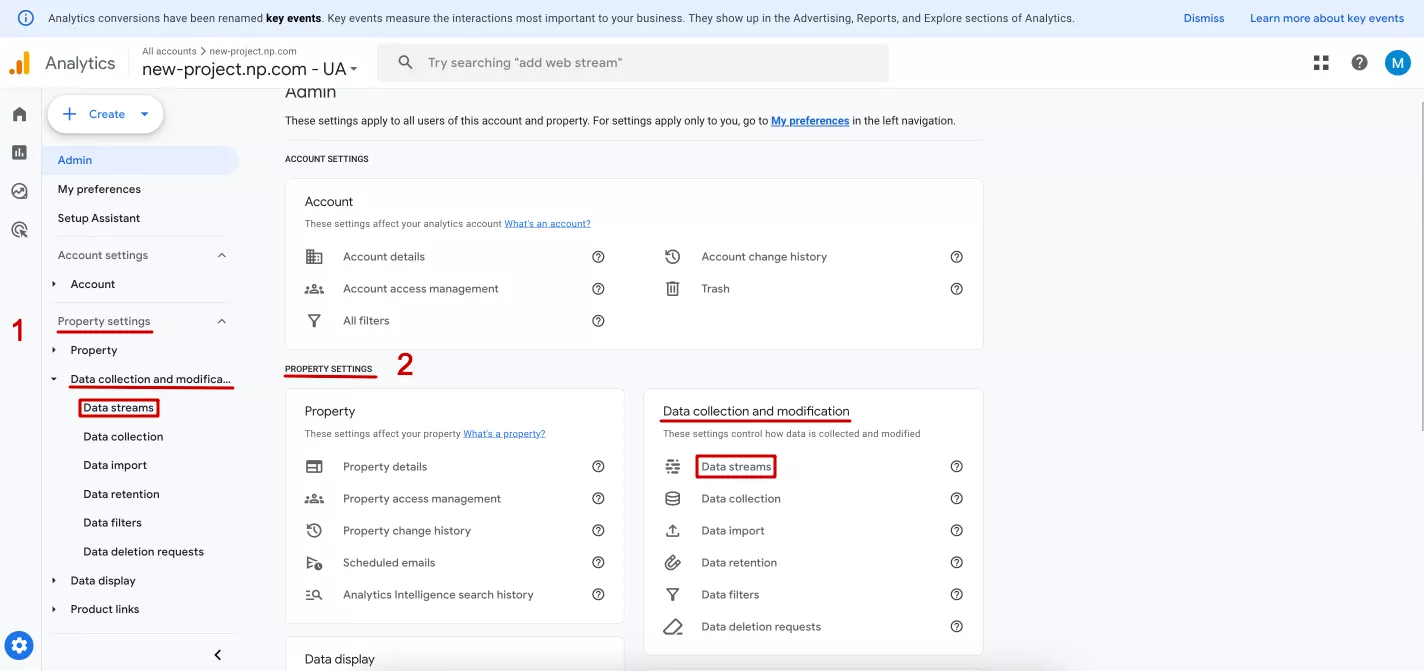
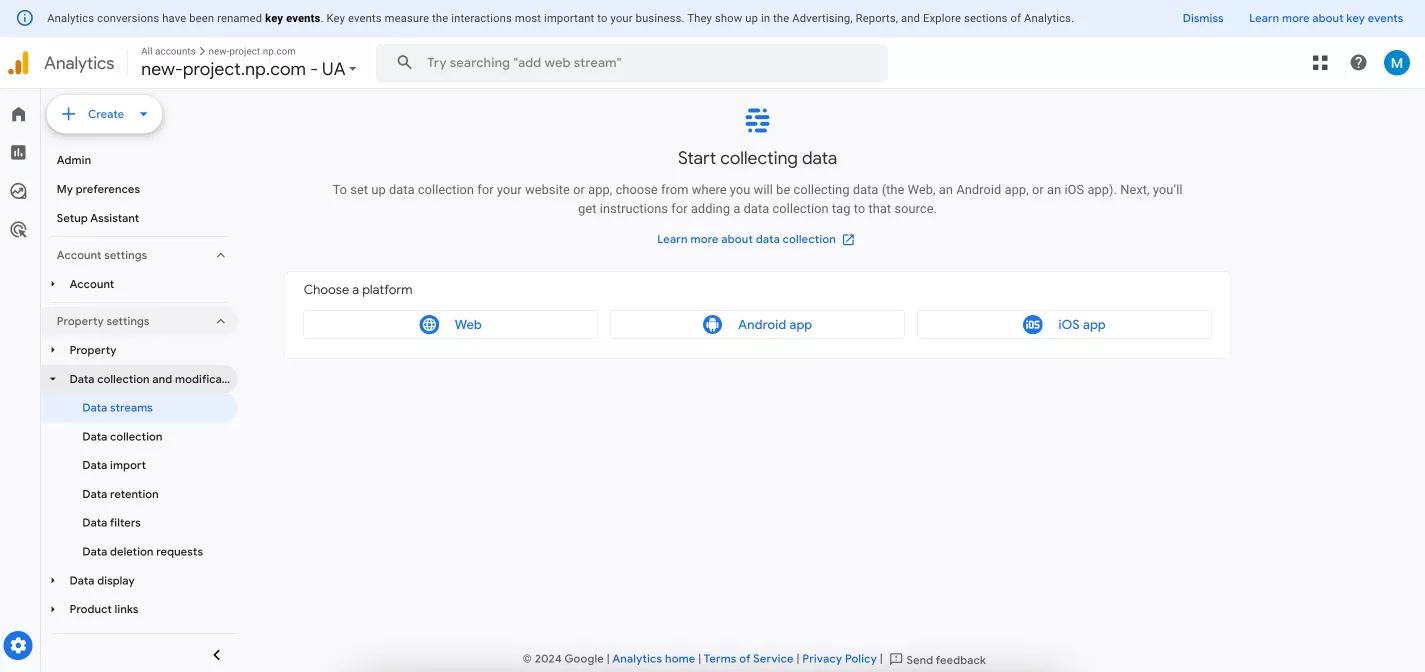
You can also find the required function in the settings. Go to the Admin section in the left menu from the main page. In the “Data collection and modification” section, use the left sidebar (1) or the widgets (2) to go to the data streams.
Remember the window you skipped when you first registered? This will take you back to those settings. Then, select where you want to collect data from: a website or an Android or iOS application.
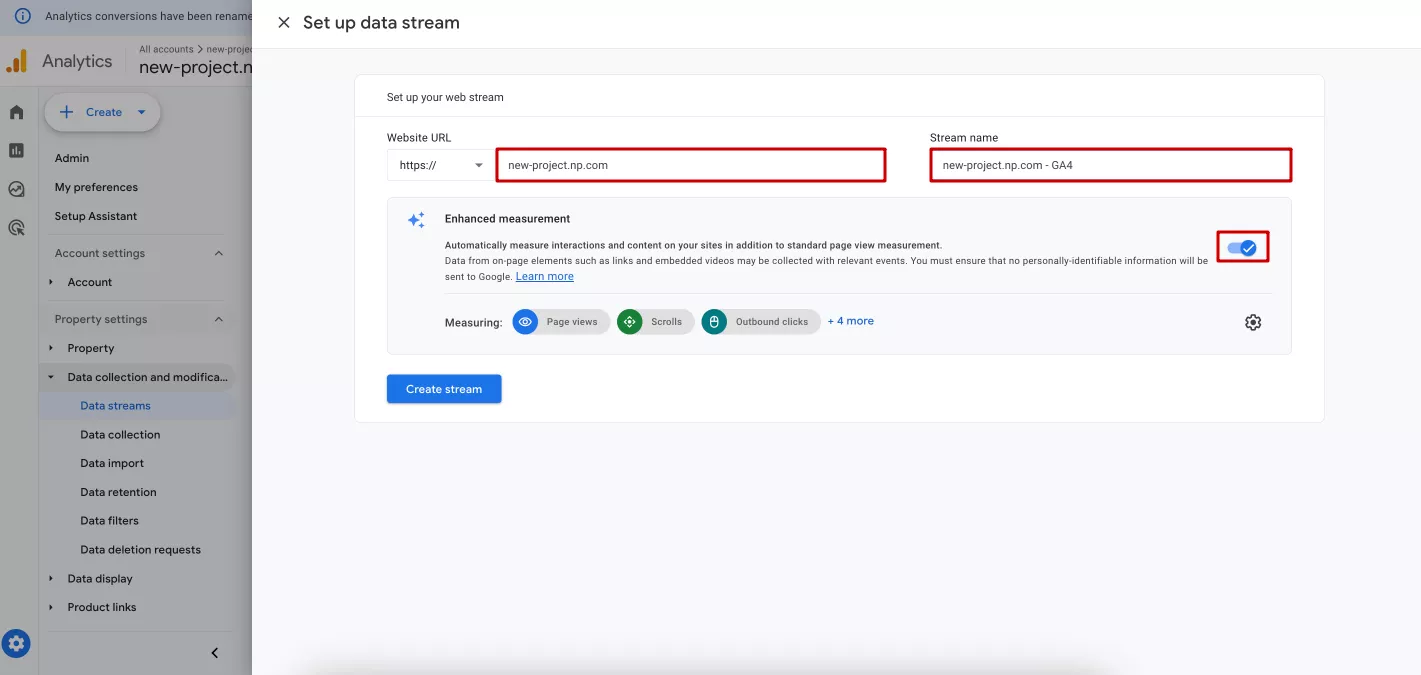
In this example, I will select a website. I will enter the site domain and stream name and configure the enhanced measurement elements.
For applications, enter the ID and name of the application. For iOS, the ID from the App Store is also provided.
I recommend that you enable this advanced measurement setting so that the system automatically measures the additional elements for the page views indicator that is automatically collected by Analytics.
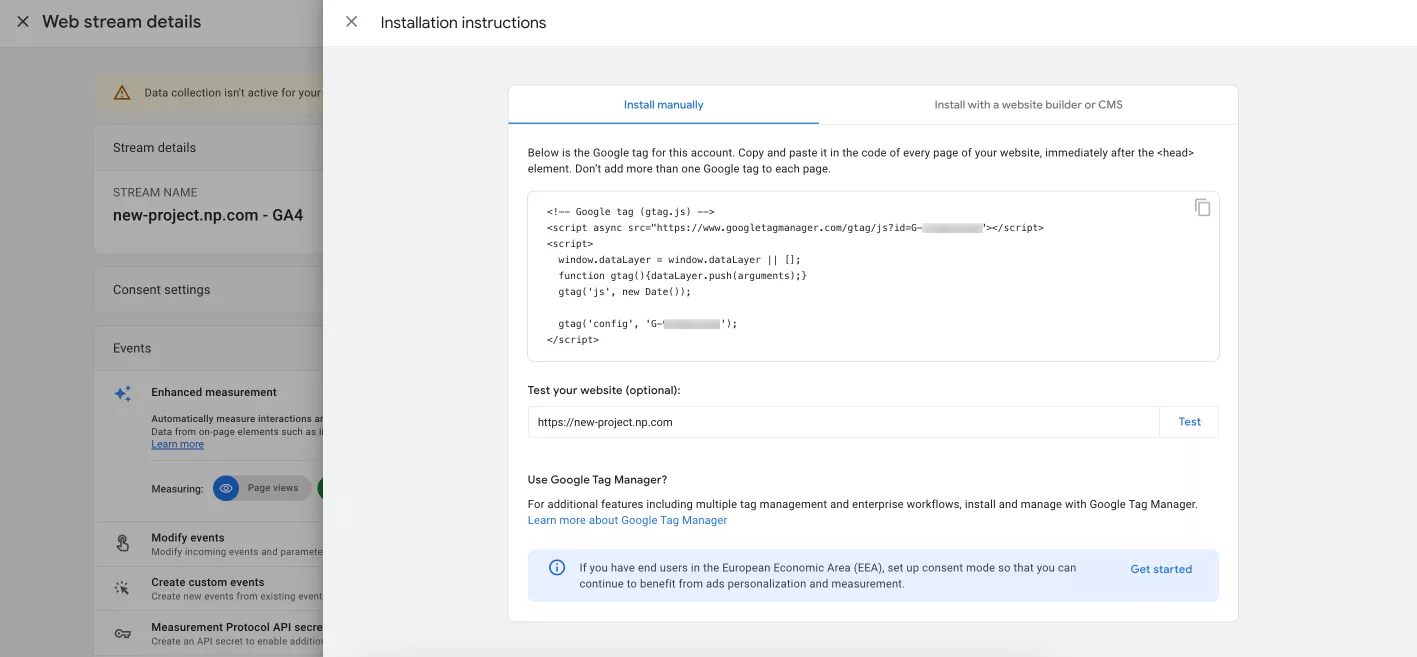
Next, click Create stream. A new window will open with a Google Analytics tag that you need to install on your website or application to start tracking data. You can do this manually, ask a programmer to do it for you, or use Google Tag Manager. Later in this article, I'll cover how to do it with GTM.
After installing the code on all pages of your website, your initial Google Analytics setup is complete. By the next day, you will see the data from the site in your Google Analytics 4 account.
If you want to change or customize the process, you can always go to the Admin tab and add filters, set up notifications, make the data available to someone else, etc.
How to extend the hierarchy or change the level of access in GA4
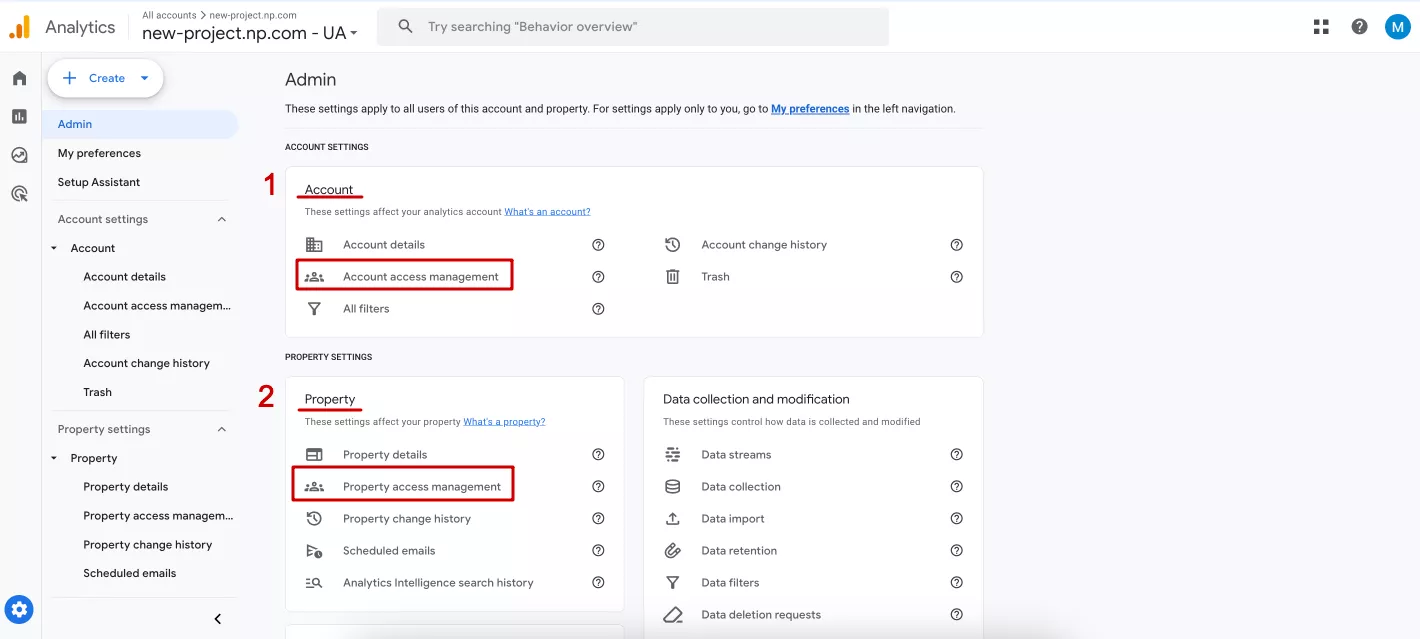
One basic GA4 setting is to allow other users to access your account. To do this, as with most settings, go to the Admin tab.
You can grant access:
- To the entire account at once through Account settings > Account access management (1);
- To a specific property through Property settings > Property access management (2).
The interface is the same, so I'll show you an example of extending access to GA4.
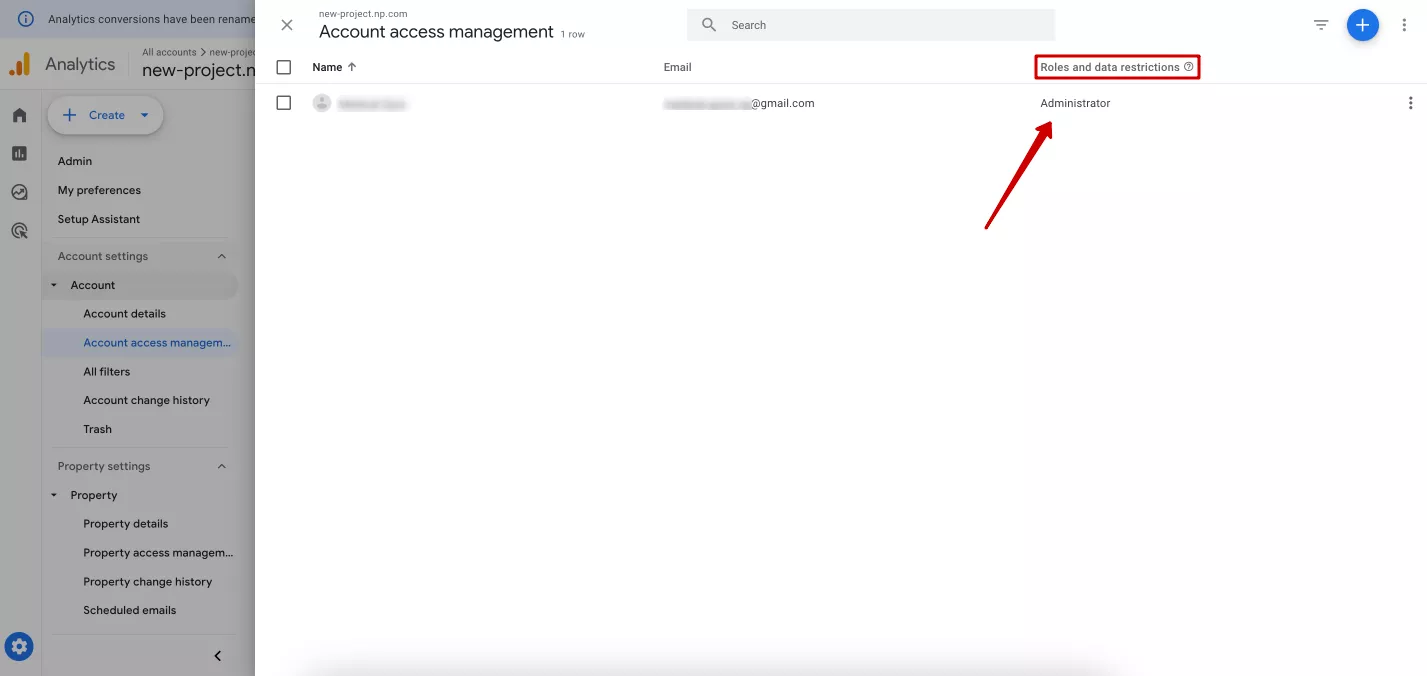
In Account access management, you can open a window with a list of all users and their access levels to this property. To change the access level of a particular user, click on their role in the “Roles and data restrictions” column opposite the user's name.
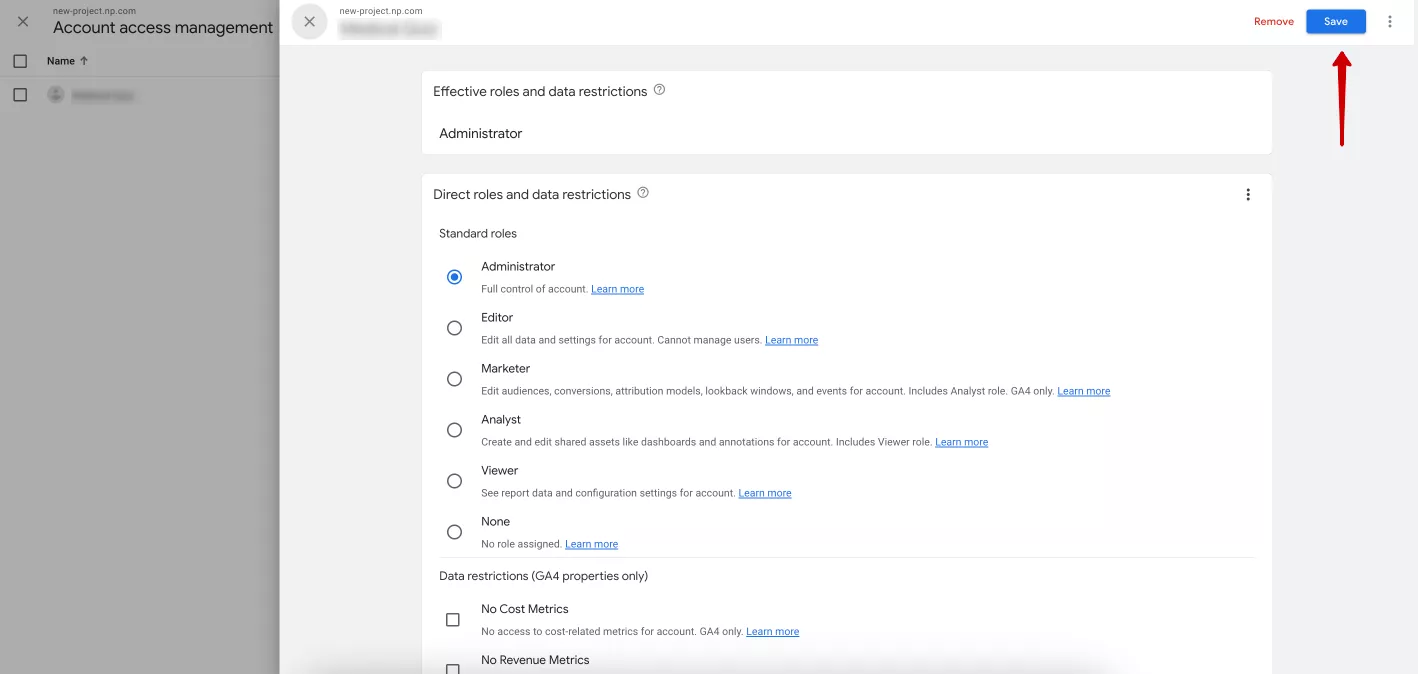
Another window with access settings will open. After changing the settings, click Save in the upper right corner.
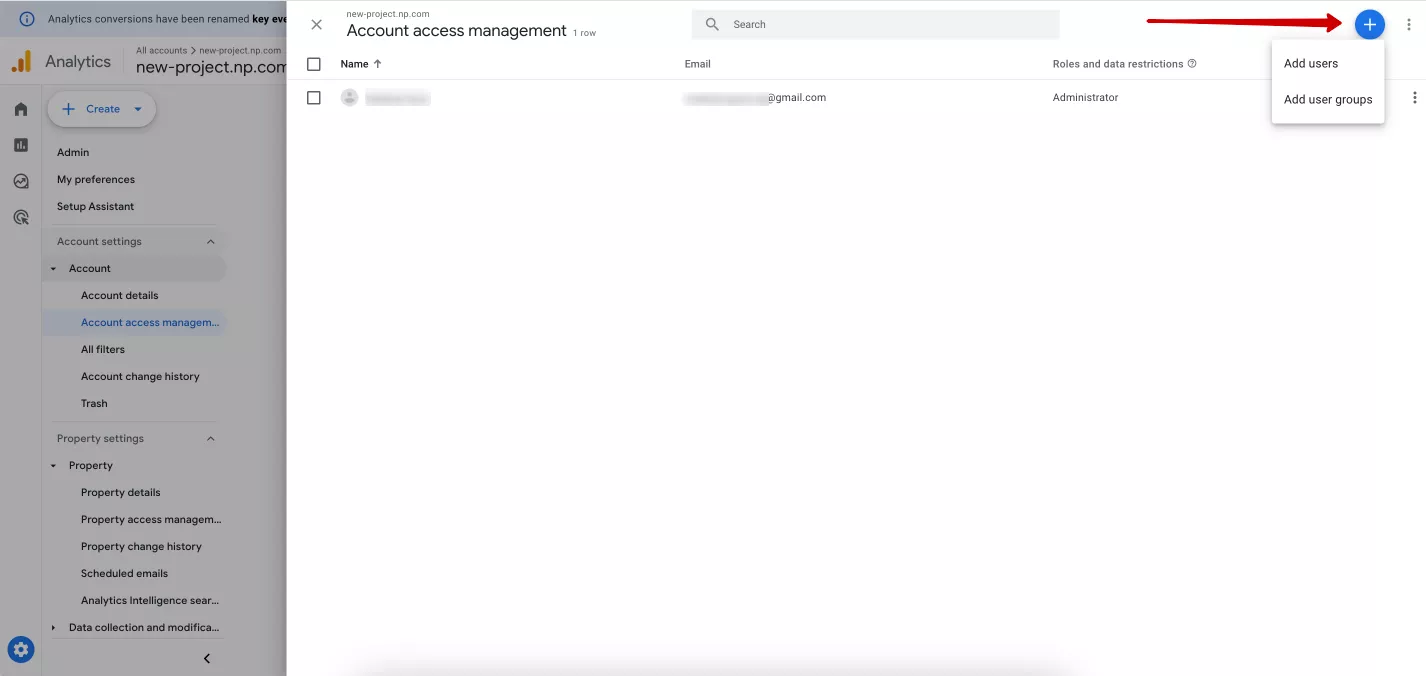
To add a new user or group of users, go back to the list of property users and click on the blue plus sign in the upper right corner of the screen.
You can create a user group only if your Analytics account is associated with an organization. If not, you'll be prompted to associate your account with your organization the first time you click “Add user groups”. For more information on user groups, see Google Analytics help.
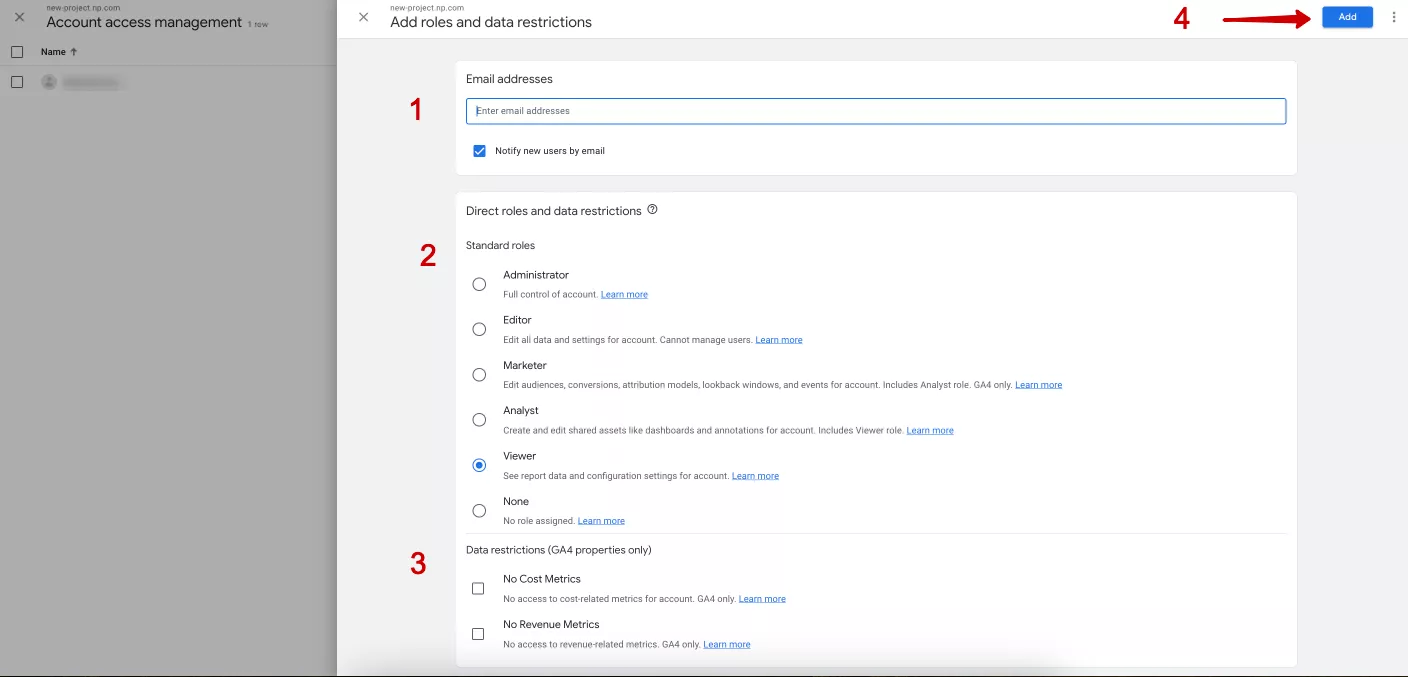
Select Add user, and in the new window that appears:
- Enter the email address of the person you want to grant access to. You can also uncheck the “Notify new users by email” option here if you don't want to be notified.
- Assign one of six roles:
- Administrator - has full control;
- Editor - manages resource settings, but does not manage other users;
- Marketer - creates, edits, and deletes audiences, conversions, attribution models, events, and conversion periods;
- Analyst - creates, edits, and deletes specific resource objects, and works with shared objects;
- Viewer - can view settings and data, determine what data is displayed in reports, and view shared objects through the UI or API, but cannot work with shared objects;
- None - the user has no role for this resource but can be assigned a role for another resource.
- If necessary, uncheck the cost and/or revenue checkboxes in the “Data restrictions” section.
- Click Add.
How to set up Google Tag Manager and link it to GA4
If you want to make your work easier and not engage any other specialists to connect and configure GA4 on your site, you will need a Google Tag Manager account. This will allow you to set up the necessary links and events in one place without having to hire a programmer for the one-off task of placing the GTM code on your site.
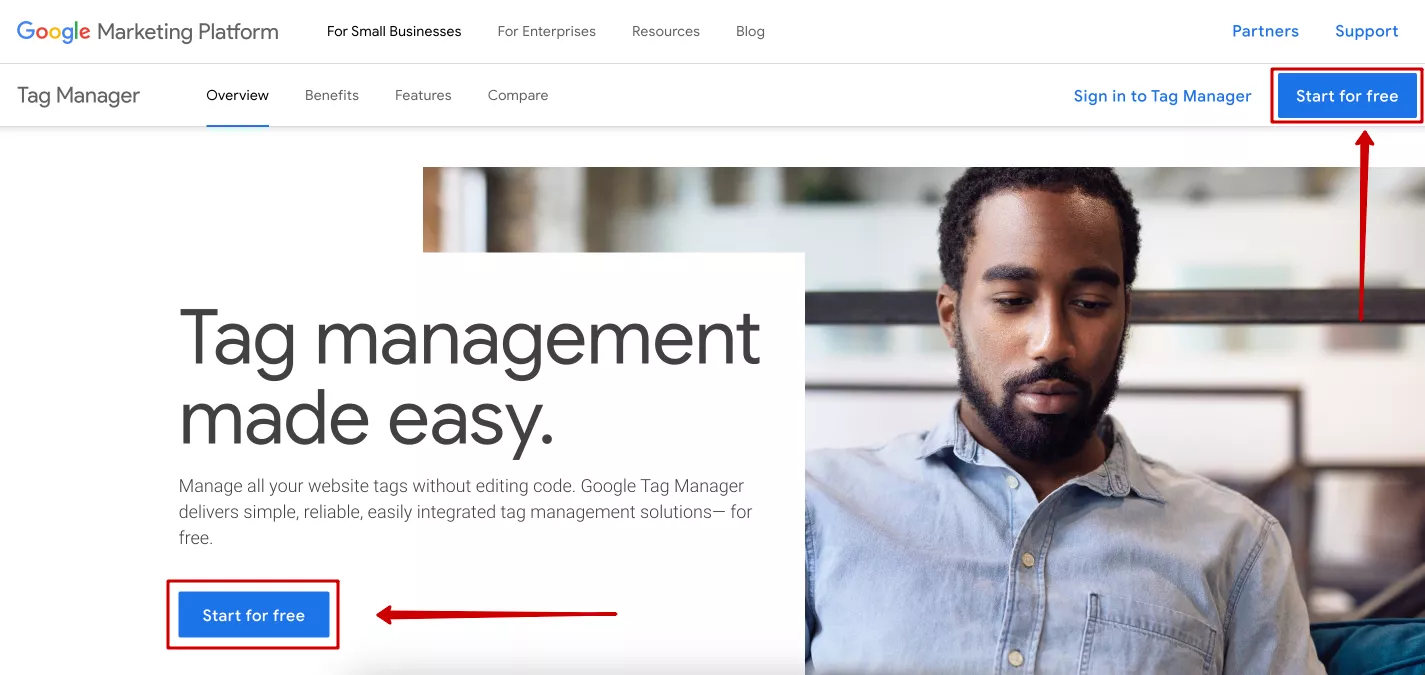
To get started with this tool, create a Google Tag Manager account. Make sure you are logged in to Google, as this is required for registration. Then, go to the official GTM website and click on the Start for free button.
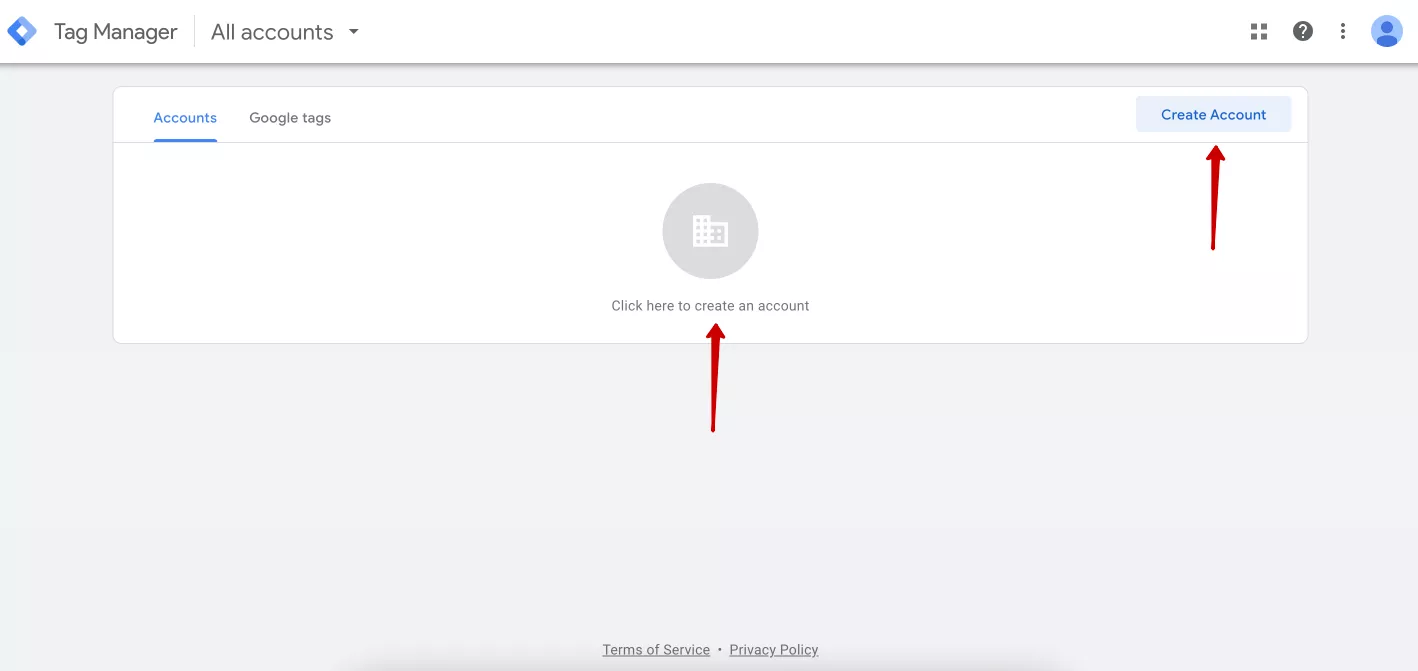
Next, click Create account in the upper right corner, or simply click in the center of the screen to create a new account.
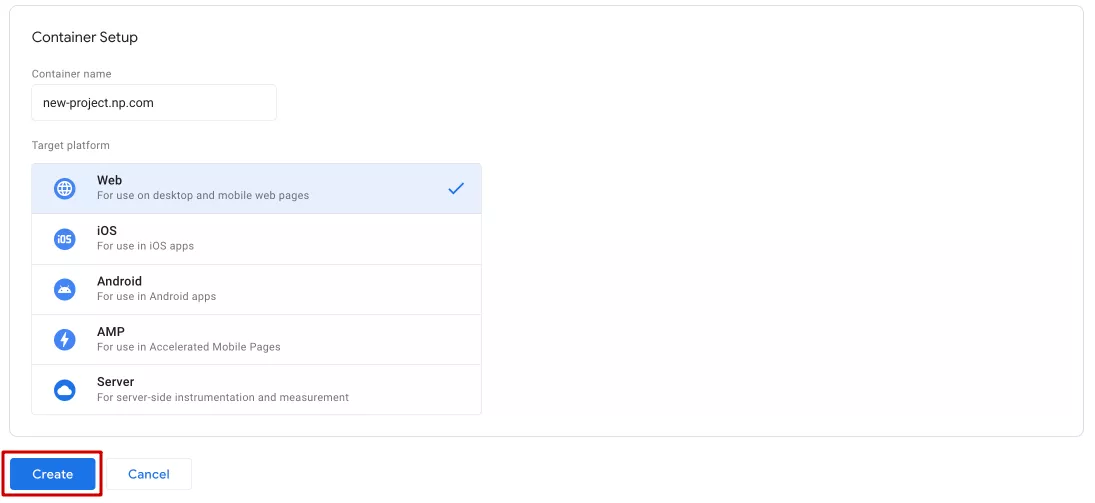
On the registration page, you need to set up an account and a container (i.e., a folder with tags for the site). Let’s start with the account settings.
Enter your account name, which can be the name of your business or project, and select your country from the list. You can also check the box to agree to share your data anonymously with Google, but this is optional.
Then, you can configure a new container. Enter a container name; I recommend using your site's domain name. Next, select the appropriate target platform as selected in Analytics. In this example, it's a website. This is where the GTM tools will be implemented. Finally, click Create.
You can create only one account for a project or company but several containers for it, for example, for a website and an application.
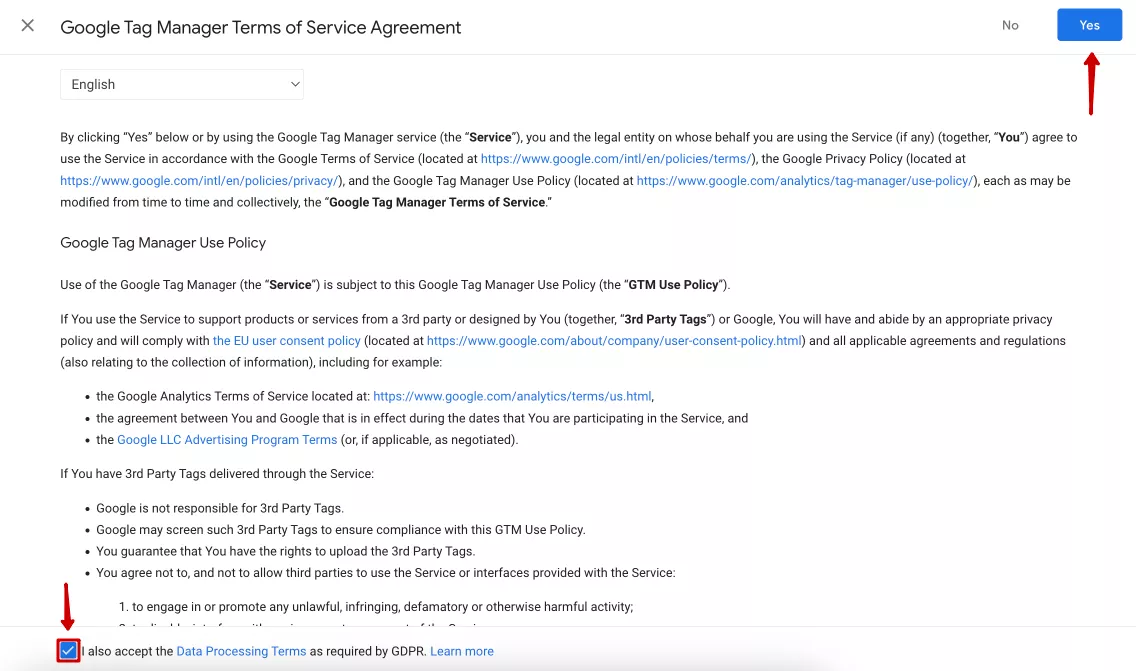
A new window will open with Google Tag Manager’s Terms of Service Agreement. Read through it, check the box at the bottom about consent to data processing, and click Yes in the upper-right corner of the screen.
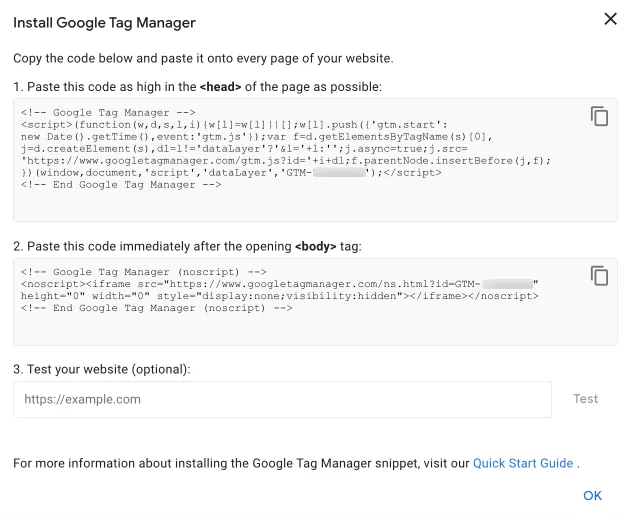
Once your account has been successfully created, you will immediately see a window with two GTM code snippets. You will need to place these snippets in the indicated locations on your site. You can copy these instructions and send them to your developers right away.
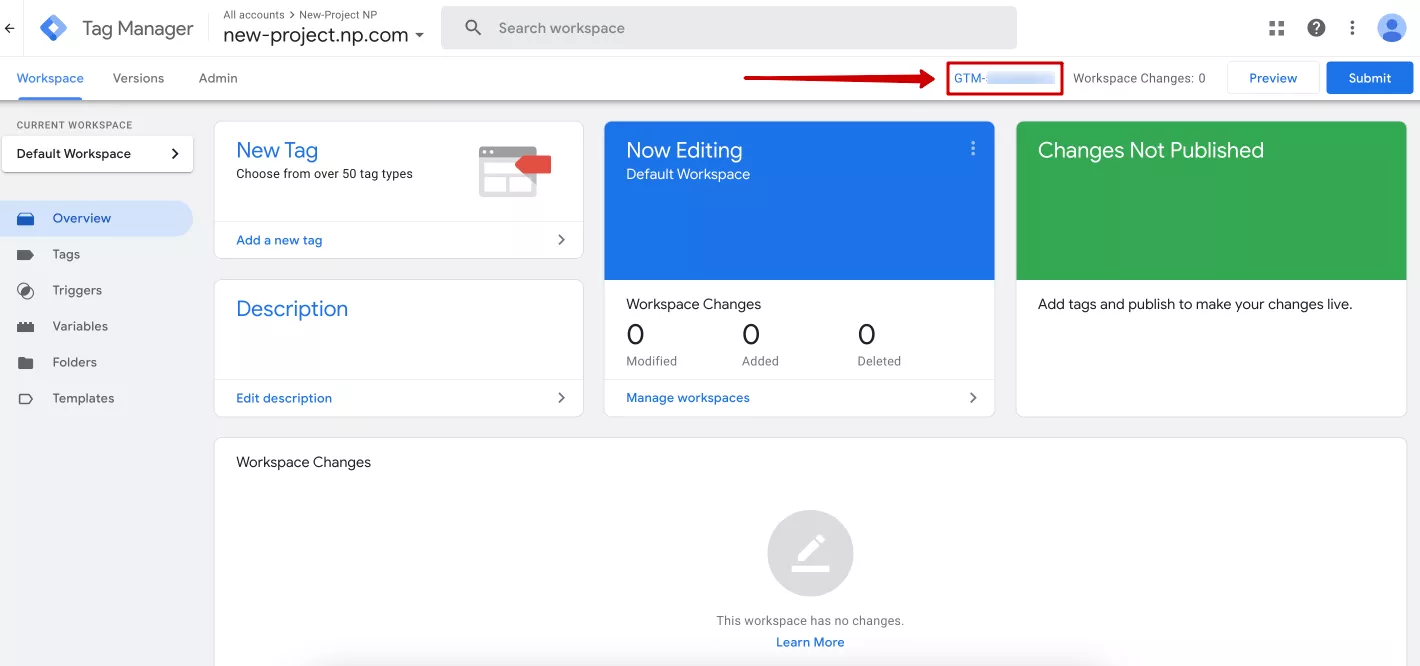
To open the code window later, click on the container ID (GTM-XXXXXXXXXX) at the top of the GTM home page screen, and the same two codes will be displayed again.
Read more on
How to share access to GTM
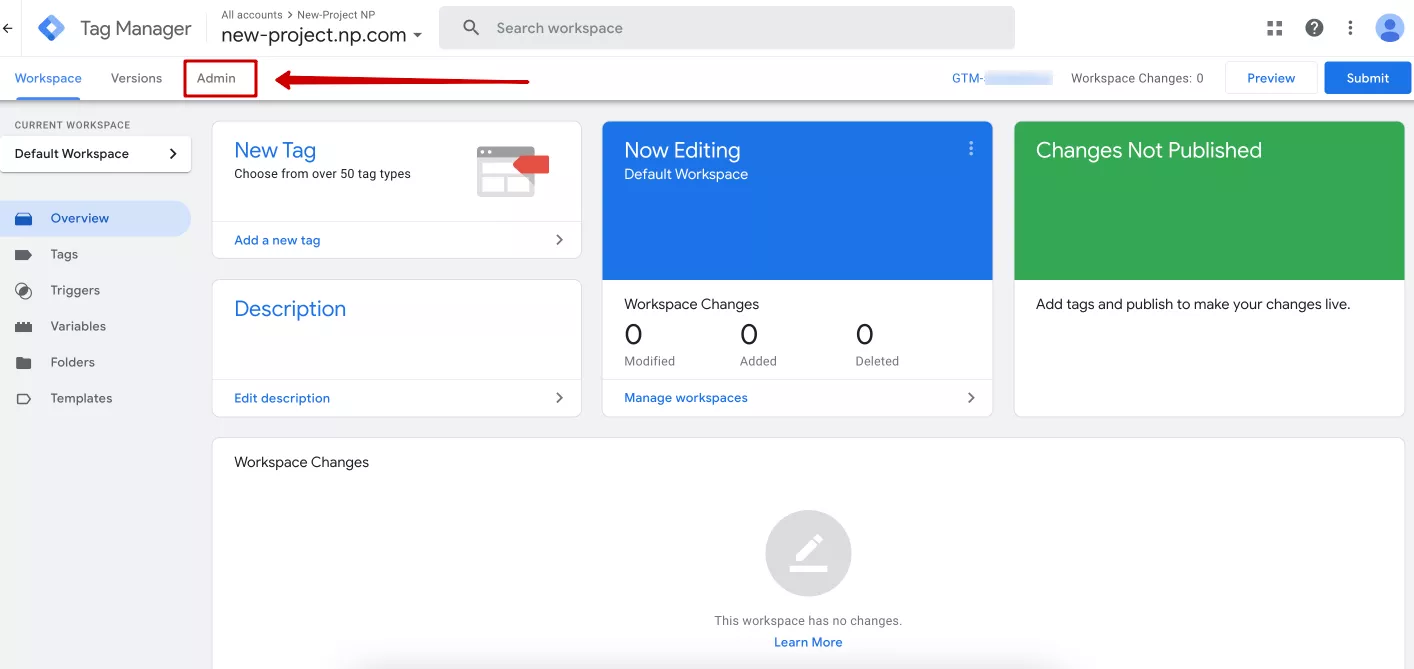
Just like GA4, GTM has permissions at the level of the entire account or a separate container. To manage them, go to the Admin tab.
Next, select the level at which you want to grant access to the account or container and click User Management.
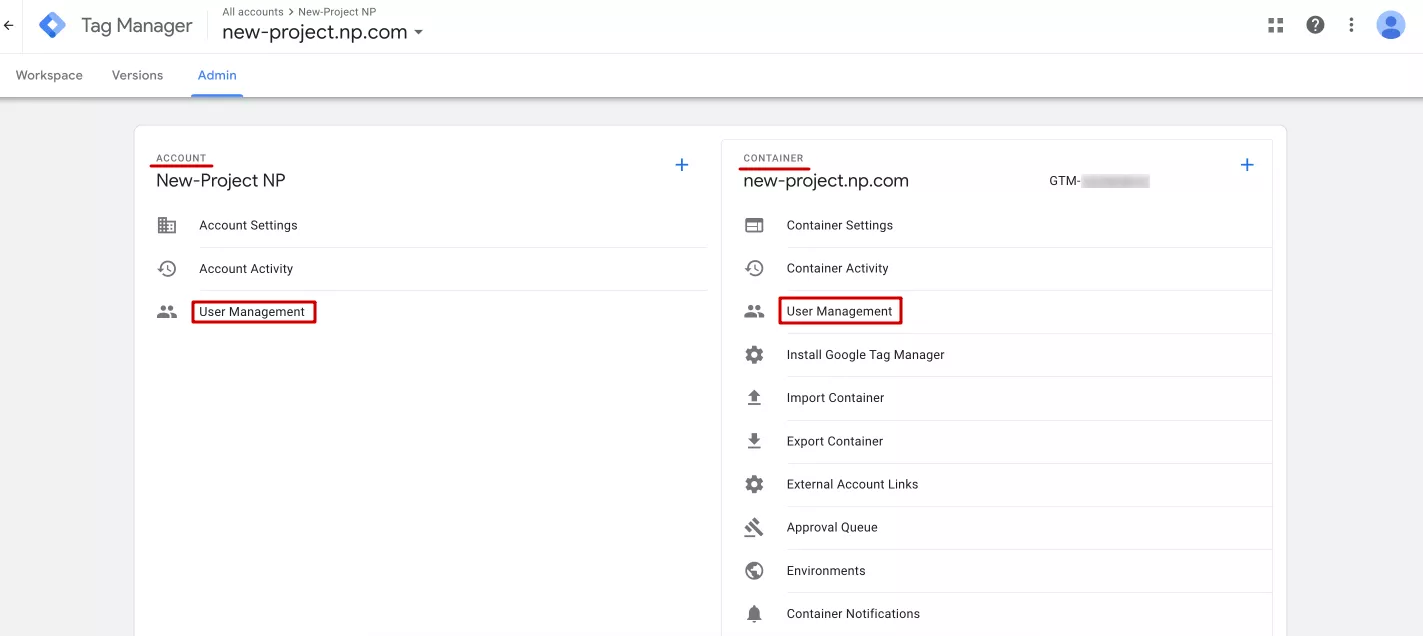
To change the access level, click a specific user's role in the column. To add a new user, click the blue plus sign in the upper right corner.
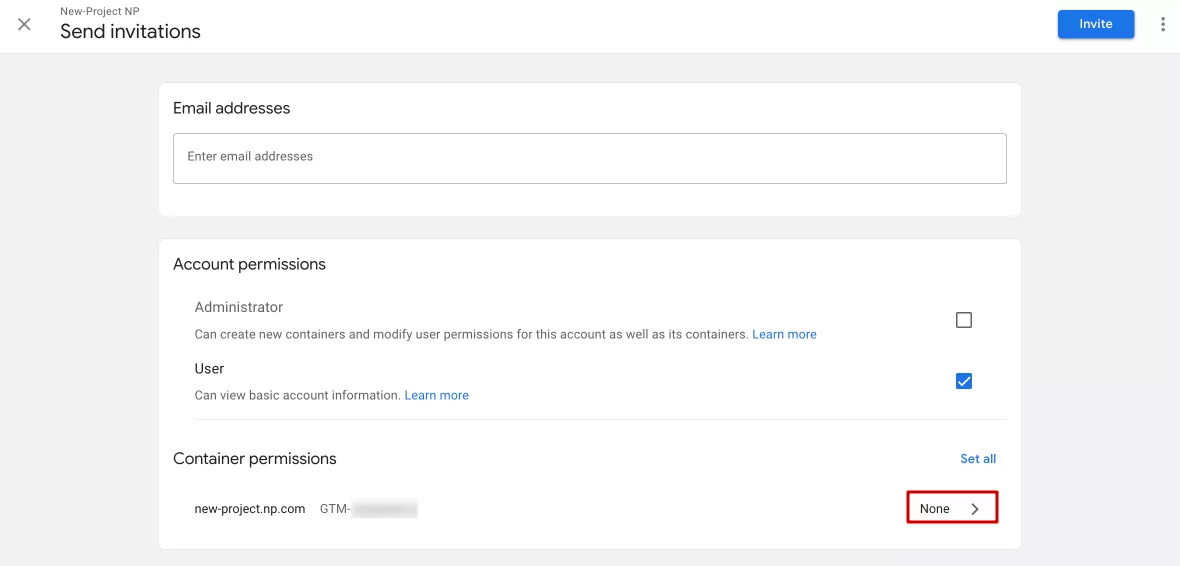
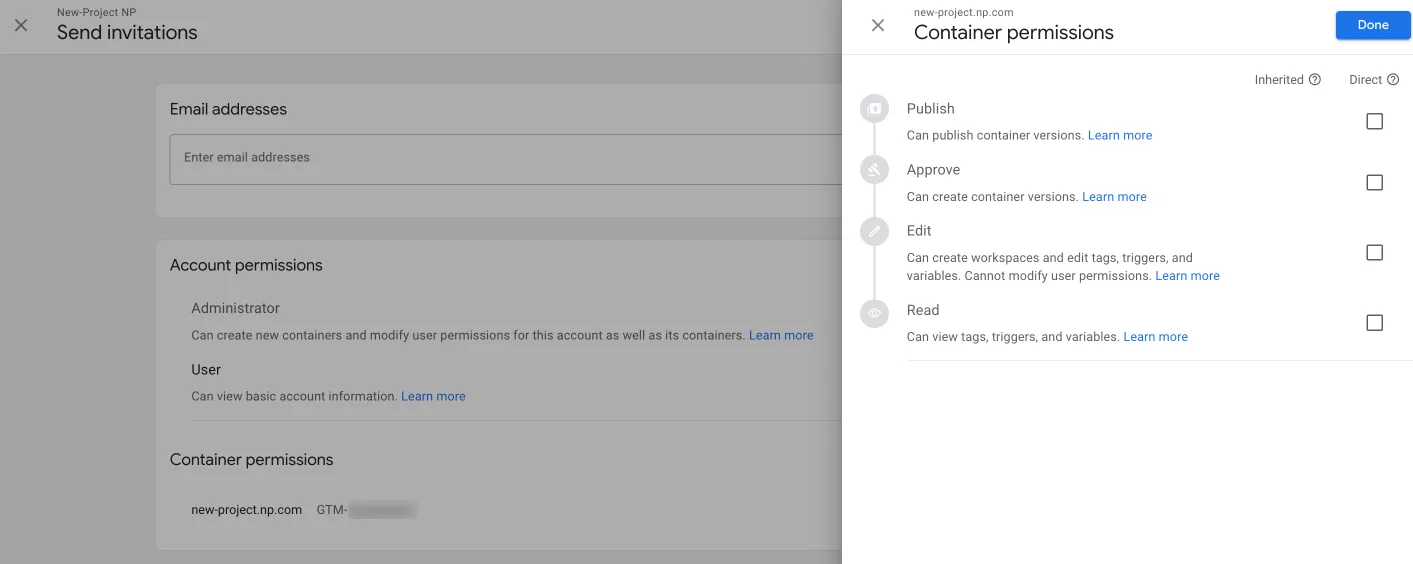
You can also invite a group of users or an individual user to GTM. To add a user, enter their email address and access level. There are only two levels of users: Administrator, who manages containers and access, and User, who can view general data in the account.
In addition, you can grant specific access to containers available in this account by clicking on the current access level for a particular container.
There are four access levels available to a new user for a container:
- Approve: The user can create a version, workspace, and make changes, but they do not have publishing permission.
- Edit: The user can create a workspace and make changes, but they cannot create a version or publish.
- Read: The user can view tags, activators, and variables in the container, but they do not have the ability to make changes.
- Publish: The user has all permissions to create versions and workspaces, make changes, and publish them.
When you have selected everything you need, click Done in the upper right corner.
Conclusions
If you are planning to launch a new project and measure website traffic or advertising performance, web analytics is a must. The most popular analytics tools are Google Analytics and Google Tag Manager. Setting them up is a straightforward process comprising a few simple steps:
- Set up a Google account.
- Register a Google Analytics 4 account and a data stream.
- Register a Google Tag Manager account.
- Install the GTM code on your website.
- Link Google Tag Manager and Google Analytics 4 with configuration tags.
Recommended theme posts
Related Articles
How to Set Up Consent Mode in GA4 on Your Website with Google Tag Manager
Let's explore how to properly integrate consent mode in GA4, configure it for effective data collection, and at the same time comply with GDPR and other legal regulations
Display Advertising Effectiveness Analysis: A Comprehensive Approach to Measuring Its Impact
In this article, I will explain why you shouldn’t underestimate display advertising and how to analyze its impact using Google Analytics 4
Generative Engine Optimization: What Businesses Get From Ranking in SearchGPT
Companies that master SearchGPT SEO and generative engine optimization will capture high-intent traffic from users seeking direct, authoritative answers

