How to Import Cost Data to Google Analytics 4: A Step-by-Step Guide for PPC Specialists
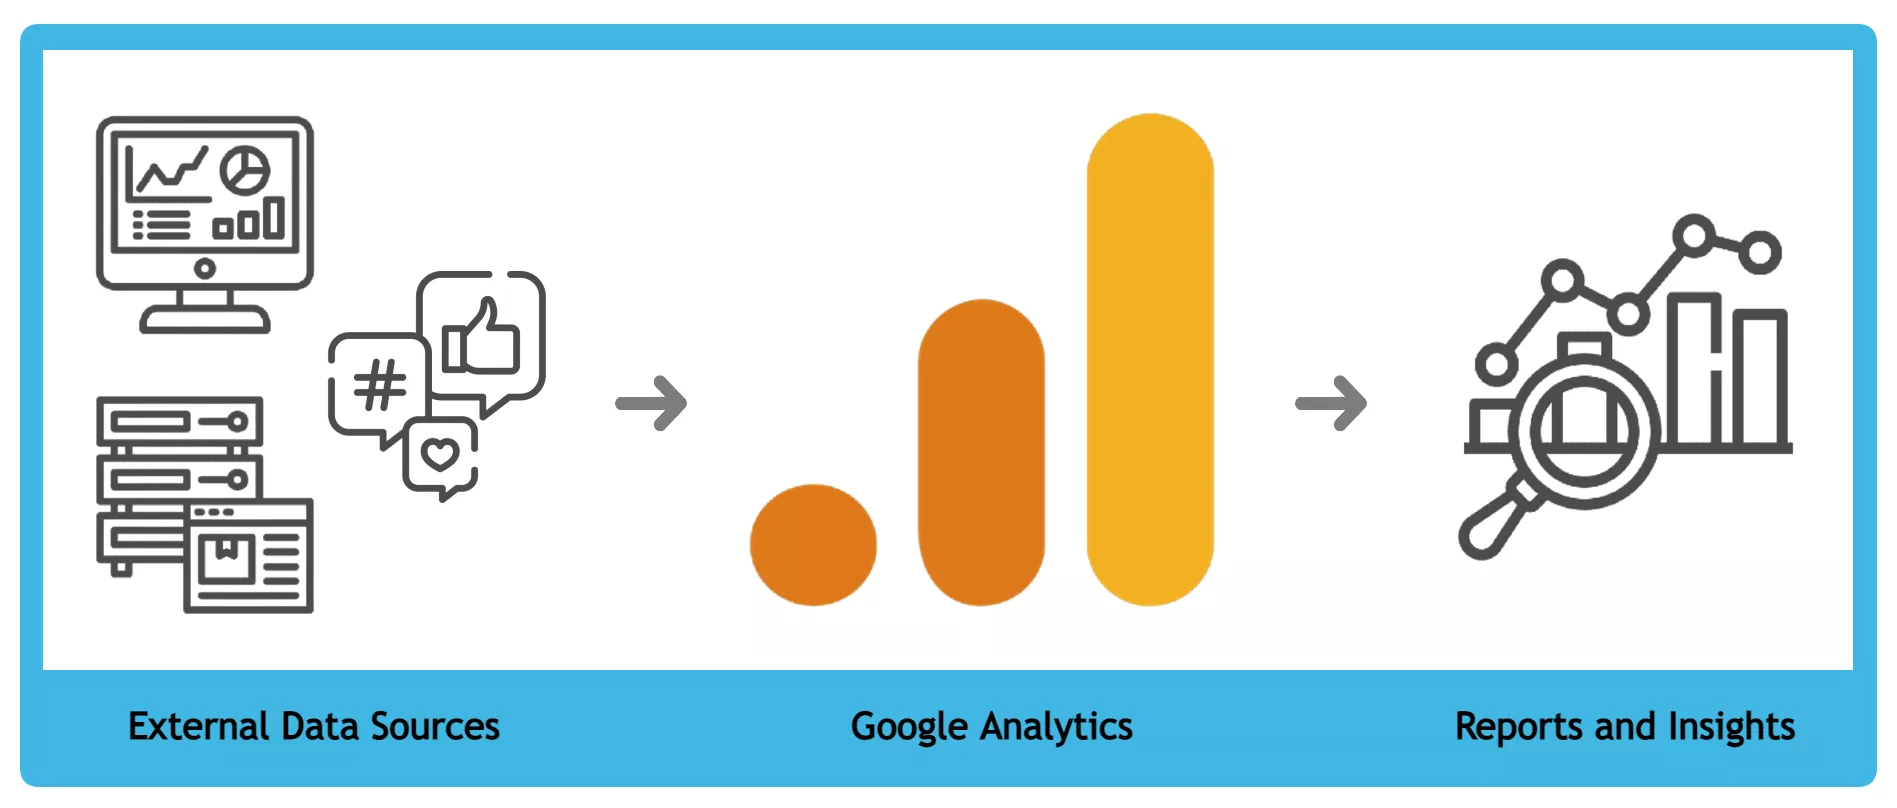
The data import feature in Google Analytics 4 lets you upload data from external sources. For example, you can upload a file with the number of impressions, clicks, and cost from different advertising systems, CRM data, or offline sales statistics and combine them with analytics data. It will give you a more complete picture of your business performance.
This guide will teach you how to import data from different advertising systems into Google Analytics 4 (GA4). You can set up imports from LinkedIn Ads, Twitter Ads, Snapchat Ads, Amazon Ads, TikTok Ads, Pinterest Ads, and more.
To begin, let me show you how it works by importing cost data from Meta Ads (Facebook).
The process of importing data is the same for any ad system. In this article, I'll discuss a simple way that doesn't take much time.
Why import cost data from advertising systems to GA4?
From easier comparison to better reports, there are several benefits to importing cost data in GA4.
- Data centralization. It is much easier to compare the results of ad campaigns from different systems if they are all in one place. There's no need to summarize data in spreadsheets or switch between ad systems. This saves time and optimizes labor costs.
- ROMI measurement (Return on Marketing Investment). By importing cost data into GA4, you can see the cost of campaigns from different ad systems and the revenue they generate. Then, you can reallocate your marketing budget by identifying the most effective campaigns.
- Analysis of the sales funnel’s effectiveness. You can compare the contributions of different ad channels to your sales funnel. This helps you evaluate KPIs for different funnel stages from different ad systems and understand which ad channel is most effective, where to reallocate the budget, etc.
- Enhanced reporting. GA4 collects certain data about user events on the website. Importing data from ad systems or additional product information allows you to compare this data and make your reports as informative as possible.
What data can be imported into GA4?
Apart from cost data, many other types of data can be imported to GA4. Here’s an overview of the main data categories that you can import.
- Cost data. Import clicks, impressions, and costs from non-Google sources (e.g., Facebook, Twitter, LinkedIn, etc.). This data can be used to analyze your ad campaign performance in GA4.
This is the type of import I will consider in this article, as it is the most common data in the work of PPC specialists.
- Product data. You can import product parameters such as items, SKUs, brands, color, size, style, and other parameters. This type of data will help you analyze user behavior in terms of the above attributes and understand, for example, the demand for a particular product or the usability of your website.
- Offline event data. You can also import information from offline sources that are not connected to the Internet. For example, download offline store sales data to track the impact of online and offline marketing on physical store sales and get a better understanding of customer behavior.
- Customer data. Download information about your customers to better segment them, create remarketing lists, and more. For example, you can download the customer ID, user ID, last purchase date, total customer value, and loyalty rating.
Read also how to
A step-by-step guide to importing data using Meta Ads cost data as an example
To import data, you need to create a data source in GA4 settings, download a file from Meta Ads (Facebook), and set up UTM tags. The tags are essential for getting the necessary data from your ad systems, so I will start with them.
The utm_id parameter when setting up UTM tags
You need UTM tags to know how users came to your site and from which ad systems, campaigns, and ads. GA4 cannot collect data about users who came to you from social networks or emails, so you need to add these parameters to the main URL of your website in the settings of your ad campaigns.
Before you set up the import, you need to start using UTM tags in your campaigns. If you already have them, add a new utm_id parameter.
Let me show you an example of an email address with a UTM tag.
Usually, paid traffic channels use the following parameters within the link:
- utm_source (ad system)
- utm_medium (ad channel)
- utm_campaign (name of the ad campaign)
But for Google Analytics 4, you need to add another custom parameter:
- utm_id (a unique campaign identifier)
Without the utm_id parameter, you won't be able to upload cost data to Google Analytics 4.
So, be sure to add it to the final URL of your website in the ad.
For future reference, the utm_id parameter is the same as the campaign_id parameter in the downloadable template.
Once your ad links are in the correct format and contain the required parameters and values, it's time to create a data import source in GA4 and upload the cost data.
Creating a data source in GA4
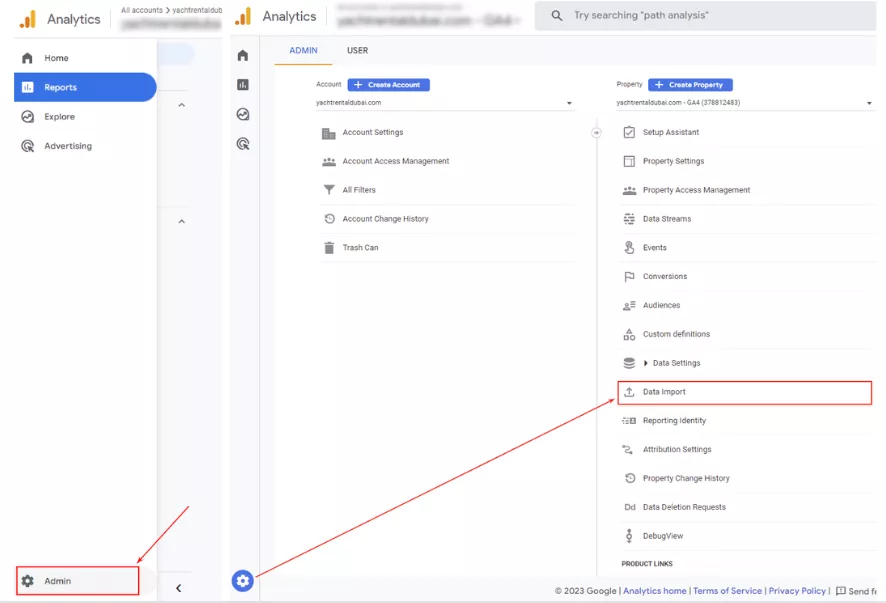
Go to GA4 and click Admin > Data import.
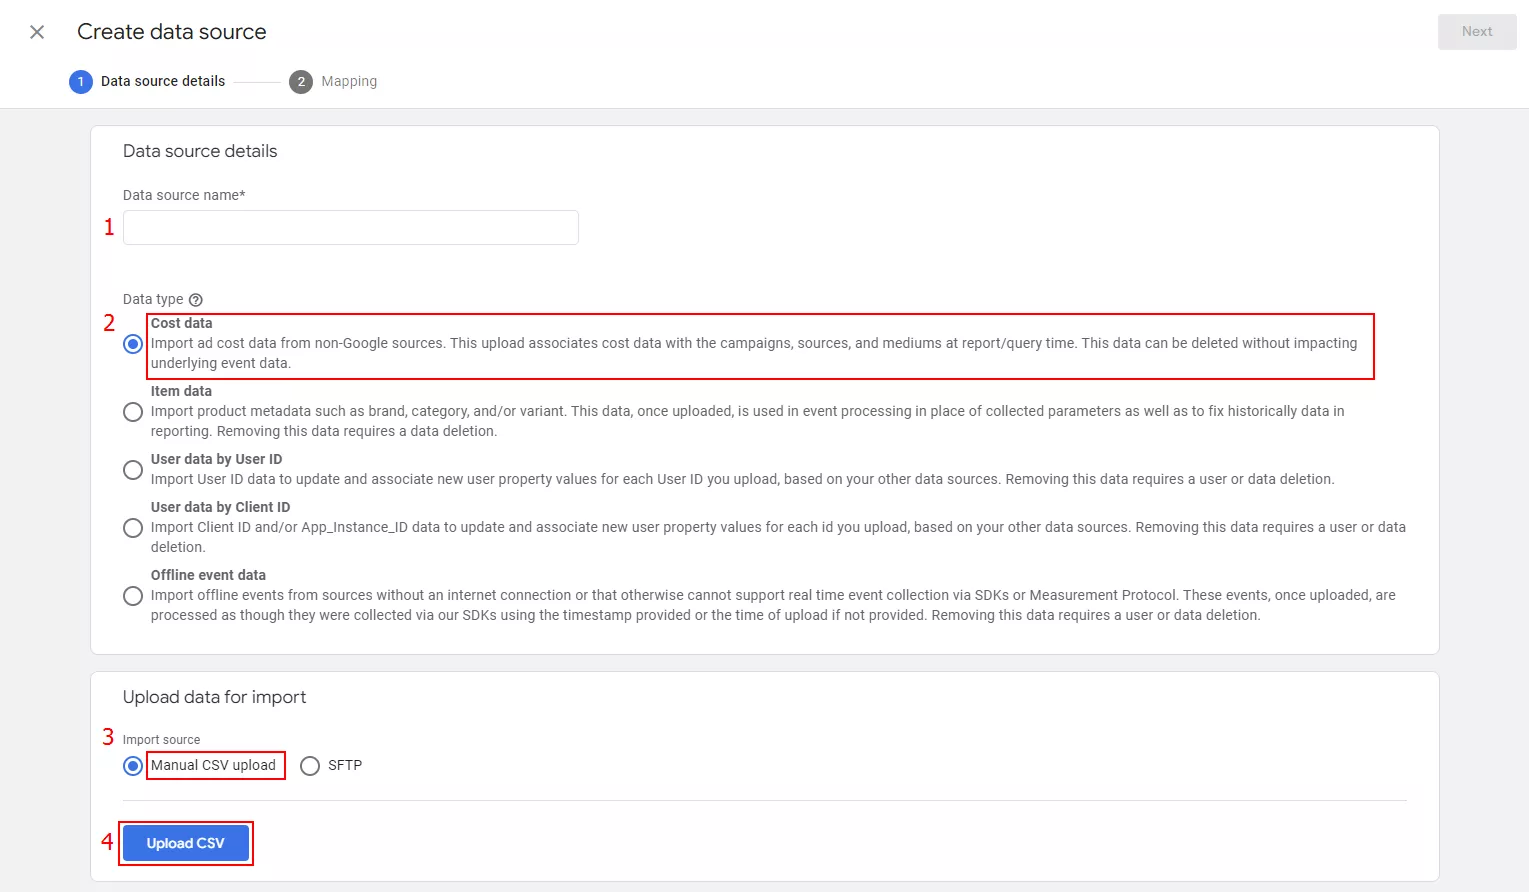
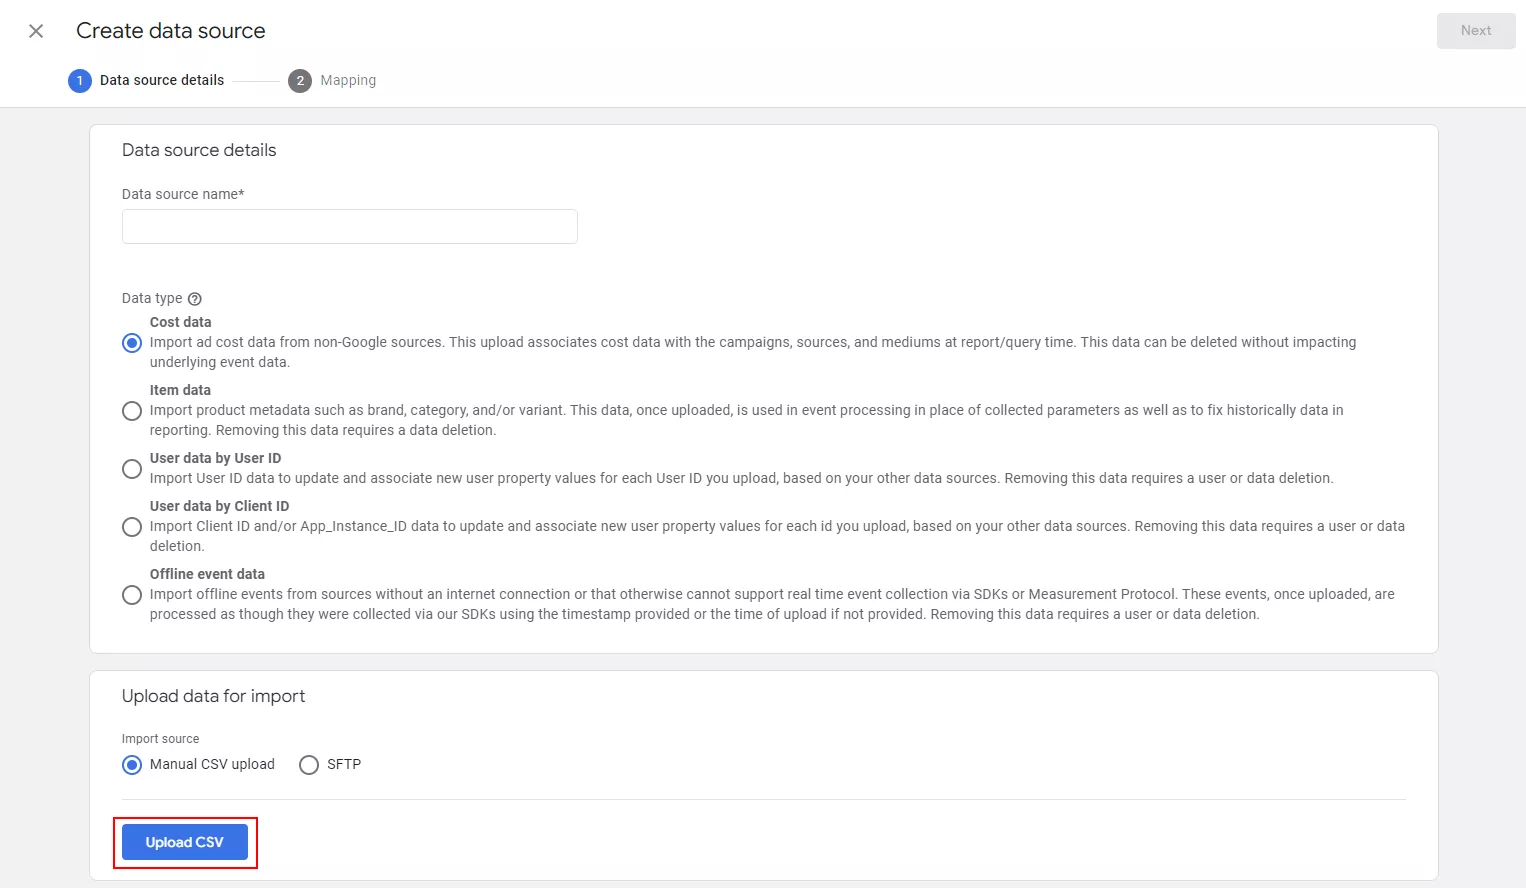
Click Create data source. Next, enter the name of your source and select Cost data as the data type. Select the upload method.
- Manual CSV upload (we will discuss this later)
- SFTP, which is an automatic and rather complicated method that involves a developer.
For automatic import via SFTP, the developer must first create a server connected to GA4 and provide access to it. The data will then be automatically uploaded to GA4.
Click Upload CSV.
Please note: The data you import will be merged with the events collected by GA4. This means that when you generate a report, GA4 will refer to your imported file and combine the data from it with its historical data. However, if you delete the import file, this data will disappear from GA4 forever. Learn more about data merging methods in the Google Analytics Help.
Attention! You can only create one source of cost data. Therefore, you must specify sources from all your ad systems in one file.
Next, upload the data file. Go to Google Help and download the CSV template for your data source to review. This is the format in which the system will be able to accept information from you.
The main parameters of the template to download
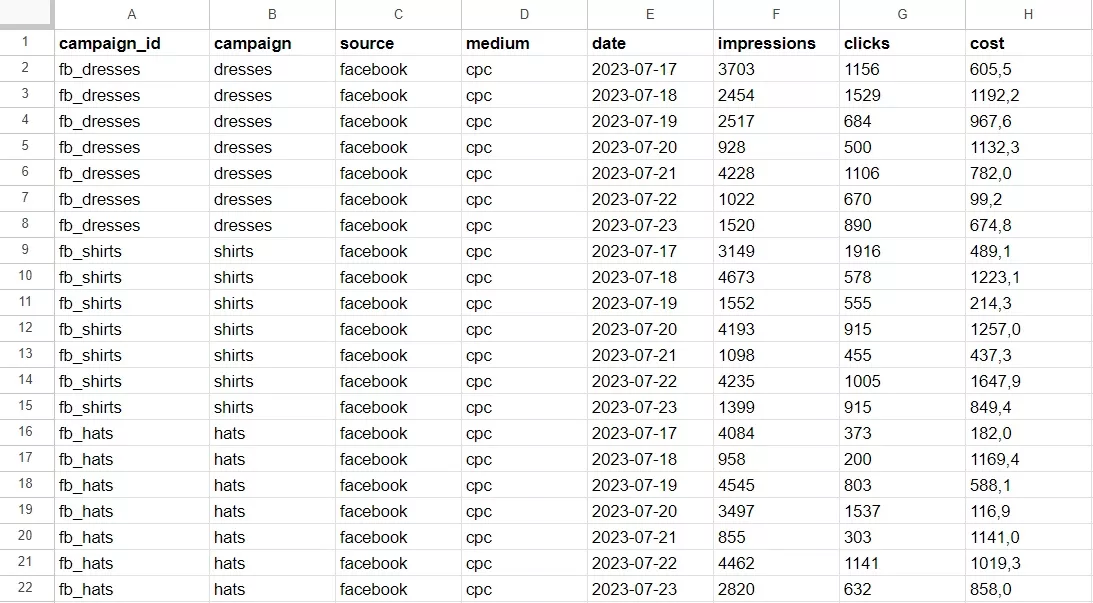
Open the template file. Here, you can see the table columns that you can fill with your actual data.
Let's take a look at each of them:
- Campaign ID is a new parameter for Google Analytics that was not used as a required parameter in the previous version. This should be a unique identifier for your ad campaign. It corresponds to the utm_id parameter of your UTM tag.
- Source is the name of your ad system.
- Medium is the name of the traffic channel.
- Campaign is missing in the template, but it is a required field in the import settings, so you should add it.
- Date is the date from your ad system. The correct format is YYYY-MM-DD, for example, 2023-07-15. Using the correct format is important, as it affects the success of the import.
- Impressions refer to the number of times your ad serving system displayed your ads on a given day.
- Clicks refers to the number of clicks on your ads for the specified day.
- Cost is the budget spent on ad campaigns for the specified day.
This template needs to be filled with actual data. As an example, I will show you how to create and download a report for import using Meta Ads data.
Creating a report in the advertising system
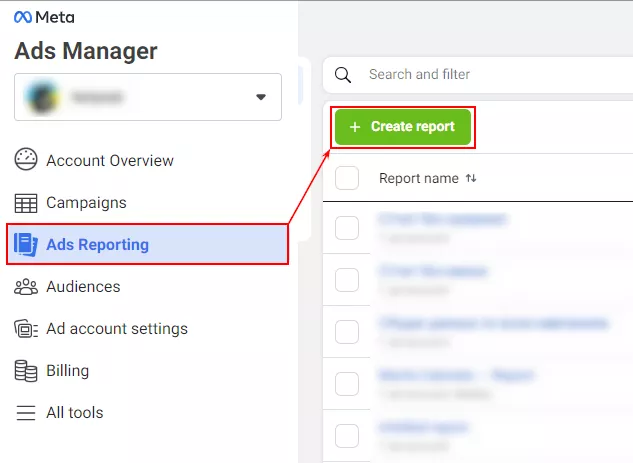
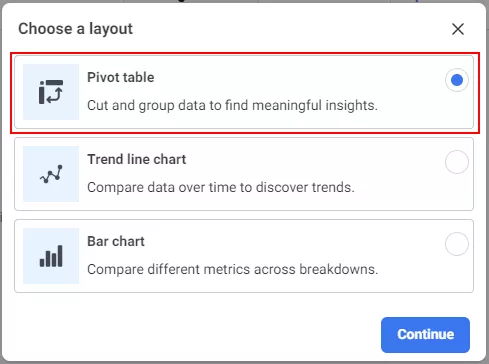
In the Meta Ads dashboard, select the Ads Reporting section in the menu. Create a new report.
Select Pivot table to get a convenient format for download.
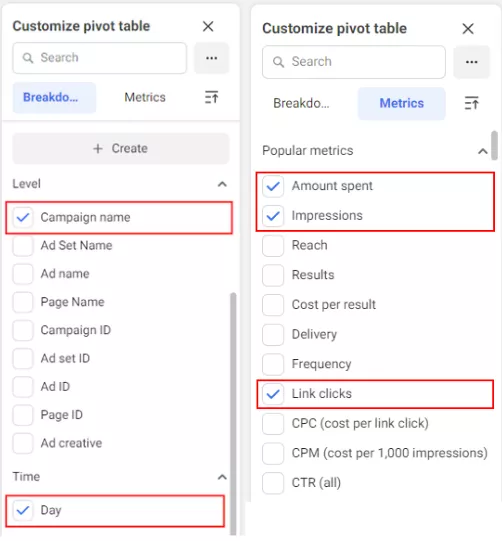
When customizing the pivot table, select the necessary parameters: campaign name and day. The metrics you need are the amount spent (which corresponds to the cost parameter from the template), impressions, and link clicks.
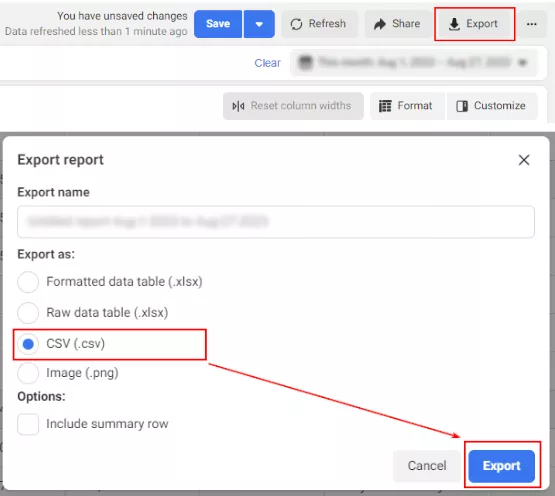
Export the file in a convenient format.
Open the export file with the data and delete any unnecessary columns. At this stage, I recommend naming the columns according to the template, as it will make it easier to correlate the data in GA4’s import settings.
Check that the data formats (dates and costs) are correct. You should end up with a file that looks something like this.
Save it as a .csv file.
As a reminder, if you are using multiple non-Google traffic channels, you must combine data from all ad systems into one file. You cannot create multiple sources for importing cost data into GA4.
Uploading and updating data in GA4
By this stage, you have:
- created a data source in GA4;
- created a file with cost data from ad systems using the template;
- saved the file in .csv format.
Now, the next step is to upload the file to the data source. Go to import settings and click Upload CSV.
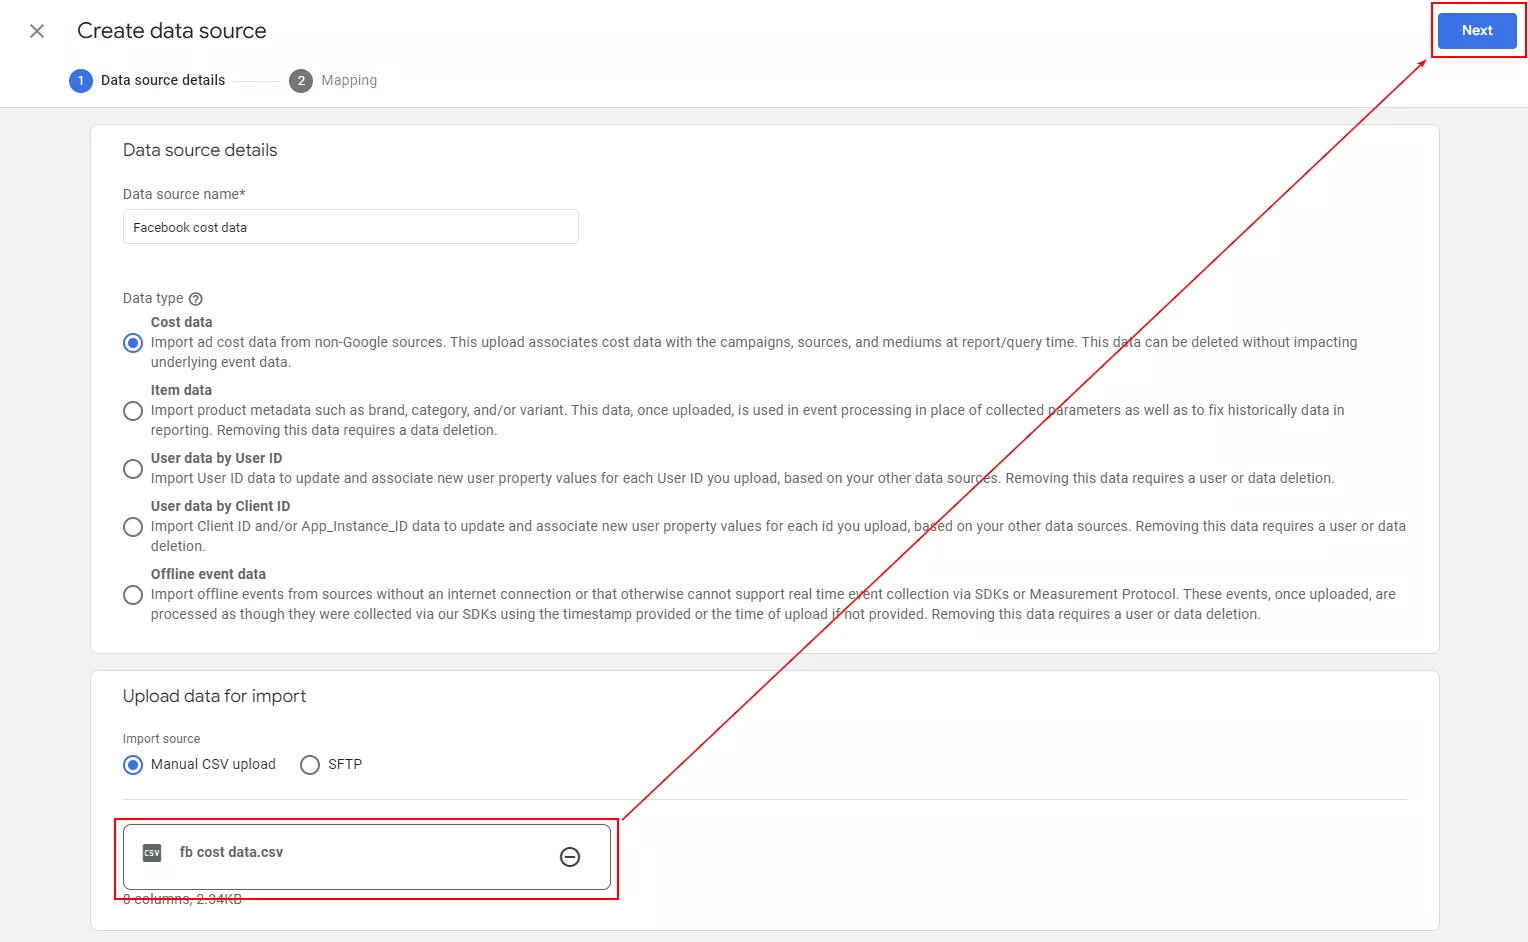
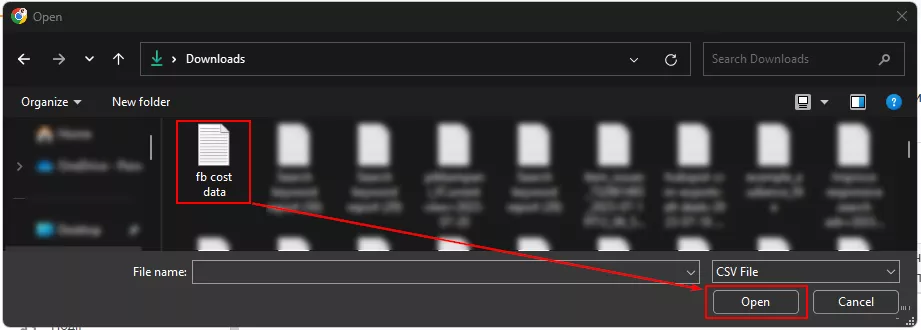
Select the file with the cost data you created and click Next.
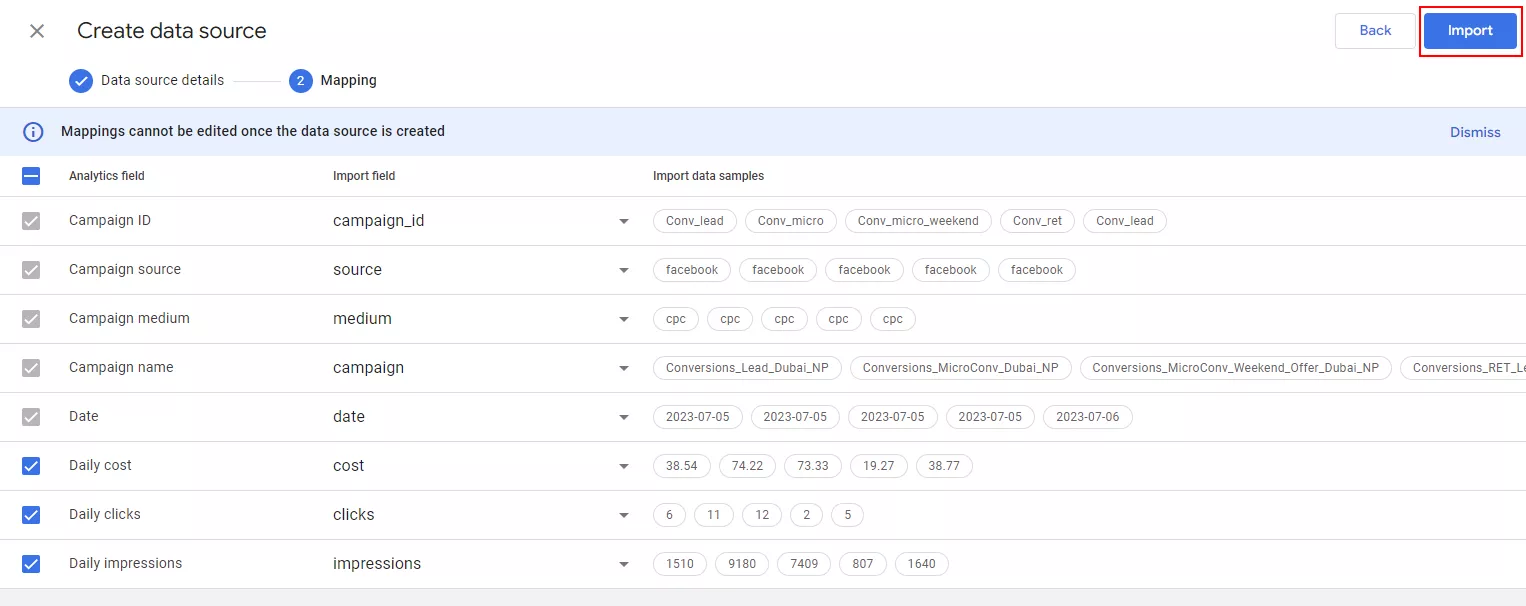
After uploading the file, you'll see the following settings. Here, you need to map the required and optional GA4 parameters to your file.
In the drop-down lists of the Import field, find the parameter of your data that matches the parameters in the Analytics field. Note that the campaign name is a required parameter that needs to be manually added to the template.
When all the data matches, click Import.
The file will be processed by the system for a while. If all the data is correct and there are no errors, you will see a successful data import status.
The data is now uploaded. According to Google documentation, the new information can take up to 24 hours to appear in your analytics reports.
Over time, you will need to update the data to keep your reports current: add new campaigns, clicks, impressions, and their costs. To do this, you must access the same .csv file containing the data you prepared for the initial upload. Make the appropriate changes, save it, and then click Import now to select the same file again.
The order of the columns and their headings must remain unchanged. This allows you to update your reports with the latest data as your business requires.
Working with reports
To view the imported data in reports, click Explore and select an empty report or a report in any form.
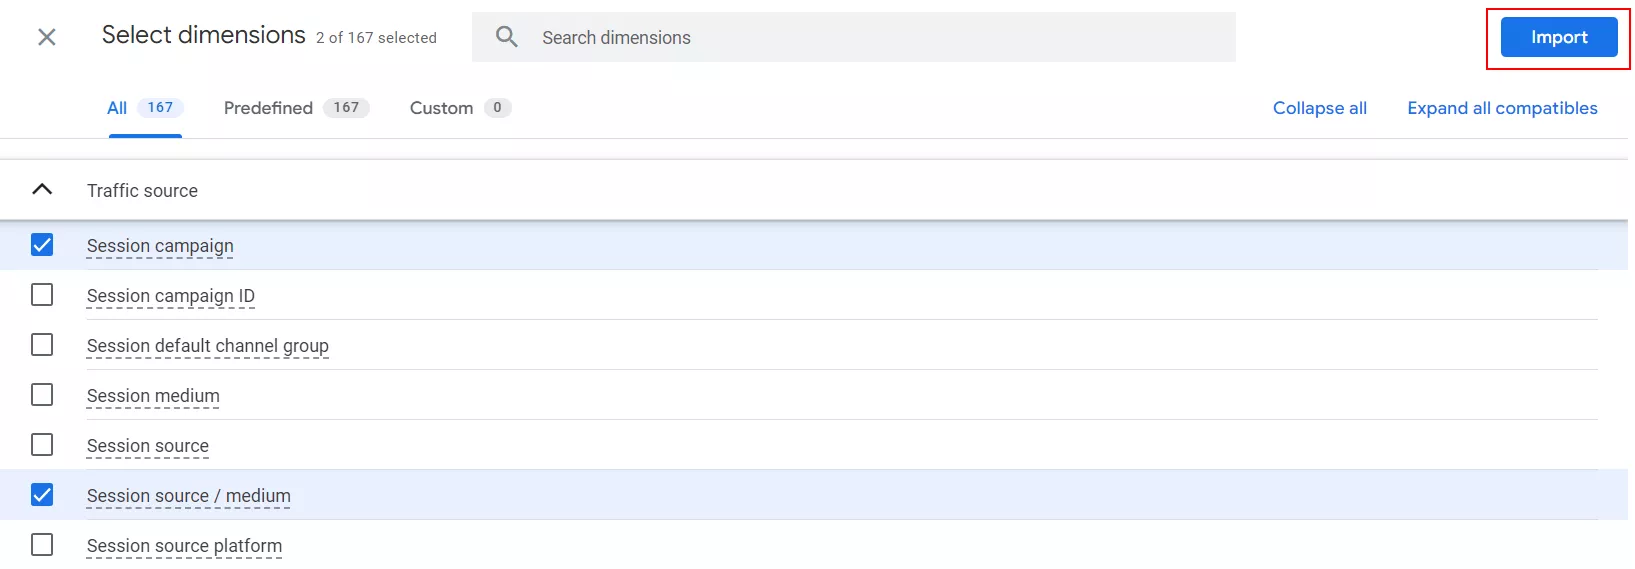
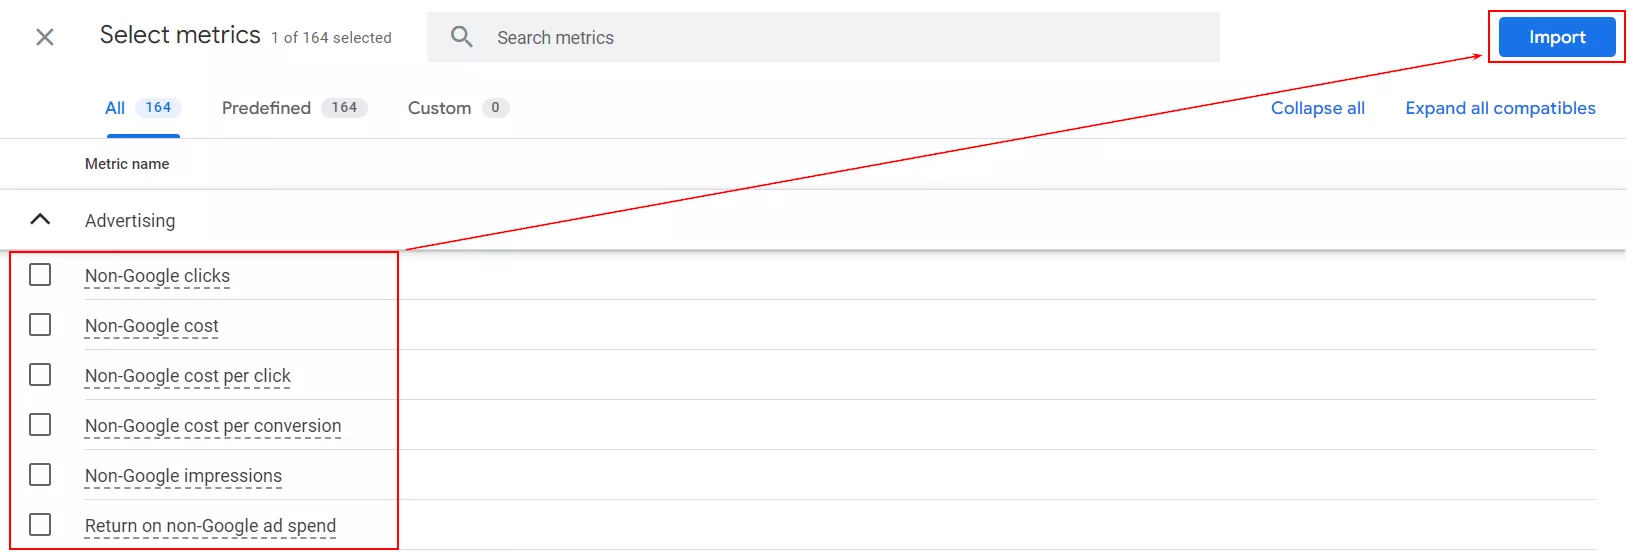
In the report builder, select the Traffic source, Session source/medium, and Session campaign options. In the Metrics tab, select the metrics you need. The name indicates that these are non-Google metrics.
The report will look like this.
You can also analyze the imported costs in Advertising > All. Here, the value in the Ads cost column should be adjusted to reflect your import file.
Most importantly, you can now compare the effectiveness of different advertising channels in one report. To do this, go to Reports > Acquisition > Non-Google cost.
Select “Session” source/medium in the settings. The report will look like this.
By centralizing data from all sources in one report, it will be easier to evaluate the effectiveness of each source and draw conclusions about their profitability or the need to reallocate the budget.
Conclusions
- Several types of data can be imported, such as costs, products, offline events, and user data. A PPC specialist will most often import cost data.
- Importing cost data from offline, email, or social media channels is a very important feature of GA4; it helps you combine information from all traffic sources and get a complete picture of your company's advertising performance. This allows you to easily compare the results of different traffic sources, saving you a lot of time and effort.
- Before you start setting up the cost data import, you need to check for UTM tags in the final URLs of your ads and add the utm_id parameter to them. Without it, the data will not be imported.
- Go to Google Analytics Help to find the downloadable file template. Here, you can find templates for the most popular advertising systems. Pay attention to the data format required by Google Analytics.
- Data from the uploaded file will appear within 24 hours after import. You can create only one source of cost data. Therefore, if you have multiple social networks, their data should be uploaded in one .csv file. Make sure the channels are correct.
- The imported data will be available in GA4 reports as long as the import file is loaded in the created data source. Once you delete the file, the data will disappear from the reports. To add new cost data, you have to change the same import file uploaded the first time and then reupload it. It is important to keep the same column names and order of columns.
- The import process can be repeated as often as your business requires.
Recommended theme posts
Related Articles
How to Set Up Consent Mode in GA4 on Your Website with Google Tag Manager
Let's explore how to properly integrate consent mode in GA4, configure it for effective data collection, and at the same time comply with GDPR and other legal regulations
Display Advertising Effectiveness Analysis: A Comprehensive Approach to Measuring Its Impact
In this article, I will explain why you shouldn’t underestimate display advertising and how to analyze its impact using Google Analytics 4
Generative Engine Optimization: What Businesses Get From Ranking in SearchGPT
Companies that master SearchGPT SEO and generative engine optimization will capture high-intent traffic from users seeking direct, authoritative answers

