Migrating to a new CMS: how to prepare a technical requirement for a developer
The online project often “grows out” of the native CMS. Those who have already failed when moving to a new CMS understand all the risks of the wrong site migration. So how to cover every contingency and prevent a site from losing its position and traffic after the migration?
I prepared a step-by-step checklist and described the actions of an SEO specialist at all stages of the site migration.
1. Preparing technical requirements to implement them on the test site
When moving to a new CMS, remember that the technical audit and SEO improvements should be implemented on it again.
One of the site migration reasons is the impossibility to improve and optimize some features on the old CMS. Therefore, you’d better learn the capabilities of a new system and search sites on this CMS in advance, so that you don’t ask developers to make impossible things.
Before starting work on a new site (or if you already have a test site), an SEO specialist should provide a developer with technical requirements for:
1.1. Creating a site structure with all types of pages. This is highly relevant if you couldn’t implement some types of pages on the old CMS. If you don’t like the structure of the old site, it’s time to modify it the way you want.
1.2. Creating a structure of all URL addresses for all types of pages. That would be great to keep the URLs unchanged, but if you migrate to a new CMS, it is almost impossible. Therefore, you need to set the URL generation templates for all page types again.
1.3. Metadata templates (Title, Keywords, Description, H1) for all types of pages. This information depends on the site. If meta tags are optimized manually on some pages, add these meta tags to a separate table for developers. If the templates were used on the old site, they can be modified, implemented or just transferred to the new one.
1.4. Basic technical recommendations on blocking search indexing, setting up robots.txt, optimizing paginated sections of content, setting up server response codes, generating sitemap.xml and HTML-sitemap, configuring canonical, micro-markup, multilingualilty, setting up automatic redirects (301), optimizing images.
1.5. Create a list of SEO amendments you want to implement or transfer to a new site. If the old CMS system didn’t allow to create or optimize filters pages, write a detailed technical requirement for it. If you want to transfer something, don’t forget to specify what exactly should be transferred.
2. Analyzing the test site and controlling implementation processes
Some time later, the developer tells that a test site is ready.
Main tasks at this stage are the following:
2.1. Agreeing on the site design. If there are designers, ask them to send the site layouts. Prepare a list of clarifications, questions and comments. Write all the questions you have, even the small ones. Engage a client in the discussion. Ask to edit layouts or figure out when changes will be made. The clearer the layouts will be, the less you will have to edit on the test site. If there are no layouts, check everything right on the test site and still prepare a list of clarifications, questions and comments.
2.2. Monitoring the implementation of technical requirements. Don’t wait for the release to check the propriety of implementation. Don’t hope that everything will be done exactly according to the TR. Ask developers to show you the implemented items from time to time.
2.3. Performing a mini-audit of usability.
Check the following:
- whether it is convenient for a user to perform target actions;
- whether the site information is conveniently arranged;
- whether the forms submission and the shopping cart work properly.
2.4. Performing audit of the test site.
When the site is almost ready, make a small audit to make sure that there are no new critical errors. Check the following:
- Does the main functionality work?
- Is the site information correct?
- Are there any test pages or temporary texts?
- Does any quick view block generate unnecessary links?
- Are there new types of pages with dynamic URLs?
- Are there cyclical redirects?
3. Preparing technical requirements for the site migration
Once the structure and new URLs have been implemented, and all landing pages are available on the test site, proceed to the preparation of the technical requirement on the resource migration.
Important: you will be supplementing this technical requirement until the site is moved. It should include the items to implement after the migration to a new CMS as well.
3.1. What should you do before moving to a new CMS?
3.1.1. A backup. Before the migration, ask developers to make a backup of old and new sites. In case of unforeseen circumstances, you can quickly roll back the changes.
3.1.2. A table of old 301 redirects. If the URLs on the site were changed, the old site should have its own redirects table. Ask developers to transfer it to the test site.
Why is it important? This table is often forgotten, and redirects are set from the displayed pages of the old site only.
This way:
http://site.com/old-url → 301 → http://site.com/new-url
Thus, the old pages of the old site are left without redirects when migrating to a new CMS. A 404 error occurs:
http://site.com/old-old-url → 404
As a result, the site loses some of the referral traffic, especially if the old pages were promoted and had links. In addition, links to old pages are frequently provided in social networks.
Besides downloading the redirects table, there are more things to do to be on the safe side.
What should you do?
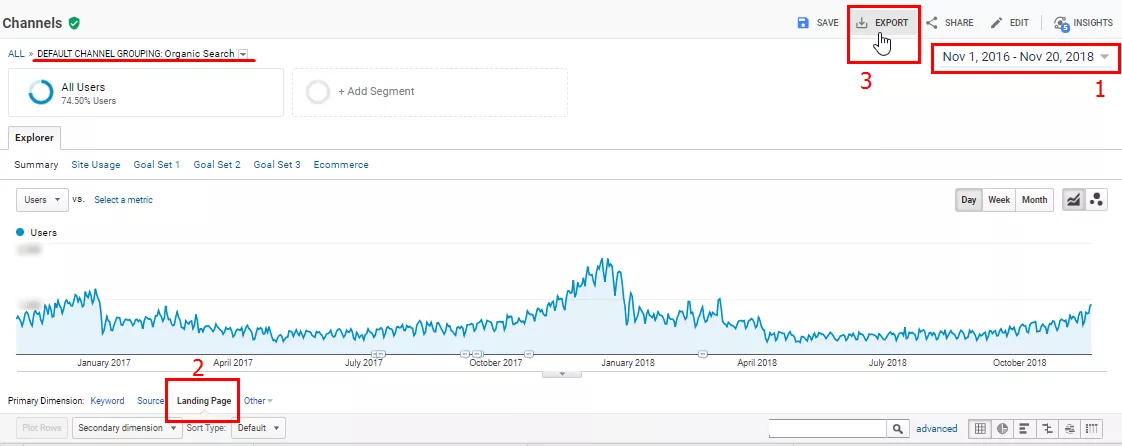
3.1.2.1. Download the pages that brought the most traffic for a year or two from Google Analytics:
1. Go to the "Channels - Organic Search" report, select the desired date and the main parameter — "Landing page".
2. Select the display of 500-1000 lines on the page and click "Export".
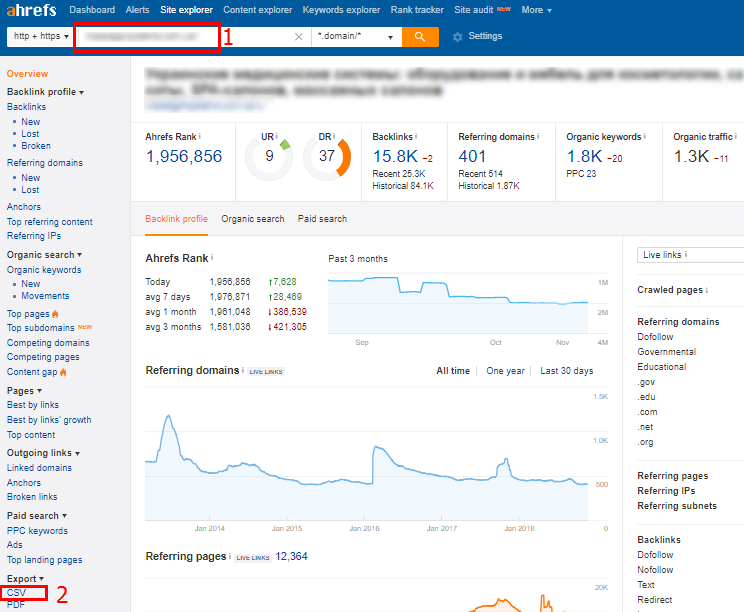
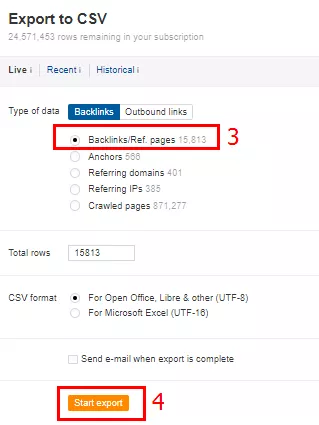
3.1.2.2. Download pages with external links from Ahrefs: open the service, enter the site domain and select "Export".
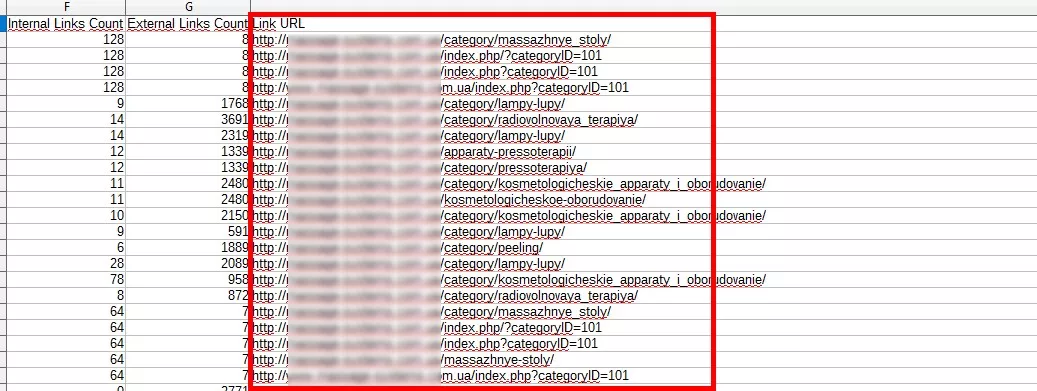
Pay attention to “Link URL” column (pages of your site the external resources refer to).
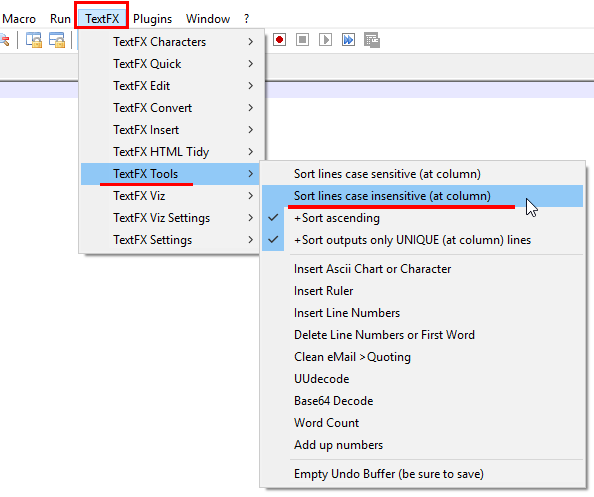
3.1.2.3. Merge two tables and remove duplicate pages (use Notepad ++ with the additional TextFX extension):
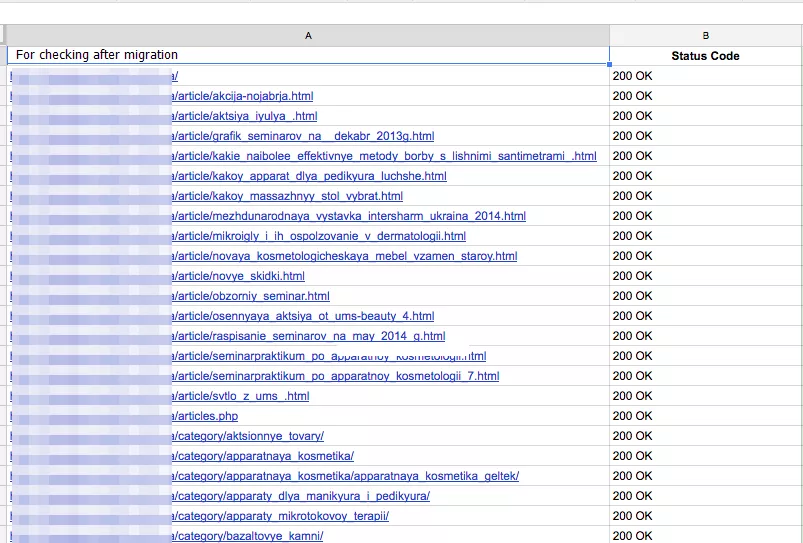
3.1.2.4. Gather the list of all URLs in a separate table, check the response code of every page to understand which pages are available now.
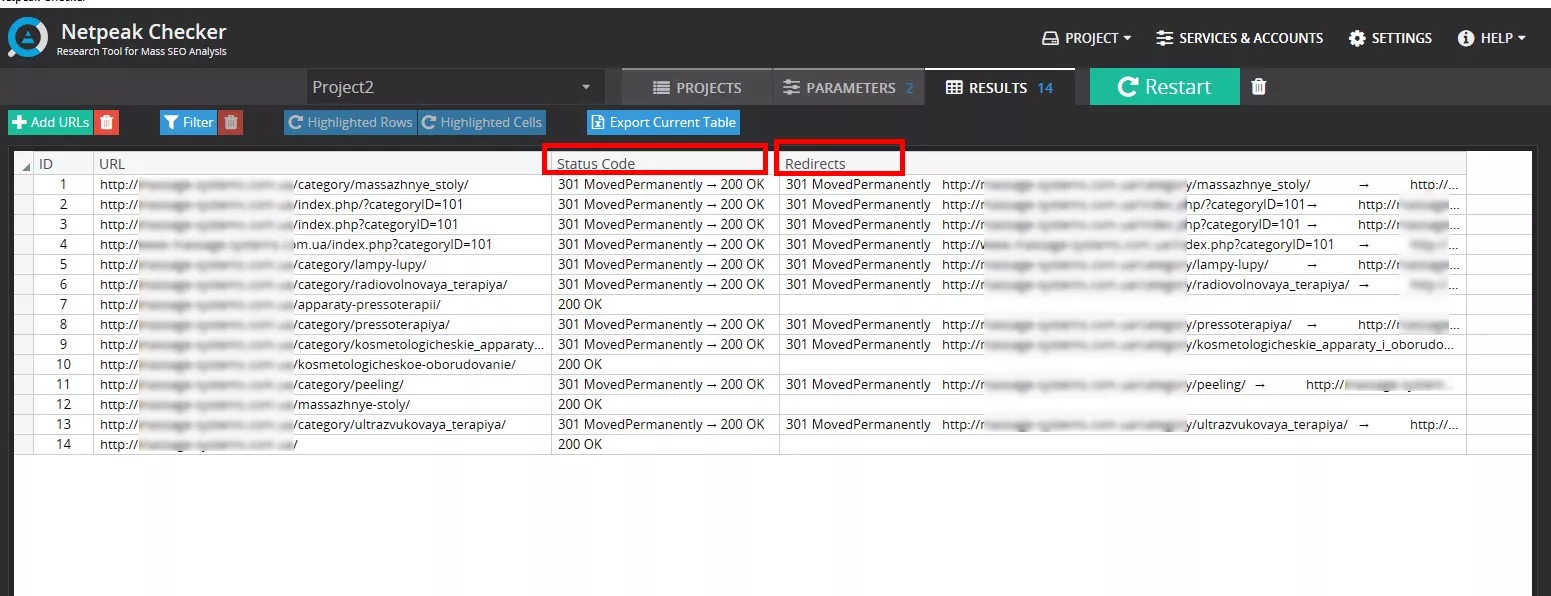
To check response codes, you may use Netpeak Checker.
If the redirects table of the old site is transferred correctly, all the pages unloaded before will give 301 response code on the test site:
http://test-site.com/old-old-url → 301→ http://test-site.com/old-url → 301 → http://test-site.com/new-url
To check the response codes and the redirects setup propriety, follow these steps:
- change the domain of the main site to the test one;
- enable “Status Code” and “Redirects” parameters in Netpeak Checker
- just check;
- follow the redirect chain — the response code may be 301, but the redirect is set to the home page.
3.1.3. A table of new redirects. 301 redirects setup allows the search robot to immediately understand that something has changed on the site, and the page has a different address now.
Register all redirects with the domain of the test site. Yes, you are setting up a redirect from non-existent pages of the test site to the pages of the test site. However, this helps you check the correctness of redirect settings on the test site. When migrating, the site domain will change, and redirects will be configured.
How to create a table of redirects?
- Download all target URLs from the old site using Netpeak Spider.
- Match them to similar URLs on the new site.
- If there are no similar pages on the new site, you don’t need to set the redirect, the response code should be 404.
If the online store or website is not extremely large, you’d better compare pages for categories and subcategories manually, and then make a table of them. The product card pages can be just downloaded and transferred to the developer for comparison.
If the site is large, it takes a lot of time to manually match pages. In this case, all the work should be performed by a developer — an SEO specialist should only download all the pages of the old site and check the response codes of the previously unloaded pages after setup.
If the URLs on the new and old sites were created with the help of different rules, the developer will easily set up a dynamic redirect.
If the URL was created manually, without any structure or logic, it is unlikely that a developer will be able to set up redirects without the appropriate table. Although the factory ID comparison method is sometimes used for the product cards.
When creating a table of redirects, remember about the special pages of a blog, news, etc. Don’t forget about subdomains if any.
No matter how you set 301 redirects — save all URLs from the old site in tables before moving. This will help you quickly check the response codes. It will also be your backup (just in case).
3.1.4. The content transfer from the old site to the test site.
If you don’t transfer content to the test site, it will be lost while migrating. And this can significantly affect the page ranking.
Give clear recommendations on the content which should be transferred to the test site:
- texts from the pages of sections, categories;
- texts from optimized filter pages (if any);
- ontent from product cards: descriptive texts, reviews, videos, characteristics;
- all information from special pages, articles, service pages or blog pages.
Again, if the site is small, you can analyze each text, make a table of texts transfers on the site for the main sections and categories. Otherwise, you will have to rely on the developer or content provider from the client's side, selectively checking the availability of texts.
3.1.5. Verification files. Ask developers to leave the verification files of Google and webmaster panels in the root directory of the site, so that access is not lost while migrating.
3.1.6. Data synchronization. Don’t forget to update the current database of goods (the prices for goods (services) and statuses (in stock, not available)).
3.1.7. Notification of other specialists. Your technical requirement should include a paragraph that a developer or a client has to inform specialists who work with contextual advertising or advertising in social networks that the URLs will be changed, and the site will migrate to the new CMS. Specialists should clarify what codes they need to be transferred.
3.1.8. Confirmation by an SEO specialist. Highlight as a separate item in the technical requirement that the migration must be approved by the SEO specialist in charge.
3.2 Post-migration checklist
3.2.1. Setting up analytics systems. All the analytics settings will be broken down after the migration. Configure the analytics of the updated site when all the forms, buttons, a shopping cart are available for the test.
What should you provide in the technical requirement for the analytics setup:
-
recommendations for implementing tracking codes (Google Analytics or Google Tag Manager with already implemented statistics system codes);
- setting up e-commerce (for e-commerce projects);
- setting up tracking of necessary events.
3.2.2. Setting up robots.txt. Often the settings of robots.txt transferred from the test site remain unchanged — as a result, the main site is closed for indexing. Specify the necessary instructions for robots.txt so that they can be quickly implemented after the migration.
3.2.3. Generating Sitemap.xml. The sitemap.xml file is also often transferred from the test site with the URL of the test site. Ask the developer to update the file so that it contains the pages of the main site. Set up an automatic update of a file once a day.
3.2.4. Replacing internal links with the current ones. All links (menu, links in texts, links in next, prev, canonical attributes) should be up-to-date, i.e., they shouldn’t belong to the test site.
3.2.5. Checking the indexing settings. Describe the basic indexing settings to check. This paragraph will be a guideline both for you and the developer.
Pay attention to the filters indexing settings and their intersections, special pages.
It's bad luck to plan a migration for Friday or a weekend ;)
4. Checking and controlling implementations after the site migration
4.1. The first thing to check after the site migration is robots.txt and redirects settings. Check whether the target pages are closed with <meta name="robots" content="noindex, follow" /> meta tag.
4.2. Check the availability of meta-information on each page to see if there are any duplicates.
4.3. Check how all forms and a shopping cart work.
4.4. Make sure that at least the statistics counters have been transferred first. It is very important to collect accurate traffic statistics after the migration.
4.5. Once again, perform a mini-audit of the site to see if there are any new critical errors.
4.6. Update the sitemap.xml files in the webmaster panels so that the search engine robots can detect the new URLs more quickly.
4.7. Monitor traffic and positions. The traffic may decrease by 10-20% for a while, but if everything has been done correctly, the traffic will return within a month.
Conclusions
The SEO specialist's work during the site migration to the new CMS consists of the four important steps:
-
preparing the necessary technical requirements for the test site;
- analyzing the test site and monitoring the implementations;
- preparing the site for migration;
- checking and controlling implementations after the site migration.
However, each site has its own peculiarities, so a standard checklist is not always enough. This is just a guide. When preparing the technical requirement, take into account the peculiarities of the project and use common sense.
We hope you realize how much work it is necessary to perform to prepare and to successfully transfer a site to a new CMS. However, this approach will help you minimize the loss of traffic and hold the key.
If you have read the article and still have difficulties with the site migration to a new CMS, send a request, and our SEO specialists will help you.
Related Articles
How to Set Up Consent Mode in GA4 on Your Website with Google Tag Manager
Let's explore how to properly integrate consent mode in GA4, configure it for effective data collection, and at the same time comply with GDPR and other legal regulations
Display Advertising Effectiveness Analysis: A Comprehensive Approach to Measuring Its Impact
In this article, I will explain why you shouldn’t underestimate display advertising and how to analyze its impact using Google Analytics 4
Generative Engine Optimization: What Businesses Get From Ranking in SearchGPT
Companies that master SearchGPT SEO and generative engine optimization will capture high-intent traffic from users seeking direct, authoritative answers

