Google Ads Editor is an official, free application from Google that you can download to any computer running 64-bit Windows 10 or later and MacOS 11 or later. It allows you to manage your ad campaigns offline and make multiple changes quickly and easily.
Needless to say, Google Ads Editor is a powerful tool. All you have to do is spend a little time learning the tool and understanding how it works, and you will effectively streamline the process of creating and editing your ad campaigns.
Advantages of Google Ads Editor over Google Ads
- Offline editing. Google Ads Editor is free software that you can download to your computer. Once it’s synced with your Google Ads Manager account, you can make changes offline. All you need is a computer with the software running on it.
- Fast and flexible editor tools. Working with campaigns in the Google Ads Editor is much faster than Google Ads. As the hierarchy is organized differently, you don’t have to waste time loading tabs and switching between sections. It is possible to create 60 campaigns in 60 minutes using the Editor.
- Review changes before posting. Google Ads Editor allows you to review your changes before you post them, so you can make sure everything looks good and is correct before you go live. All changes remain only in the Editor on your computer until you click the Post button.
- Bulk editing. You can make edits to multiple ads and campaigns with a single click. For example, you can change headlines in 15 ads in just 2 minutes and a few clicks.
- Custom rules will not allow you to upload an ad campaign if a specialist has overlooked critical settings. This feature will also help you avoid common mistakes that Google’s algorithm is sure to detect. See Google Help to learn more about custom rules.
Disadvantages of Google Ads Editor
Google Ads Editor does have its downsides. First, the Editor doesn’t yet support product listings for Performance Max campaigns. That said, updates are released regularly, so it’s more of a matter of time.
Second, there are much fewer statistics available for campaign performance analysis. The Editor is optimized for editing campaigns, not analyzing them. The Overview tab in the Manage section gives you a quick overview, but you still have to use Google Ads online or Google Analytics 4 for a more thorough analysis.
Finally, you need to get the latest changes on a regular basis. I know a dozen stories of early-career marketers accidentally taking down other specialists’ ad campaigns because they forgot to get the latest changes before publishing. This is not a drawback of Editor, but rather a common mistake made by beginners.
Check out our glossary for key online advertising definitions to enhance your marketing knowledge!
First acquaintance
Getting started in Editor is easy, as you can sign in with your Google account. Let’s look at the main elements of the interface.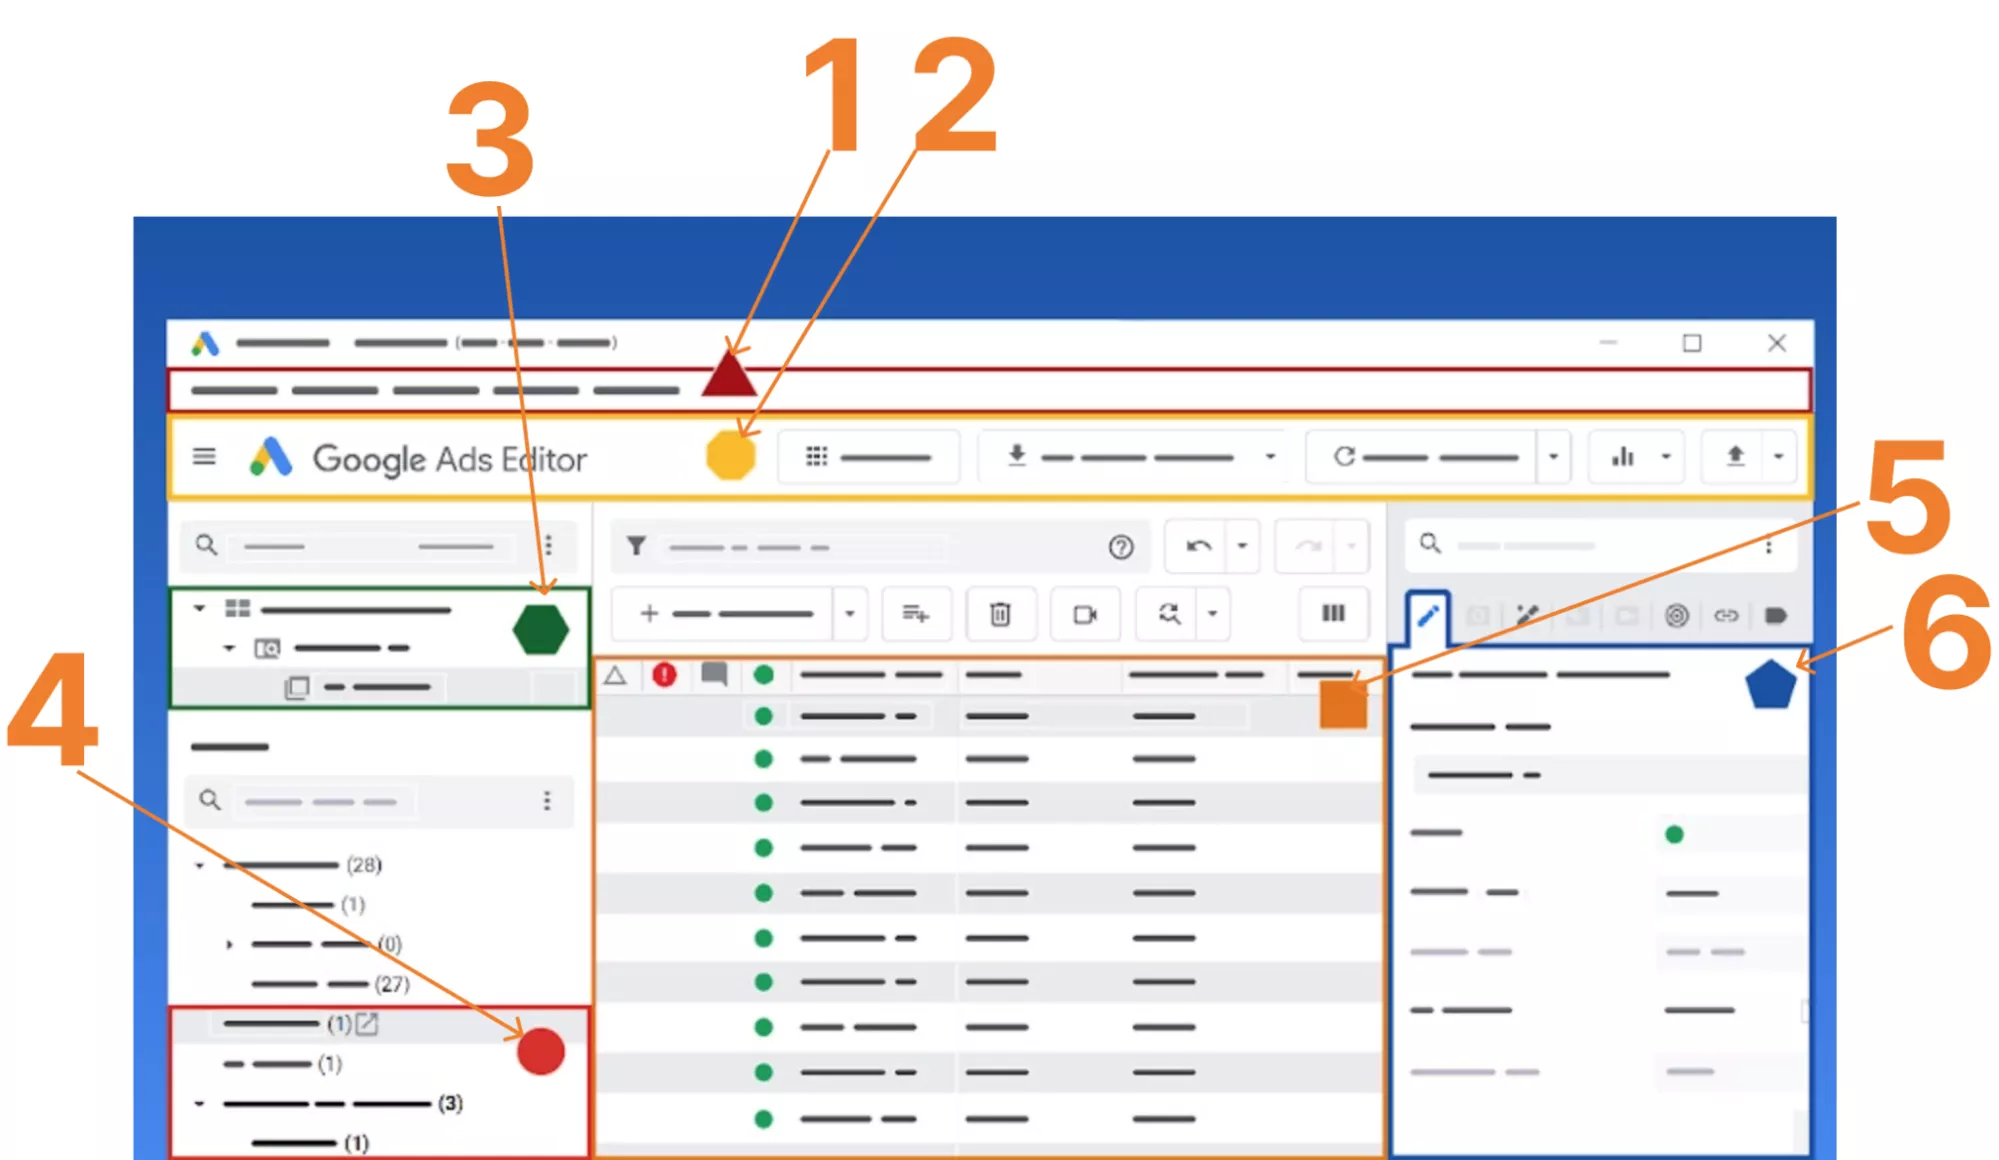
- The app menu is located at the top of the Google Ads Editor interface on Windows OS. On Mac OS, the app menu is slightly higher at the top of the screen.
- The toolbar is located at the top of Google Ads Editor. Use the buttons on this panel to open or add an account, download the latest changes, review and publish changes, and view your Google Ads account statistics.
- Use the Account tree view to find and select the account, campaign, or ad group you want to view or modify. To expand or collapse this view, click the arrow next to the account or campaign name.
- In the Dashboard, you can select a campaign or ad group to find or view its information. For example, select a campaign in the tree view and click it. Click Keywords in the dashboard to display the keywords for that campaign in the data view.
- The data view allows you to view the contents of an account, campaign, or ad group. The content displayed in the data view depends on the options you selected in the tree view and type list.
- The edit panel lets you change a row highlighted in the data view. You can also enter data using the keyboard. Open the edit panel as a floating window by clicking the arrow icon in the square. You can also resize the panel to increase the number of columns visible in the data view.
Google Ads Editor statuses
The account tree is located in the upper left corner of the Editor. Depending on the changes made to campaigns or ad groups and their statuses, the name of the asset may have a different color and boldness. See the example below:
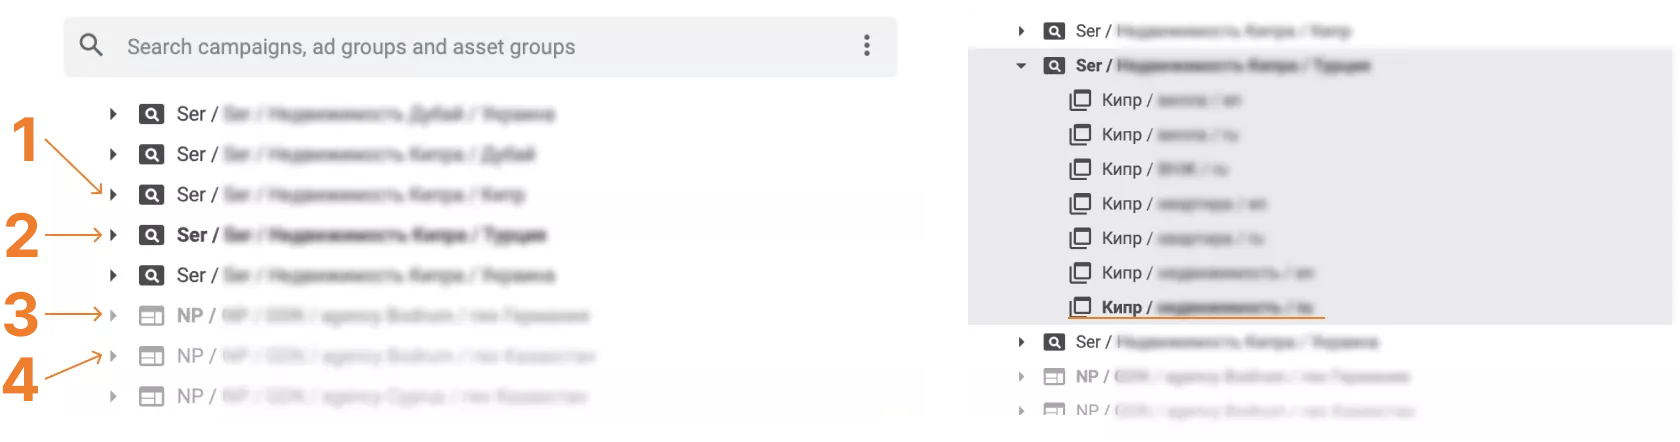
- Regular font. The ad campaign is included, and no changes have been made.
- Bold font. The campaign is active, and changes have been made to one of the assets.
- Gray bold font. The campaign is disabled, but changes have been made.
- Gray regular font. The campaign is off, and no changes have been made.
If you open the menu for campaign number 2, you can see which ad group has been changed.
If you select campaign number 2 and go to the Manage panel, you can see the element that has been changed. The list of standard dashboard assets is quite extensive. I recommend you click Hide empty types to leave only those assets used in your campaigns.

One of the best features of the Editor is the ability to undo an action. To undo the last action, use the Command+Z / Ctrl+Z hotkey or the Back arrow on the interface. You can undo an unlimited number of actions. However, if you only need to undo changes in one campaign without affecting changes in other campaigns, you can use the Revert with all included assets option.
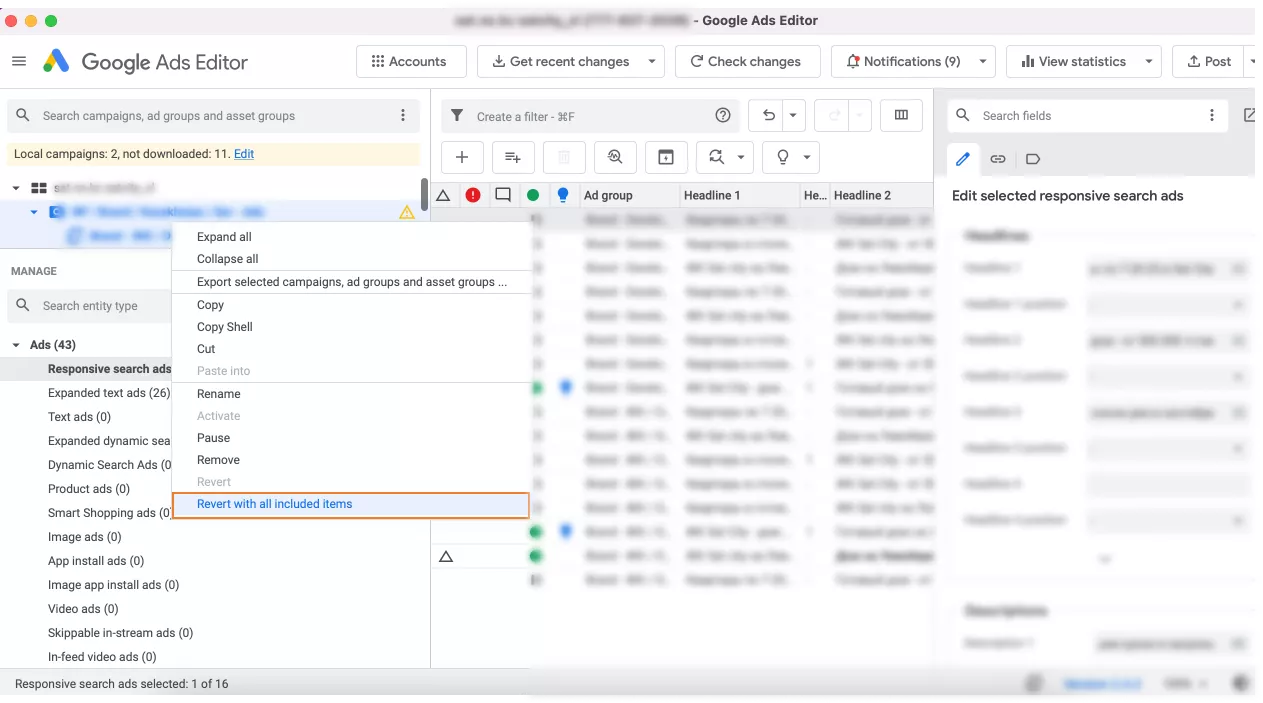
For example, you may have worked with a search ad campaign (Ser Ads) and made changes to it. You then made changes to the display campaign (DSA Ads). Later, however, you realize that you must undo the changes you made to the search ad campaign.

If you use Command + Z, it will undo the changes to the Display campaign first and then the changes to the Search campaign. If you use Undo with all included assets, you will undo the changes to the search campaign while retaining the changes to the display campaign.

.
How to use filters in the Google Ad Editor
It can take a long time to find the information you need in Google Ads Editor, especially if you have a large account with many campaigns. However, you can speed up the process considerably by using filters. I’ll walk you through a few steps you can take to easily find the information you need.
For example, let’s say you need to find all references to the Baby Safe 5z pushchair at every campaign level.
- Type all or part of the phrase in the search bar.
I chose only part of the phrase (“5z”) because the words “baby” and “safe” can often appear in an account that sells children’s products. I did not enter the whole phrase because there is a chance that you will miss the required assets due to differences in spelling (with a space, hyphenation, or lowercase).
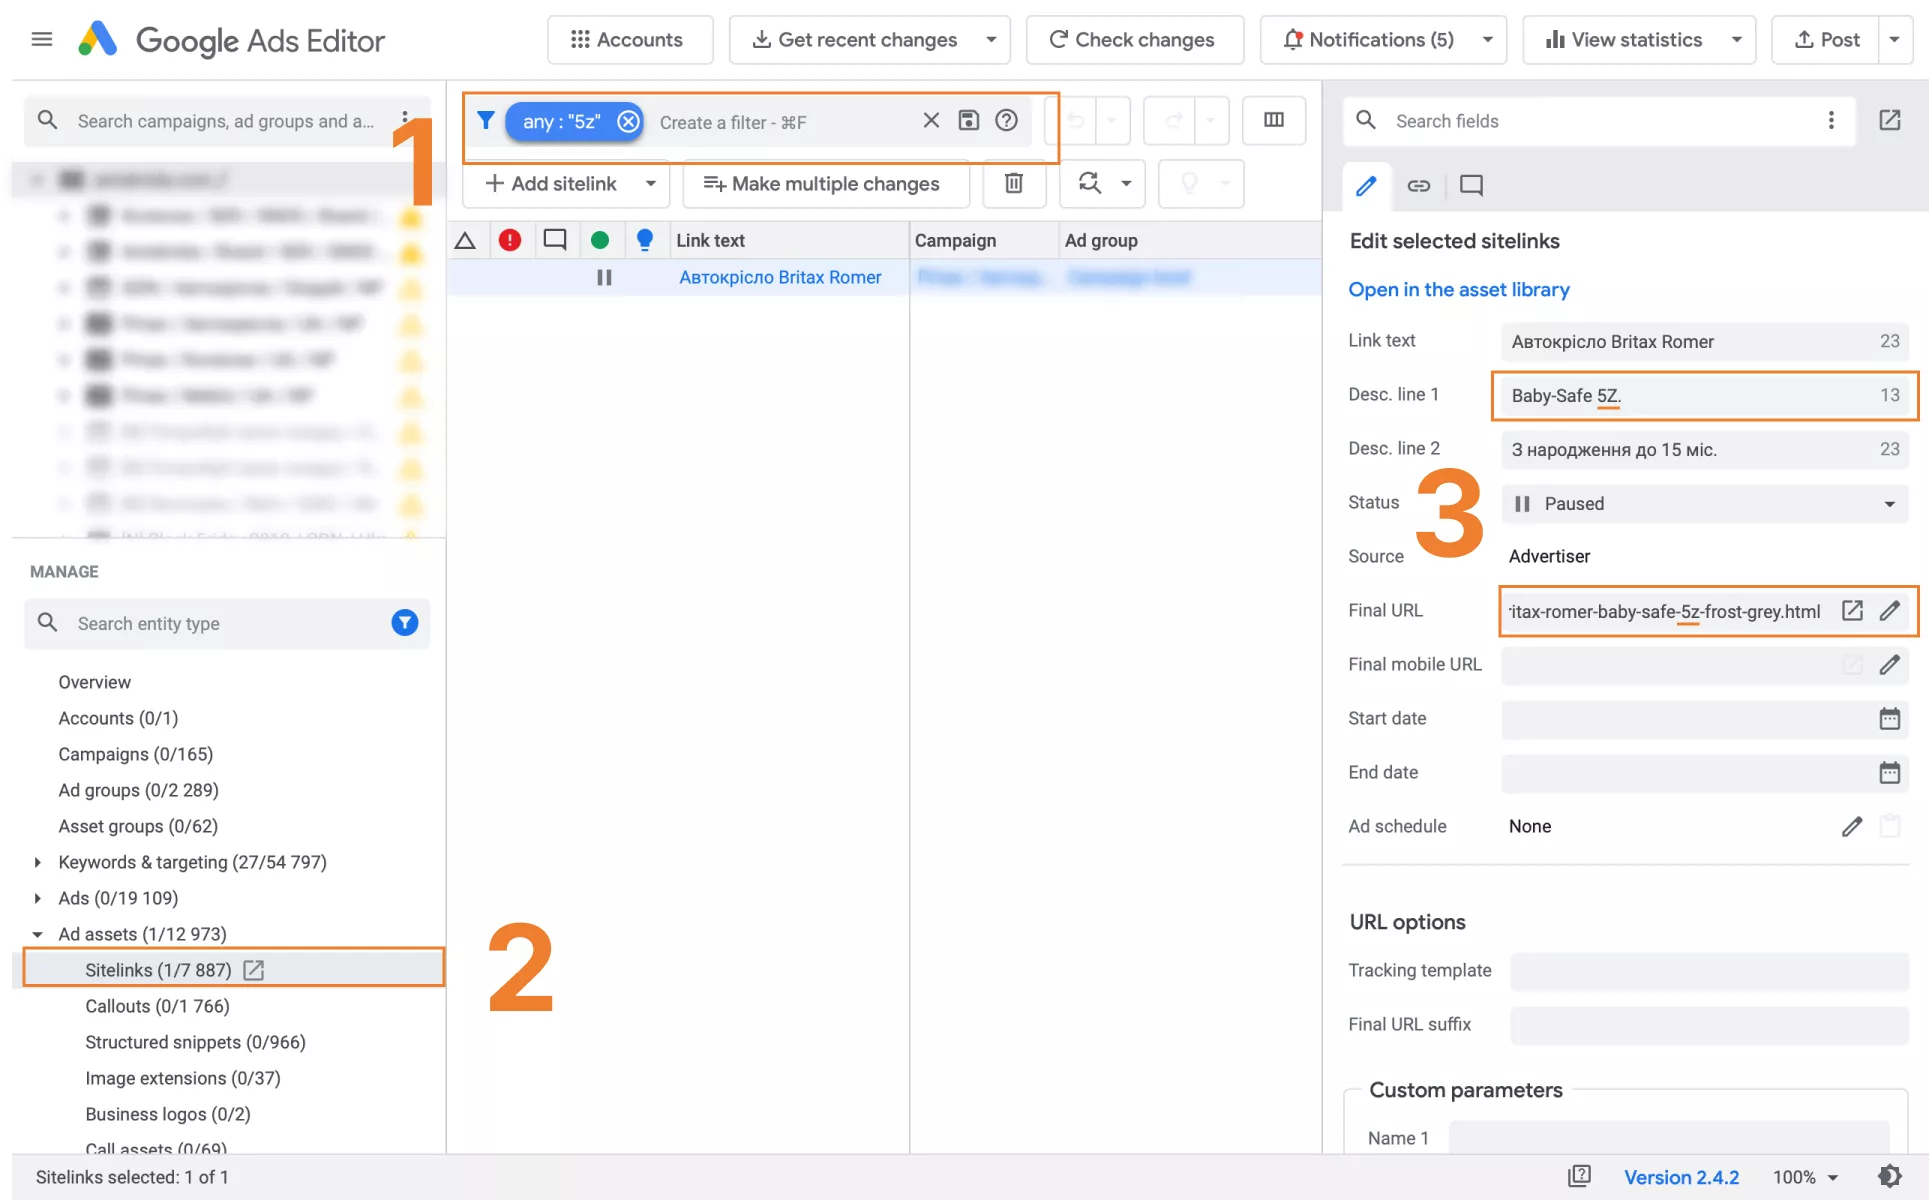
When you enter a phrase and press Enter, Google Ads Editor automatically applies the “any” rule. In other words, it searches for all fields that contain the specified phrase.
- Determine the type of asset.
I go to the Manage panel and see which row has a value >0. In my case, I see that the system has found the mention of “5z” in ad assets, namely in additional links.
- Make changes to the required assets.
In my case, I had to delete this asset. So, I changed the status to Paused.
- That’s it!
You’ve saved yourself a lot of time that would otherwise be spent manually checking all the campaigns and assets in your account. In practice, it took me a mere 3 minutes to perform all these steps.
Pause everything you can. It’s important to save the statistics, and you’ll still have the option of activating the asset again if necessary.
Let’s consider another case of using filters.
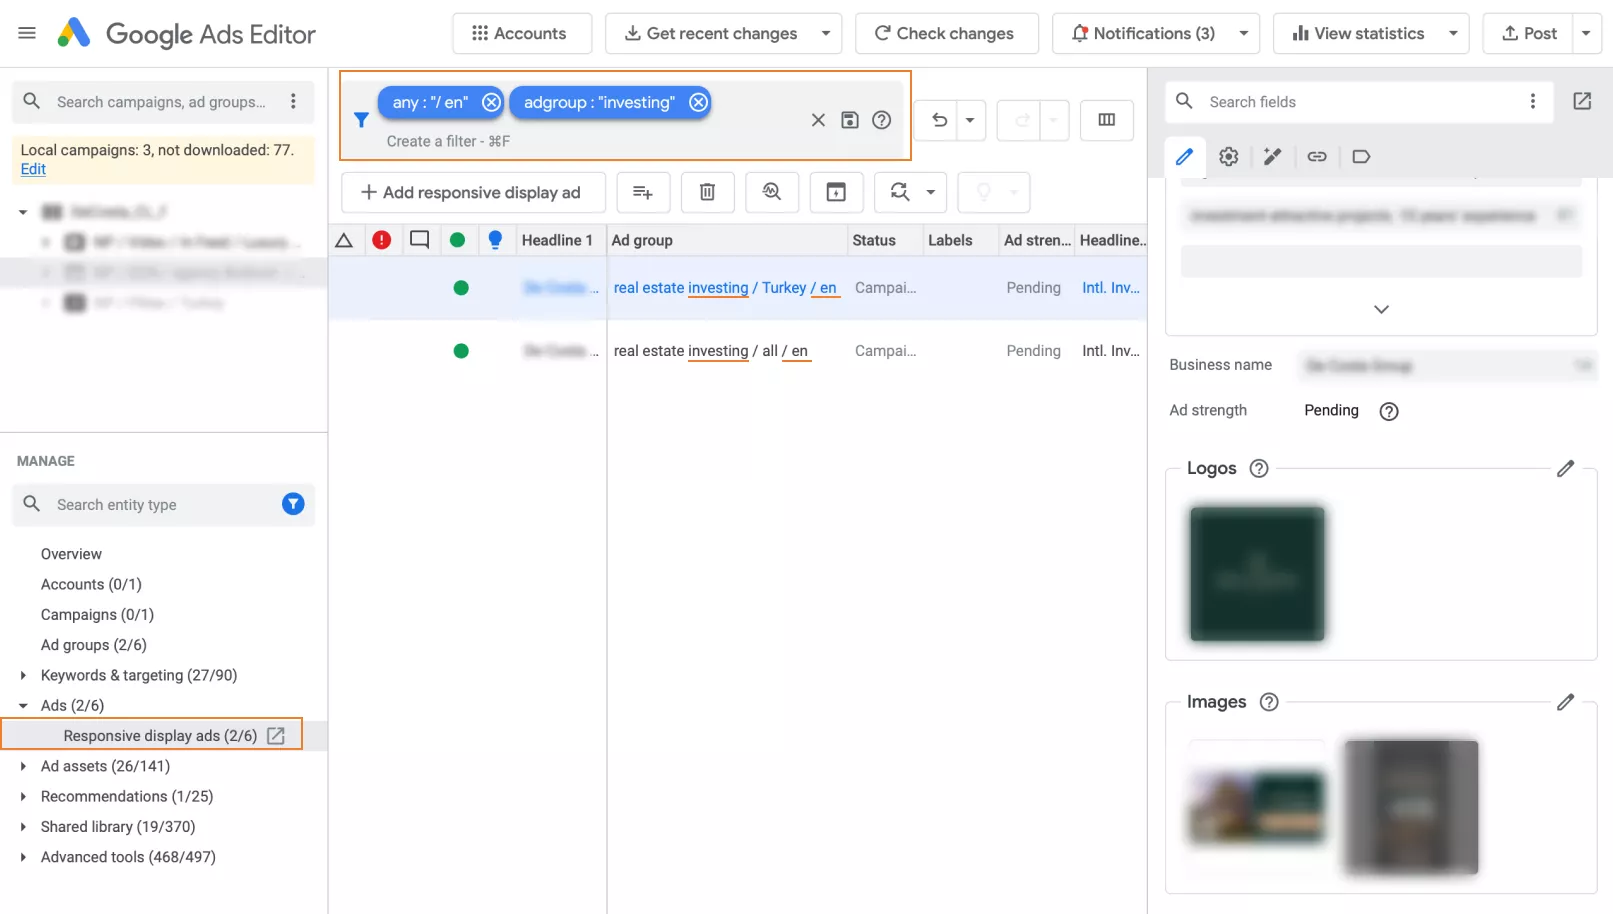
For example, I need to replace banners in 50 ad campaigns for a display network. In my account, I have display ads in Turkish, English, and Ukrainian. The ads will be tagged in the tr, en and uk accounts, depending on the language. The ad groups are divided into real estate investing and investing based on user intent.
To filter ads in English related to “real estate investing”, I use the following filters: any: “/ en” and adgroup: “real estate investing”.
Filter by “any:” and the editor will automatically pull assets unless otherwise specified.
To select a different filter, e.g., “adgroup:”, click Create a filter, select the asset you want to apply the filter to, specify the type of match, and enter the desired text.
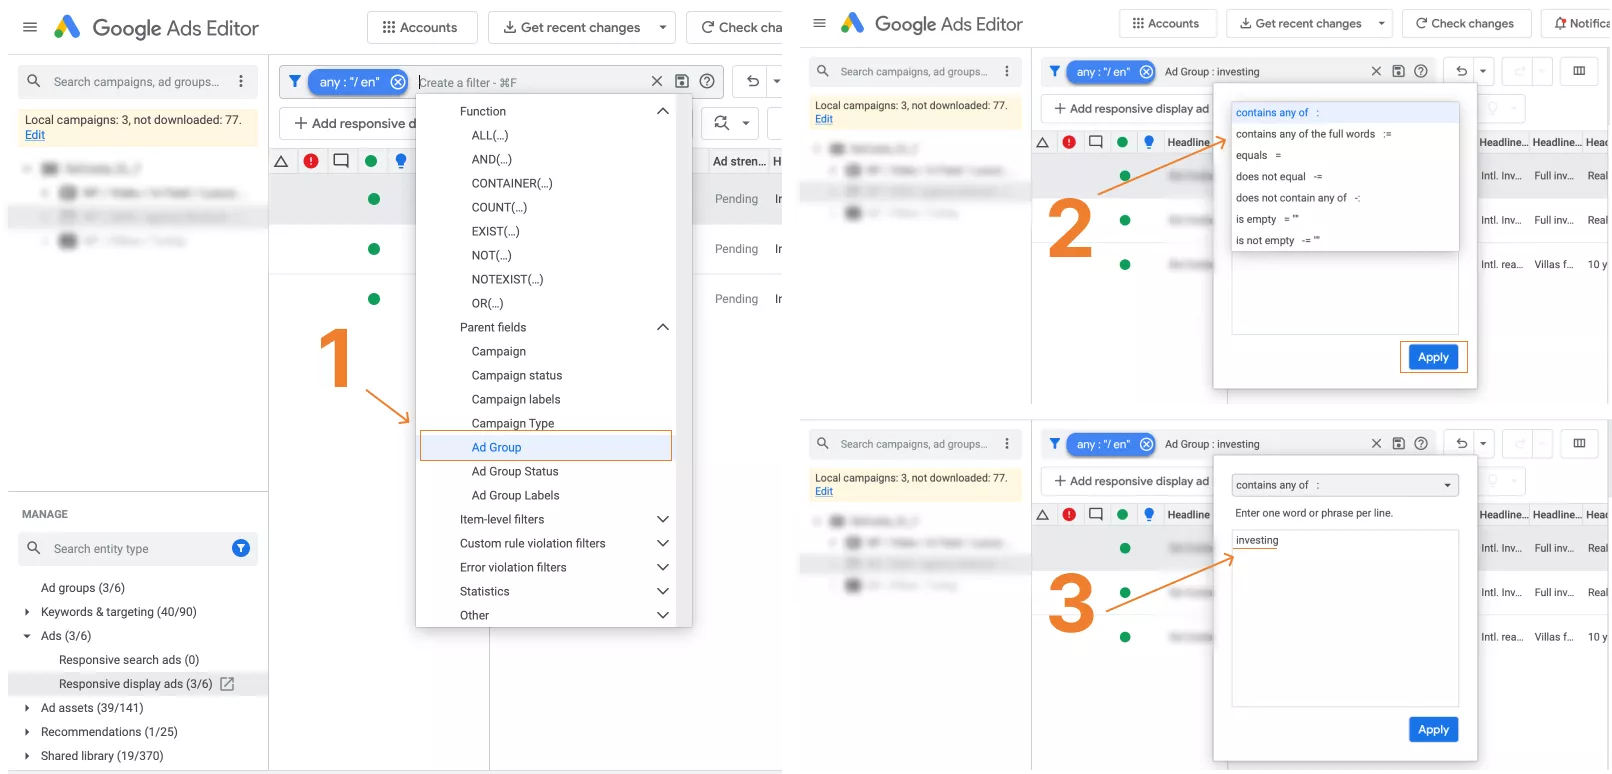
What does the filter type mean in Google Ads Editor?
- Filter by any: “/ en” means find all assets that contain the text “/ en” in the title, description, headings, link, or anywhere else. Why “/en” and not “en”? Because words like rent, investment, and lending contain the “en” particle. Whereas when filtered by “/en”, these words are dropped.
- Filter by adgroup: “real estate investing” will find all ad groups with the following text in the title: “real estate investing”.
In the control panel, select the type of asset you need. In this case, 39 out of 180 adaptive display ads met the filtering criteria.
Proper asset naming saves you a lot of time in the future. Name the asset in such a way that any other specialist can understand what it refers to when logging into your account.
Next, I select all 39 ads that the Editor has filtered. Go to the ad editing panel, and click on the pencil.
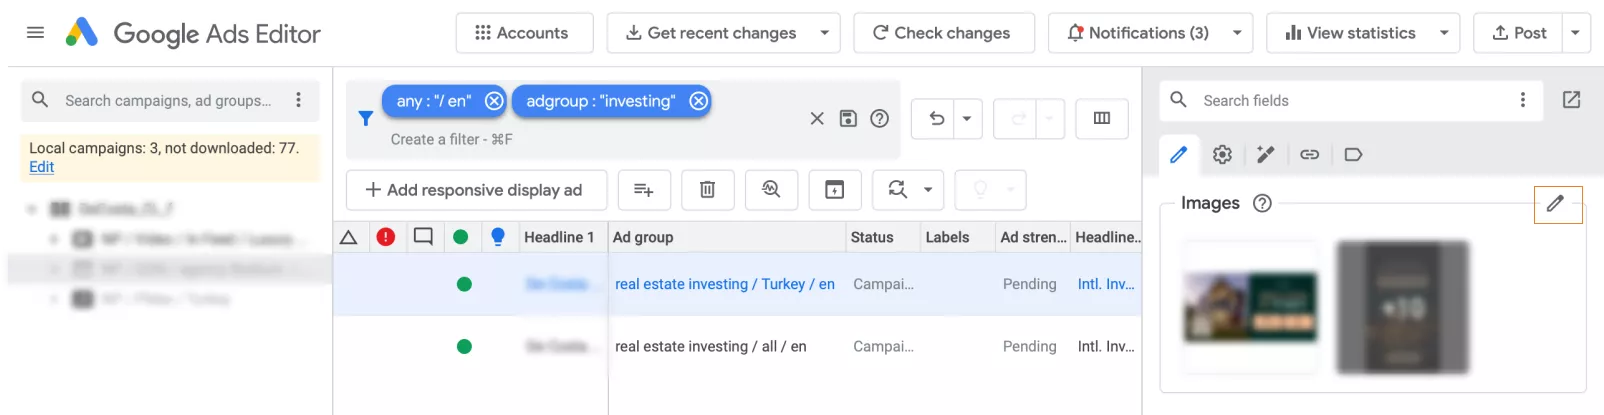
Next, I uncheck the images I no longer need in my ads. Check mark 1 (a dash) means the image is used only in some ads. Check mark 2 (a tick) indicates that the image is used in all selected ads.
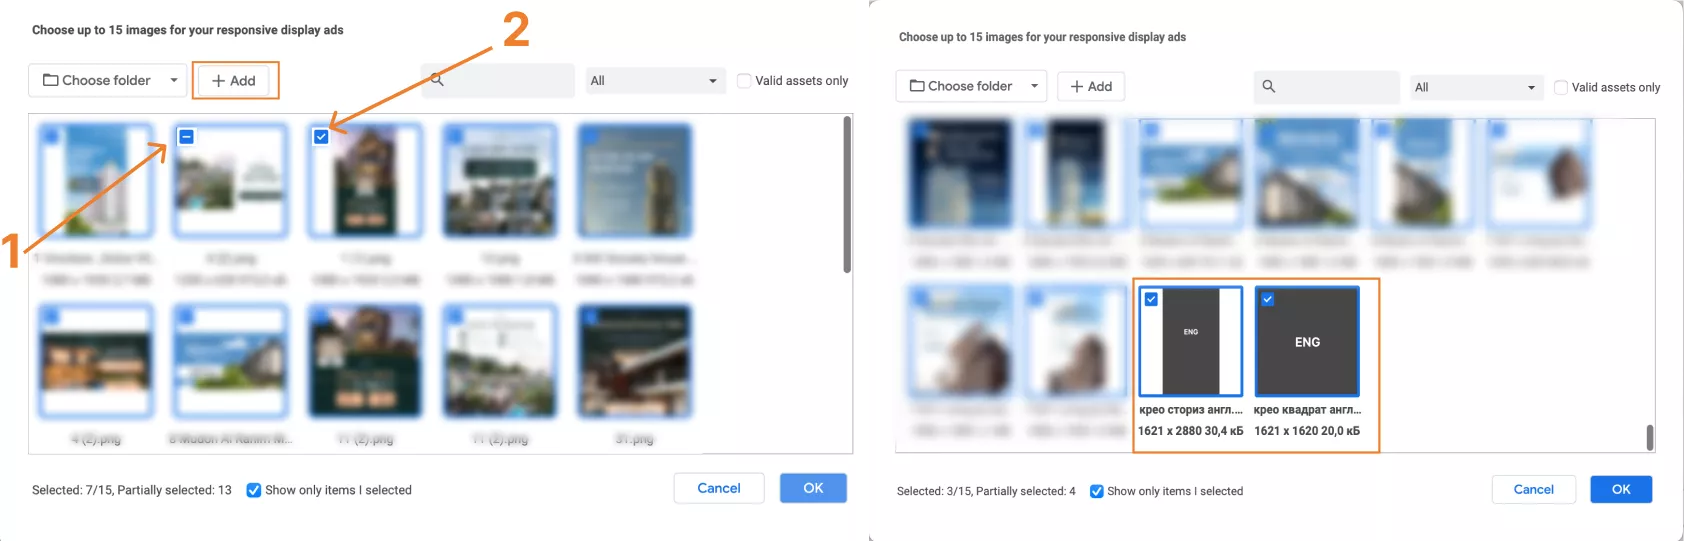
I click “Add and select the necessary files on my computer”. Then, I tick the checkbox.
And I’m done! These images have been successfully added to all 39 responsive display ads.
You can also make bulk changes to all other ad elements, such as titles, descriptions, links, etc. In addition, you can edit settings for multiple campaigns in the same way. This “select multiple items & make changes” principle can be applied to any element in the Editor.
Dealing with large accounts in Google Ads Editor
If your account has a large amount of data and your computer can’t handle it, don’t upload your entire account to Google Ads Editor; upload only selected campaigns.
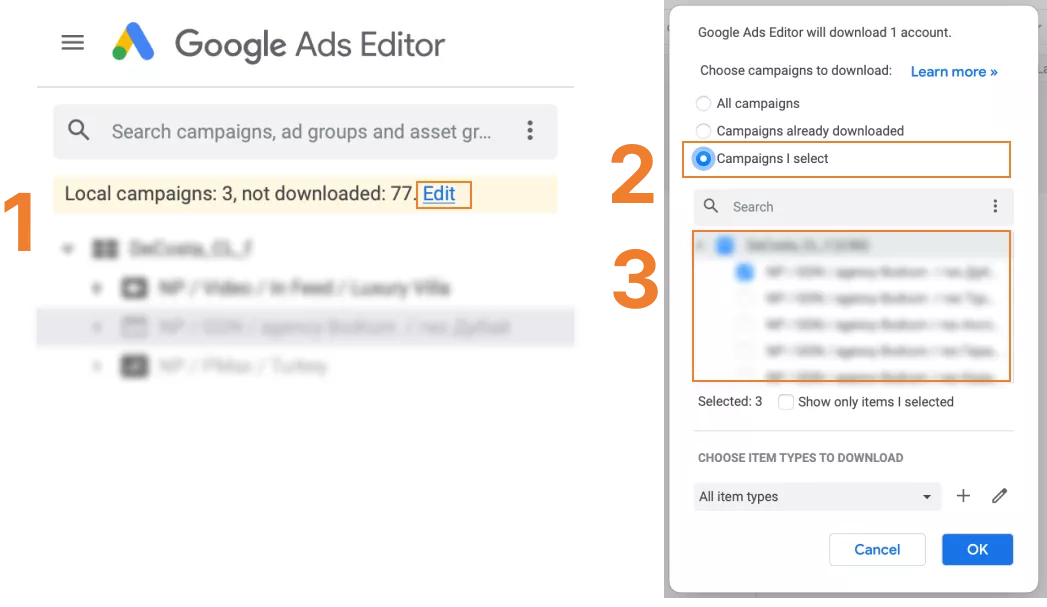
If several users are working on the same account simultaneously, you can only upload the campaigns you want to make changes to. This will prevent you from making mistakes at the start and accidentally making changes to other people’s campaigns.
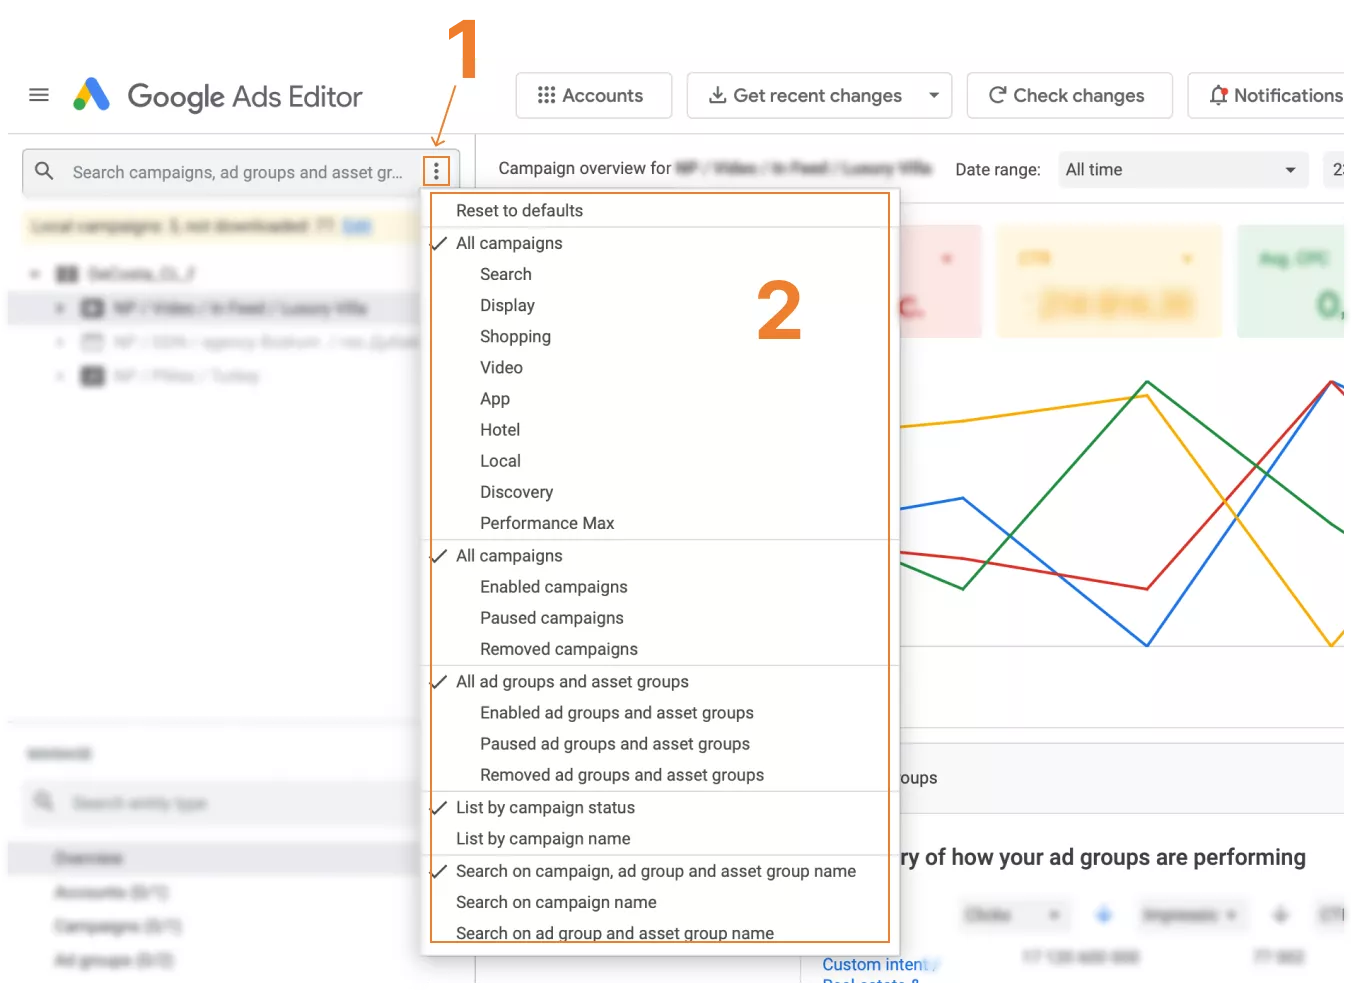
If you still have many campaigns even after uploading only the ones you need, you can use filters in the account tree to organize how they are displayed. Simply click on the three-dot menu on the right, and choose the types of campaigns or ad groups you want to see and the ones you want to temporarily hide.
Recent changes
Remember this rule and be sure to follow it. It will help you avoid unnecessary stress and time spent re-processing the data.
Before you publish anything, get the latest changes by clicking “Get recent changes”.

Google Ads Editor is an offline editor that saves changes on your computer instead of your Google Ads account. So, it is especially important to click Get recent changes to get the most recent data from your Ads account. To publish everything you have created offline, click Post.
Please note that Google Ads Editor cannot synchronize data on its own. It believes that the most recent change is the final version, even if that means deleting someone else’s data. To prevent this from happening, you must ensure you have the latest changes before posting your changes.
Let’s look at a specific example, the workflow of a PPC specialist. This is the best way to work:
- User 1 works with campaigns in Google Ads Editor.
- User 1 switches to other tasks.
- User 2 makes changes to the Google Ads account.
- User 1 gets the latest changes by clicking the Get recent changes button.
- User 1 continues to work in Google Ads Editor.
- User 1 receives the latest changes.
- User 1 publishes the changes.
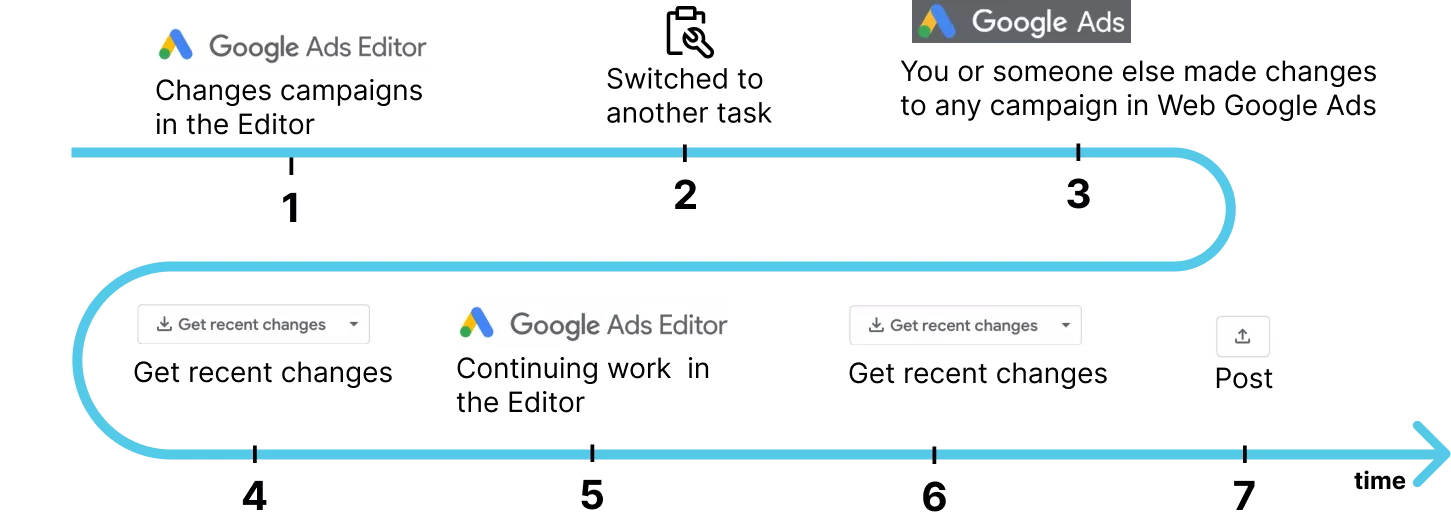
Please note that I recommend getting the recent changes every time you leave a task, as changes can be made to the ad account in as little as 5 minutes. I also recommend that you always get the latest changes before you post.
Why is this important? One of my colleagues told me a story about rebuilding ad campaigns from bits and pieces of screenshots because he hadn’t received the latest changes before publishing. Another specialist had made changes to the ad account the day before, but these changes were not uploaded to his Editor. This data was then deleted when my colleague uploaded his own changes.
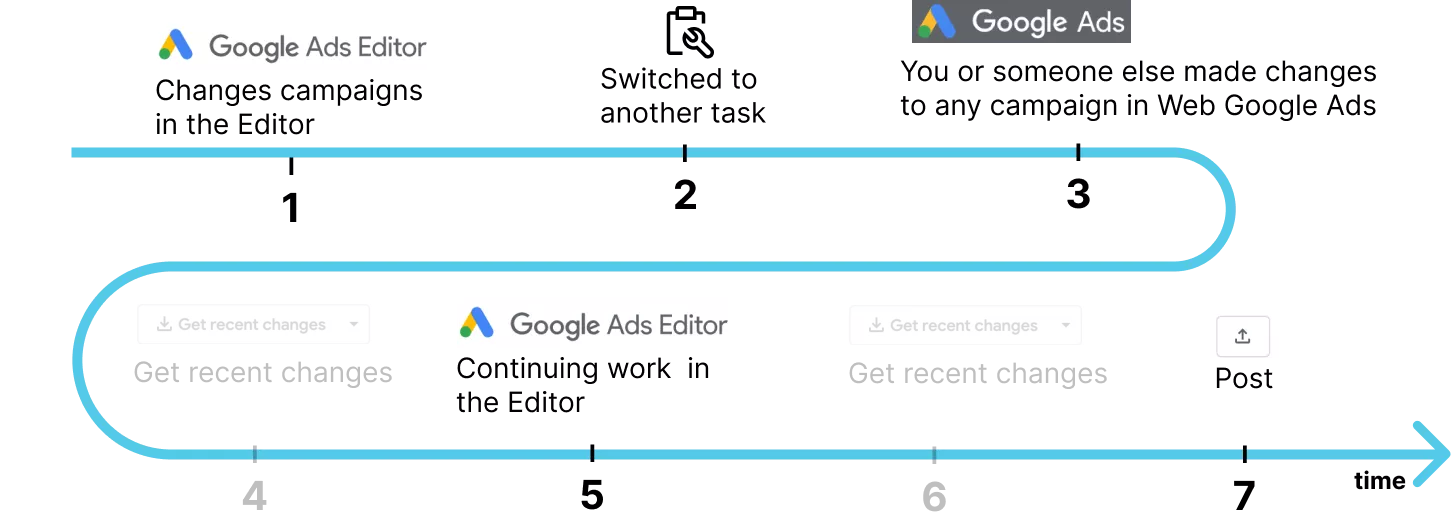
Compare this workflow with the previous one. It does not include steps 4 and 6 (“Get the latest changes”). With this workflow, the Editor does not see the changes made in step 3, and when posting, it takes into account only the data from steps 1 and 5.
To avoid such problems, I recommend that you make it a habit to get the recent changes while working. Just like brushing your teeth in the morning, it will become an automatic process, and you won’t have to worry about accidentally deleting some important information.
Extensions in Google Ads Editor
Often, PPC newcomers make mistakes in the editor when working with extensions, which can affect the ad information, such as the logo, additional links, headlines, and descriptions.
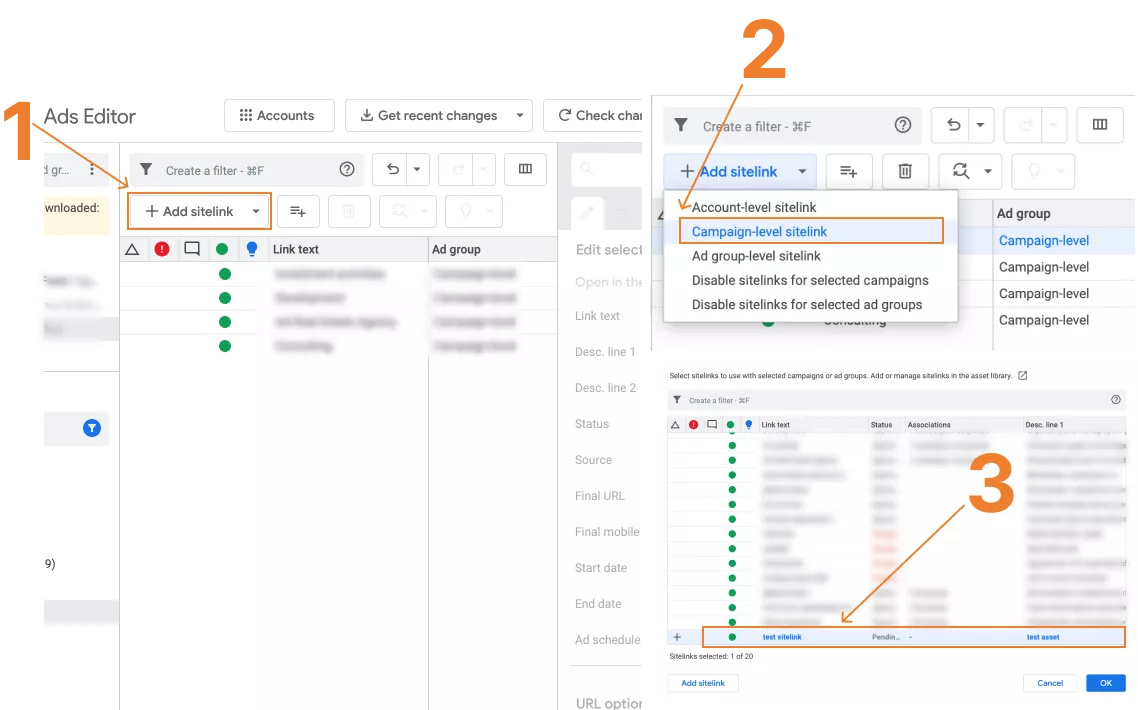
To create a new extension, go to Manage > Shared library > Asset library > Sitelinks. Click +Add sitelink and enter the required details.
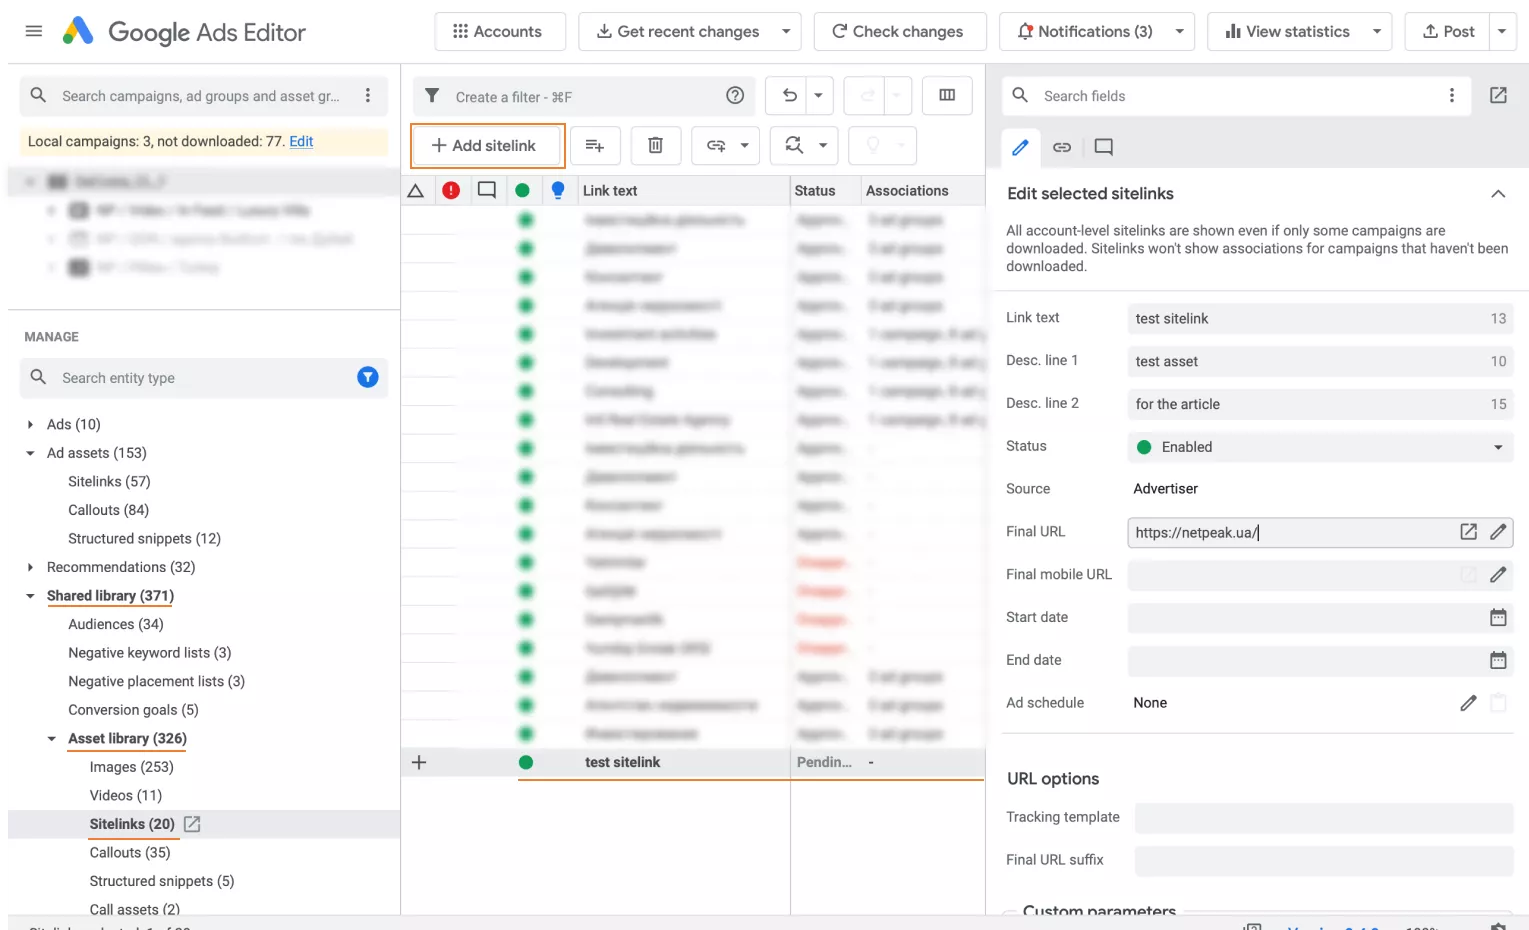
The next step is to add the newly created extension. To do this, select the required ad campaign (or group of ads) in the account tree and go to Managed > Asset library. Click +Add sitelinks. Select the level, whether ad group, ad campaign, or account. Find and select the extension you created.
What can go wrong?
There are usually no issues with adding extensions. Problems start when you need to edit or delete an extension.
Simply selecting the extension you want from the Managed - Asset library menu and making changes will not work. To be specific, you can click and make changes, but they will be applied to other extensions added to other campaigns at the same time.
The diagram shows the logic of the relationship between extensions. Think of the Asset library as a box containing all the necessary extensions. On the other hand, ad campaigns are shelves containing specific extensions required for those campaigns.
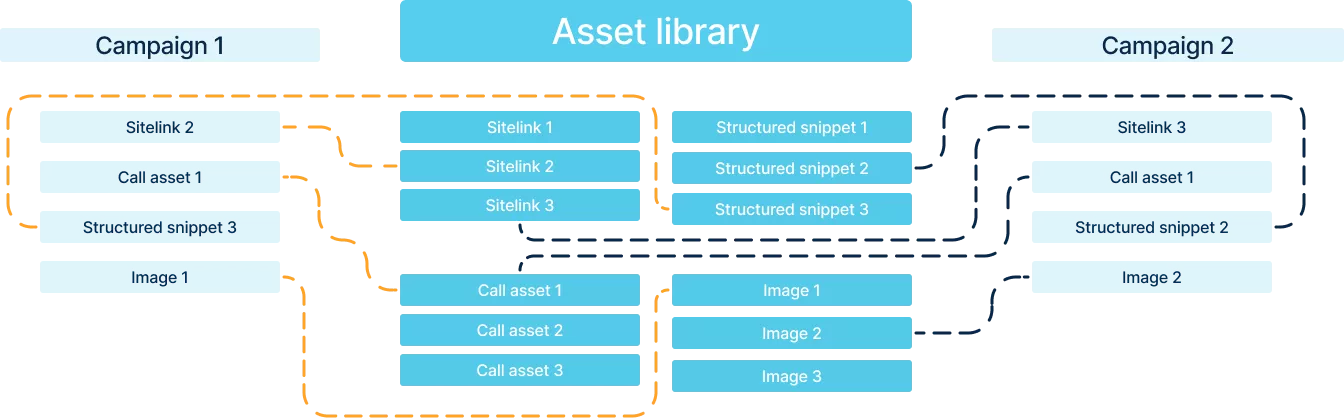
However, placing an extension on a shelf (ad campaign) does not lose its connection to the parent box (Asset library). Therefore, when you make changes at the ad level, you are making changes to the extension in the Asset library, which will, in turn, change all the extensions on the other shelves.
Take a look at the Call asset 1 extension in the Asset library. It has been added to two campaigns. If you start editing this extension at the campaign level, it will also change in both the Asset library and Campaign 2.
What if you need to change the text or description of the extension? In that case, ask yourself if you need to change the extension for all campaigns.
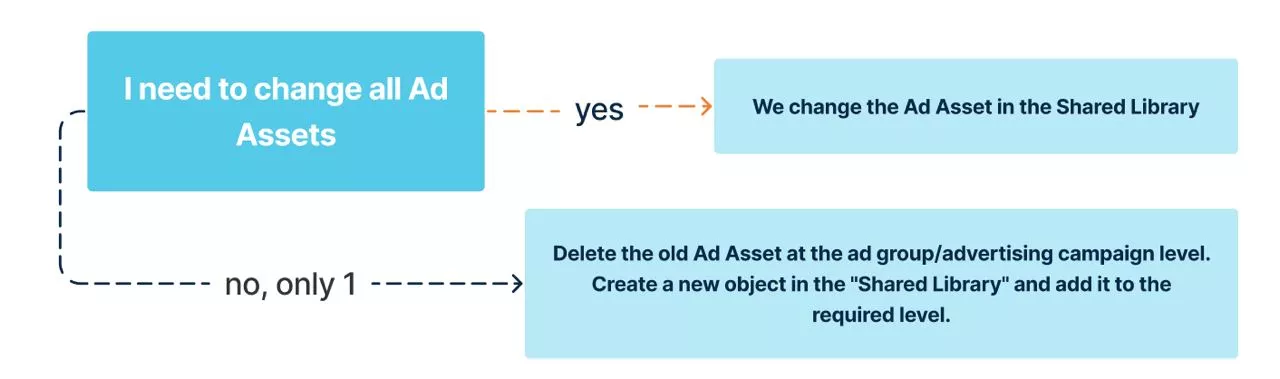
When deleting (or pausing) extensions, there are a few peculiarities to keep in mind. If you delete an extension that has been associated with an ad campaign, it will automatically be removed from the ad group.
Similarly, if you delete an extension added at the account level, it will be removed not only from the selected campaign but also from all the campaigns in that account.

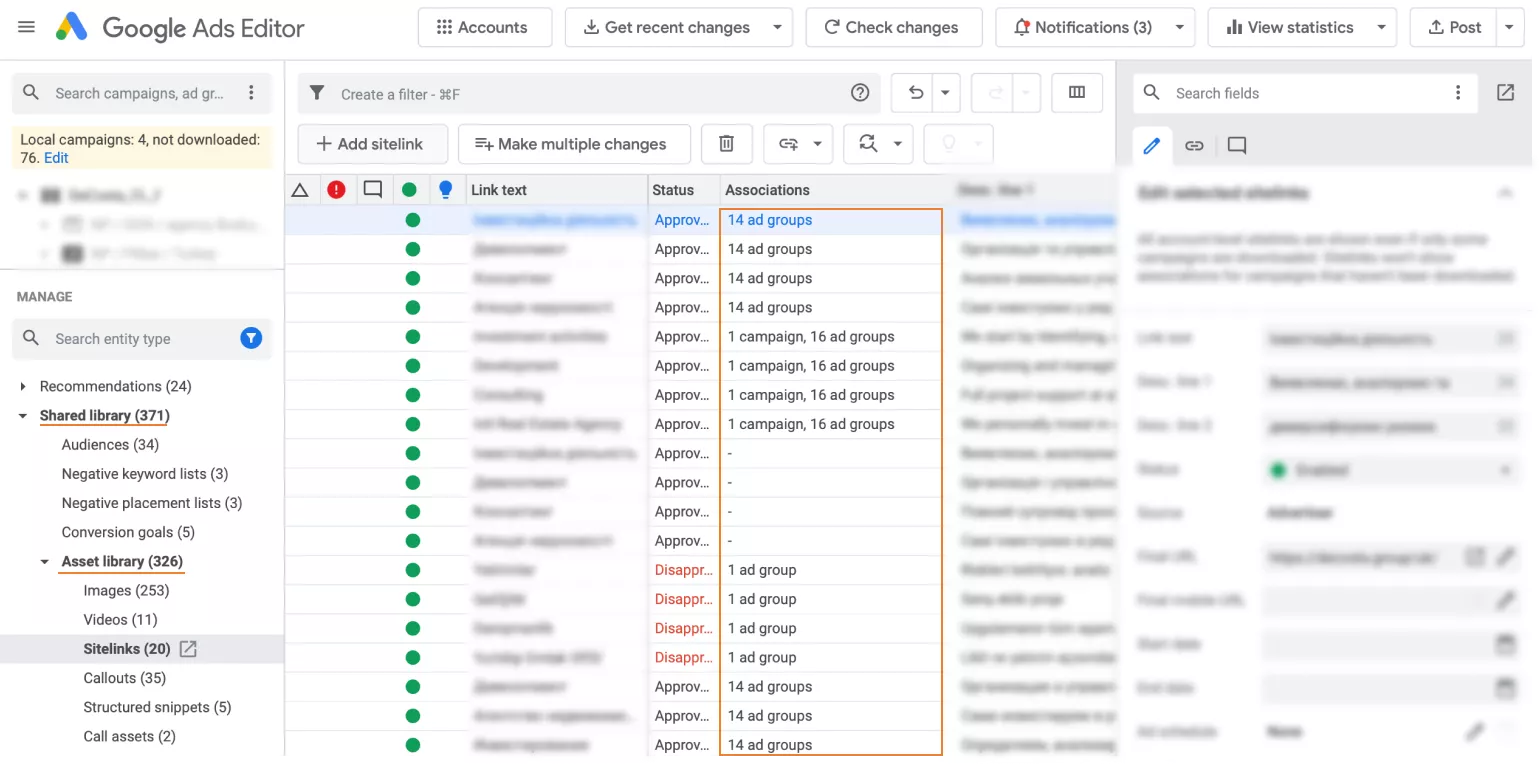
How do I know how many campaigns an extension is associated with?
Go to the Asset Library, use the filters to find the extension you need, and look at the Associations column. This shows the number of times an asset has been used in your account. For example, in the first row, the blue sitelink extension is used 14 times at the ad group level.
Conclusions
In a nutshell:
- Google Ads Editor is a desktop application that allows you to create and optimize Google Ads campaigns more quickly and efficiently.
- Thanks to filters, you can quickly find the campaigns and assets you need. You can also make quick changes in bulk rather than on a per ad basis.
- Remember, Google Ads Editor is a desktop application that doesn’t sync automatically. Get the latest changes from your Ads Account before and after you make changes so you don’t accidentally delete previous changes.
Finally, don’t be afraid to experiment and make mistakes. Everyone does, just not everyone admits it. :)

 13
13
 8
8
 3
3
Related Articles
How to Set Up Consent Mode in GA4 on Your Website with Google Tag Manager
Let's explore how to properly integrate consent mode in GA4, configure it for effective data collection, and at the same time comply with GDPR and other legal regulations
Display Advertising Effectiveness Analysis: A Comprehensive Approach to Measuring Its Impact
In this article, I will explain why you shouldn’t underestimate display advertising and how to analyze its impact using Google Analytics 4
Generative Engine Optimization: What Businesses Get From Ranking in SearchGPT
Companies that master SearchGPT SEO and generative engine optimization will capture high-intent traffic from users seeking direct, authoritative answers