E-commerce in Google Analytics 4 (GA4) is a feature that allows you to track and analyze the performance of an online store or e-commerce site. You can use this tool to identify the most popular products on the site, ineffective site elements, ads that work better and drive conversions, and more.
In this article, I'll show you how to set up the e-commerce feature to track events, transactions, and sales data in GA4.
- How to set up e-commerce tracking in Google Analytics 4.
- How to prepare Google Tag Manager for e-commerce.
- How to implement e-commerce tracking in GA4.
To track e-commerce events, you need to have a GA4 account set up and a Google Tag Manager account associated with it.
If you've previously tracked e-commerce events in Universal Analytics and have the code set up on your site, read on to learn how to reconfigure it for GA4. Please note, however, that this reconfiguration is less functional than the guide described in this article.
A step-by-step guide to setting up e-commerce tracking in GA4
You can track e-commerce directly through Google tag (gtag.js) or by using the Google Tag Manager.
A Google tag (gtag.js) is a snippet of code that you need to add to your website to send information to Google Analytics 4. Doing this manually requires an experienced developer.
Google Tag Manager (GTM) is a tool that allows you to quickly modify tags on a website or application through a web interface. It makes it easy to upload and edit tags, including Google tags.
The only difference between the methods is that to use GTM, you need to additionally configure variables, triggers, and tags, and the code with parameters and an items layer is passed through the dataLayer.
GTM setup is divided into several stages:
- Preparing data for transmission (code with parameters and an items layer).
- Using the codes or creating a technical task for programmers to add the code to the site.
- Setting up variables, triggers, and tags in GTM, if you decide to use Google Tag Manager.
Next, I'll show you how to set up tracking for a standard set of events required for a typical online store. I'll set it up using GTM as the recommended method.
You can find the full set of recommended events in Google Help. Once you've figured out how to set up the default set, you can set up any other events you want – the principle is the same.
Google Tag Manager pre-setup
Prepare variables, triggers, and tags for GTM setup.
Data variables
Variables are additional data needed to store and send information when tags are executed and triggers are activated.
There are built-in variables for various events that you must enable before using and custom variables that require independent configuration. For e-commerce, you will need custom variables, and I recommend the following six.
Information | Variable value |
Products | ecommerce.items |
Shipping methods | ecommerce.shipping_tier |
Payment methods | ecommerce.payment_type |
Transaction IDs | ecommerce.transaction_id |
Transaction amount | ecommerce.value |
Currency type | ecommerce.currency |
The second column contains the values required for configuration.
To see the complete list of variables, go to Help:
These variables are used in the tag settings. They will pass additional information about the event you need, but in this case, they will also add the appropriate items to the parameters and items layer in the dataLayer code. For example, for the ecommerce.coupon variable, there should be lines with information about the coupon:
To set up variables, go to the GTM container, select Variables in the workspace, and click New:
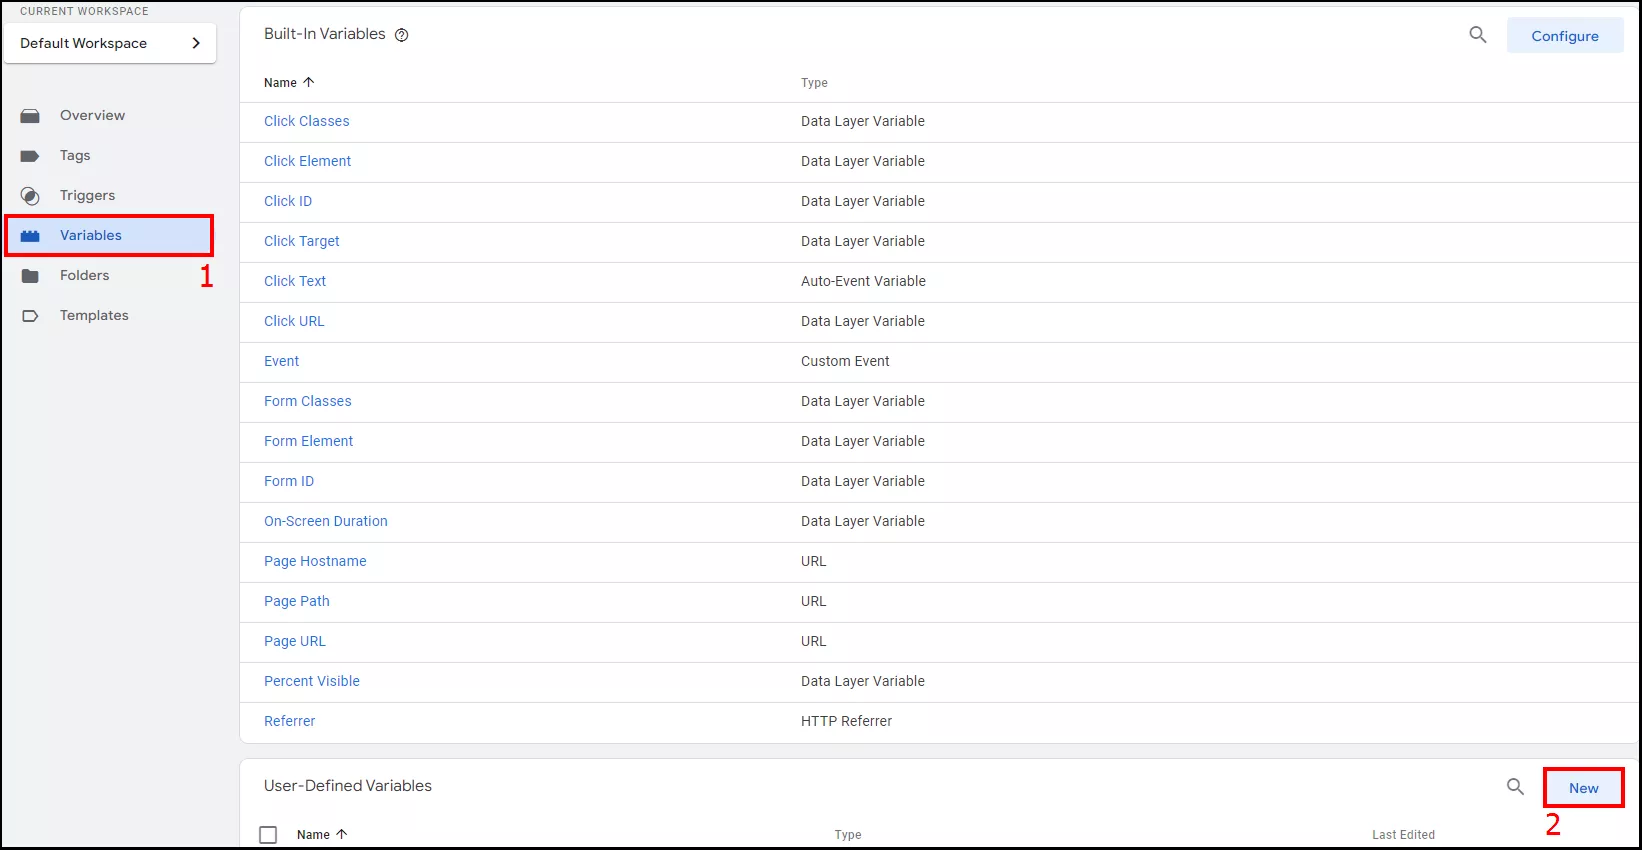
Next, fill in the following information:
- Variable type: data level variable
- User variable name: [variable name].
- Data layer variable name: [variable name].
For example, for a custom variable with information about products, the parameters look like this:
- Variable type: data level variable.
- User variable name: ecommerce.items.
- Data layer variable name: ecommerce.items.
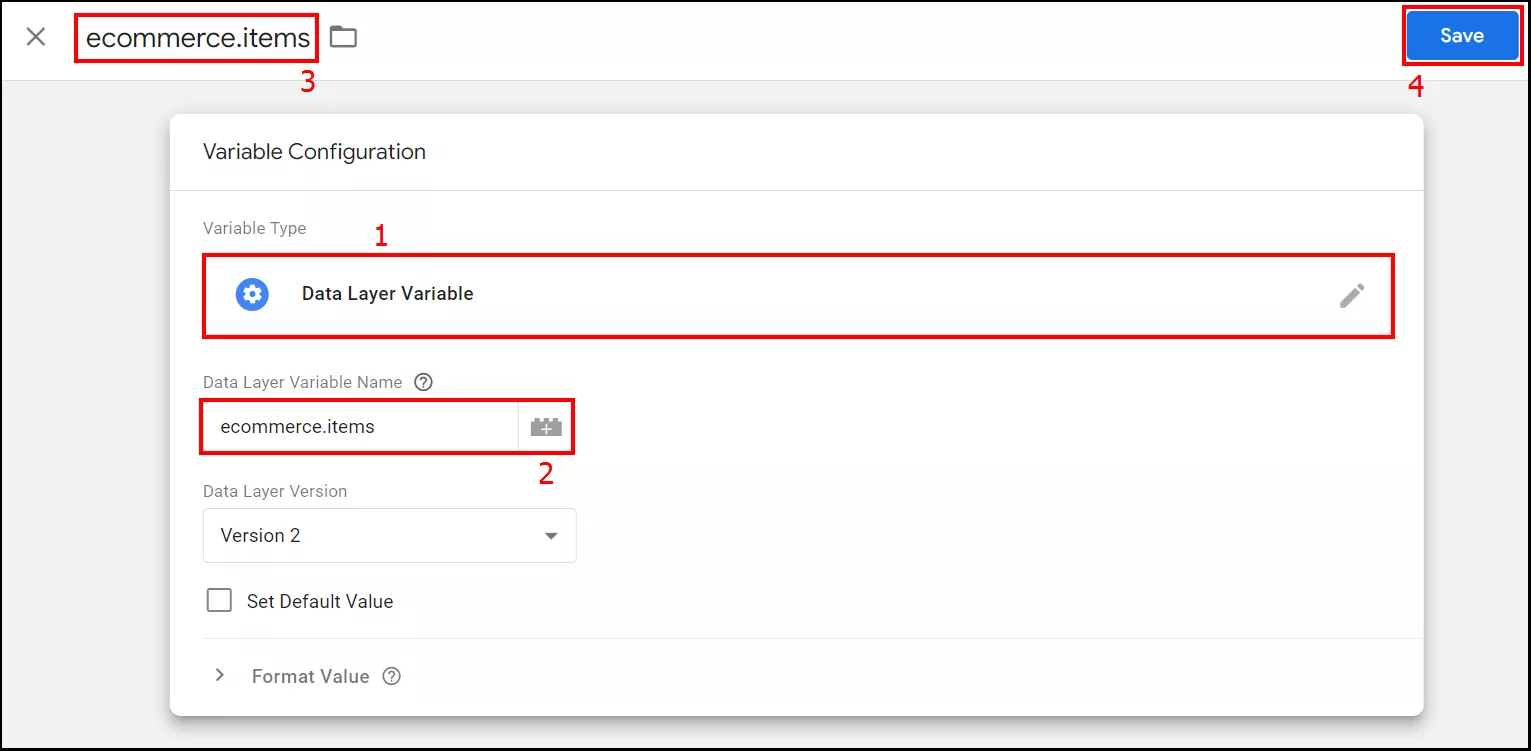
Use this method to configure six custom variables.
Triggers
A trigger is a condition for executing a tag on a web page after clicking on a certain element, loading a page, submitting a form, etc.
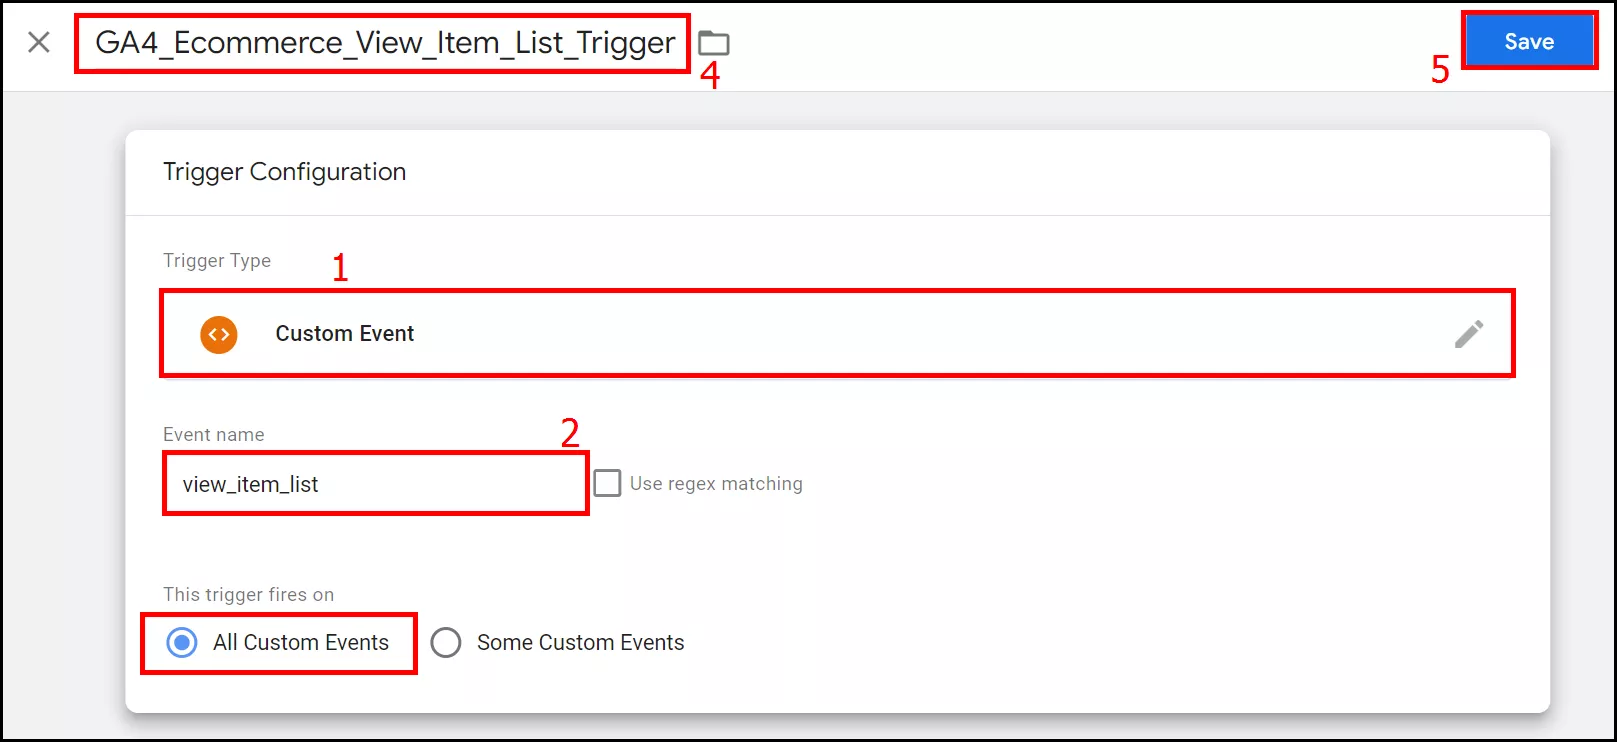
Set up a trigger for each event separately. To do this, in the GTM container, select Triggers in the workspace and click New:
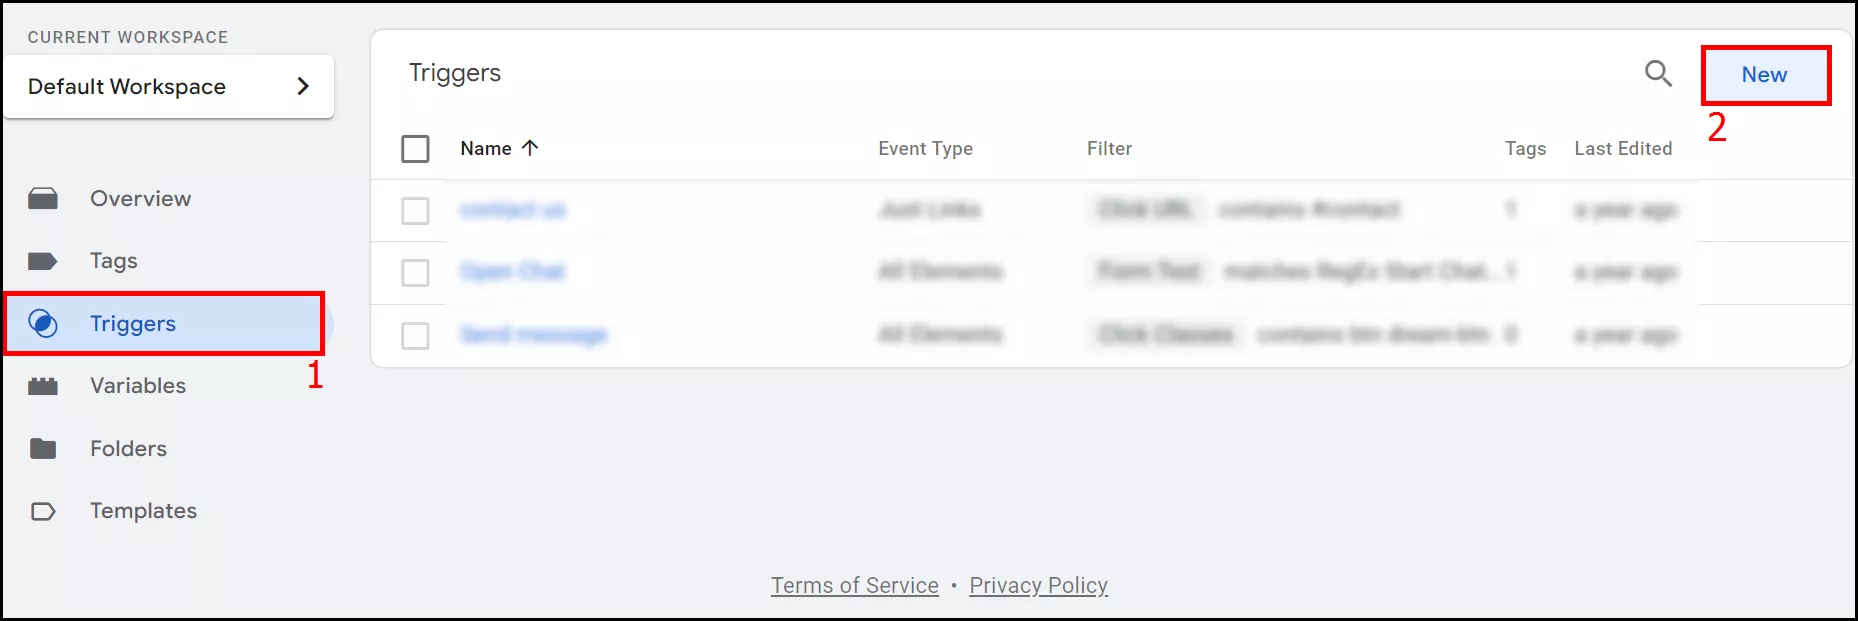
Next, fill in the following data:
- Trigger name
- Trigger type
- Event name
- Trigger activation conditions
These are the mandatory trigger parameters for the view item list event:
- Trigger name: GA4_Ecommerce_View_Item_List_Trigger.
- Trigger type: Custom event.
- Event name: view_item_list.
- This trigger fires on: All custom events.
Tags
A tag is a piece of code used to track events or perform various actions on a site.
To create tags in the same workspace, select Tags and click New:
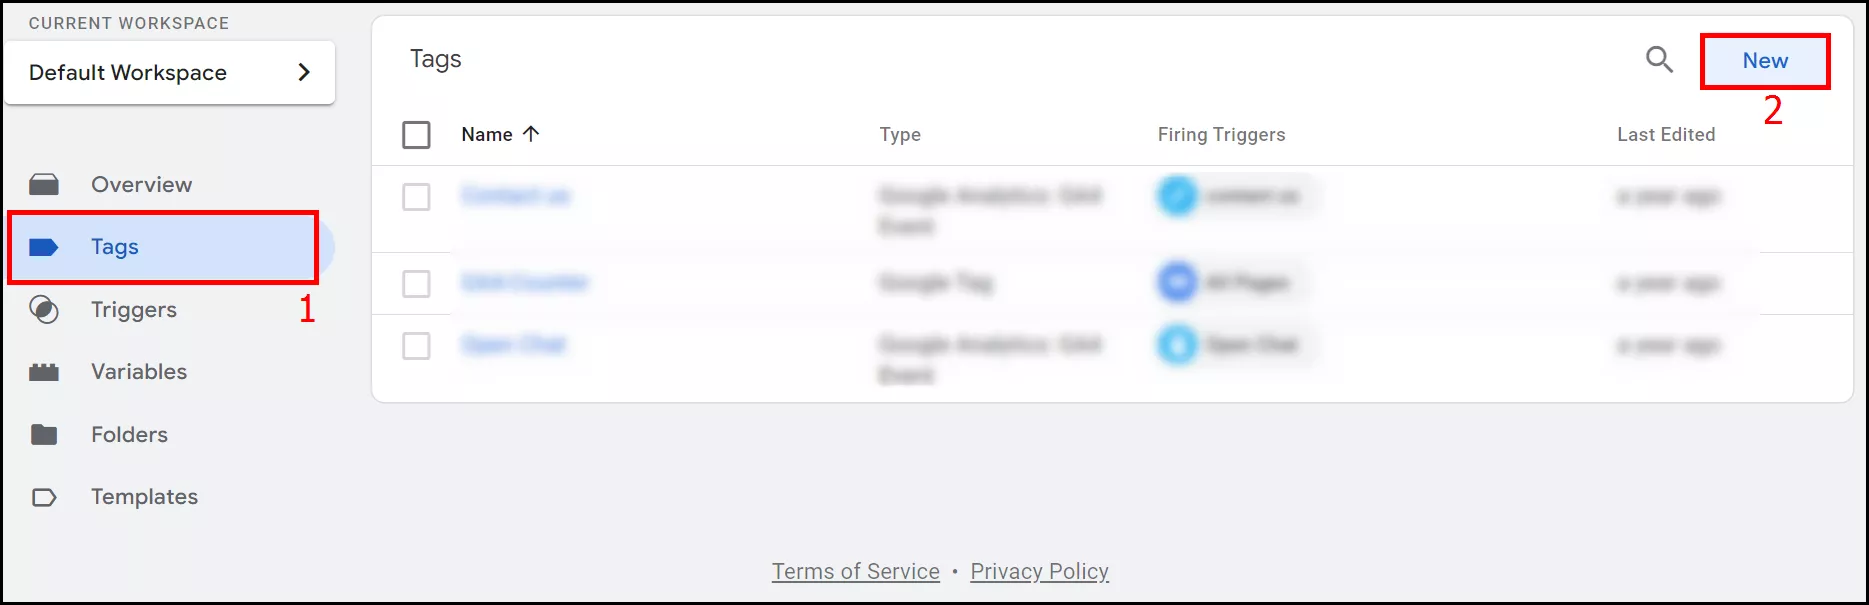
Next, enter the following information:
- Tag type.
- Tag name.
- Measurement ID: Google Analytics 4 data stream identifier in the format G-XXXXXXXXXX.
- Event name.
- In the Event Parameters block, enter items as the parameter name and select the previously created ecommerce.items user variable as a value.
- Select the previously created trigger as the Firing Trigger.
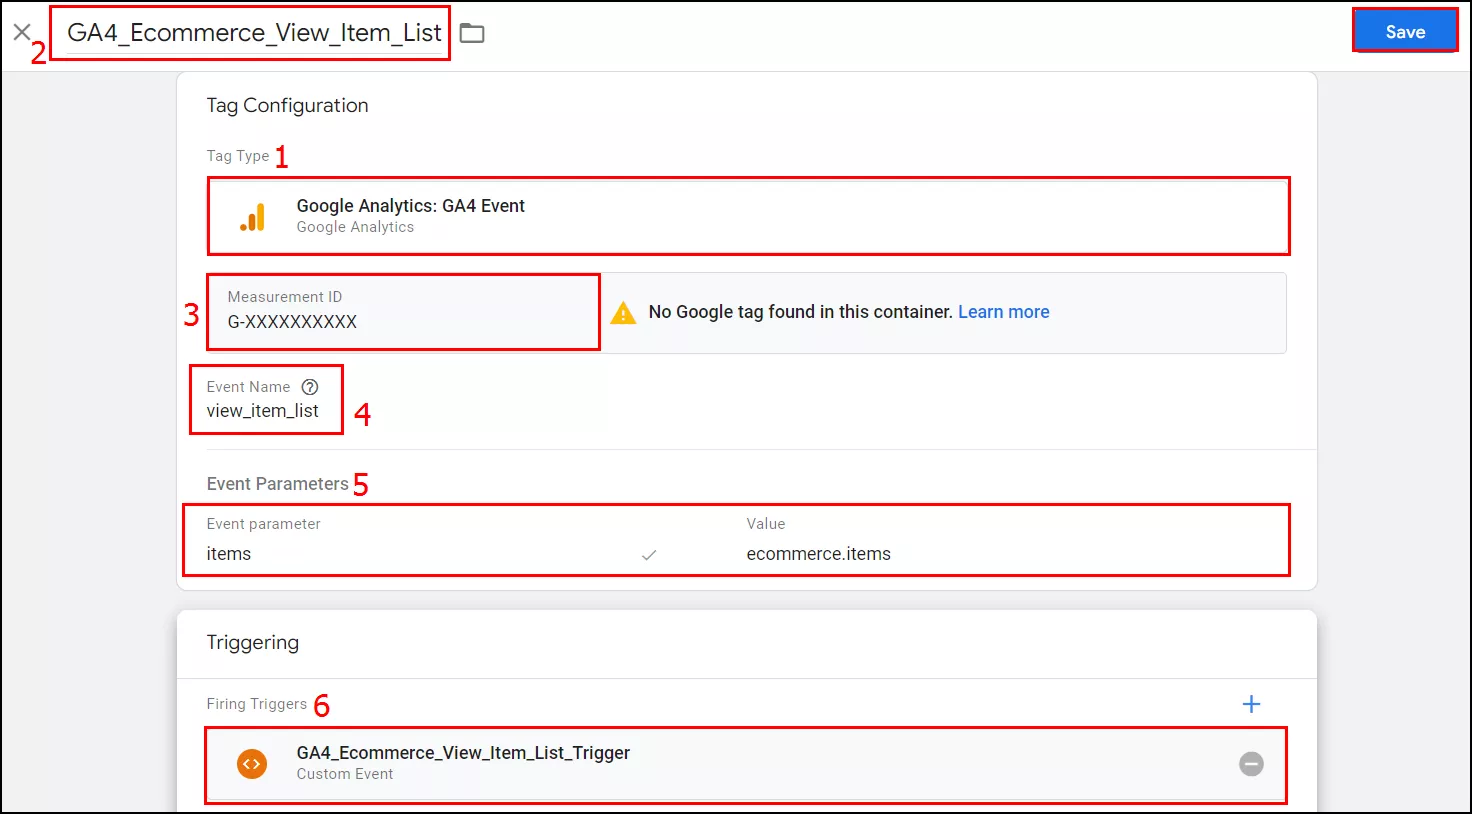
Tag parameters for the view item list event:
- Tag type: Google Analytics: GA4 event.
- Tag name: GA4_Ecommerce_View_Item_List.
- Measurement ID: G-XXXXXXXXXX.
- Event name: view_item_list.
- In the Event Parameters block, specify items as the action parameter name and select the previously created ecommerce.items user variable as a value.
- Firing trigger: GA4_Ecommerce_View_Item_List_Trigger.
Tracking e-commerce in GA4
All e-commerce data is transferred to Google Analytics 4 via an event code. If you are using GTM, the data is transferred through the dataLayer.
The dataLayer is a JavaScript object that passes data from the page to the Tag Manager container. It is used to assign values to variables and activate triggers in GTM.
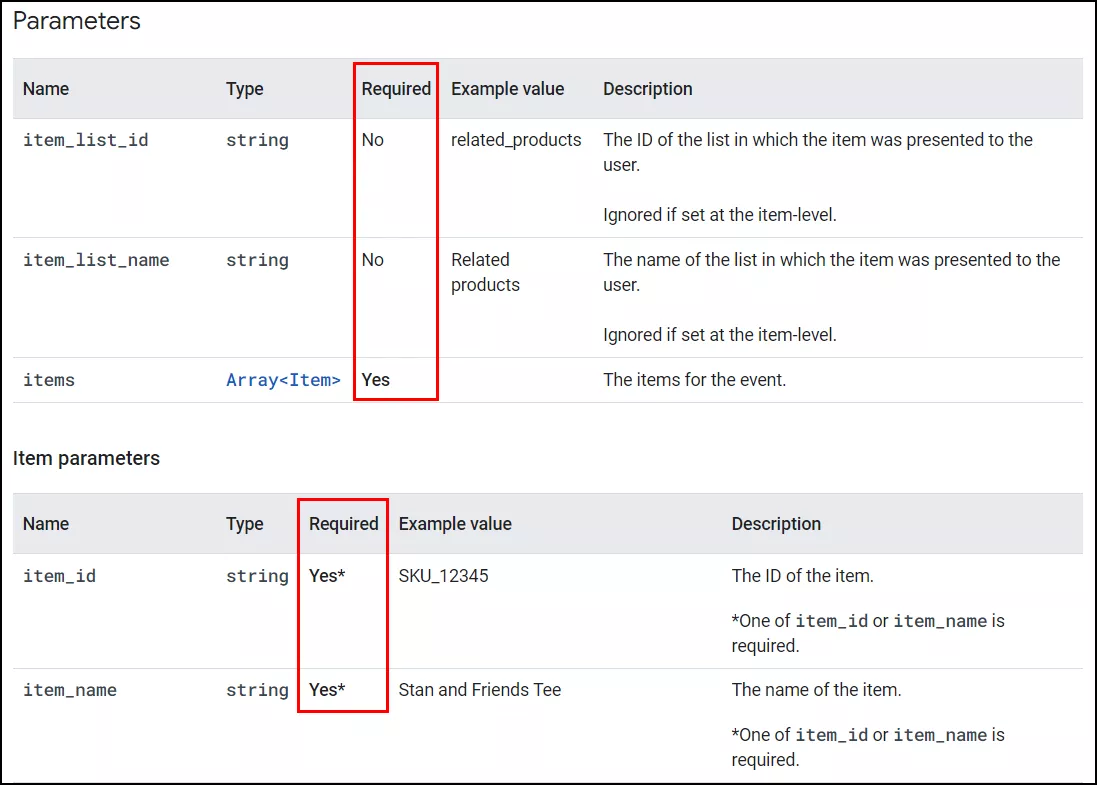
For each event you want to track, you need to run the code with parameters and an items layer.
Information about the products is in the items layer. The array can have up to 200 parameters. Next, I'll discuss the minimum set of parameters for this array and how to fill them in.
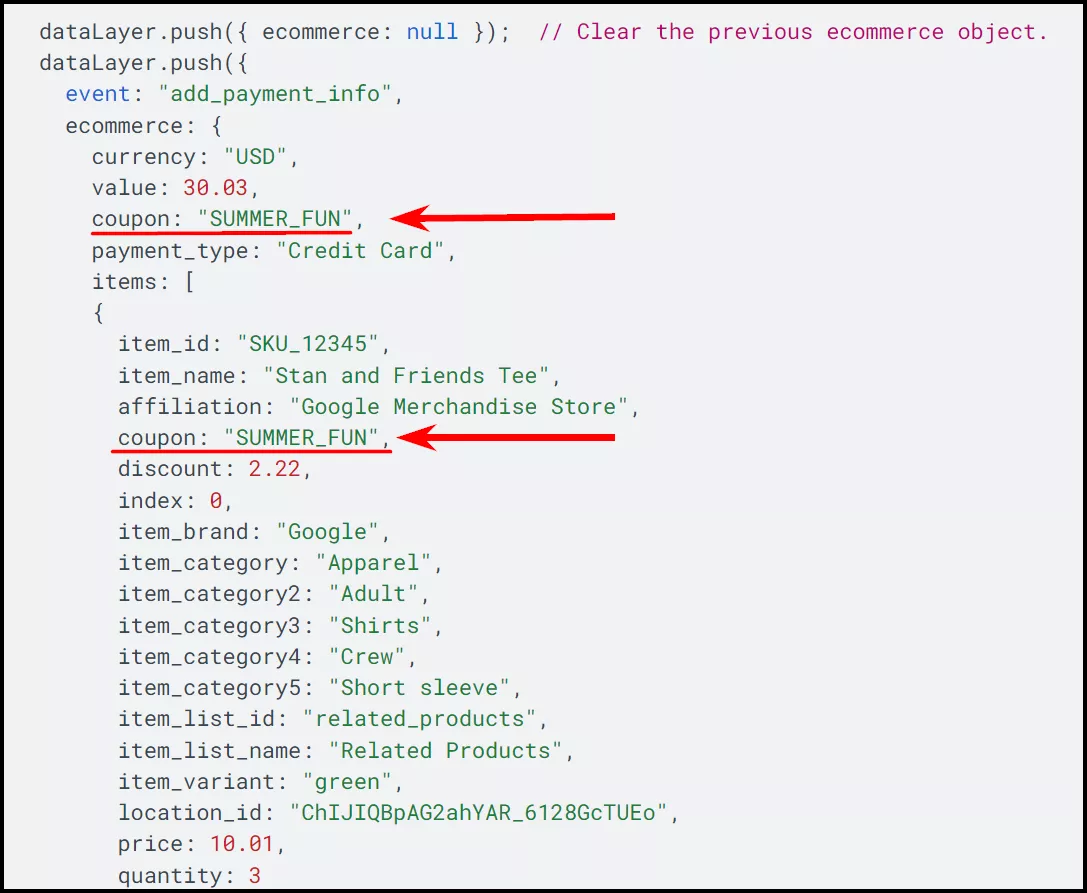
In addition to the required and recommended parameters, you can add up to 27 custom parameters to the items array. See Google Help for more details.
Recommended events to track include:
- Views and impressions of an item or item listing
- Clicks on an item or item listing
- Views of an item or item listing
- Items added to and removed from shopping carts
- Internal advertising views and impressions
- Clicks from internal advertising
- Checkout
- Purchases
- Refunds
For a complete list of recommended events, see the Help in the right-hand navigation bar:
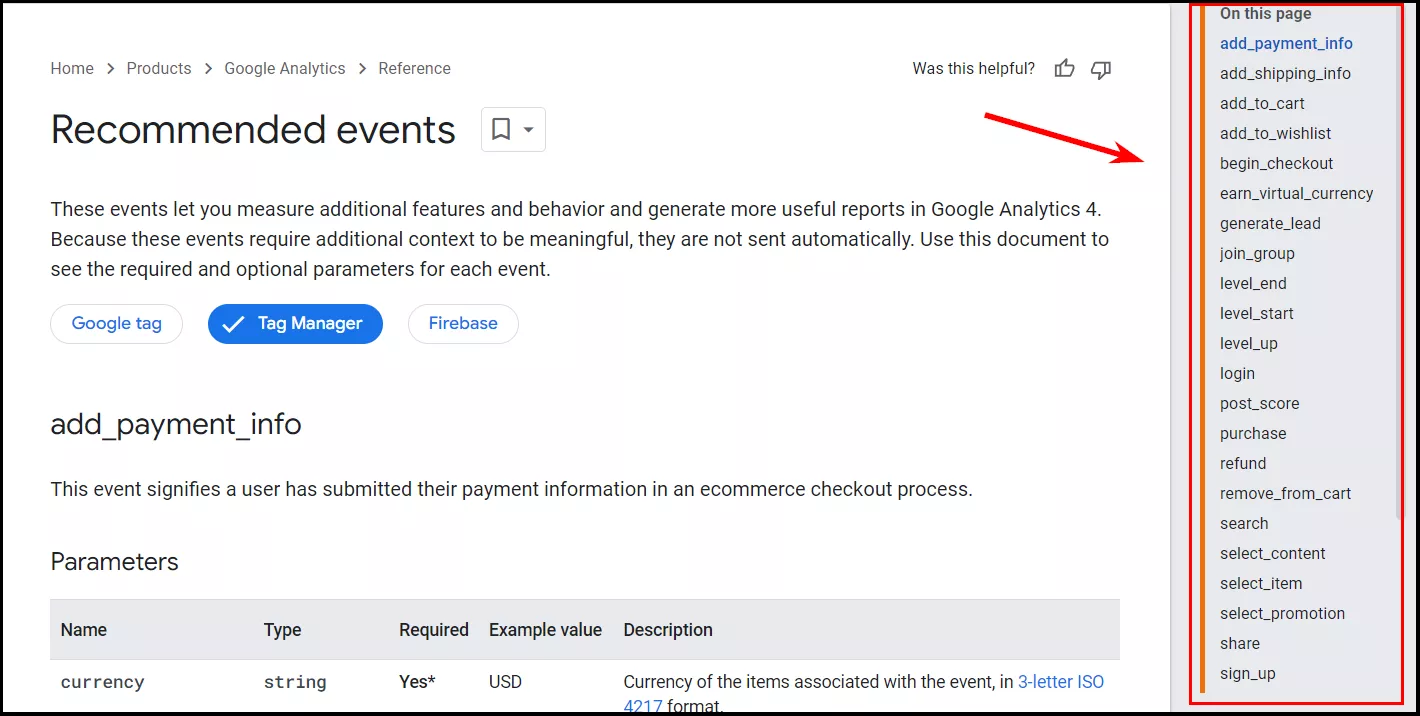
This page contains extensive information about each event and its data, so I recommend keeping it open and reading the Google documentation as you set it up.
To add the dataLayer code, place the code snippet in the <head> section of your pages, above the Google Tag Manager container snippet.
Before transferring the e-commerce object to the data layer, I recommend clearing the dataLayer with the following command:
dataLayer.push({ ecommerce: null }); // Clear the previous ecommerce object.This step is necessary to ensure that different e-commerce events on the page do not interfere with each other.
Next, let's look at specific examples of code for each event.
1. Views and displays of product listings or items
This metric provides information about the blocks of site and product listings that the user sees during the session. It will help you analyze the effectiveness of the blocks and decide the best placement for priority products.
To get statistics from GTM, I recommend passing the item to the data layer and including the view_item_list event with this data:
window.dataLayer = window.dataLayer || [];
window.dataLayer.push({
  event: "view_item_list",
  ecommerce: {
      item_list_id: "list ID",
      item_list_name: "list name",
    items: [{
      item_id: "item ID",
      item_name: "item name",
      index: "Item position on the list",
      item_brand: "item brand, manufacturer",
      item_category: "product category",
      item_category2: "Second product category",
      …
     item_category5: "fifth product category", // if you need more product categories
      price: "item price",
      quantity: "item quantity"
    },
{
      ... // here, similarly, pass the data of all subsequent items that are in the visible area of the screen (if there are more than 1)
    }]
  }
});
Not all parameters of the items layer are needed. In the example, only the minimum is required to provide sufficient information about the event. The item parameter is required, as well as one of the item_id or item_name parameters:
The dataLayer only contains data about products that are in the visible area of the screen. If a product disappears from the visible area and another one appears instead, for example as a result of scrolling the page, the data of the previous product is replaced by the data of the new one.
The index value indicates the position of the product in the list. I recommend that you define the product position number in the same way for all products, e.g., horizontally from left to right:
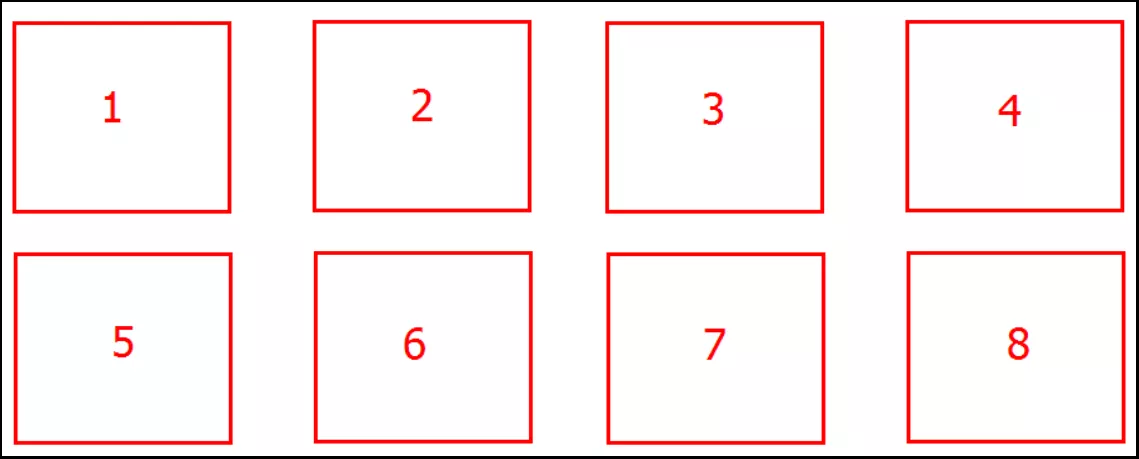
To track the quality of product views in your listings, analyze your site and label the items with products for yourself. Then, give these items names and IDs.
For example, on the main page of the allo.ua website with the top-sellers block:
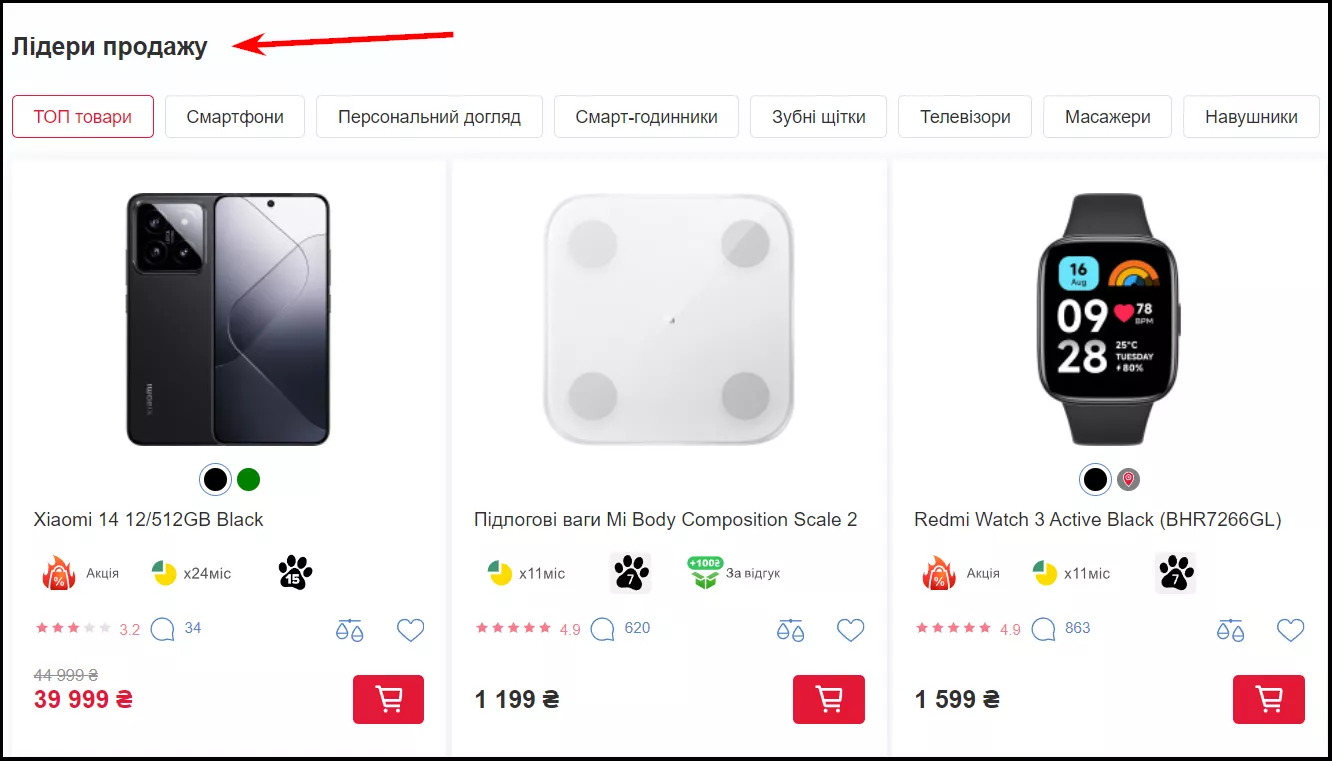
Let’s name the list in the example, Sales leaders list, and assign identifier 1 (ID 1).
This is the completed code to display the first product on the list:
window.dataLayer = window.dataLayer || [];
window.dataLayer.push({
  event: "view_item_list",
  ecommerce: {
      item_list_id: "ID-1",
      item_list_name: "Sales Leaders List",
    items: [
    {
      item_name: "Xiaomi 14 12/512GB Black",
      item_id: "1025260",
      index: 1,
      item_brand: "Xiaomi",
      item_category: "Smartphones and mobile phones",
      item_category2: "Xiaomi smartphones and mobile phones",
      price: "39 999",
      quantity: "1"
    }]
  }
});
To track views and impressions of items with products, set up a separate trigger in Google Tag Manager with the following parameters:
- Trigger name: GA4_Ecommerce_View_Item_List_Trigger.
- Trigger type: custom event.
- Event name: view_item_list.
- Trigger activation conditions: all custom events.
Next, configure the appropriate tag:
- Tag type: Google Analytics: GA4 event.
- Tag name: GA4_Ecommerce_View_Item_List.
- Measurement ID: G-XXXXXXXXXX.
- Event name: view_item_list.
- In the Event Parameters block, specify items as the parameter name and select the previously created ecommerce.items user variable as a value.
- As the trigger, select the GA4_Ecommerce_View_Item_List_Trigger you created earlier.
To transfer the data via gtag.js, implement the following sample code:
gtag("event", "view_item_list", {
    item_list_id: "list ID",
    item_list_name: "list name",
    items:  [{
      item_id: "item ID",
      item_name: "item name",
      index: "Item position on the list",
      item_brand: "item brand, manufacturer",
      item_category: "item category",
      item_category2: "Second product category",
      …
     item_category5: "fifth product category", // if you need more product categories
      price: "item price",
      quantity: "item quantity"
    }
  ]
});
For gtag.js, the code is slightly different from the GTM version, so be very careful. Most of the changes are in the parameters, and the items layer remains the same.
2. Clicks on an item or list of items
This event provides information about which items, blocks, and product lists the user interacts with. It allows you to track the effectiveness of elements on your site, such as the Top Offers block, and understand whether your site is interesting enough for users.
Or, conversely, you can find blocks that people aren't interacting with and remove them to improve page load speeds.
To get statistics on clicks on a product or a list of items using Google Tag Manager, I recommend passing the item to the data layer and using the select_item event.
Use the following code for the data layer:
window.dataLayer = window.dataLayer || [];
window.dataLayer.push({
  event: "select_item",
  ecommerce: {
      item_list_id: "list ID",
      item_list_name: "list name",
    items: [{
      item_id: "item ID",
      item_name: "item name",
      index: "Item position on the list",
      item_brand: "item brand, manufacturer",
      item_category: "item category",
      item_category2: "Second product category",
      …
     item_category5: "fifth product category", // if you need more product categories
      price: "item price",
      quantity: "item quantity"
    }]
  }
});
Trigger configuration for this code in GTM:
- Trigger name: GA4_Ecommerce_Select_Item_Trigger.
- Trigger type: custom event.
- Event name: select_item.
- Trigger activation conditions: all custom events.
Configuration of the corresponding tag in GTM:
- Tag type: Google Analytics: GA4 event.
- Tag name: GA4_Ecommerce_Select_Item.
- Measurement ID: G-XXXXXXXXXX.
- Event name: select_item.
- In the Event Parameters block, specify items as the parameter and select the previously created ecommerce.items user variable as a value.
- As the trigger, select the GA4_Ecommerce_Select_Item_Trigger you created earlier.
To track product clicks directly through the Google Tag, use the following code:
gtag("event", "select_item", {
    item_list_id: "List ID",
    item_list_name: "List name",
    items:  [{
      item_id: "Item ID",
      item_name: "Item name",
      index: "Item position on the list",
      item_brand: "Item brand, manufacturer",
      item_category: "Item category",
      item_category2: "Second product category",
      …
      item_category5: "fifth product category", // if you need more product categories
      price: "Item price",
      quantity: "Item quantity"
    }
  ]
});
3. Views and impressions of product or item details
This event shows the statistics for product detail views that users were interested in. With this data, you can understand which products are the most popular on the site or through which element on the page the user found it.
The event type is view_item. Be sure to specify it in the dataLayer code for GTM:
window.dataLayer = window.dataLayer || [];
window.dataLayer.push({
  event: "view_item",
  ecommerce: {
      currency: "Currency",
      value: “Event value",
items: [{
      item_id: "Item ID",
      item_name: "Item name",
      index: "Item position on the list",
      item_brand: "Item brand, manufacturer",
      item_category: "Item category",
      item_category2: "Second product category",
      …
      item_category5: "fifth product category", // if you need more product categories
      item_list_id: "List ID",
      item_list_name: "List name",
      price: "Item price",
      quantity: "Item quantity"
    }]
  }
});
Trigger configuration for this code in GTM:
- Trigger name: GA4_Ecommerce_View_Item_Trigger.
- Trigger type: custom event.
- Event name: view_item.
- Trigger activation conditions: all custom events.
Configuration of the corresponding tag in GTM:
- Tag type: Google Analytics: GA4 event.
- Tag name: GA4_Ecommerce_View_Item.
- Measurement ID: G-XXXXXXXXXX.
- Event Name: view_item.
- In the Event Parameters block, specify items as the parameter and select the previously created ecommerce.items user variable as a value.
- Select the previously created GA4_Ecommerce_View_Item_Trigger as the trigger.
Using gtag.js, the views and displays of product information are tracked using the following code:
gtag("event", "view_item", {
      currency: "Currency",
      value: “Event value",
    items:  [{
      item_id: "Item ID",
      item_name: "Item name",
      index: "Item position on the list",
      item_brand: "Item brand, manufacturer",
      item_category: "Item category",
      item_category2: "Second product category",
      …
      item_category5: "fifth product category", // if you need more product categories
      item_list_id: "List ID",
      item_list_name: "List name",
      price: "Item price",
      quantity: "Item quantity"
    }
  ]
});
If this event is marked as a conversion in GA4, Google recommends adding the value to the code for better reporting of the event. And if you choose to specify the value, be sure to add the currency for accurate revenue calculation.
4. Adding products to your cart
To get information about adding and removing items from the cart, use the add_to_cart event.
Below is an example of the data-level code for GTM:
window.dataLayer = window.dataLayer || [];
window.dataLayer.push({
  event: "add_to_cart",
  ecommerce: {
      currency: "Currency",
      value: “Event value",
    items: [{
      item_id: "Item ID",
      item_name: "Item name",
      index: "Item position on the list",
      item_brand: "Item brand, manufacturer",
      item_category: "Item category",
      item_category2: "Second product category",
      …
      item_category5: "fifth product category", // if you need more product categories
      item_list_id: "Iist ID",
      item_list_name: "List name",
      price: "Item price",
      quantity: "Item quantity"
    }]
  }
});
Trigger configuration for this code in GTM:
- Trigger name: GA4_Ecommerce_Add_To_Cart_Trigger.
- Trigger type: custom event.
- Event name: add_to_cart.
- Trigger activation conditions: all custom events.
Configuration of the corresponding tag in GTM:
- Tag type: Google Analytics: GA4 event.
- Tag name: GA4_Ecommerce_Add_To_Cart.
- Measurement ID: G-XXXXXXXXXX.
- Event name: add_to_cart.
- In the Event Parameters block, specify items as the parameter and select the previously created ecommerce.items user variable as a value.
- Select the previously created GA4_Ecommerce_Add_To_Cart_Trigger as the trigger.
Type the following code for gtag.js:
gtag("event", "add_to_cart", {
      currency: "Currency",
      value: “Event value",
    items:  [{
      item_id: "Item ID",
      item_name: "Item name",
      index: "Item position on the list",
      item_brand: "Item brand, manufacturer",
      item_category: "Item category",
      item_category2: "Second product category",
      …
      item_category5: "fifth product category", // if you need more product categories
      item_list_id: "List ID",
      item_list_name: "List name",
      price: "Item price",
      quantity: "Item quantity"
    }
  ]
});
5. Removing an item from the shopping cart
To track the removal of products from the cart, use the remove_from_cart event.
Below is an example of data-level code for Google Tag Manager:
window.dataLayer = window.dataLayer || [];
window.dataLayer.push({
  event: "remove_from_cart",
  ecommerce: {
      currency: "currency",
      value: “event value",
    items: [{
      item_id: "item ID",
      item_name: "item name",
      index: "Item position on the list",
      item_brand: "Item brand, manufacturer",
      item_category: "Item category",
      item_category2: "Second product category",
      …
      item_category5: "fifth product category", // if you need more product categories
      item_list_id: "List ID",
      item_list_name: "list name",
      price: "Item price",
      quantity: "Item quantity"
    }]
  }
});
Trigger configuration for this code in GTM:
- Trigger name: GA4_Ecommerce_Remove_From_Cart_Trigger.
- Trigger type: custom event.
- Event name: remove_from_cart.
- Trigger activation conditions: all custom events.
Configuration of the corresponding tag in GTM:
- Tag type: Google Analytics: GA4 event.
- Tag name: GA4_Ecommerce_Remove_From_Cart.
- Measurement ID: G-XXXXXXXXXX.
- Event Name: remove_from_cart.
- In the Event Parameters block, specify items as the parameter and select the previously created ecommerce.items user variable as a value.
- Select the previously created GA4_Ecommerce_Remove_From_Cart_Trigger as the trigger.
For the Google tag, enter the following code:
gtag("event", "remove_from_cart", {
      currency: "Currency",
      value: “Event value",
    items:  [{
      item_id: "Item ID",
      item_name: "Item name",
      index: "Item position on the list",
      item_brand: "Item brand, manufacturer",
      item_category: "Item category",
      item_category2: "Second product category",
      …
      item_category5: "fifth product category", // if you need more product categories
      item_list_id: "List ID",
      item_list_name: "List name",
      price: "Item price",
      quantity: "Item quantity"
    }
  ]
});
6. Adding a product to the wishlist
If your website has an option to add products to a wishlist, you should track this event. To do this, consider using the add_to_wishlist event.
Example for dataLayer:
window.dataLayer = window.dataLayer || [];
window.dataLayer.push({
  event: "add_to_wishlist",
  ecommerce: {
      currency: "Currency",
      value: “Event value",
    items: [{
      item_id: "Item ID",
      item_name: "Item name",
      index: "Item position on the list",
      item_brand: "Item brand, manufacturer",
      item_category: "Item category",
      item_category2: "Second product category",
      …
      item_category5: "fifth product category", // if you need more product categories
      item_list_id: "List ID",
      item_list_name: "List name",
      price: "Item price",
      quantity: "Item quantity"
    }]
  }
});
Trigger configuration for this code in GTM:
- Trigger name: GA4_Ecommerce_Add_To_Wishlist_Trigger.
- Trigger type: custom event.
- Event name: add_to_wishlist.
- Trigger activation conditions: all custom events.
Configuration of the corresponding tag in GTM:
- Tag type: Google Analytics: GA4 event.
- Tag name: GA4_Ecommerce_Add_To_Wishlist.
- Measurement ID: G-XXXXXXXXXX.
- Event name: add_to_wishlist.
- In the Event Parameters block, specify items as the parameter and select the previously created ecommerce.items user variable as a value.
- Select the previously created GA4_Ecommerce_Add_To_Wishlist_Trigger as the trigger.
For gtag.js, enter the following code:
gtag("event", "add_to_wishlist", {
      currency: "Currency",
      value: “Event value",
    items:  [{
      item_id: "Item ID",
      item_name: "Item name",
      index: "Item position on the list",
      item_brand: "Item brand, manufacturer",
      item_category: "Item category",
      item_category2: "Second product category",
      …
      item_category5: "fifth product category", // if you need more product categories
      item_list_id: "List ID",
      item_list_name: "List name",
      price: "Item price",
      quantity: "Item quantity"
    }
  ]
});
7. Viewing products in the cart
This configured trigger will fire each time the user views their shopping cart, if such a function is available on the site. To set this up, consider the view_cart event.
Here is an example for dataLayer:
window.dataLayer = window.dataLayer || [];
window.dataLayer.push({
  event: "view_cart",
  ecommerce: {
      currency: "Currency",
      value: “Event value",
    items: [{
      item_id: "Item ID",
      item_name: "Item name",
      index: "Item position on the list",
      item_brand: "Item brand, manufacturer",
      item_category: "Item category",
      item_category2: "Second product category",
      …
      item_category5: "fifth product category", // if you need more product categories
      item_list_id: "List ID",
      item_list_name: "List name",
      price: "Item price",
      quantity: "Item quantity"
    }]
  }
});
Trigger configuration for this code in GTM:
- Trigger name: GA4_Ecommerce_View_Cart_Trigger.
- Trigger type: custom event.
- Event name: view_cart.
- Trigger activation conditions: all custom events.
Configuration of the corresponding tag in GTM:
- Tag type: Google Analytics: GA4 event.
- Tag name: GA4_Ecommerce_View_Cart.
- Measurement ID: G-XXXXXXXXXX.
- Event name: view_cart.
- In the Event Parameters block, specify items as the parameter and select ecommerce.items as the value.
- Select the previously created GA4_Ecommerce_View_Cart_Trigger as the trigger.
The code at the data level is almost identical, with only one line changing — the event type. However, you need to make sure that there are no errors in the code, and do not forget to set up triggers with tags.
For the gtag.js, enter the following code:
gtag("event", "view_cart", {
      currency: "Currency",
      value: “Event value",
    items:  [{
      item_id: "Item ID",
      item_name: "Item name",
      index: "Item position on the list",
      item_brand: "Item brand, manufacturer",
      item_category: "Item category",
      item_category2: "Second product category",
      …
      item_category5: "fifth product category", // if you need more product categories
      item_list_id: "List ID",
      item_list_name: "List name",
      price: "Item price",
      quantity: "Item quantity"
    }
  ]
});
8. Placing an order
The checkout process is divided into several stages, each of which should be tracked separately:
- Checkout start: the event when the user clicks on the "Checkout" button, for example, in the shopping cart, and proceeds to fill in the data.
- Filling out the shipping information: the event when the user starts filling out their shipping address, chooses the shipping method, etc.
- Filling in the payment information: the event that occurs when the user fills in the payment information.
- Order completion: the event that occurs when the user has filled in all the required fields and confirmed the order.
Each stage requires a separate code at the data level.
8.1. Checkout start
When you go to the first stage of checkout, you need a code with the begin_checkout event.
I suggest you run the following code through the data layer:
window.dataLayer = window.dataLayer || [];
window.dataLayer.push({
  event: "begin_checkout",
  ecommerce: {
      currency: "Currency",
      value: “Event value",
    items: [{
      item_id: "Item ID",
      item_name: "Item name",
      index: "Item position on the list",
      item_brand: "Item brand, manufacturer",
      item_category: "Item category",
      item_category2: "Second product category",
      …
      item_category5: "fifth product category", // if you need more product categories
      item_list_id: "List ID",
      item_list_name: "List name",
      price: "Item price",
      quantity: "Item quantity"
    }]
  }
});
Trigger configuration for this code in GTM:
- Trigger name: GA4_Ecommerce_Begin_Checkout_Trigger.
- Trigger type: custom event.
- Event name: begin_checkout.
- Trigger activation conditions: all custom events.
Configuration of the corresponding tag in GTM:
- Tag type: Google Analytics: GA4 event.
- Tag name: GA4_Ecommerce_Begin_Checkout.
- Measurement ID: G-XXXXXXXXXX.
- Event name: begin_checkout.
- In the Event Parameters block, specify items as the parameter and select ecommerce.items as the value.
- Select the previously created GA4_Ecommerce_Begin_Checkout_Trigger as the trigger.
For the gtag.js, enter the following code:
gtag("event", "begin_checkout", {
      currency: "Currency",
      value: “Event value",
    items:  [{
      item_id: "Item ID",
      item_name: "Item name",
      index: "Item position on the list",
      item_brand: "Item brand, manufacturer",
      item_category: "Item category",
      item_category2: "Second product category",
      …
      item_category5: "fifth product category", // if you need more product categories
      item_list_id: "List ID",
      item_list_name: "List name",
      price: "Item price",
      quantity: "Item quantity"
    }
  ]
});
8.2. Filling out the shipping information
When the customer is filling in their shipping information, you need to track it using a code with the event add_shipping_info.
For Google Tag Manager, implement the following code at the data level:
window.dataLayer = window.dataLayer || [];
window.dataLayer.push({
  event: "add_shipping_info",
  ecommerce: {
      currency: "Currency",
      value: “Event value",
      shipping_tier: "Shipping method",
    items: [{
      item_id: "Item ID",
      item_name: "Item name",
      index: "Item position on the list",
      item_brand: "Item brand, manufacturer",
      item_category: "Item category",
      item_category2: "Second product category",
      …
      item_category5: "fifth product category", // if you need more product categories
      item_list_id: "List ID",
      item_list_name: "List name",
      price: "Item price",
      quantity: "Item quantity"
    }]
  }
});
Trigger configuration for this code in GTM:
- Trigger name: GA4_Ecommerce_Add_Shipping_Info_Trigger.
- Trigger type: custom event.
- Event name: add_shipping_info.
- Trigger activation conditions: all custom events.
Configuration of the corresponding tag in GTM:
- Tag type: Google Analytics: GA4 event.
- Tag name: GA4_Ecommerce_Add_Shipping_Info.
- Measurement ID: G-XXXXXXXXXX.
- Event name: add_shipping_info.
- In the Event Parameters block, specify items as the first parameter and select ecommerce.items user variable as a value.
- In the Event Parameters block, specify shipping_tier as the second parameter and select ecommerce.shipping_tier as the value.
- Select the previously created GA4_Ecommerce_Add_Shipping_Info_Trigger as the trigger.
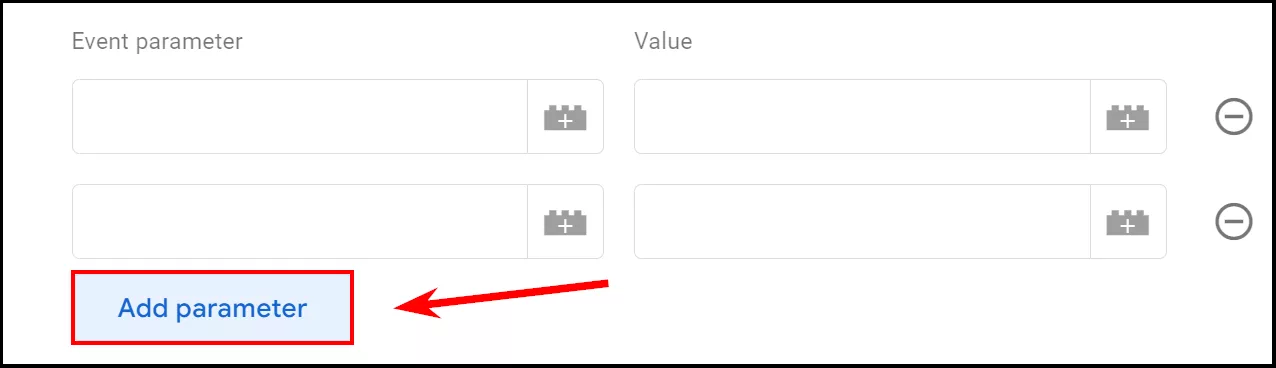
To add a new action parameter, click Add parameter when setting up a tag in GTM:
For the gtag.js, enter the following code:
gtag("event", "add_shipping_info", {
      currency: "Currency",
      value: “Event value",
      shipping_tier: "Shipping method",
    items:  [{
      item_id: "Item ID",
      item_name: "Item name",
      index: "Item position on the list",
      item_brand: "Item brand, manufacturer",
      item_category: "Item category",
      item_category2: "Second product category",
      …
      item_category5: "fifth product category", // if you need more product categories
      item_list_id: "List ID",
      item_list_name: "List name",
      price: "Item price",
      quantity: "Item quantity"
    }
  ]
});
8.3. Filling in the payment information
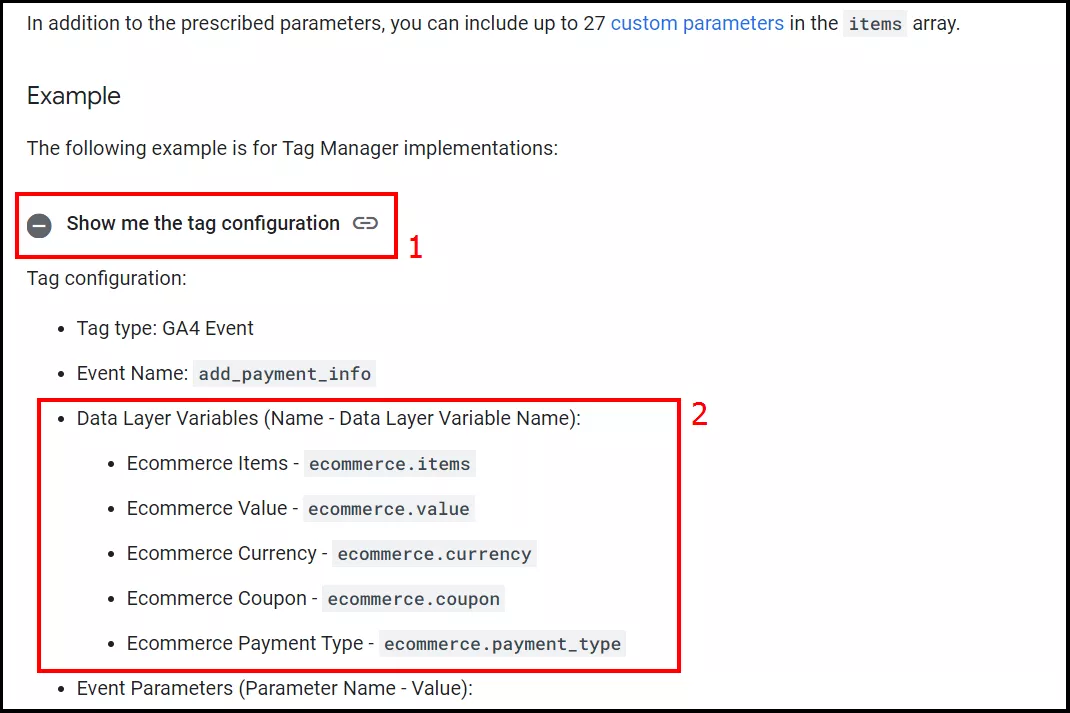
To track the stage of filling in the order payment information, you need a code with the event add_payment_info.
The code for dataLayer:
window.dataLayer = window.dataLayer || [];
window.dataLayer.push({
  event: "add_payment_info",
  ecommerce: {
      currency: "Currency",
      value: “Event value",
      payment_type: "Payment type",
    items: [{
      item_id: "Item ID",
      item_name: "Item name",
      index: "Item position on the list",
      item_brand: "Item brand, manufacturer",
      item_category: "Item category",
      item_category2: "Second product category",
      …
      item_category5: "fifth product category", // if you need more product categories
      item_list_id: "List ID",
      item_list_name: "List name",
      price: "Item price",
      quantity: "Item quantity"
    }]
  }
});
Trigger configuration for this code in GTM:
- Trigger name: GA4_Ecommerce_Add_Payment_Info_Trigger.
- Trigger type: custom event.
- Event name: add_payment_info.
- Trigger activation conditions: all custom events.
Configuration of the corresponding tag in GTM:
- Tag type: Google Analytics: GA4 event.
- Tag name: GA4_Ecommerce_Add_Payment_Info.
- Measurement ID: G-XXXXXXXXXX.
- Event name: add_payment_info.
- In the Event Parameters block, specify items as the first parameter and select ecommerce.items as the value.
- In the Event Parameters block, specify payment_type as the second parameter and select ecommerce.payment_type as the value.
- Select the previously created GA4_Ecommerce_Add_Payment_Info_Trigger as the trigger.
Type the following code for gtag.js:
gtag("event", "add_payment_info", {
      currency: "Currency",
      value: “Event value",
      payment_type: "Payment type",
    items:  [{
      item_id: "Item ID",
      item_name: "Item name",
      index: "Item position on the list",
      item_brand: "Item brand, manufacturer",
      item_category: "Item category",
      item_category2: "Second product category",
      …
      item_category5: "fifth product category", // if you need more product categories
      item_list_id: "List ID",
      item_list_name: "List name",
      price: "Item price",
      quantity: "Item quantity"
    }
  ]
});
8.4. Order completion
When the user is redirected to the page that indicates a successful order (the Thank You page), you will need a code with the purchase event.
For dataLayer, this is the code:
window.dataLayer = window.dataLayer || [];
window.dataLayer.push({
  event: "purchase",
  ecommerce: {
    transaction_id: "Transaction ID",
    value: "Total transaction cost",
    currency: "Currency",
    items: [{
      item_id: "Item ID",
      item_name: "Item name",
      index: "Item position on the list",
      item_brand: "Item brand, manufacturer",
      item_category: "Item category",
      item_category2: "Second product category",
      …
      item_category5: "fifth product category", // if you need more product categories
      item_list_id: "List ID",
      item_list_name: "List name",
      price: "Item price",
      quantity: "Item quantity"
    }]
  }
});
Trigger configuration for this code in GTM:
- Trigger name: GA4_Ecommerce_Purchase_Trigger.
- Trigger type: custom event.
- Event name: purchase.
- Trigger activation conditions: all custom events.
Configuration of the corresponding tag in GTM:
- Tag type: Google Analytics: GA4 event.
- Tag name: GA4_Ecommerce_Purchase.
- Measurement ID: G-XXXXXXXXXX.
- Event name: purchase.
- In the Event Parameters block, specify items as the first parameter and select ecommerce.items as the value.
- In the Event Parameters block, specify transaction_id as the second parameter and select ecommerce.transaction_id as the value.
- In the Event Parameters block, specify value as the third parameter and select ecommerce.value as the value.
- In the Event Parameters block, specify currency as the fourth parameter and select ecommerce.currency as the value.
- Select the previously created GA4_Ecommerce_Purchase_Trigger as the trigger.
Type the following code for gtag.js:
gtag("event", "purchase", {
    transaction_id: "Transaction ID",
    value: "Total transaction cost",
    currency: "Currency",
    items:  [{
      item_id: "Item ID",
      item_name: "Item name",
      index: "Item position on the list",
      item_brand: "Item brand, manufacturer",
      item_category: "Item category",
      item_category2: "Second product category",
      …
      item_category5: "fifth product category", // if you need more product categories
      item_list_id: "List ID",
      item_list_name: "List name",
      price: "Item price",
      quantity: "Item quantity"
    }
  ]
});
9. Refund/returning purchases
I'll also show you the refund tracking settings. For example, on the Rozetka website, you can return an order within 14 days from the date of purchase. You will get a full refund or if not all products from the order are returned, you will get a partial refund.
9.1. Full refund
If you are canceling the entire order, you will need a code with the refund event parameter.
For Google Tag Manager, the code looks like this:
window.dataLayer = window.dataLayer || [];
window.dataLayer.push({
  event: "refund",
  ecommerce: {
    transaction_id: "Transaction ID",
    value: "Total transaction cost",
    currency: "Currency",
    items: [{
      item_id: "Item ID",
      item_name: "Item name",
    }]
  }
});
The product information in the items layer is optional. However, if this array is in the code, item_name and item_id are already required, and all other parameters are optional. Google recommends that you add this information.
Trigger configuration for this code in GTM:
- Trigger name: GA4_Ecommerce_View_Cart_Trigger.
- Trigger type: custom event.
- Event name: refund.
- Trigger activation conditions: all custom events.
Configuration of the corresponding tag in GTM:
- Tag type: Google Analytics: GA4 event.
- Tag name: GA4_Ecommerce_Refund_Trigger.
- Measurement ID: G-XXXXXXXXXX.
- Event name: refund.
- In the Event Parameters block, specify items as the first parameter and select ecommerce.items as the value.
- The second parameter is transaction_id, with value ecommerce.transaction_id.
- The third parameter is value, with value ecommerce.value.
- The fourth parameter is currency, with value ecommerce.currency.
- Select the previously created GA4_Ecommerce_Refund_Trigger as the trigger.
Type the following code for gtag.js:
gtag("event", "refund", {
  transaction_id: "Transaction ID",
  currency: "Currency",
  value: "Total transaction cost",
    items: [{
      item_id: "Item ID",
      item_name: "Item name",
    }]
  }
});
9.2. Partial refund
This happens when the customer returns one or more items from an entire order while deciding to keep the other items.
When refunding only some items from an order, the following code is required through the dataLayer:
window.dataLayer = window.dataLayer || [];
window.dataLayer.push({
  event: "refund",
  ecommerce: {
    transaction_id: "Transaction ID",
    value: "Total transaction cost",
    currency: "Currency",
    items:  [{
      item_id: "Item ID",
      item_name: "Item name",
      index: "Item position on the list",
      item_brand: "Item brand, manufacturer",
      item_category: "Item category",
      item_category2: "Second product category",
      …
      item_category5: "fifth product category", // if you need more product categories
      item_list_id: "List ID",
      item_list_name: "List name",
      price: "Item price",
      quantity: "Item quantity"
    }
  ]
});
The name of the event is the same, but for a partial refund, specify the information about the products that the user is returning.
Trigger configuration for this code in GTM:
- Trigger name: GA4_Ecommerce_View_Cart_Trigger.
- Trigger type: custom event.
- Event name: refund.
- Trigger activation conditions: all custom events.
Configuration of the corresponding tag in GTM:
- Tag type: Google Analytics: GA4 event.
- Tag name: GA4_Ecommerce_Refund_Trigger.
- Measurement ID: G-XXXXXXXXXX.
- Event name: refund.
- In the Event Parameters block, specify items as the first parameter and select ecommerce.items as the value.
- The second parameter is transaction_id, with value ecommerce.transaction_id.
- The third parameter is value, with value ecommerce.value.
- The fourth parameter is currency, with value ecommerce.currency.
- Select the previously created GA4_Ecommerce_Refund_Trigger as the trigger.
Type the following code for gtag.js:
gtag("event", "refund", {
    transaction_id: "Transaction ID",
    value: "Total transaction cost",
    currency: "Currency",
    items:  [{
      item_id: "Item ID",
      item_name: "Item name",
      index: "Item position on the list",
      item_brand: "Item brand, manufacturer",
      item_category: "Item category",
      item_category2: "Second product category",
      …
      item_category5: "fifth product category", // if you need more product categories
      item_list_id: "List ID",
      item_list_name: "List name",
      price: "Item price",
      quantity: "Item quantity"
    }
  ]
});
Conclusions
- E-commerce in Google Analytics 4 (GA4) is a tool to track and analyze the performance of an online store or e-commerce site.
- E-commerce tracking helps you identify the most popular products on your site. It will also show you the site elements that are most attractive to users, as well as elements on your site that are ineffective or not working at all.
- You can track e-commerce using either Google tag (gtag.js) or Google Tag Manager. Google recommends tracking with GTM.
- The Google tag (gtag.js) is a snippet of code that you need to add to your website to send information to Google Analytics 4. This requires an experienced developer.
- When configured through GTM, events are passed to GA4 through the dataLayer code. This is a JavaScript object that passes information from the site to the Tag Manager container. To track through GTM, you need to prepare the dataLayer code, as well as data variables, triggers, and tags.
- The code for tracking different events on the data layer is almost identical, with only one line changing — the event type.
FAQ
Why is it important to track e-commerce events?
E-commerce events provide valuable information about website performance. You can use this feature to analyze user behavior, conversion rates, problematic site elements, and more. E-commerce tracking in Google Analytics 4 will help you customize and analyze your marketing strategy, improve website performance, and ultimately increase revenue.
What events should you track with GA4 e-commerce?
Some of the events that you should track are page views, adding products to the cart, checkout, abandonment, and interaction with various elements. By analyzing these events, you can better understand user behavior and optimize your website.
How can I improve my e-commerce performance?
To improve your e-commerce performance, start by collecting and analyzing data with GA4’s e-commerce tracking. Compare your performance to industry standards, and based on the findings, develop a site optimization plan to improve your performance.

 0
0
 0
0
 0
0
Recommended theme posts
Related Articles
How to Set Up Consent Mode in GA4 on Your Website with Google Tag Manager
Let's explore how to properly integrate consent mode in GA4, configure it for effective data collection, and at the same time comply with GDPR and other legal regulations
Display Advertising Effectiveness Analysis: A Comprehensive Approach to Measuring Its Impact
In this article, I will explain why you shouldn’t underestimate display advertising and how to analyze its impact using Google Analytics 4
Generative Engine Optimization: What Businesses Get From Ranking in SearchGPT
Companies that master SearchGPT SEO and generative engine optimization will capture high-intent traffic from users seeking direct, authoritative answers