Proper data collection in Google Analytics 4 is critical for effective website analysis. To ensure you are recording events correctly, it is worth checking your settings with DebugView.
In this article, I will show you how to use DebugView and perform tests with the tool.
What is DebugView, and what is it used for?
DebugView is a tool in Google Analytics 4 that allows you to analyze and debug website event tracking in real time.
Let’s say you want to verify that the “click the Buy Now button” event is being tracked correctly. Open the tool, go to the product page, and click the Buy Now button. In the DebugView window, you will see if the purchase event was sent with all the required parameters (product name, price, quantity, etc.). If there is no event or the parameters are incorrect, you can immediately fix the error in the tracking code.
You can use the tool to:
- Configure event tracking to ensure that all events are sent correctly.
- Identify and resolve errors. If you notice inconsistencies between what is reported and what is actually happening, DebugView can help you determine where the error occurred.
- Perform detailed event analysis to understand why a particular action occurred.
For example, if you notice that the registration-to-purchase conversion rate is very low, you can use DebugView to analyze events related to the registration and checkout process. Many users get stuck at the address entry step or encounter errors during the payment process. This information will help you make changes to the design of the registration form or fix any issues with the payment system.
Enabling DebugView and starting data collection
By default, the DebugView feature is disabled in your GA4 account. To enable it, log in to your GA account, select the desired website, and go to the Admin section.

Go to the Property settings section in the left menu. Select Data display to find the DebugView.
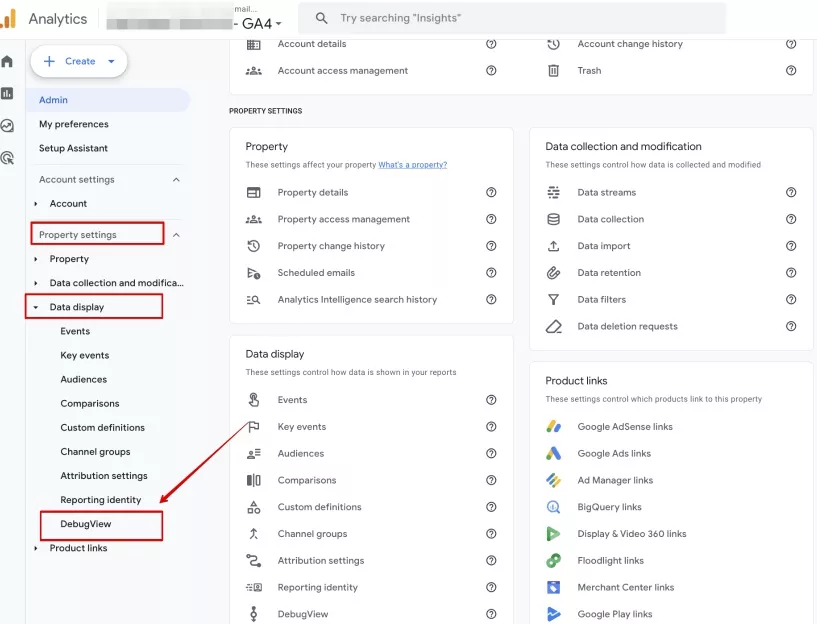
Clicking on it will take you to the real-time event review section. To use DebugView, you must enable the debug mode using the Debug Device option.
At the initial configuration stage, the list of devices and the report are empty.

To enable tracking, install the Google Analytics Debugger extension in your browser. This is required for DebugView to work.
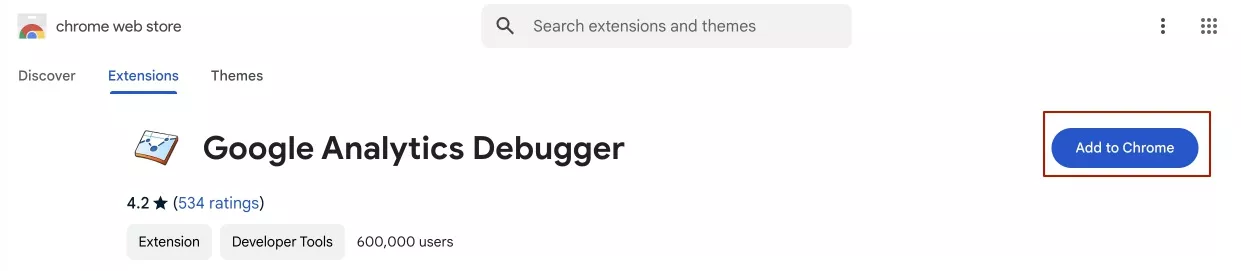
After the GA Debugger extension is successfully installed, activate it. Click GA Debugger from the Extensions submenu at the top right of the screen. After that, the icon will show the status On, which means Enabled.
![]()
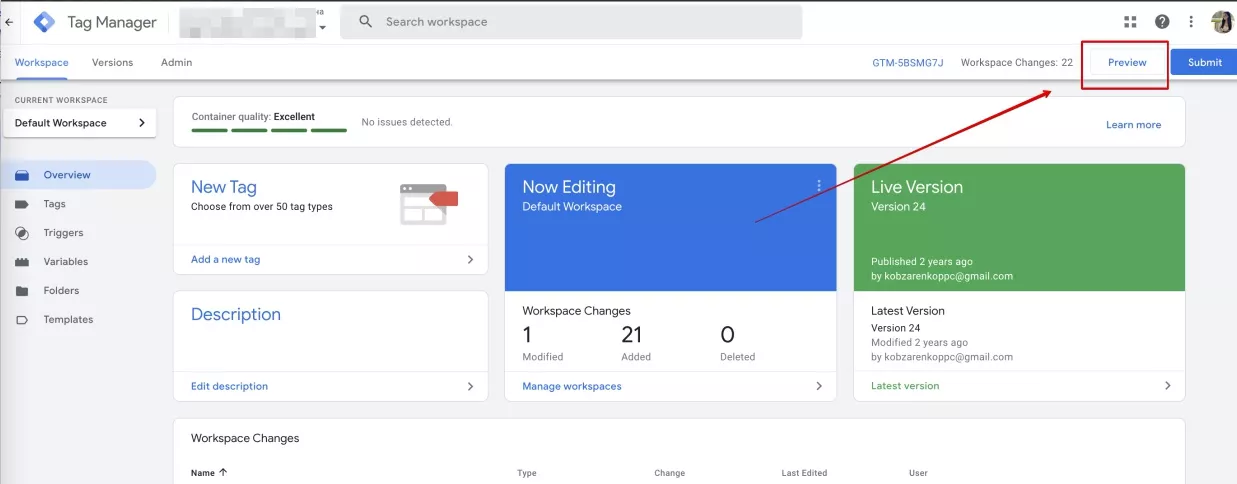
Next, go to Google Tag Manager, select the desired site, and click Preview.
Google Analytics will then allow you to select your device, e.g., Apple if you are using a MacBook. You’ll see the live event information on the page next to it.
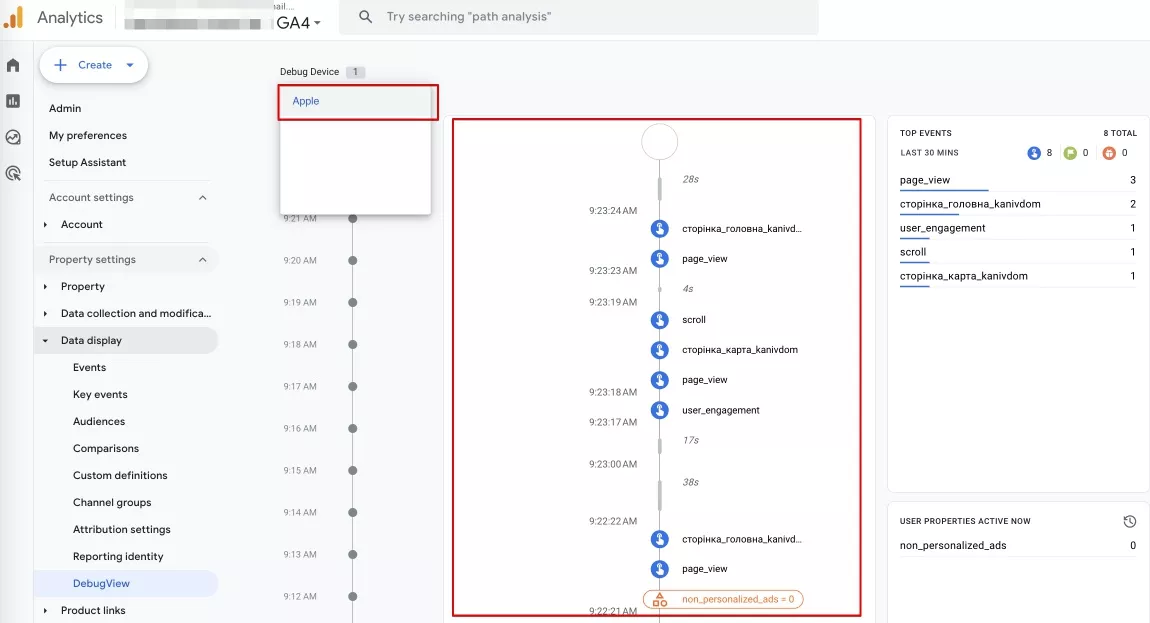
If the data is displayed, the collection is working correctly.
Testing and debugging events with DebugView
Using Google Tag Manager, go to your website in Preview mode and emulate the user experience from viewing a product to purchasing it. All the actions on the site will be displayed sequentially in the DebugView section of Google Analytics 4.
Next, proceed with the analysis. Select a specific event, click on it, and view its parameters in the box that opens to the right. Make sure the events contain the information you need for your reports.
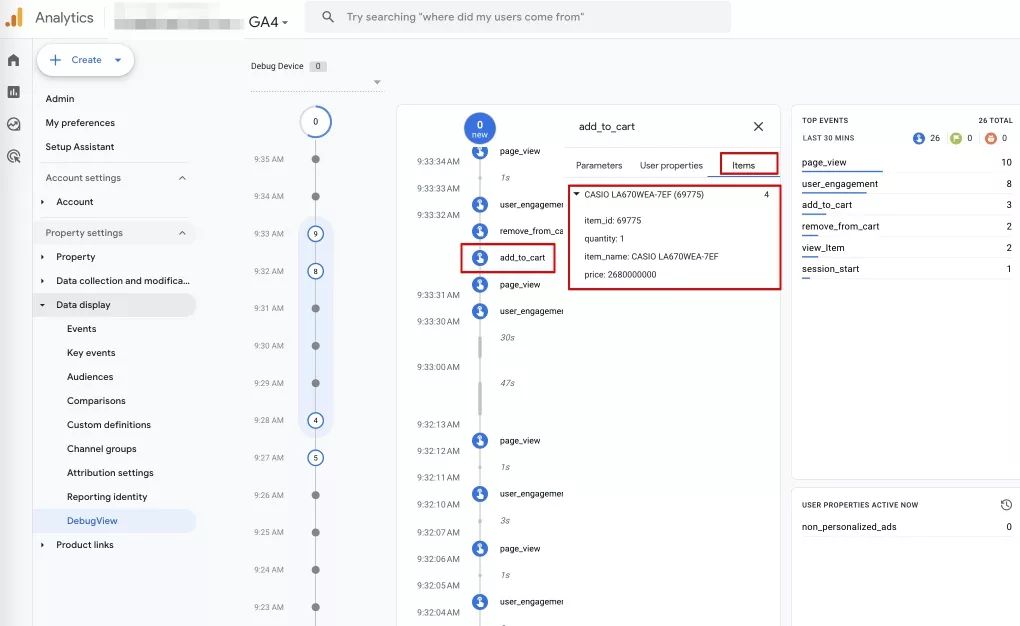
For example, the mandatory parameters for the real-time view_item event include:
- item_id (item id);
- quantity (number of units of the product);
- item_name (product name);
- item_brand (brand name);
- price.
For more details on the parameters of the recommended events for tracking, see the Google Analytics 4 Help.
Similar parameters should be passed for the add_to_cart and purchase events. It is important for the price, product name, and quantity information to be correct and not duplicated.
For example, let’s say that there’s a “Buy Now” button on a web page. When the user clicks it, the “purchase” event should be sent. However, due to a bug in the code, this event is sent twice each time the user clicks the button. As a result, reports will show the number of purchases twice as high as the actual number, while DebugView will record two data sends for one event. Check the event settings to see whether the error is due to incorrect or incomplete data transmission.
The following articles will help you do this:
- How to Track Events with Google Analytics 4: The Ultimate Guide
- How to Set Up Google Analytics 4 with Google Tag Manager
Monitoring with DebugView helps you analyze various actions of website visitors. By evaluating this information, you can find and avoid typical errors while tracking the most important events.
The advantages of using DebugView:
- Real-time reporting. Unlike reports that show aggregated data over a period of time, DebugView lets you see every event sent to your website or application. It’s like looking through a microscope.
- Deep detail. Each event in DebugView is recorded with a lot of information: product parameters, user IDs, etc. This allows you to understand exactly what is happening on your site.
- Debugging. The main purpose of DebugView is to set up event tracking properly. You can quickly detect errors in tags, triggers, etc.
Conclusions
- DebugView is a tool in Google Analytics 4 that allows you to analyze and track events on a website in real time.
- It is especially helpful when setting up tracking, as it enables you to identify and troubleshoot errors and analyze individual events in detail.
- To enable DebugView, you must have the Google Analytics Debugger extension and have configured Google Analytics 4 and Google Tag Manager.
- To analyze an event, run it on your website in Google Tag Manager preview mode.
- DebugView provides detailed information about the data transmitted by the event, allowing you to identify incorrect or duplicate data.
If you need expert help with setup or strategy, explore our Google Analytics 4 Services to unlock the platform’s full potential.

 4
4
 2
2
 0
0
Recommended theme posts
Related Articles
How to Set Up Consent Mode in GA4 on Your Website with Google Tag Manager
Let's explore how to properly integrate consent mode in GA4, configure it for effective data collection, and at the same time comply with GDPR and other legal regulations
Display Advertising Effectiveness Analysis: A Comprehensive Approach to Measuring Its Impact
In this article, I will explain why you shouldn’t underestimate display advertising and how to analyze its impact using Google Analytics 4
Generative Engine Optimization: What Businesses Get From Ranking in SearchGPT
Companies that master SearchGPT SEO and generative engine optimization will capture high-intent traffic from users seeking direct, authoritative answers