How to Set Up Consent Mode in GA4 on Your Website with Google Tag Manager
In 2024, Google made Consent Mode mandatory for personalized advertising in the EU. Now, when users visit your website, you must ask for their consent to process their data so Google tags can record and read cookies. Without user consent, the data collected by Google tags is not complete, making it difficult to analyze and evaluate marketing effectiveness.
This article will explain how to properly integrate consent mode into GA4, configure it for effective data collection, and ensure compliance with GDPR and other legal regulations.
- Types of Google consent mode
- How to Check if Consent Mode is Active in GA4
- Creating a Usercentrics web CMP workspace
- Implementing Usercentrics CMP with GTM
- Setting up a tag activation trigger
- Reviewing and publishing changes
- An example of how consent works in GTM
- Key parameters collected by Google tags by default
- How CMP affects analytics
- Lack of indexing of categories and DPS parameters in CMP
Types of Google consent mode
There are two options to implement Google consent mode on your website or in your app: basic consent mode and advanced consent mode.
Before setting up Google consent mode, pick a tracking option and decide how you will implement it.
For more information about consent mode, visit the Google Help Center.
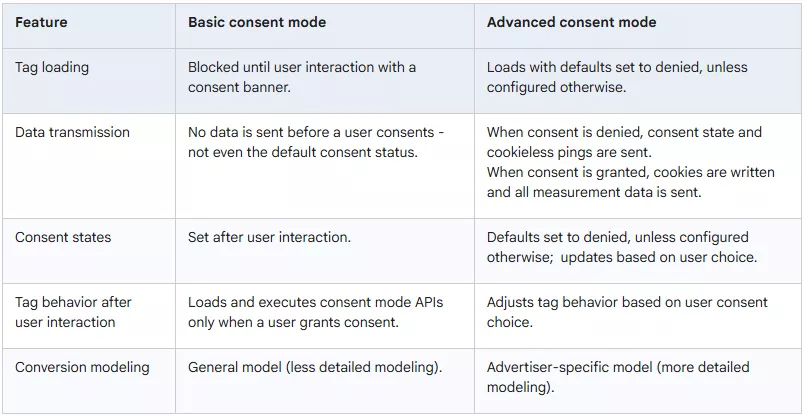
Basic consent mode
In this mode, user actions are not tracked, and Google tags are not activated until a visitor interacts with the consent banner.
Here's how it works:
-
If the user gives consent, Google tags load and interact with the Consent Mode API. First, the default status is transmitted, followed by the updated status if the user changes their selection.
-
If the user does not give consent, Google does not receive any data, including consent status, and Google tags are blocked. In this case, Google Ads uses aggregated conversion modeling without personalization.
Advanced consent mode
Google tags load immediately after the site opens. They then interact with the Consent API as follows.
-
A default consent status is set. If no custom settings are configured, the default value is denied.
-
If consent is not granted, Google tags send incomplete signals without cookies.
-
After the user interacts with the banner, the statuses are updated. If consent is granted, Google tags begin full tracking.
This mode provides a more accurate conversion model because it uses a personalized model for each advertiser instead of a generic one.
Basic consent mode: Data collection and Google tags are blocked until consent is given. Tracking only begins once the user has explicitly consented.
Advanced consent mode: Google tags load immediately when the site opens, and data is collected regardless of the consent. If consent is not given, incomplete signals are transmitted without cookies. If consent is given, full tracking using cookies is activated.
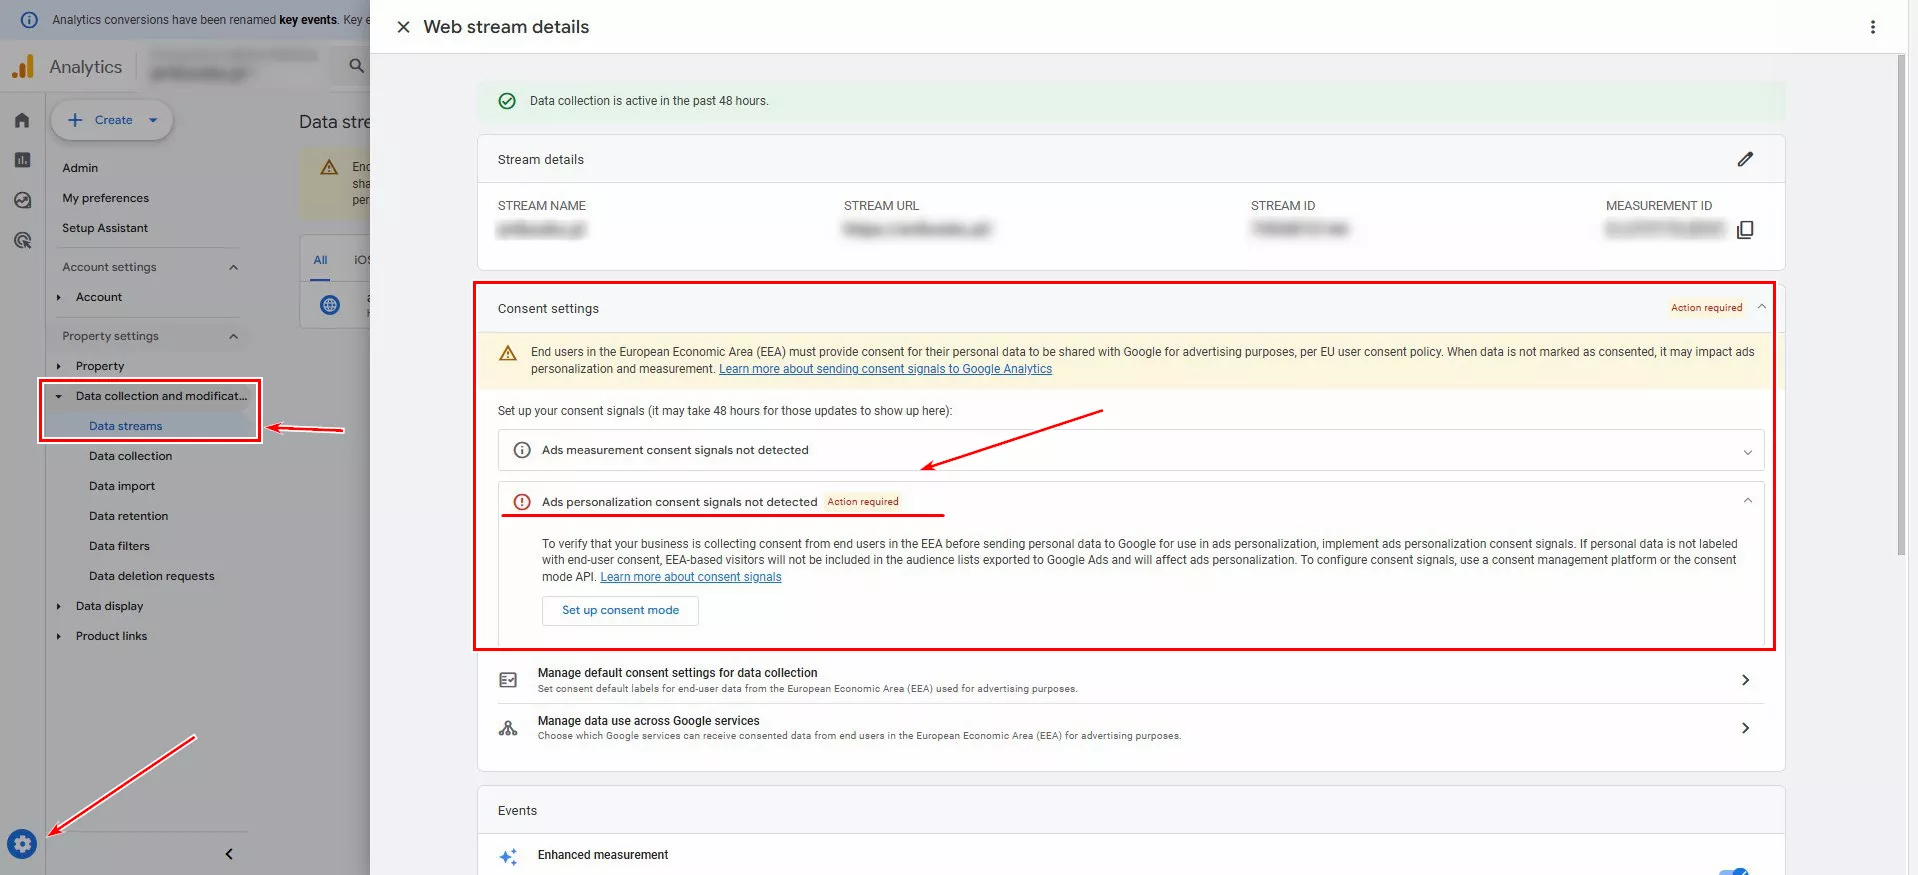
How to Check if Consent Mode is Active in GA4
Follow these steps to ensure that the new consent mode settings are active and configured correctly in your GA4 account.
-
First, log in to your GA4 account via the official Google Analytics website.
-
In the menu at the bottom left, click Admin.
-
In the Data Stream column, select the appropriate resource — your website or application.
-
Find the Consent Setting tab and verify that it is enabled.
Creating a Usercentrics web CMP workspace
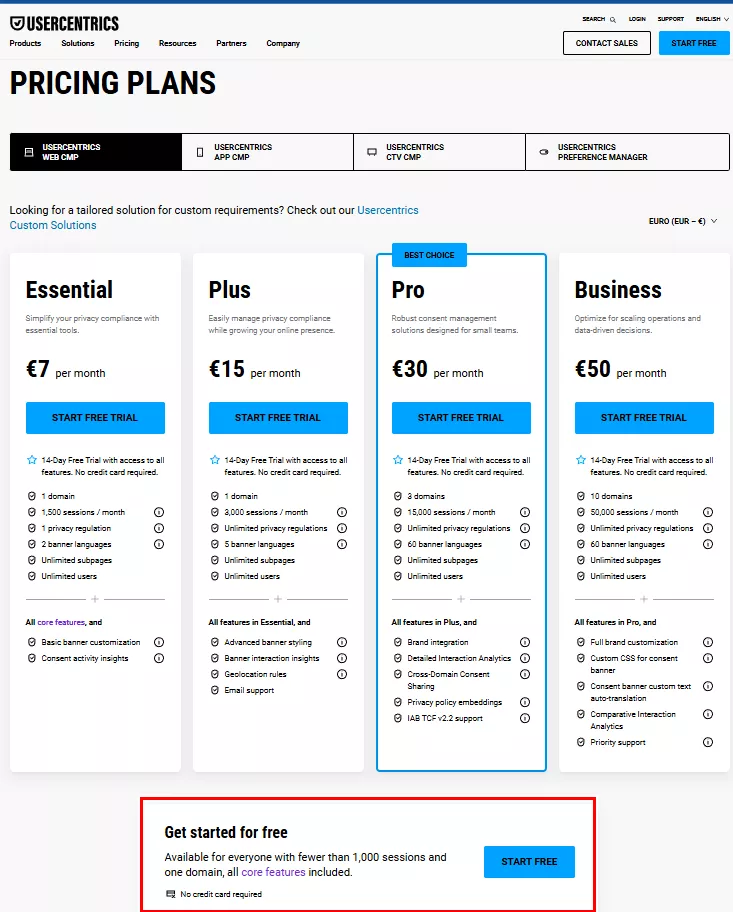
As an example, I will use the Usercentrics Web CMP to set up consent mode in GA4. It is a Google CMP partner that integrates directly into the Google Tag Manager interface. The platform offers convenient tools for managing user consent, allowing you to customize data collection according to your specific privacy requirements. The service offers a 14-day free trial, which provides ample time to test its functionality and determine whether it meets your needs.
Check out the selection of partner consent management platforms.
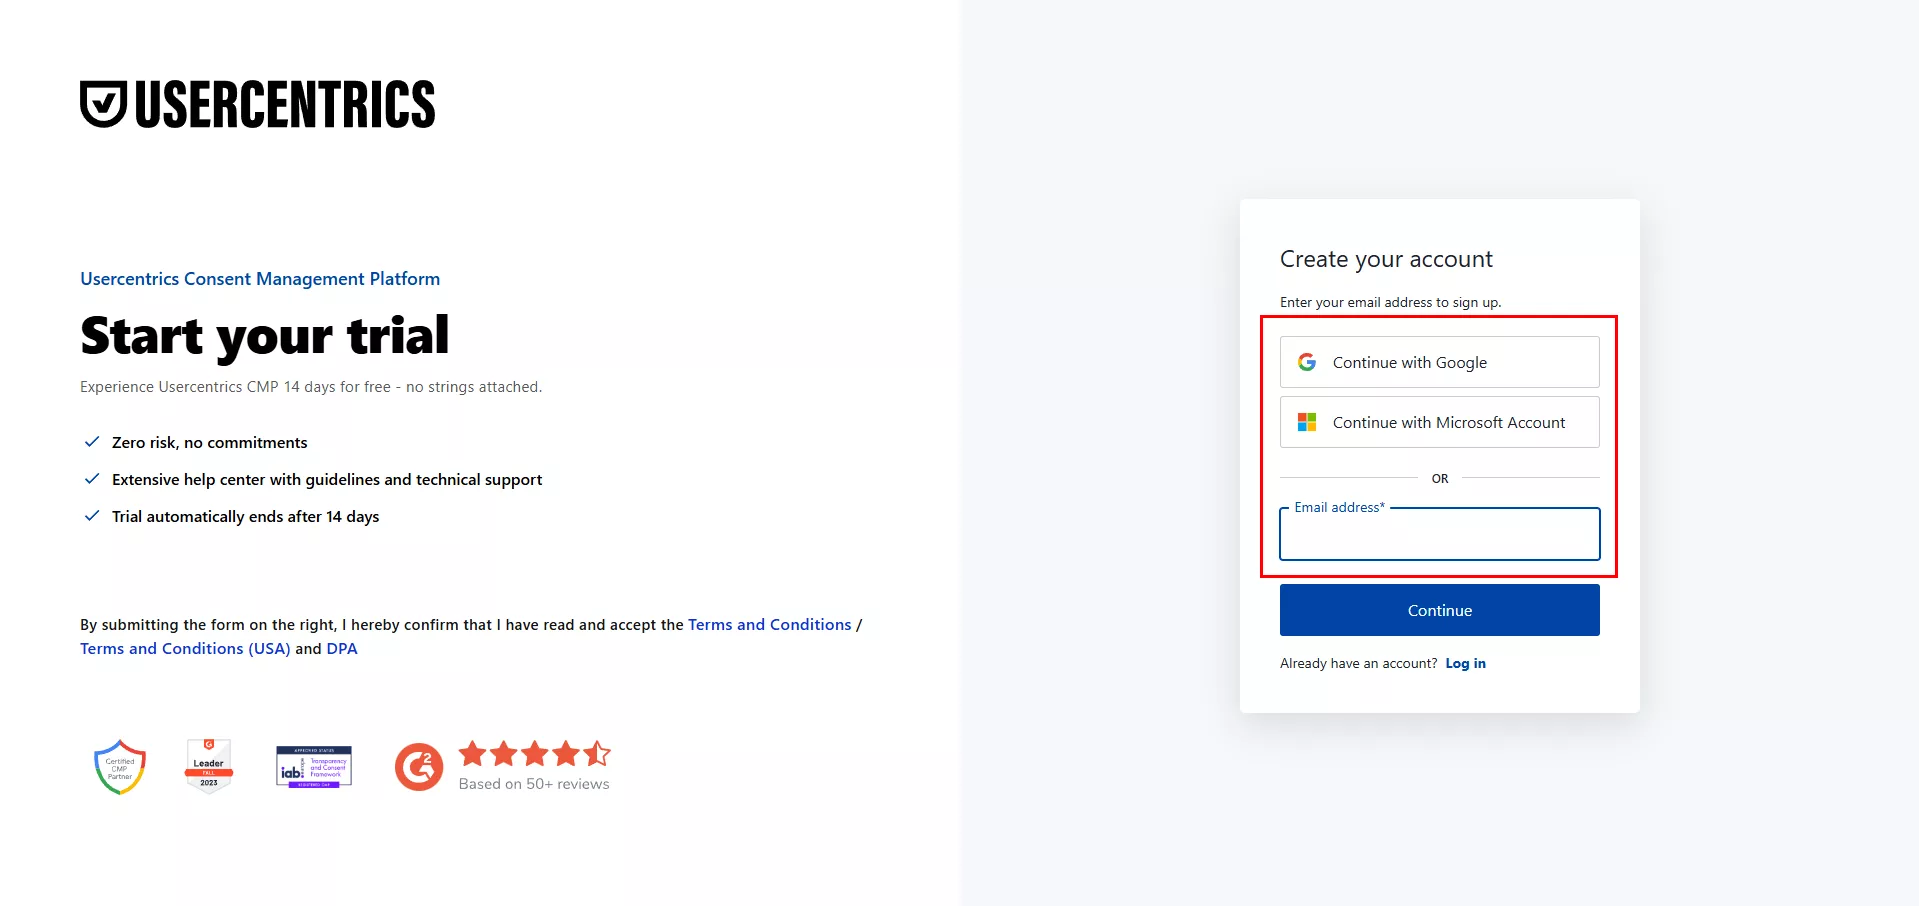
Register on the Usercentrics platform.
-
Go to the official Usercentrics Web CMP website and select the Pro version, which has a free 14-day trial period.
-
Fill out the required fields to create your account.
- Welcome. Provide information about your needs, team size, and other business details.

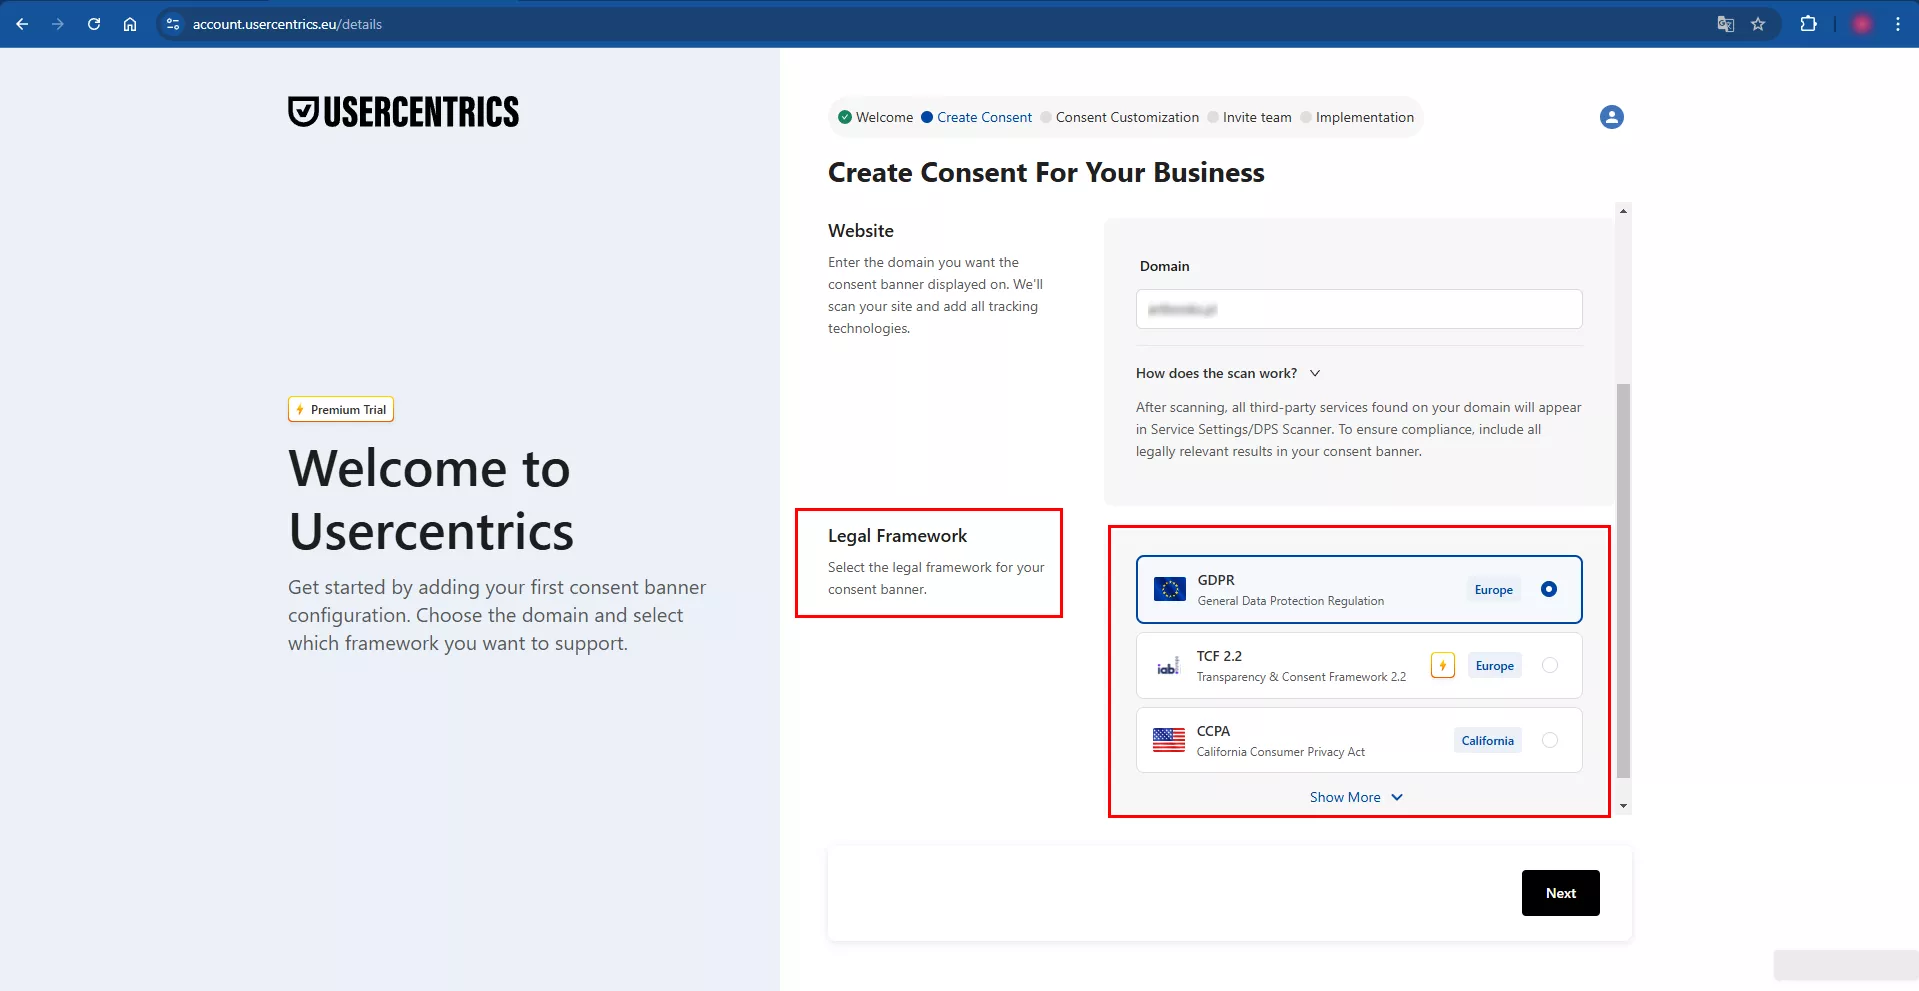
- Create Consent. Enter the account name, country, and website domain. Select the legal framework for the consent banner depending on the region where the ad is displayed and the applicable law.
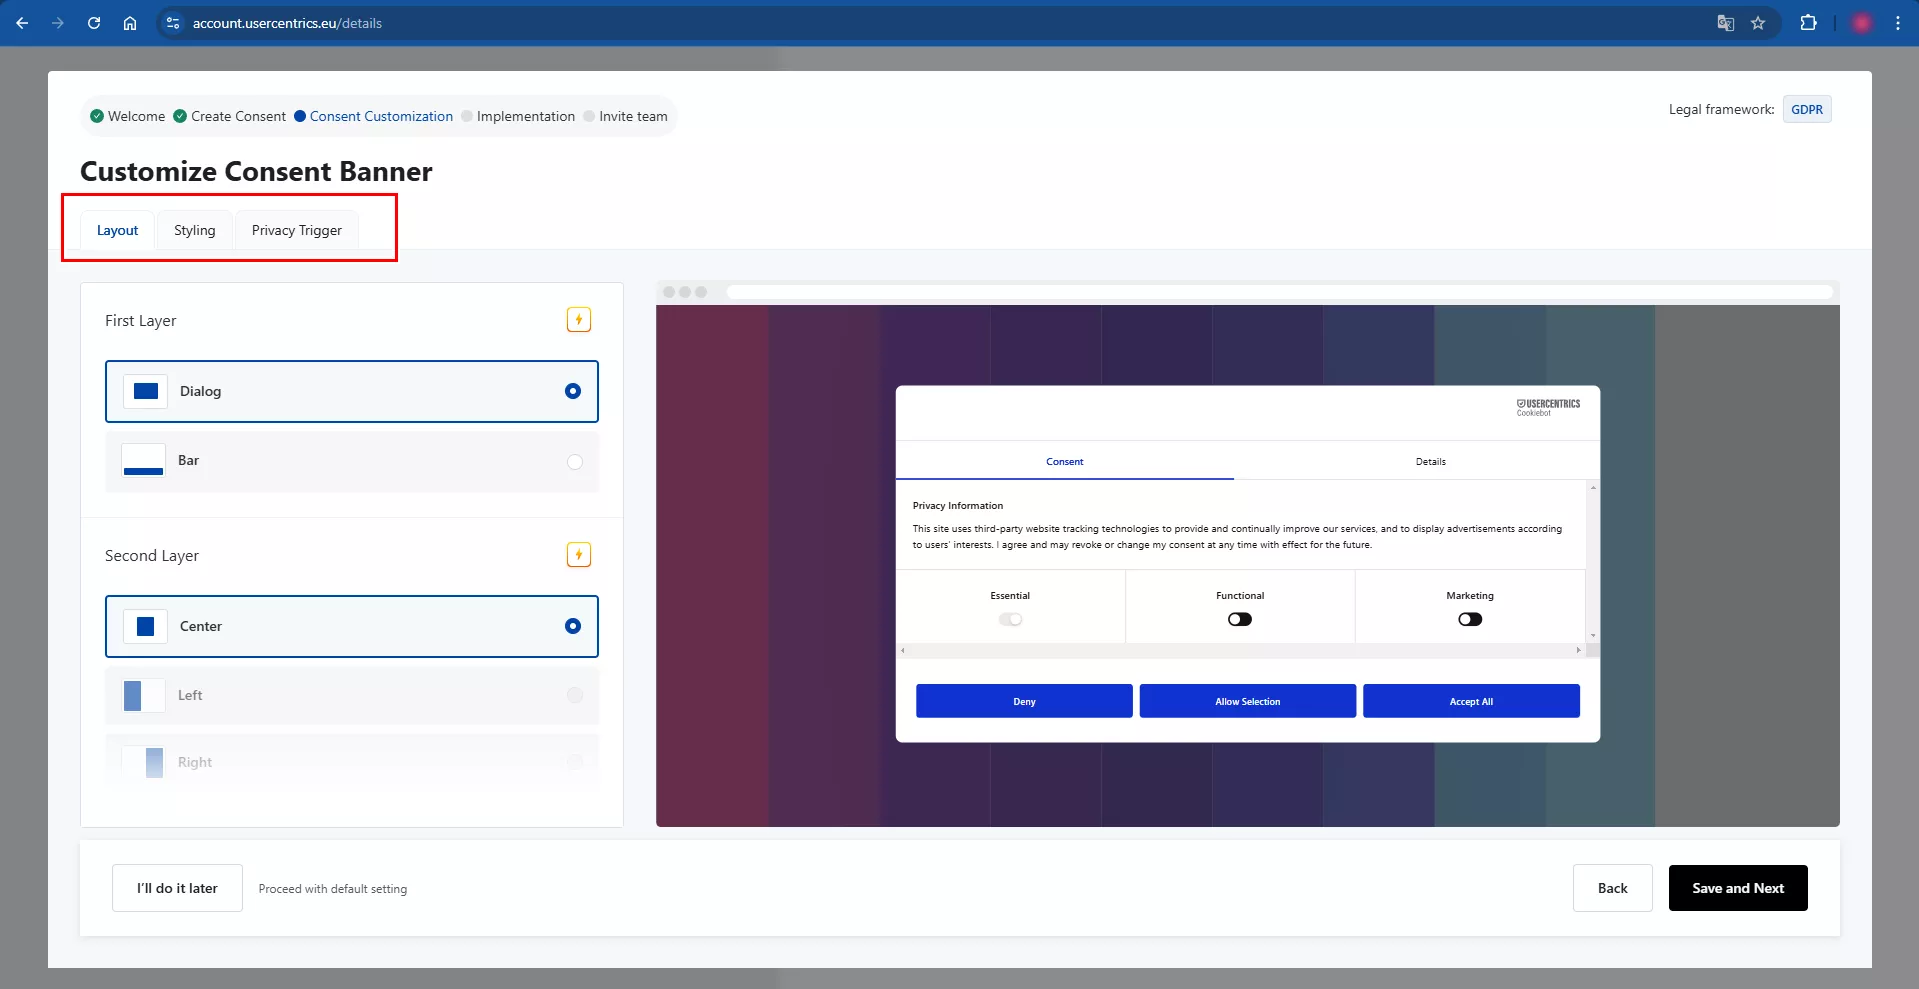
- Consent Customization. At this stage, you can configure the appearance of the consent banner. The available options depend on the selected pricing plan.
-
The free version offers basic functionalities, such as the ability to select the layout, style, and privacy triggers.
-
The paid plans offer more advanced customization options.
If you do not plan to finish setting up or grant access to other users at this time, click I'll do it later to proceed directly to the admin panel.
- Invite team. Then, invite other users to the account and specify the appropriate level of access for each user.
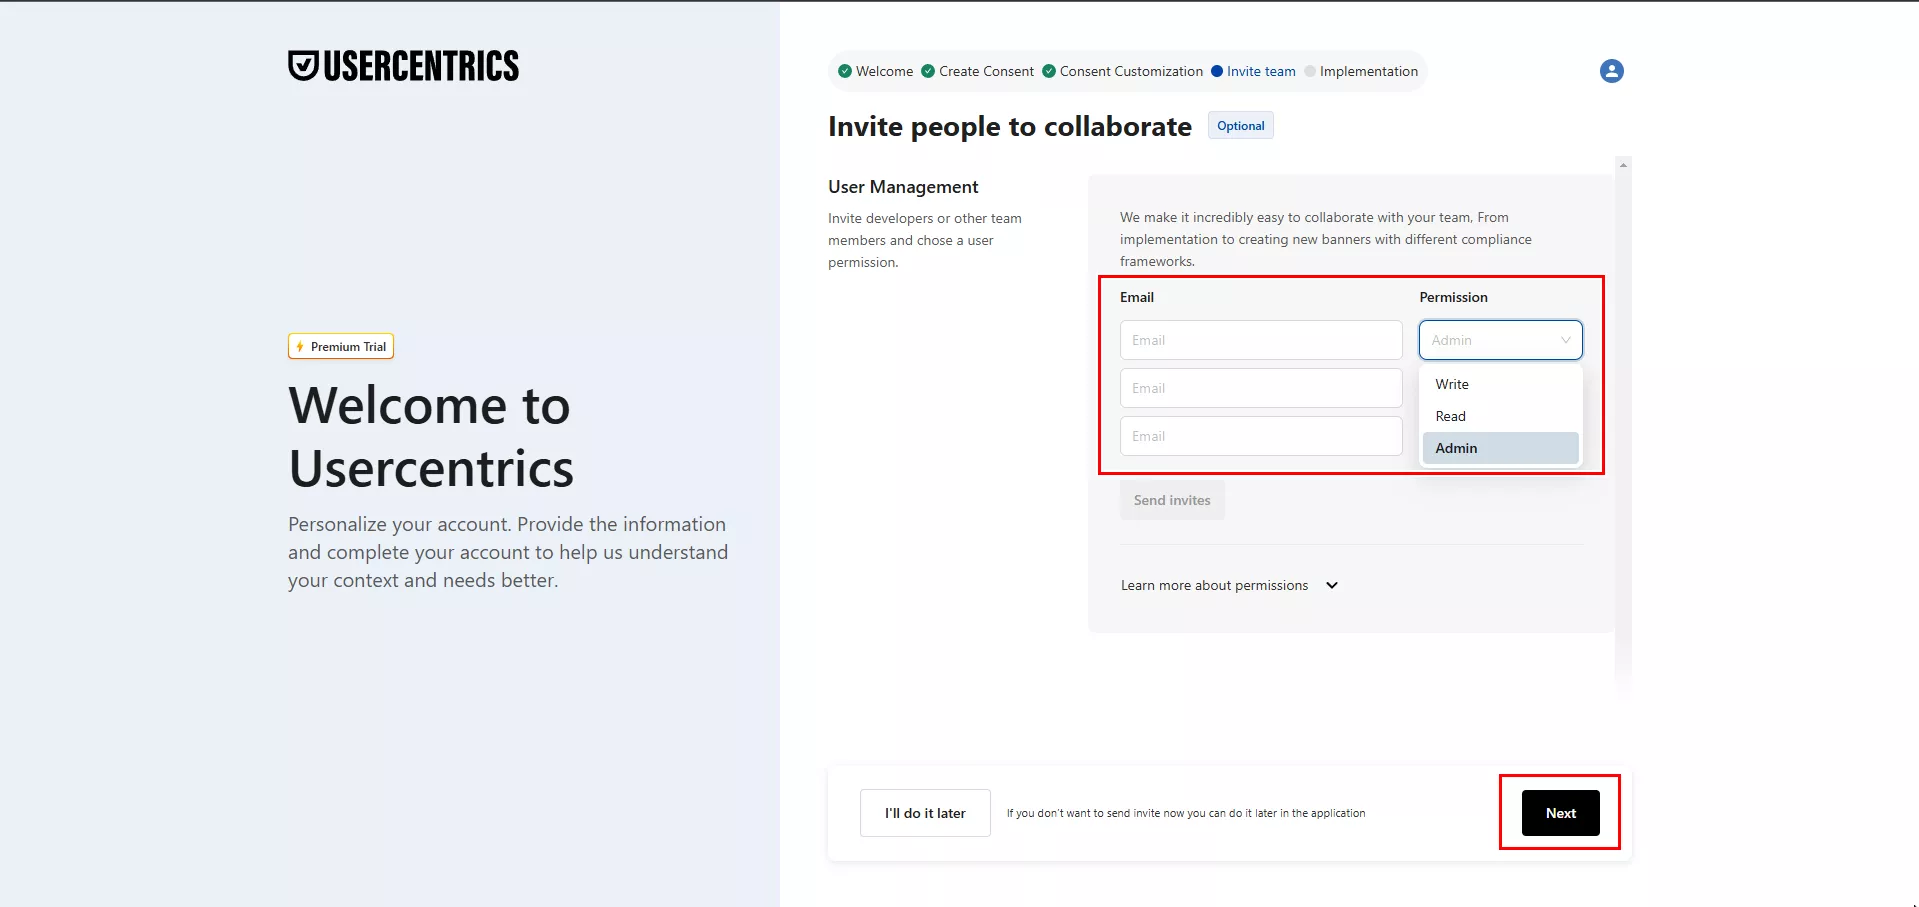
- Implementation. Usercentrics offers several options for integrating consent mode into your website.
-
Direct integration: This option requires technical coding skills.
-
Integration via third-party services, such as Google Tag Manager (GTM): This option is the most convenient for most users because it uses a ready-made configuration tag template directly within the GTM interface.

In your account, select the configuration you just created and go to the admin panel.
Implementing Usercentrics CMP with GTM
Implementing the Usercentrics CMP via Google Tag Manager (GTM) does not require any complex technical steps. You can configure the necessary tags and settings yourself, which significantly simplifies the consent management process.
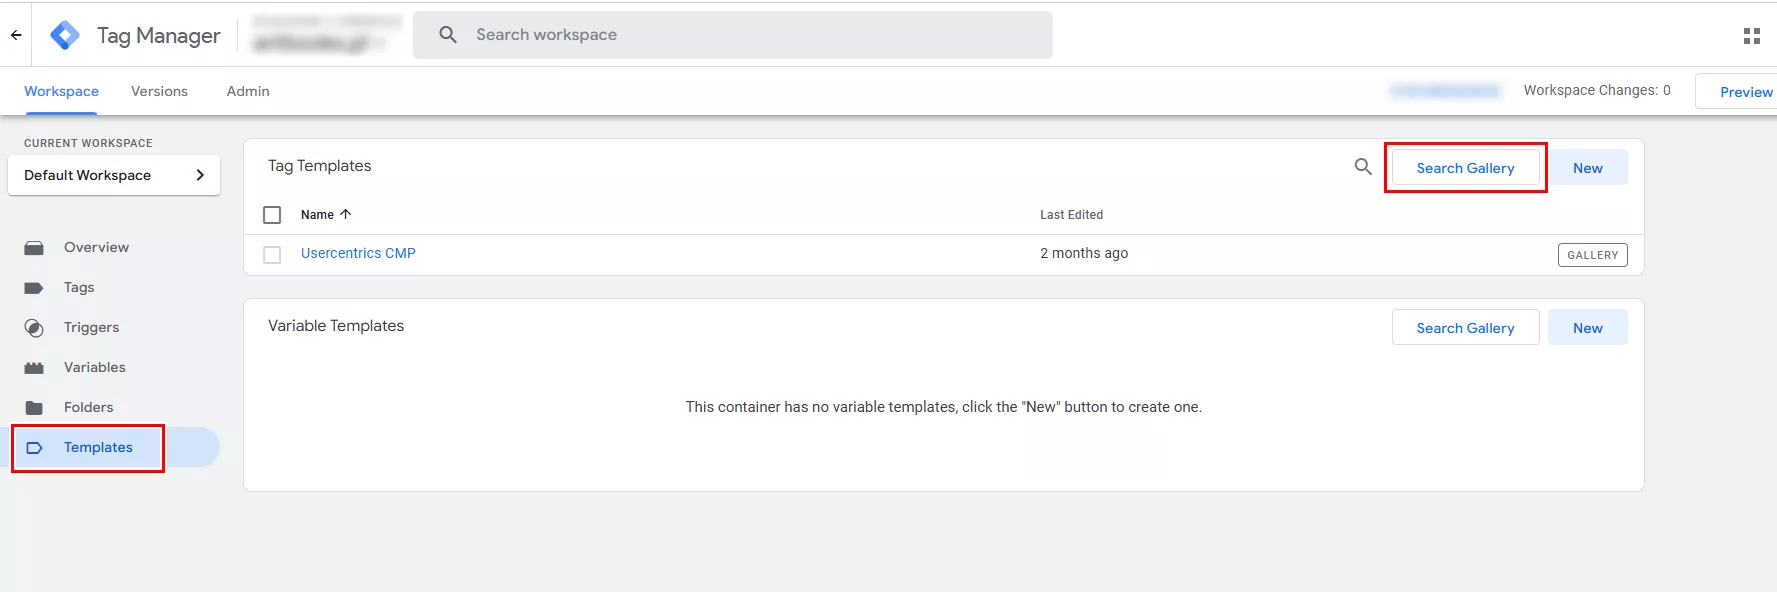
How to get the template
The Usercentrics CMP tag template is required to configure and enable settings in the Usercentrics script.
How to obtain it:
-
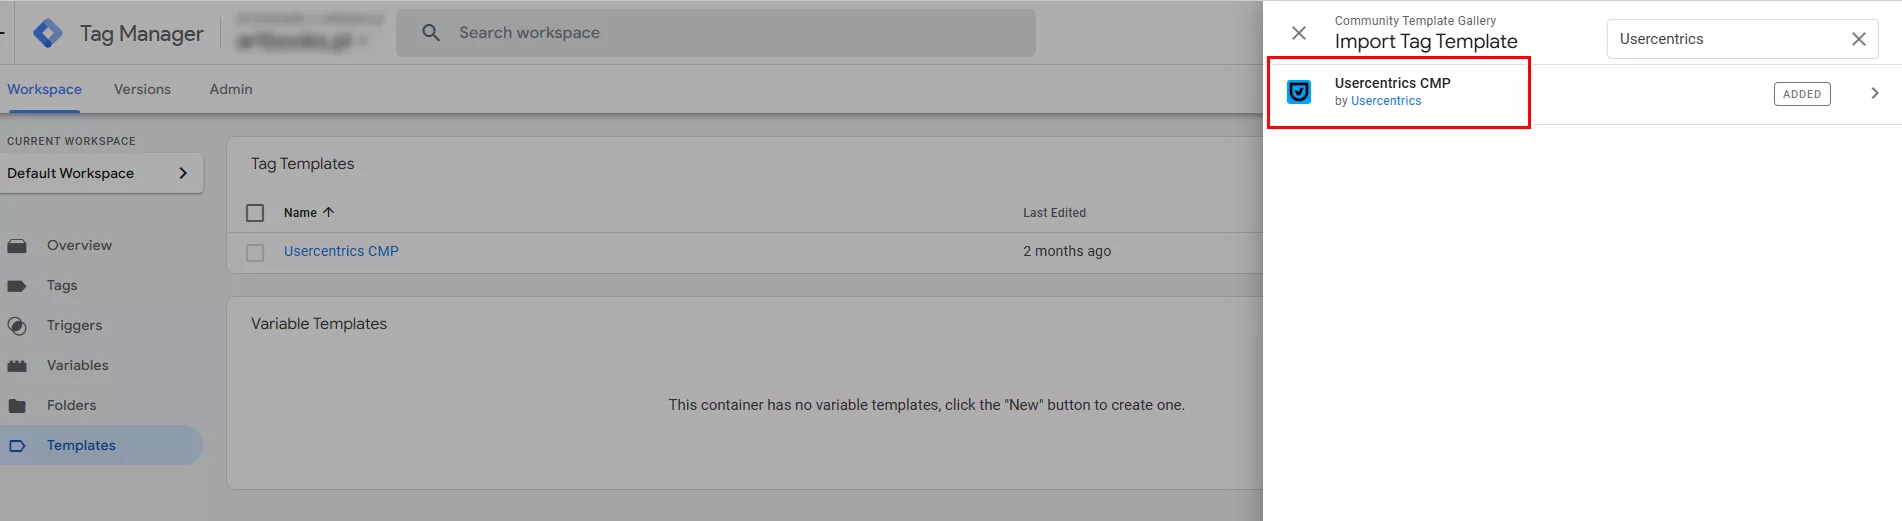
In the GTM workspace, open the Templates tab and click Search Gallery.
-
Search for Usercentrics, select the Usercentrics CMP tag, and add it to your workspace.
Creating a Usercentrics CMP Tag
Once you have received the template, create a tag based on it.
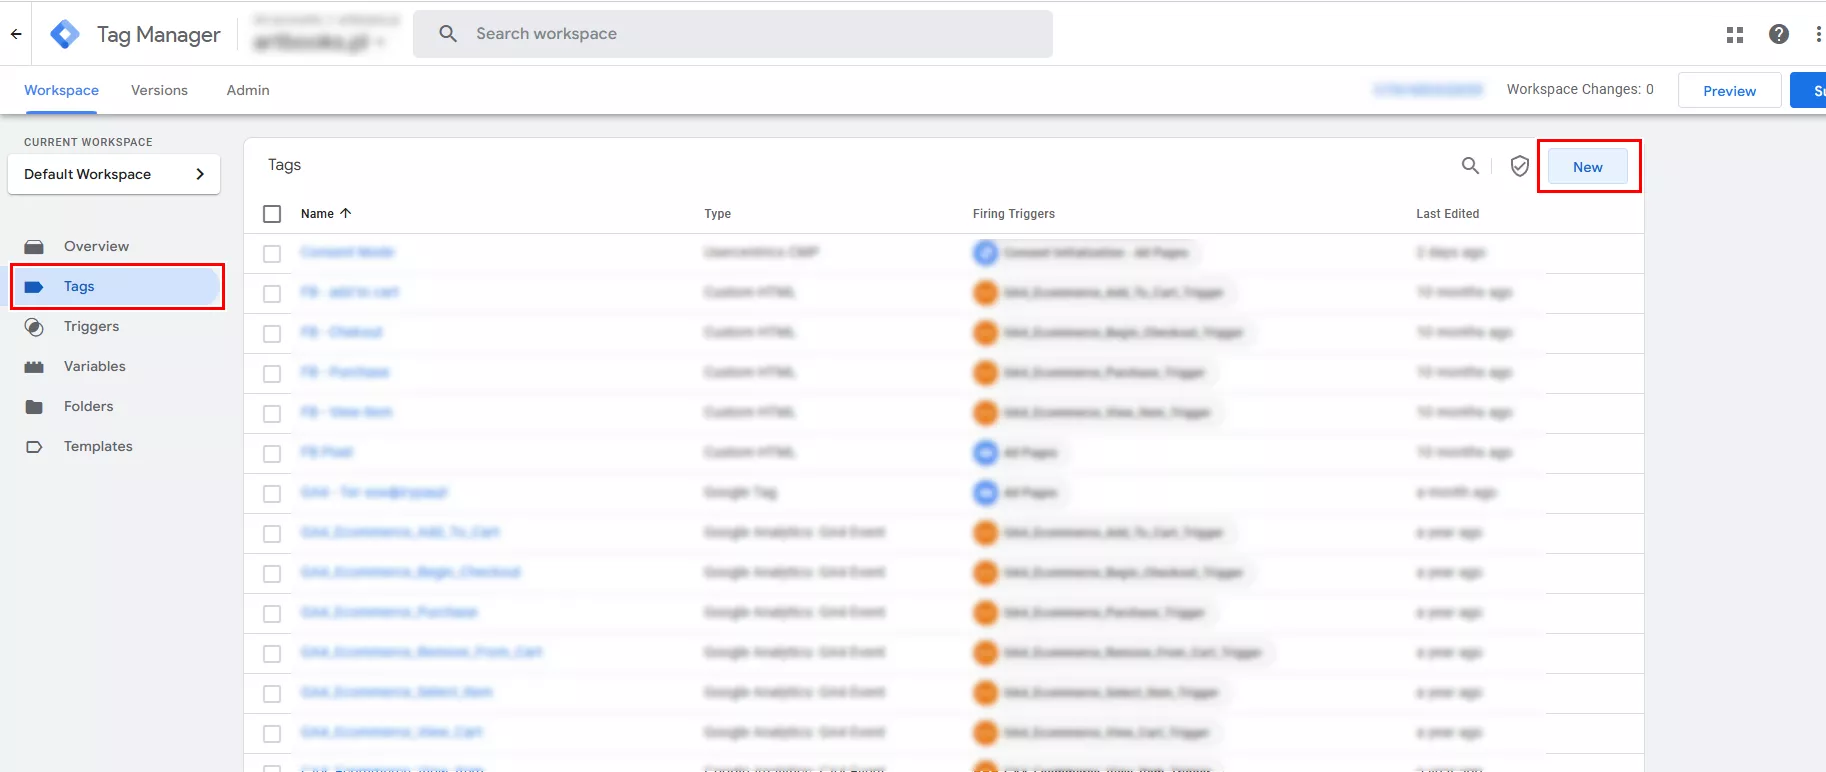
1. In the GTM workspace, open the Tags tab.
2. Click New.
-
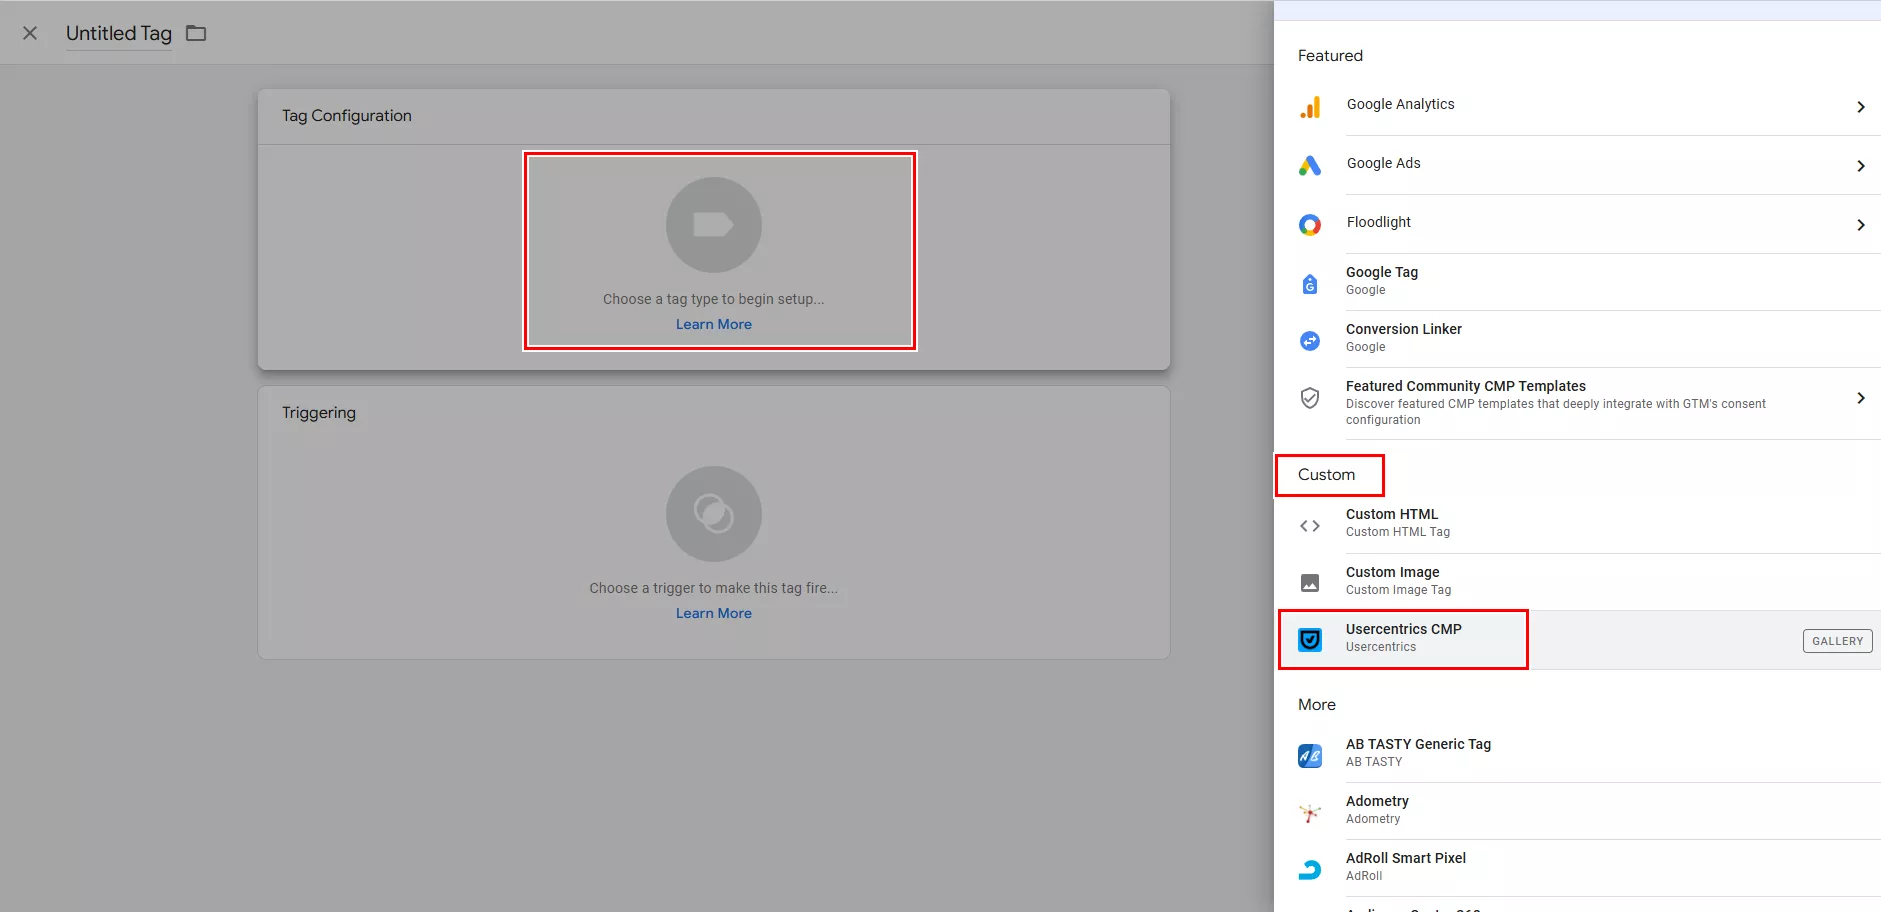
Click Tag Configuration inside the field. In the Custom section, select Usercentrics CMP from the list of tags.
Configuring the Usercentrics CMP Tag
After creating the tag, configure it using the following settings:
-
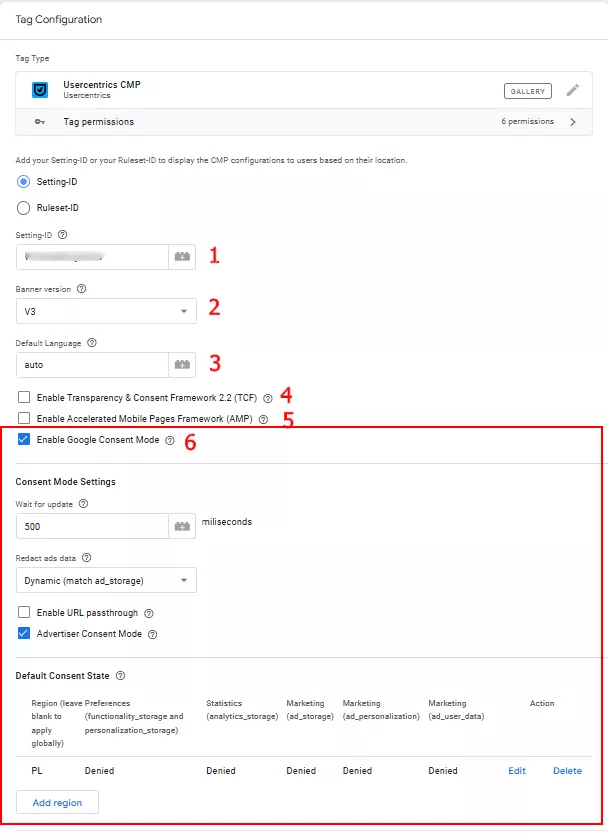
Determine whether you need to enter the Settings ID or the Ruleset ID, then enter it in the appropriate field.
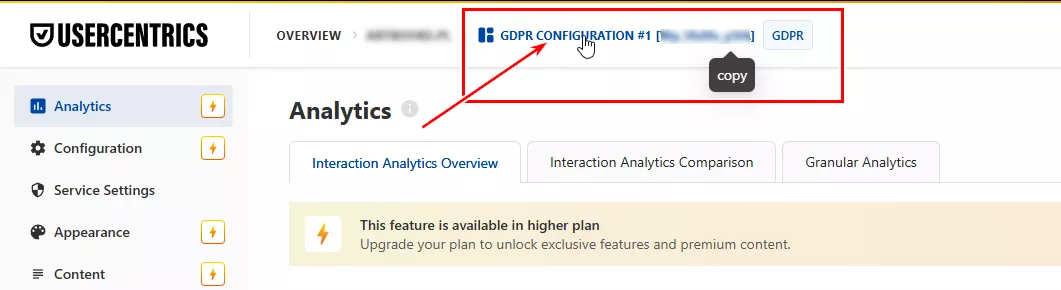
To obtain the Settings ID, go back to the admin panel in Usercentrics. The ID is located at the top of the panel. Copy it.
-
Specify the banner version — V2 or V3 — in the Banner version field. We recommend selecting the latest version.
-
Select the desired language for the banner, or leave the default setting of auto. In this case, the language will be determined based on the browser settings. If the desired language is not in the list, the default option specified in the admin panel will be used. For regional values, use country codes according to ISO 3166-2.
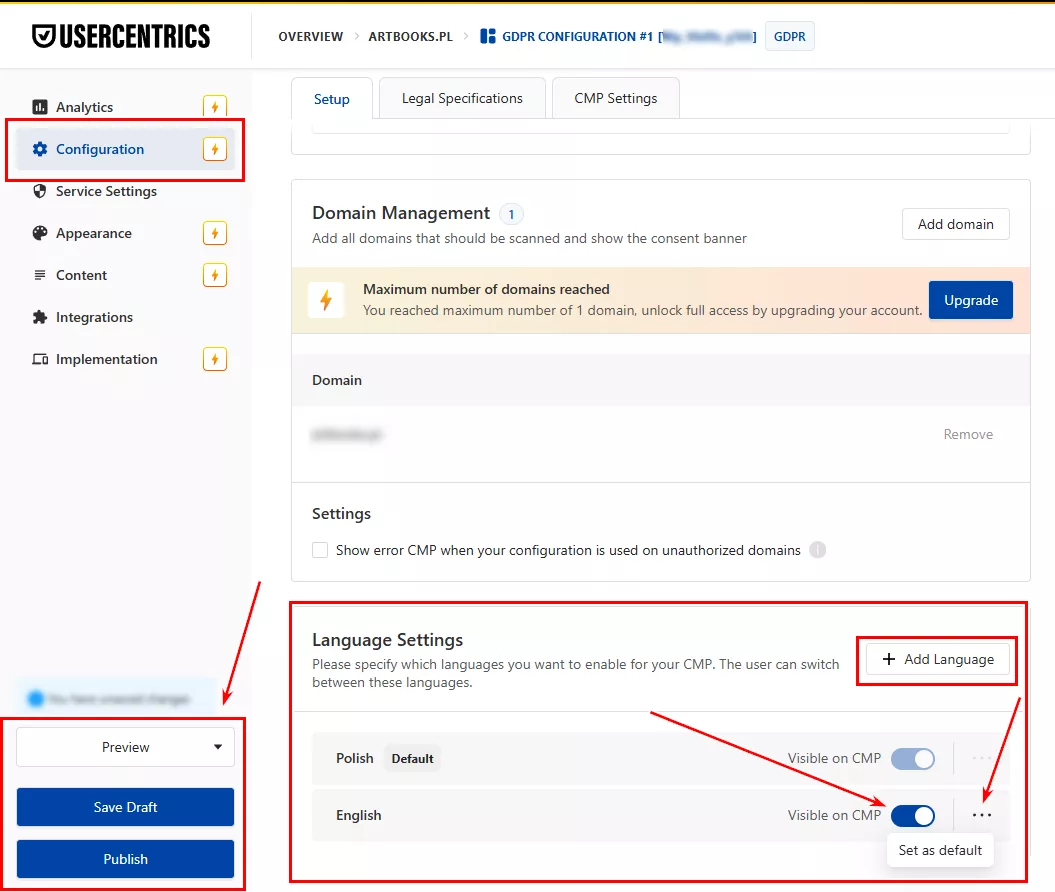
You can change or add a language in the Configuration tab of the admin panel.
Activate the display of your preferred language in CMP and set it as the default option, if necessary. Then, check the result in preview mode, save your changes, and publish the settings.
For the US, you can use state codes. For example, US-CA for California. If you are using one consent policy for multiple regions, separate the regions with commas in the "Region" field.
-
If you need to use the Transparency and Consent Framework (TCF), select the corresponding option. Since only the latest version of tcStrings is valid, the selected option will always be up to date.
-
If your website uses the Accelerated Pages Framework (APF), enable this option.
-
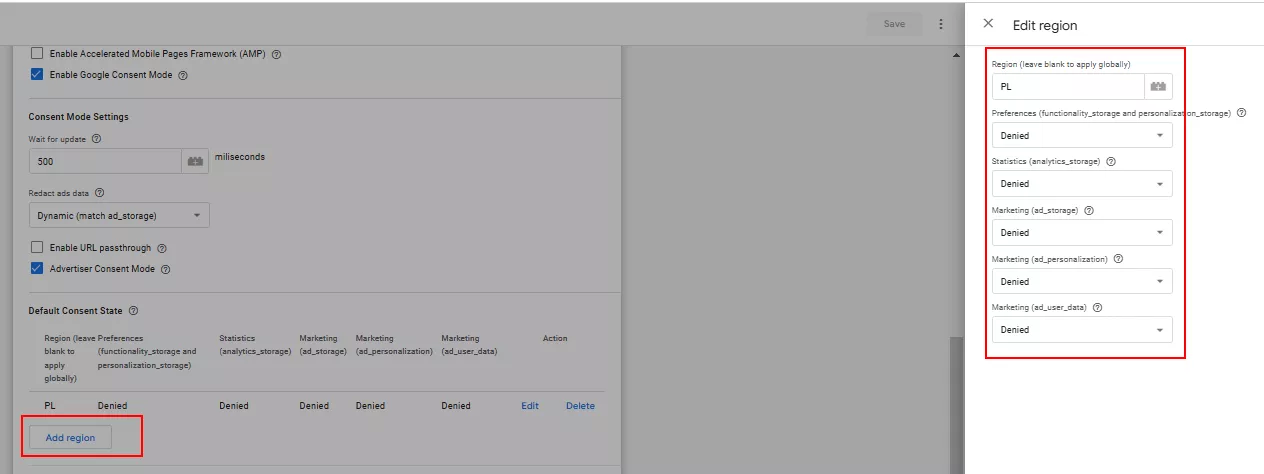
Ensure that "Enable Google Consent Mode" is selected — it is usually selected by default. This is required for automatic integration with Google's consent mode (Google Consent API). This is the advanced consent mode.
If necessary, you can configure it in more detail using the following parameters:
|
Name |
Purpose |
|
Wait for update |
This allows you to set the number of milliseconds that tags should wait for consent confirmation before launching. This option is helpful for users who have already given consent on a previous page or during a previous visit. In most cases, 500 ms is sufficient. For more information, see the documentation on asynchronous tools. |
|
Redact ads data |
This determines whether personal data can be used for targeted advertising. Available options: True: Use is allowed False: Use is prohibited Dynamic (match ad_storage) is the default value and recommended option. This option ensures that editing ad data complies with the user's consent settings for ad storage use. |
|
Enable URL passthrough |
It adds special query parameters to links when users navigate between pages. This allows data to be passed without using cookies when the user has not consented to storing information in their browser. |
|
Advertiser Consent Mode |
Enabling this option allows the system to receive user consent data from the Transparency and Consent Framework (TCF). To support the TCF, you must use CMP v2. |
|
Default Consent State |
This setting determines which tracking permissions will be active before the user makes a selection in the consent banner. It is typically left blank or configured globally by selecting ‘Denied’ for all permissions. This ensures that data will not be shared with third parties, such as Google Analytics, Google Ads, or Facebook, without the user's explicit consent. |
Why can't ‘Granted’ be used in Europe?
According to GDPR requirements, tracking must be disabled by default. Setting the Default Consent State to Granted for the European region would be a direct violation of personal data protection laws.
In practice, this means the following:
-
User data may be collected without explicit consent.
-
Regulators may consider this illegal collection of personal data.
-
Companies may face fines if the Data Protection Authority or another regulatory body detects a violation.
Do not leave the value for European countries as Granted because this creates a potential risk for your business.
Set the status to Denied by default and only update consent after the user takes action.
Setting up a tag activation trigger
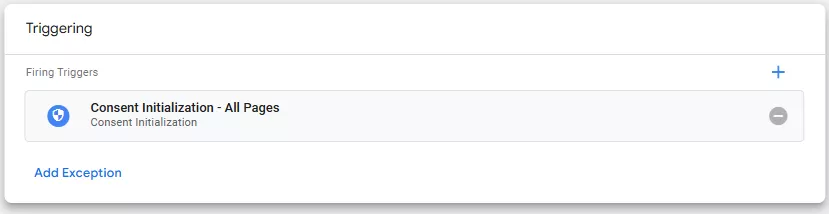
Use the Consent Initialization — All Pages trigger to set up Consent Mode correctly in GTM.
This ensures that consent settings are taken into account before other tags are activated. No tags, including Google Analytics, Google Ads, and Facebook Pixel, will be activated until the user's consent status is determined.
This trigger is necessary for tags that:
-
Determine the default consent status (Denied or Granted, depending on the region).
-
Update the consent status based on the user's selection in the cookie banner.
-
Trigger other tags, depending on the consent received.
Benefits of using the Consent Initialization — All Pages trigger:
-
Protect against the premature loading of tags that may send data before the user gives consent.
-
Ensure compliance with GDPR and other laws, avoiding the risk of fines.
-
Prevent tags from being blocked by browsers that restrict tracking without the appropriate Consent Mode configuration.
Reviewing and publishing changes
Before completing the setup, verify all settings to ensure that the tracking works correctly and complies with relevant privacy requirements.
1. Ensure that the default consent state is set correctly:
-
For European countries and regions subject to the GDPR, set Denied as the default.
-
In the US, Granted is allowed if CCPA restrictions do not apply, but the user must be able to opt out.
2️. Test the Consent Initialization — All Pages trigger:
-
This trigger must run before all other tags.
-
Use Preview Mode in GTM to ensure that tags are not activated before consent is obtained.
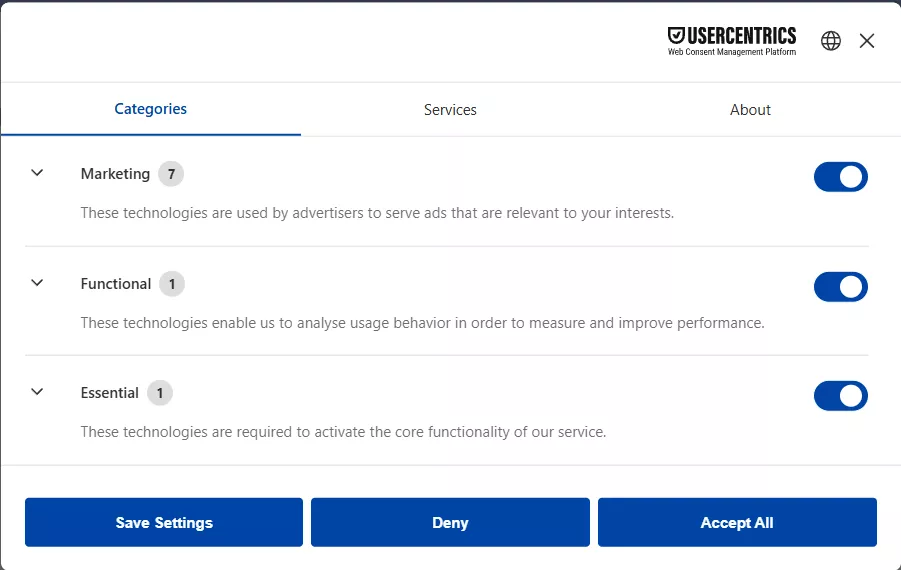
3️. Check the visual settings in the Consent Management Platform (CMP).
-
The consent banner must clearly inform users of the available options.
-
The Accept All and Decline buttons must be visible and equally accessible.
4️. Test the consent transfer in GTM:
-
Use the Consent Overview in GTM to check if the consent status has been updated correctly.
5️. Final publication:
-
Save and publish the changes in the CMP, if applicable.
-
Publish the updates in GTM to activate the settings.
An example of how consent works in GTM
Stage 1: Consent Initialization
Before tags are launched, all consent settings in Google Tag Manager are set to Denied. This means that, by default, no data is sent to Google Analytics, Google Ads, or other services until the user gives their consent.

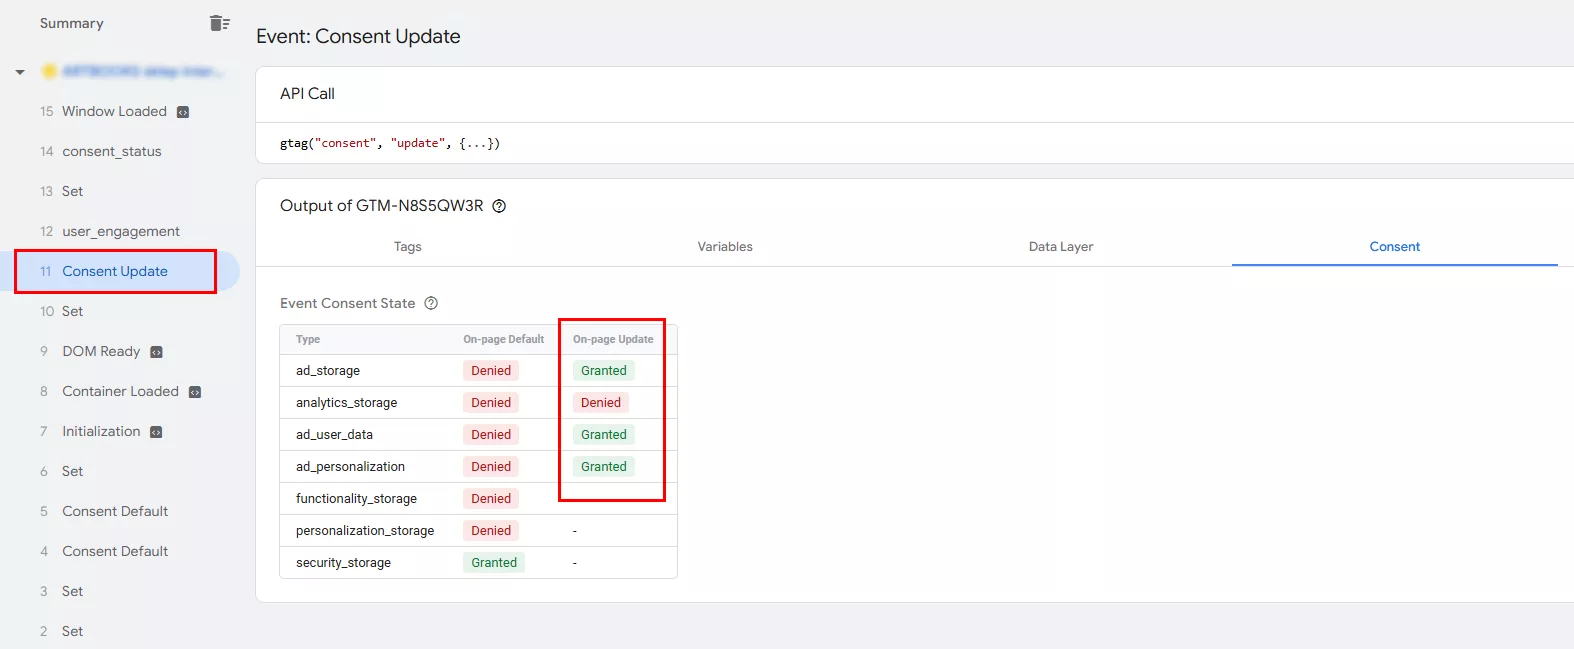
Stage 2: Consent Update
Once a user gives consent in the cookie banner, the statuses change according to the user’s selection.
When the user clicks Accept All, the status changes to Granted, and the tags can start collecting data.
If consent is not given for individual categories, the corresponding settings remain in the Denied status, and tracking in these areas is not performed.
Key parameters collected by Google tags by default
Google uses four main parameters to process and collect data:
-
ad_storage: storage of advertising data associated with cookies.
-
ad_personalization: personalization of advertising for users, such as remarketing.
-
ad_user_data: transfer of user data to Google services.
-
analytics_storage: storage of information for Google Analytics.
The first three parameters belong to the Marketing category and are responsible for campaigns, personalization, and transferring user data to advertising platforms.
The analytics_storage parameter belongs to the "Statistics" category. Google Analytics uses it to collect information about user behavior and record website visits.
Why is it important to obtain permissions for all these parameters?
To ensure the most accurate collection, analysis, and use of data for advertising purposes, the website must obtain consent for all of these parameters.
If the user does not consent to ad_storage or ad_user_data:
-
Remarketing and ad personalization will not work in Google Ads.
-
Conversion tracking will be incomplete or inaccurate.
Google Analytics will not be able to collect data about visits, sessions, and user actions on the website if the analytics_storage parameter is inactive.
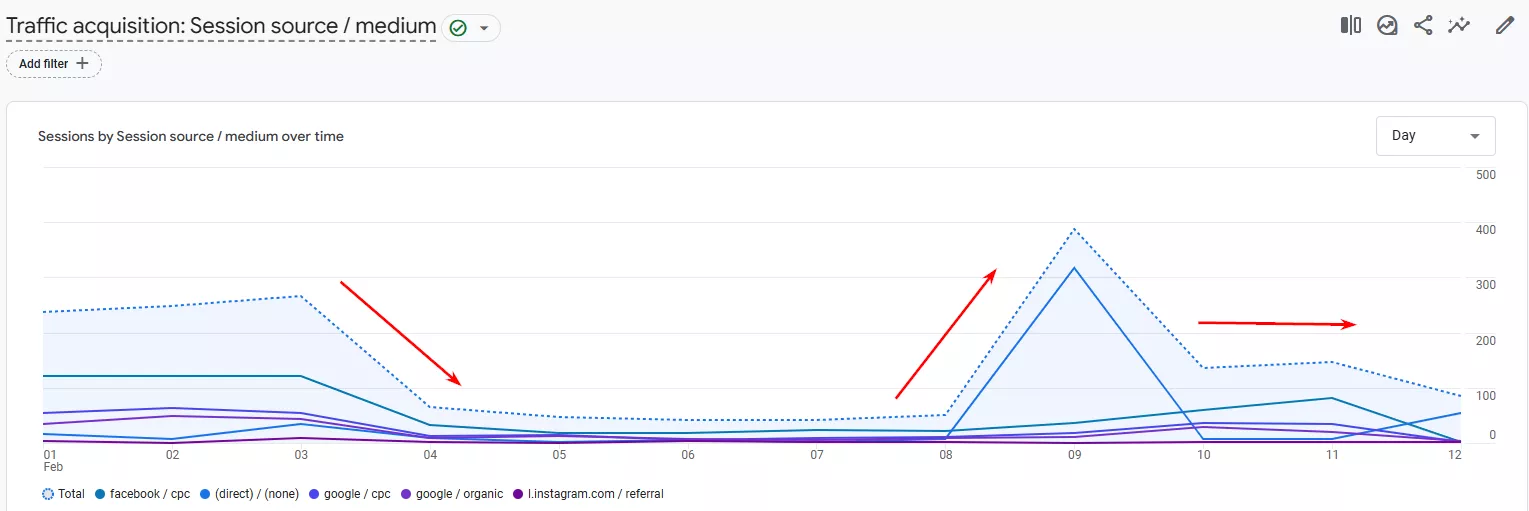
How CMP affects analytics
After implementing the CMP platform on a website, there is usually a noticeable decrease in visible traffic in analytics.
Why does this occur?
-
Some users do not consent to analytics, so their actions are not tracked.
-
Additionally, analytics tags, such as GA4 and Google Ads, may not run without confirmed consent.
-
It may take up to two weeks for performance to stabilize after CMP integration.
Lack of indexing of categories and DPS parameters in CMP
Here is an example from practice.
After integration, the CMP platform automatically scans categories and Data Processing Services (DPS) parameters to determine which ones require consent.
In this case, however, the "Statistics" category and the analytics_storage parameter were not indexed. Consequently, the request for consent to collect analytical data was never initiated.
The problem: Users gave their consent, but analytics did not work because analytics_storage was not included in the CMP.
This is how we solved the issue:
-
We manually added an analytical DPS to the CMP settings.
-
Then, we linked the parameter to either the "Marketing" or "Statistics" category depending on the CMP configuration.
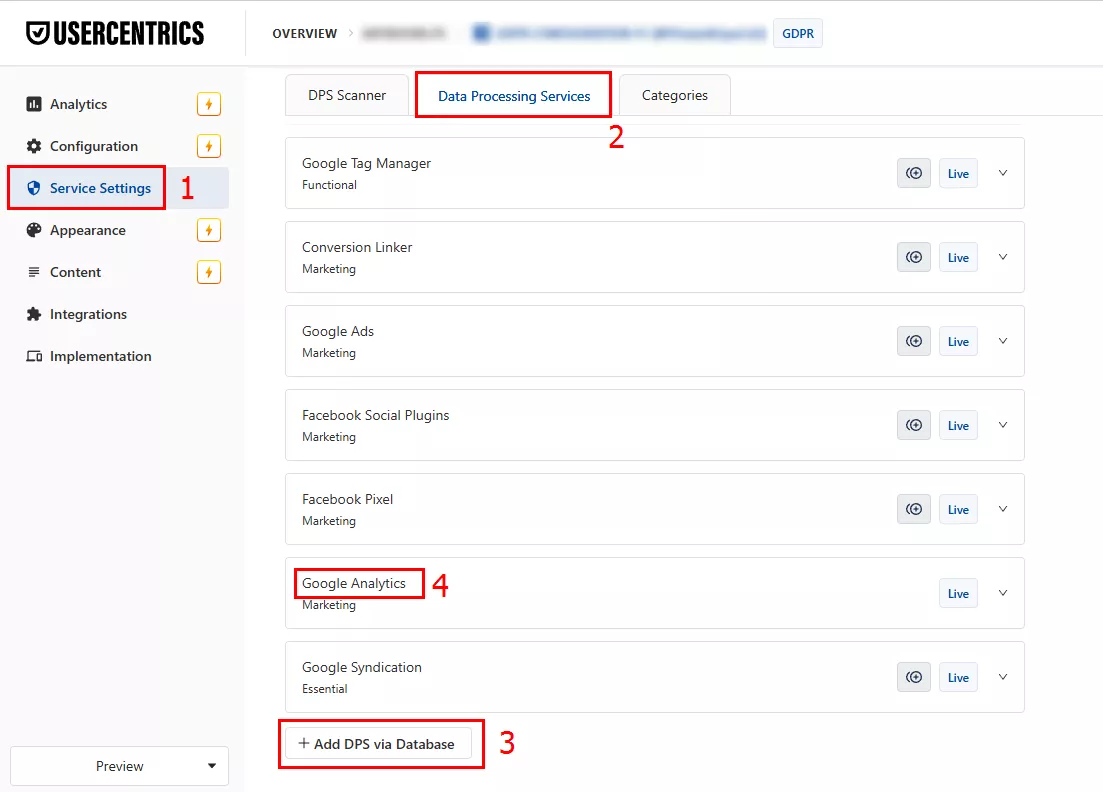
Result: After the changes were made, the data in Analytics was restored, and the system began collecting user information correctly.
Conclusions
-
Implementing Consent Mode in GA4 enables compliance with legal requirements, such as the GDPR and CCPA, while maintaining transparency in user data collection.
-
Consent Mode strikes a balance between analytics and privacy. If a user does not give consent, data is not collected, which makes it difficult to evaluate marketing effectiveness. However, CMP settings allow limited signals to be transmitted even without cookies.
-
Proper CMP configuration is critical. Even if the user clicks "Accept All," mistakes in configuration can disable analytics completely. One such error is the CMP platform failing to index the analytics_storage DPS parameter.
-
After implementing a CMP, there is a temporary drop in analytics traffic. This is to be expected. Some users do not give consent, and the system only stabilizes one or two weeks after launch.

 1
1
 0
0
 1
1
Recommended theme posts
Related Articles
Display Advertising Effectiveness Analysis: A Comprehensive Approach to Measuring Its Impact
In this article, I will explain why you shouldn’t underestimate display advertising and how to analyze its impact using Google Analytics 4
Generative Engine Optimization: What Businesses Get From Ranking in SearchGPT
Companies that master SearchGPT SEO and generative engine optimization will capture high-intent traffic from users seeking direct, authoritative answers
From Generic to Iconic: 100 Statistics on Amazon Marketing for Fashion Brands
While traditional fashion retailers were still figuring out e-commerce, one company quietly revolutionized how U.S. consumers shop for everything from workout gear to wedding dresses