Google Ads and MCC Accounts Setup: A Step-by-Step Guide for Beginners
My Client Center (MCC) is a Google Ads account type for advertisers and agencies who need to access multiple individual Google Ads accounts using a single email address. MCC allows you to effectively monitor and optimize campaigns for different projects, as well as gain access to aggregated statistics and reports for all accounts. This makes it easy to manage the advertising activities of several projects simultaneously.
However, many beginners have experienced difficulties with setting up an advertising account and multiple accounts in My Client Center before launching ad campaigns. This article aims to address those challenges and provide a step-by-step guide to MCC accounts. The article also covers the following topics:
- Advantages of an MCC account over a Google Ads account
- Creating an MCC account in Google Ads: a step-by-step checklist
- Setting up a payment profile for your MCC account in Google Ads
- Linking an ad account to MCC
- Creating an ad account
- Setting up a payment profile for an ad account
- The most common mistakes beginners make when setting up and managing an MCC account
Advantages of MCC over a Google Ads account
An MCC account is a manager account for Google Ads advertising accounts. It is a useful tool for agencies and businesses that advertise online, especially if they have clients with their own ad accounts.
One MCC account lets you manage campaigns and budgets across multiple Google Ads accounts.
Simply put, an MCC account in Google Ads is like a large office with many employees doing different things in different cubicles. And you, as a manager, can manage all processes from one place, regardless of what they involve or where they are.
What’s the difference between a regular advertising account and an MCC account?
- A regular Google Ads account is one account for one website that can be owned by one person or organization. An MCC account contains many different accounts for different websites under one advertising account.
- In a regular advertising account, the owner has access only to their own account and cannot directly manage other accounts without an additional invitation. With an MCC account, the owner has the ability to consolidate multiple advertising accounts into one centralized account. This allows the owner to manage and monitor several separate accounts without having to constantly switch between them.
- A regular advertising account has its own settings, budget, keywords, ads, etc. Furthermore, ad campaign management is limited to a single account. With an MCC account, you can:
- implement centralized settings: view and edit budgets, geographic settings, ad schedules, and others. for many ad accounts at once;
- create common keywords and ads that can be used across accounts;
- share your MCC and selected accounts with other users to work on campaigns and complete tasks together;
- get summary reports and statistics for all accounts in the MCC so you can easily analyze and compare campaign performance.
- In a regular ad account, the owner sets up payment methods and manages financial transactions for their own account only. The MCC account allows you to:
- combine payment data for several accounts, making the payment process easier;
- store payment data, which allows you to conveniently use it for different accounts;
- control your expenses by setting budgets and monitoring expenses for each connected account, which helps you control your clients’ advertising costs;
- receive summary invoices and expense reports for all connected accounts, which simplifies accounting and reporting.
To sum up, My Client Center provides advanced features for managing multiple advertising accounts from one place, such as access control, convenient analytics, and financial control. In contrast, a regular advertising account is limited to one account and has limited management and analytics capabilities.
How to create an MCC account in Google Ads
Step 1: Register your MCC account with Google Ads using the “Go to Manager Accounts” button.
You must be signed in with the email address you will use for your new MCC account. You can use the same email address for up to 20 Google Ads accounts, including the managing ones.

Step 2: Fill in your manager account information.
Please note that this information cannot be changed once it has been added. Complete the necessary fields:
- Account name. This will be visible to your customers (e.g., the business owners you provide services to).
- The country and time zone that will be used in reports and invoicing.
- Account currency. Select the currency your company uses for payments. Client accounts are already billed in their currency. If the manager account contains expense data for some advertising accounts in other currencies, you can use the “currency after conversion” feature in the MCC system for these reports.
- Click Submit.

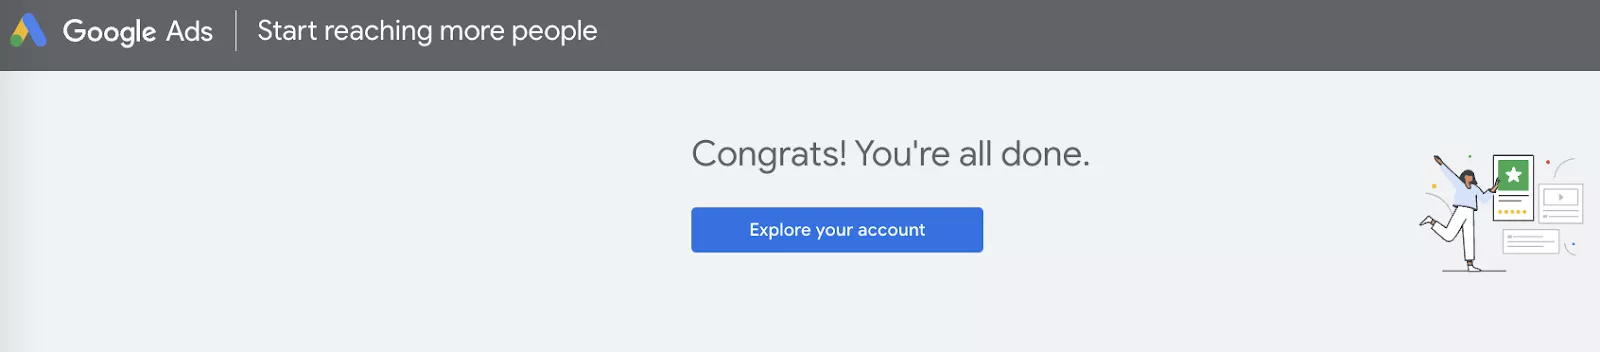
Step 3: You’re done! Click Explore your account.
Check out our glossary for key online advertising definitions to enhance your marketing knowledge!
Payment profile setup for your MCC account in Google Ads
Step 1: Sign in to your MCC Google account.
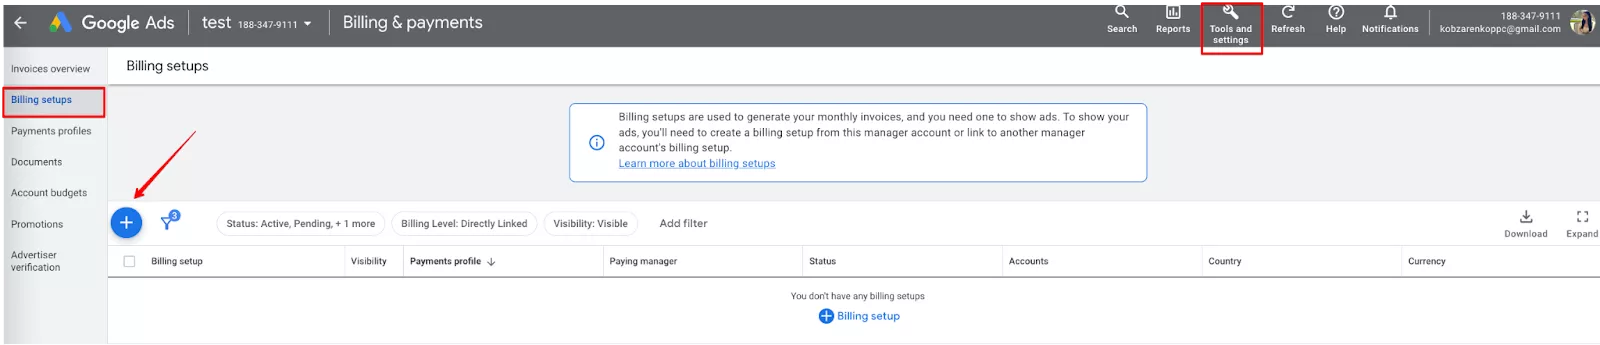
Step 2: Click on the “Tools & settings” button.
Step 3: Select “Billing setups” and click “+.“
Step 4: Select your preferred payment method (e.g., credit card or direct debit), enter your information, and save the changes.
For the direct debit option, you can set different spending limits for each of the connected advertising accounts. This means that you can control how much money can be spent on each account by setting appropriate limits.
If you choose to pay by credit card, you can set up a single base payment for all connected advertising accounts. This means that all accounts will be charged from this credit card.
Keep in mind that when you add a credit card, all accounts in your MCC account will be charged to that card. With a direct debit, you can set different spending limits for each account.
In this section, you can also view payment information, such as your account balance, the amount of money spent over a certain period, and payment history.
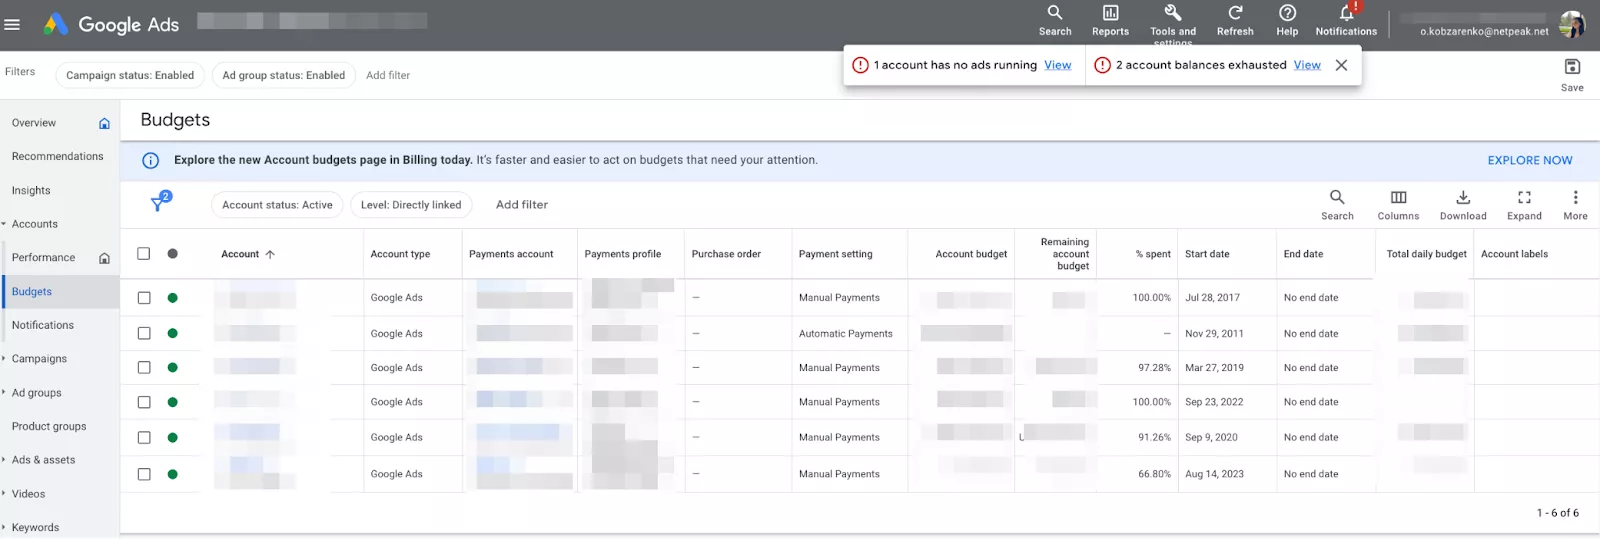
Step 5. The “Account budgets” section allows you to view the status of all accounts at once. Here you’ll find the following information.
- Budget status: the amount of money you receive for advertising on your account.
- % spent: the percentage of the total budget that has been spent.
- Remaining account budget: the difference between the total account budget and the total account expenditure.
- Total daily budget: account expenses for the day.
- Payment setting: manual, credit line, or automatic.
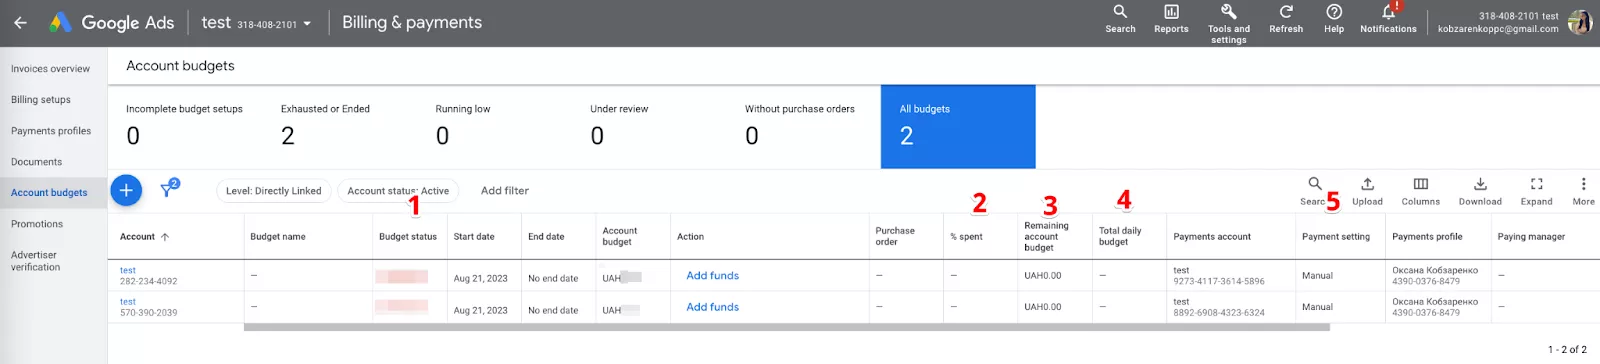
This information allows you to manage the budgets of your MCC and individual accounts, as well as plan future advertising expenses.
Requirements and limits for MCC accounts
1. You must have your own Google account to create an MCC account.
2. One Google account cannot have more than 20 MCC accounts.
3. You must complete certain steps to verify your identity and payment information for the MCC account, including:
- email address verification by following the instructions in the email;
- payment data verification by entering a code sent to you by Google;
- account verification — some services may require you to verify your Google account, for example, by providing a scanned identification document or proof of physical address.
4. Limits for manager accounts. If you started using a manager account less than 12 months ago, you will be limited to managing 50 advertising accounts. After a year of using a manager account, your limit may be increased depending on the advertising budgets used.
|
Highest amount spent in a month from the last 12 months |
Maximum account limit (active non-manager accounts) |
|
Less than $10.000 |
50 |
|
$10.000–$500.000 |
2.500 |
|
Greater than $500.000 |
85.000 |
5. There is a limit to the number of requests that can be made to the API Google Ads from an MCC account per day:
- For MCC accounts with less than 1,000 connected accounts, a limit of up to 25,000 API units (requests) per day can be provided.
- For MCC accounts with 1,000 to 10,000 connected accounts, the limit can be increased to 100,000 API units per day.
How to link an advertising account with MCC
Step 1: Go to the My Client Center page.
Step 2: Log in to your My Client Center account with your login information.
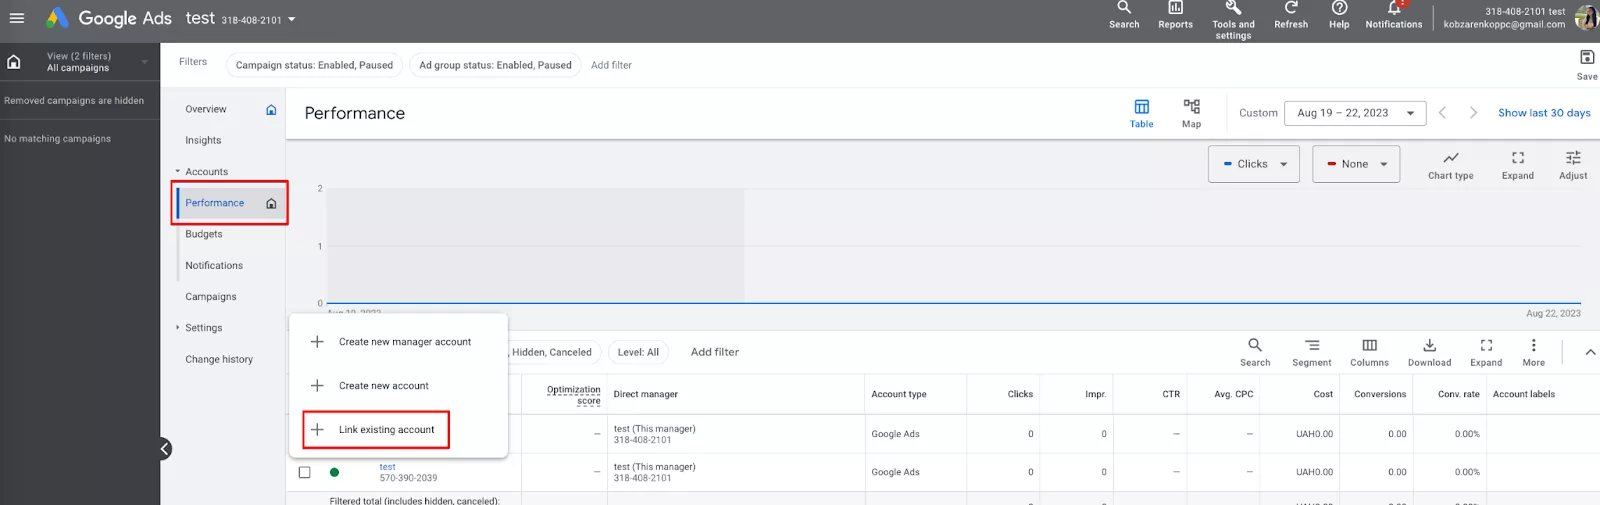
Step 3: Locate the Accounts section on the main page and select Performance.
Step 4: Click the plus sign (+) next to Link existing account.
Step 5: In the field that appears, enter the ID of the ad account you want to link My Client Center to.
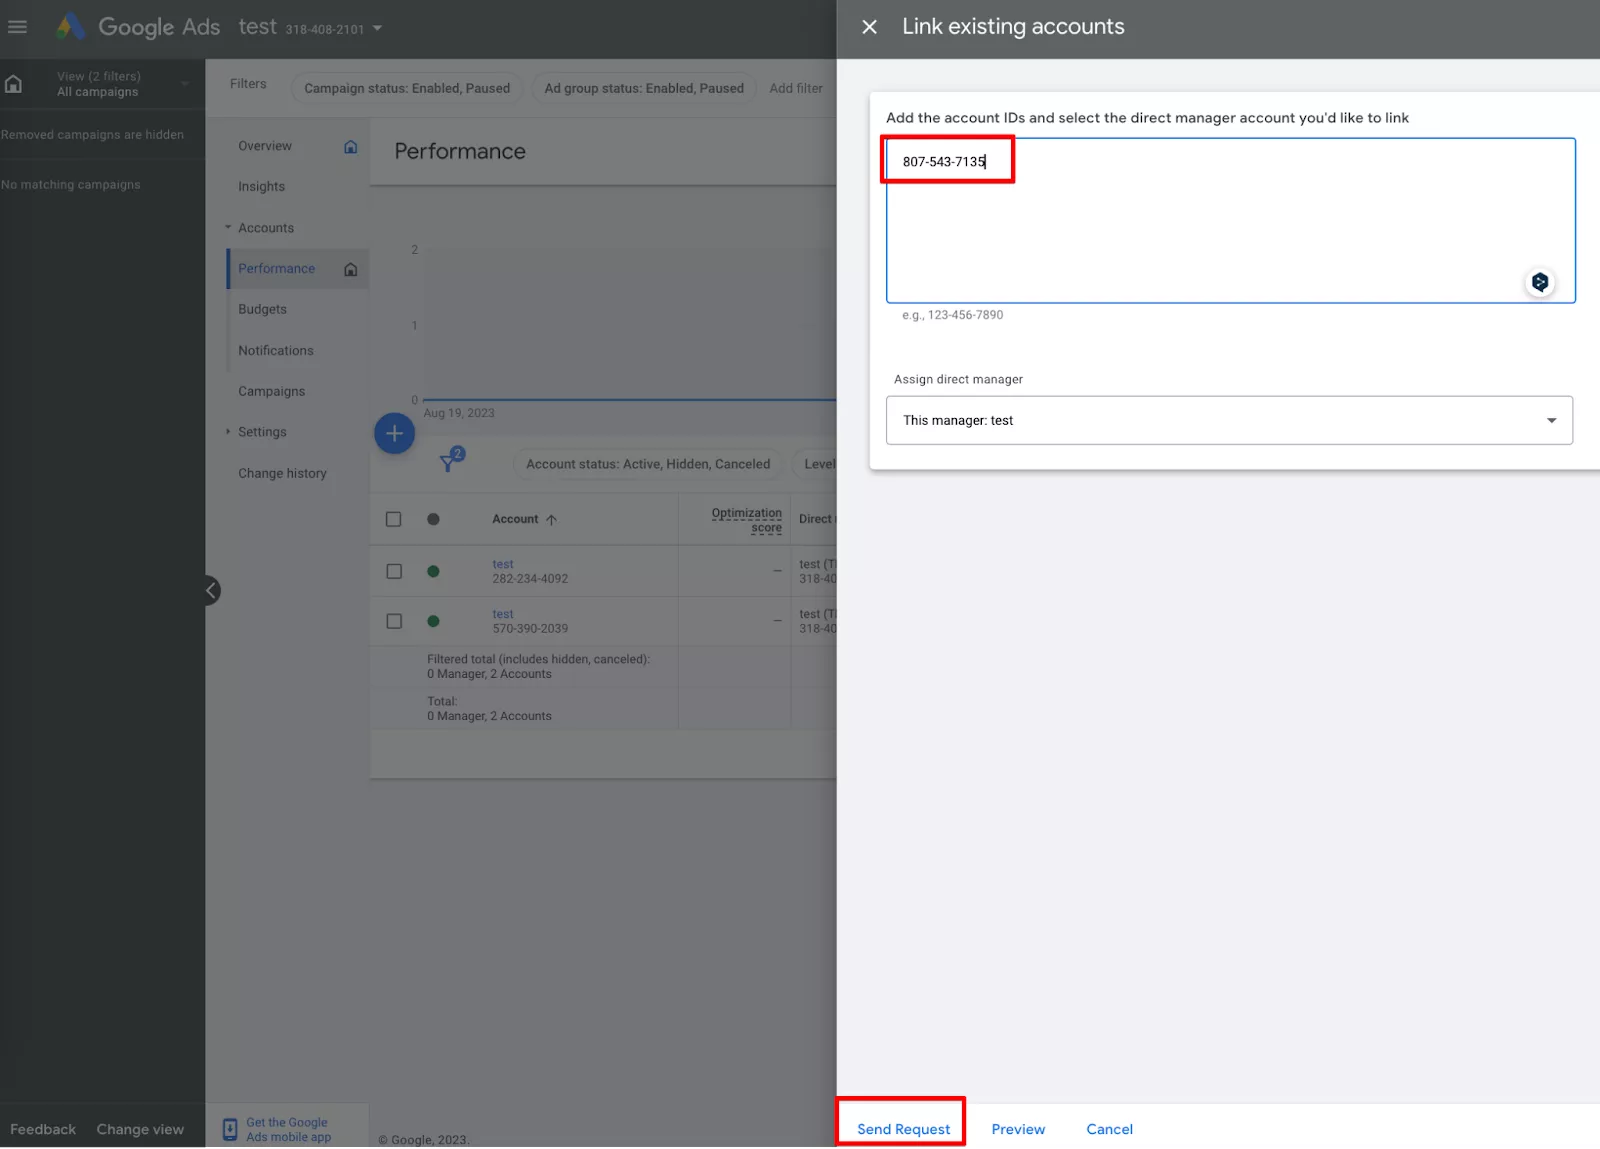
Step 6: Click the Send Request button to send a linking request.
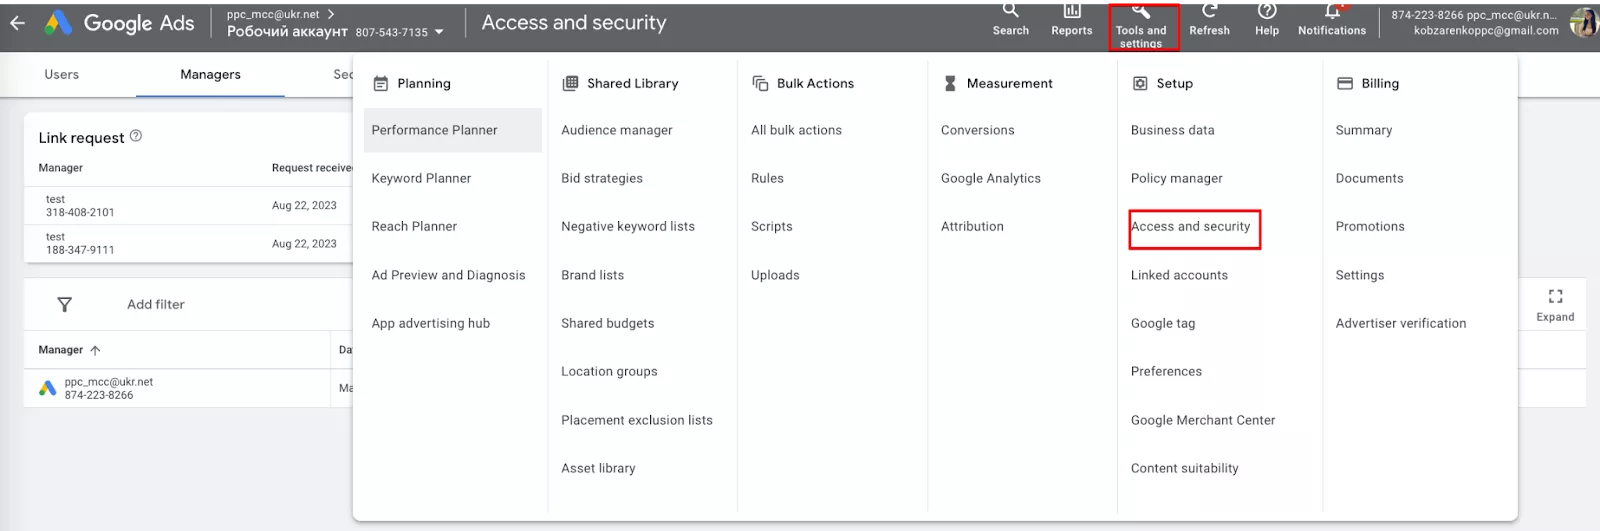
Step 7: After sending the request to the ad account, the account owner should log in to their ad account, go to the Tools & settings section, and click Access & security.
Step 8: Next, the owner of the advertising account should go to the Managers section. There you will find a request to link your account to My Client Center. If everything is correct, click Accept.
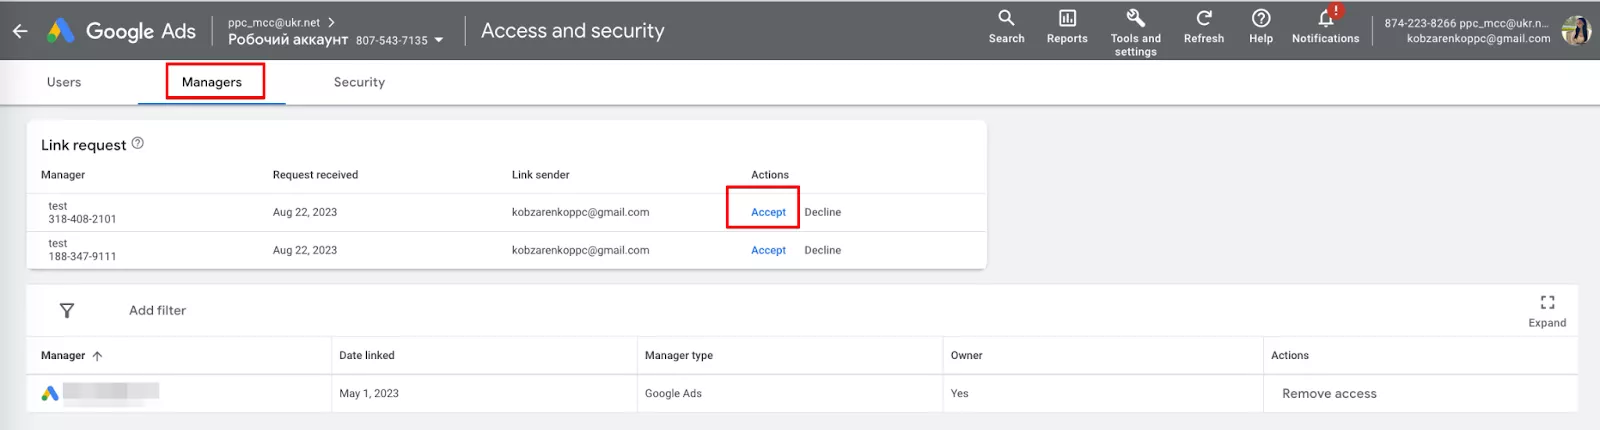
Done! The accounts are linked.
How to create an advertising account from your MCC account
All you need is an email address.
Step 1: Click on the Accounts menu on the left, and select Performance > Create new account.
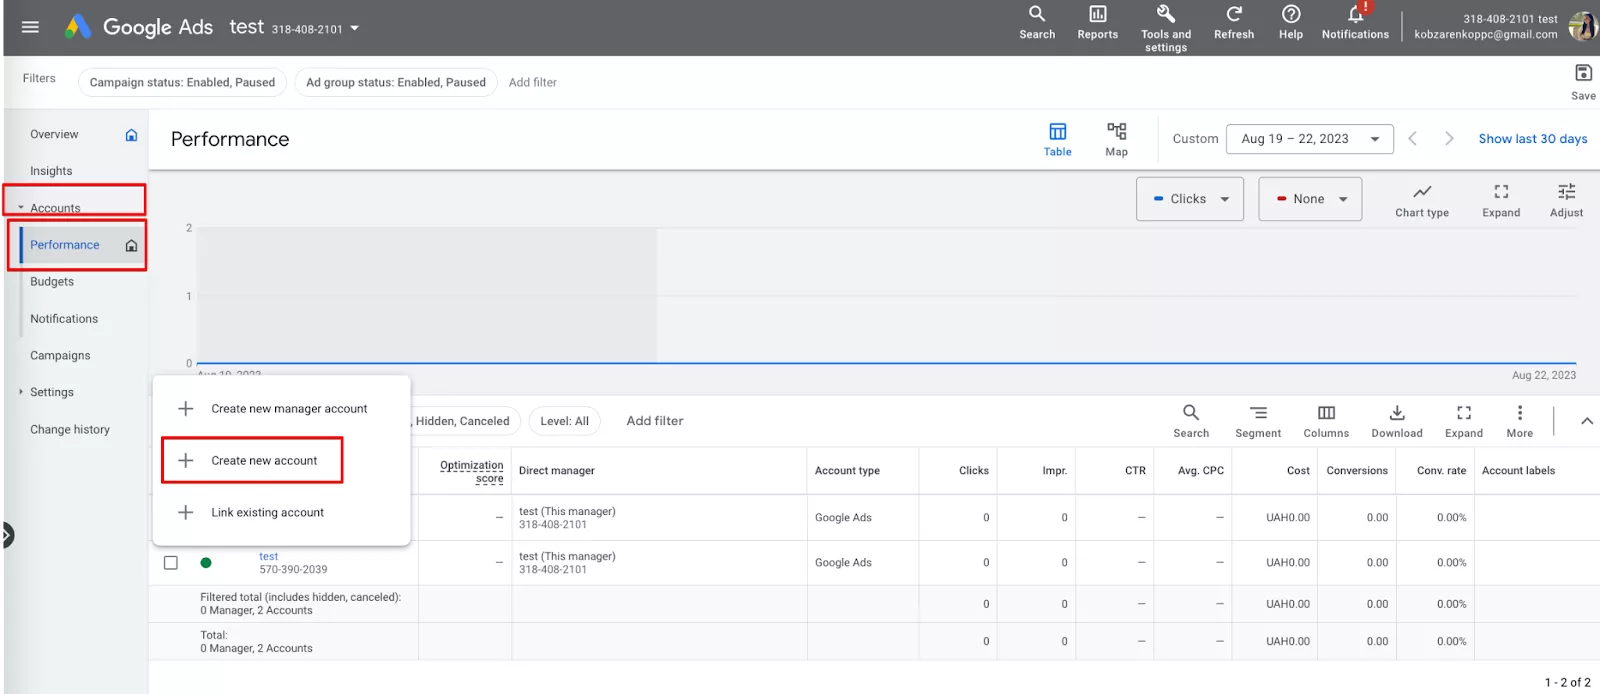
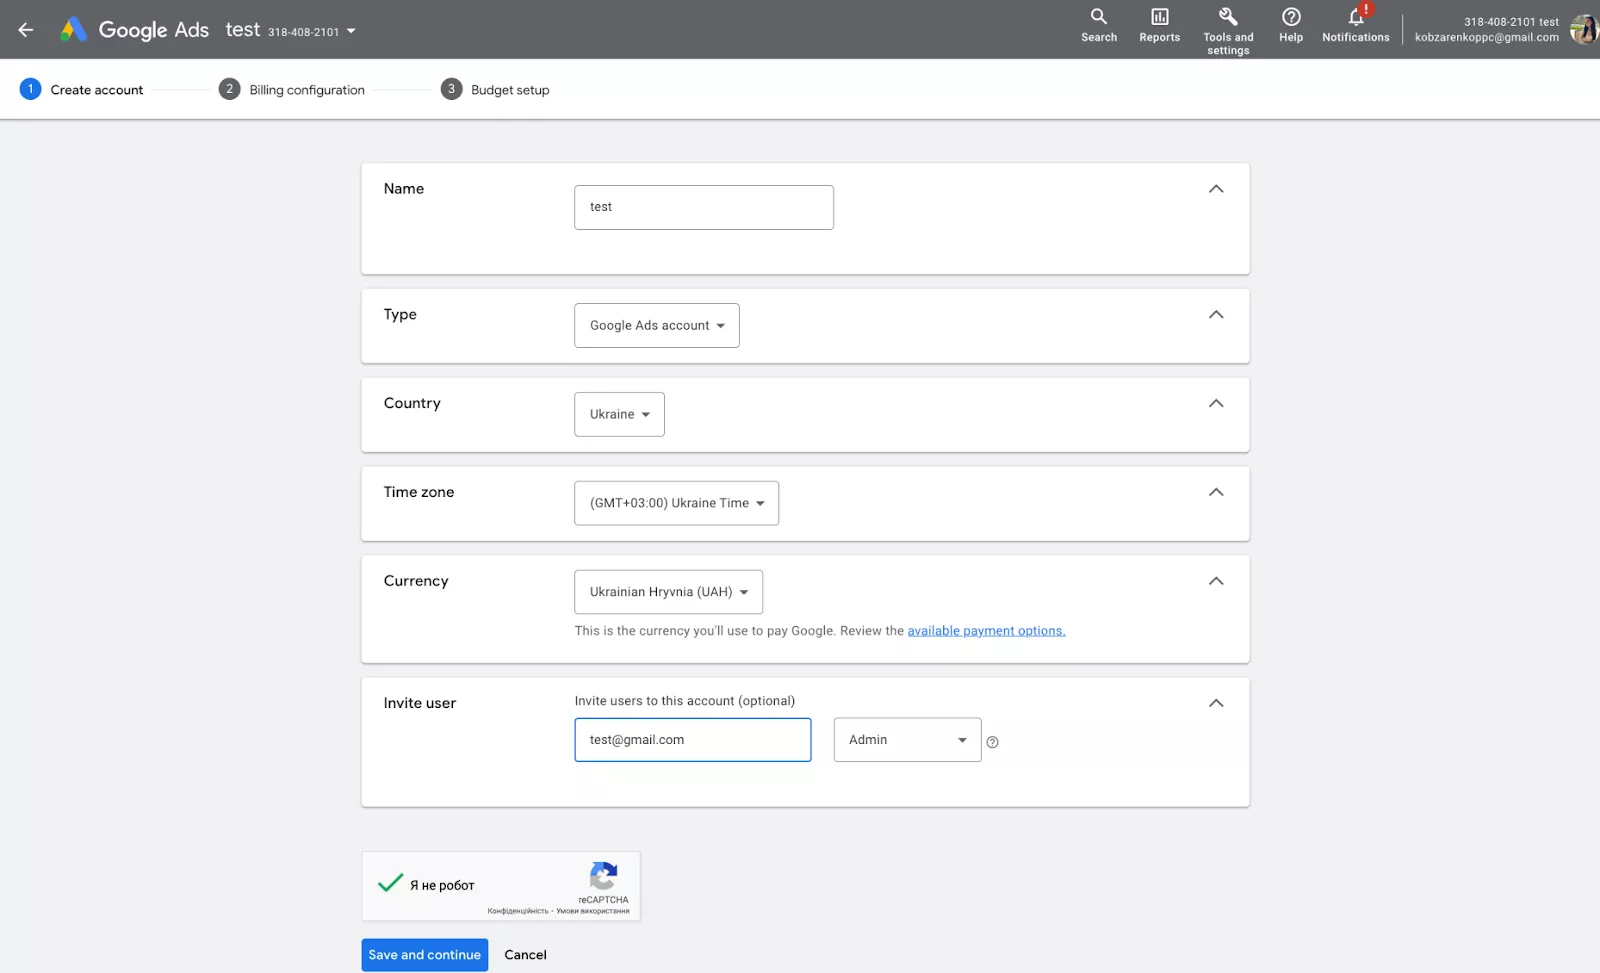
Step 2: Next, create an ad account with the required settings. Specify the following:
- Advertising account name (it can be a website URL)
- Type of Google Ads account
- Country
- Time zone
- Currency
After creating an account, you will need to enter your payment information. There are two ways to make payments: manually and automatically.
How to set up a payment profile
When you make manual payments, you will pay for advertising costs before you start running ads. When the ads start running, the cost will be deducted from the prepaid amount. Once the balance is exhausted, the ads will stop running.
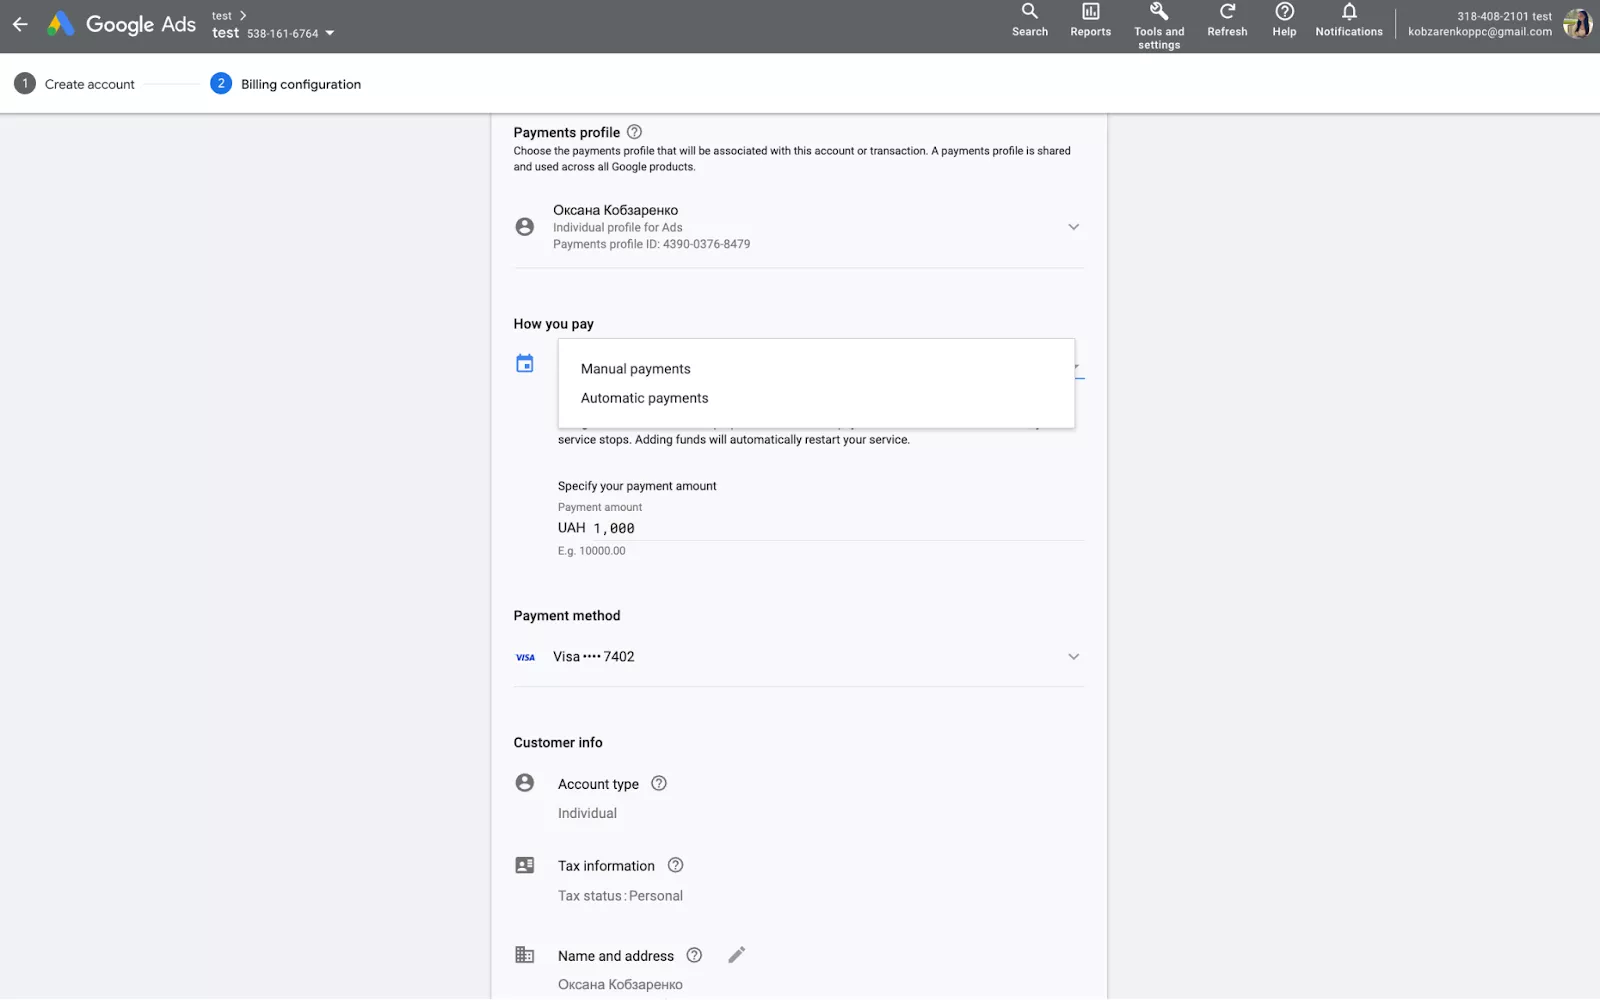
If you opt for automatic payments, the costs are automatically charged to the specified card account every month after the ads are launched.
The payment settings can be changed at any time, but only users with administrator or payment profile editor rights can change them.
Next, you need to specify the tax information: tax status and country of taxation, as well as the taxpayer identification number associated with the account.
Depending on the location of the company, its activities may be subject to tax.
When registering with Google Ads, you need to select a tax status: natural person, private entrepreneur, or legal person. You can only do this once. For example, if you choose the status of a physical person, you will not be able to change it to a legal entity.
If your VAT status changes, you can contact Google Support and provide a scanned copy of your taxpayer certificate.
The final step is to select a payment method. The payment methods available for your account depend on the country, the currency, and how you make payments (manually, automatically, or by invoice).

Money transfer. Money transfers can be made online or in person at a bank or post office. Funds are usually credited to your account balance within five business days.
Add credit or debit card. To use a credit or debit card for automatic payments, add it to your Google Ads account and set it as your preferred payment method. You will need to provide your card number, CVV, and expiration date.
If you are registering a new customer, this step is performed directly by the customer in their account, as the card details are confidential information.
Common MCC account setup and management mistakes
1. Failure to complete the registration form correctly. An error in the registration form, such as an incorrect email address or password, may result in difficulties accessing your MCC account or having it hacked by other users.
2. Incorrectly configured access levels. Incorrect settings can lead to unauthorized access to sensitive data or an inability to effectively manage accounts.
3. Failure to verify your email address. Without verification, you will not be able to access your MCC account.
4. Incorrect currency. For example, if the currency of the MCC account is UAH and the currency of the advertising account is USD, this may result in additional fees or loss of money during conversion.
5. Wrong choice of payment method. If you need quick payments but choose to pay by bank transfer instead of credit card, expect delays in payment processing and campaign activation.
6. Payment card limits. Google Ads may limit the number of payment cards associated with a single MCC account, which can cause problems during the payment process. A few tips to avoid this issue:
- Don’t add too many cards. If a user adds many different payment cards to one MCC account within a short period of time, it may look suspicious, and Google may limit the number of cards for security reasons.
- Ensure all data is consistent. If the data entered for the card (e.g., cardholder name, and address) does not match the data in the MCC account, this may result in a restriction.
7. Mistakes in completing the taxpayer’s data. This leads to tax reporting errors and fines from the tax authorities.
8. Outdated tax information. Outdated tax information can also lead to tax reporting errors and fines from tax authorities.
Read more about Google Ads on Netpeak Journal:
- A Comprehensive Guide to Creating a Performance Max Campaign in Google Ads Editor
- Complete Guide to Performance Max Assets and Specs
- Performance Max Campaign Optimization: 10 Steps to Maximize Efficiency
Conclusions
- If you have more than one advertising account, an MCC account in Google Ads is the main account for managing your advertising accounts. It is a must for agencies and businesses that work with digital advertising and have clients with their own Google Ads accounts.
- A regular ad account, without an MCC account, may be enough if you manage only one project. But if you have several different advertising accounts, it will be more convenient to control and successfully manage advertising campaigns from your MCC account.
- In your MCC account, you can link existing advertising accounts and create new ones from scratch.
- Follow the tips and instructions in the post when setting up your MCC account and advertising account. They will help you effectively manage your ad campaigns and achieve better results for your business.

 2
2
 2
2
 0
0
Related Articles
How to Set Up Consent Mode in GA4 on Your Website with Google Tag Manager
Let's explore how to properly integrate consent mode in GA4, configure it for effective data collection, and at the same time comply with GDPR and other legal regulations
Display Advertising Effectiveness Analysis: A Comprehensive Approach to Measuring Its Impact
In this article, I will explain why you shouldn’t underestimate display advertising and how to analyze its impact using Google Analytics 4
Generative Engine Optimization: What Businesses Get From Ranking in SearchGPT
Companies that master SearchGPT SEO and generative engine optimization will capture high-intent traffic from users seeking direct, authoritative answers