Are users leaving your site without making a purchase? Not to worry; you can effectively bring them back by showing them relevant ads.
Remarketing is a Google Ads tool that allows you to show ads to users who have previously visited your website. What makes dynamic remarketing unique is that ads are tailored to site visitors based on specific categories and products that they have viewed. When properly configured, Performance Max campaigns act like dynamic remarketing and bring back a lot of visitors.
In this article, I will discuss:
- How to set up a dynamic remarketing tag in Google Ads
- How to create a dynamic remarketing tag in Google Tag Manager
- Technical requirements for the developer to implement dynamic remarketing codes
- How to use the Google Ads tool to show users the exact products they viewed on your site
Dynamic remarketing tag setup in Google Ads
To create a dynamic remarketing campaign, you need to install the relevant Google Ads tags on your website. To ensure that the information for the campaign is transferred correctly, set up the tag in Google Ads by following the steps below:
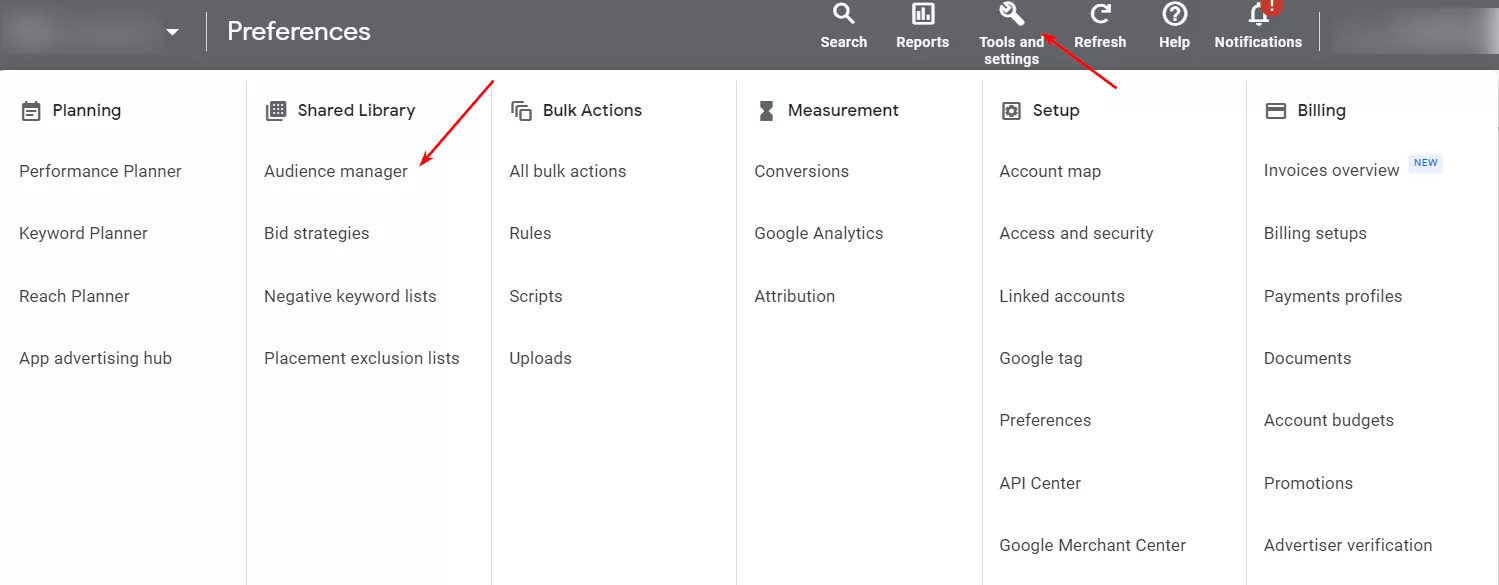
1. In the navigation bar, select Tools and settings and then Audience manager.
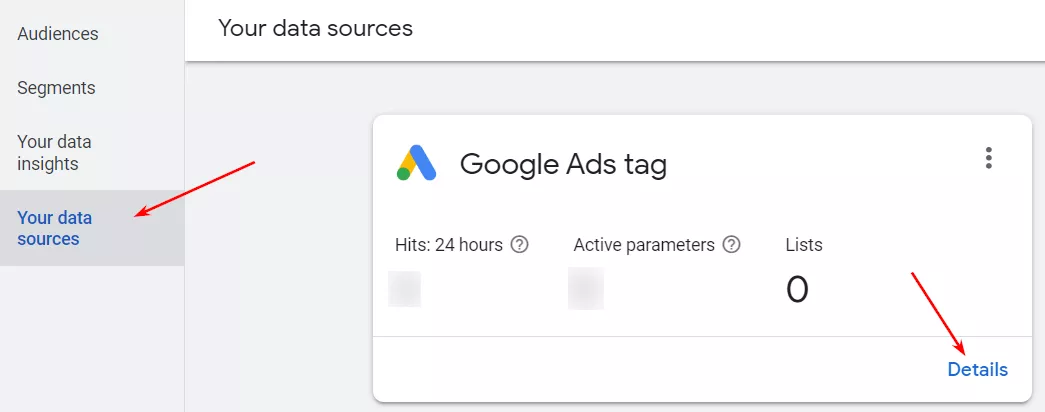
2. Select Your data sources > Google Ads tag > Details.
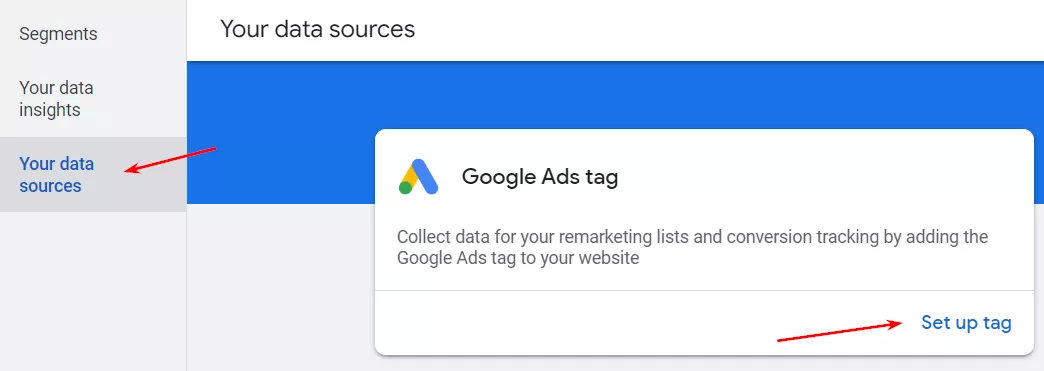
If you have a new account, instead of Details, you will see the Set up tag button. Click it.
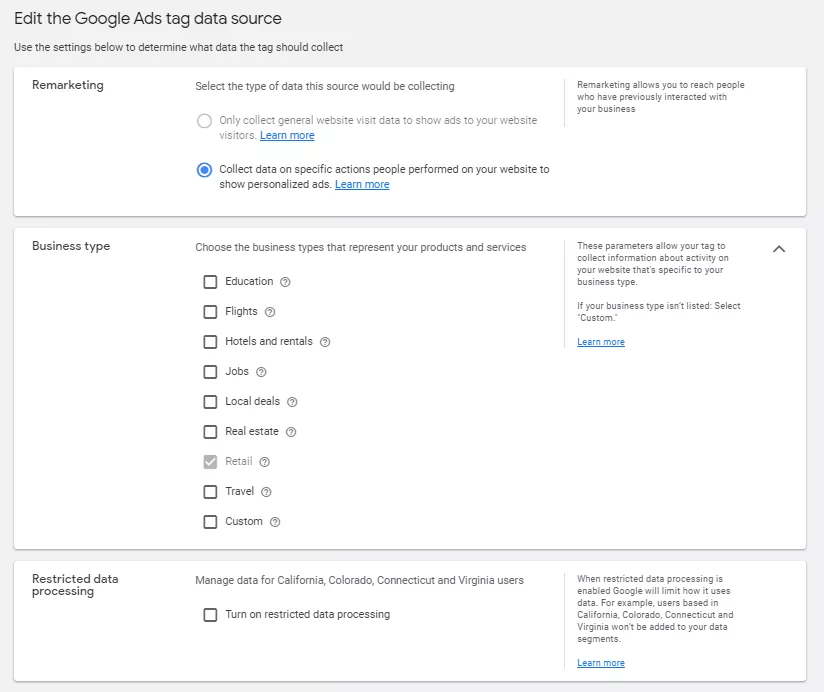
If it’s a new account, you’ll need to create a data source for the Google Ads tag. Edit the data source as shown in the screenshot below. In this example, I’m setting up remarketing for an online store, but the settings are the same for other types of businesses. Select the business type according to your business activity.
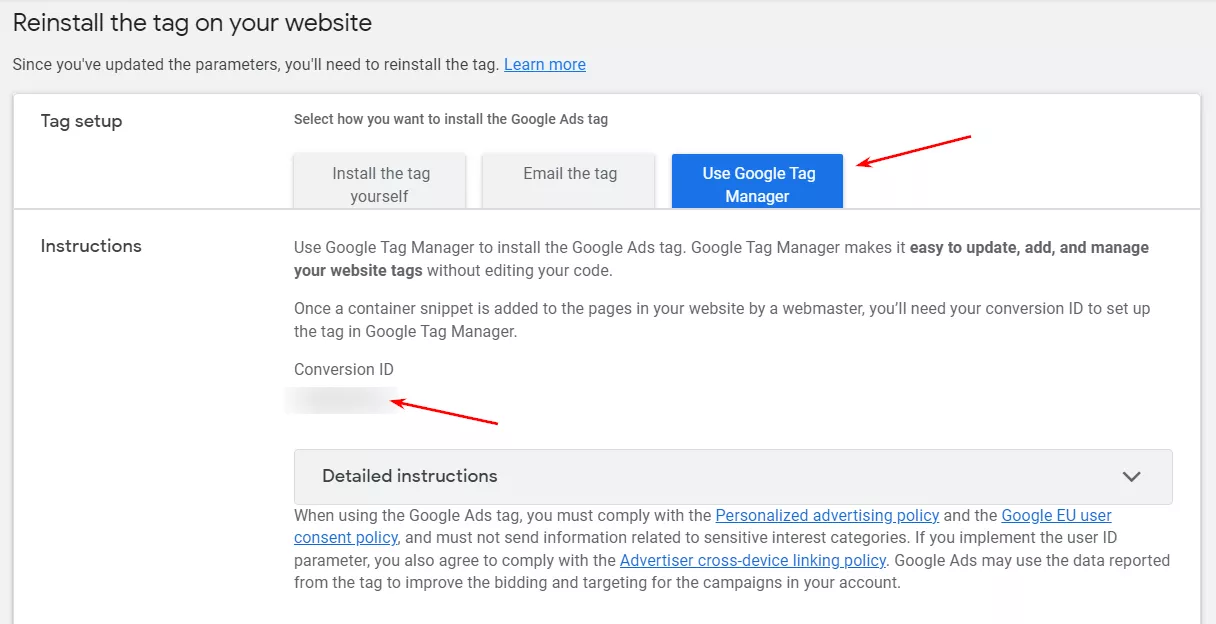
- Next, you’ll be directed to the Google Ads tag reinstallation menu. You can choose one of three ways to reinstall the tag:
- Set the tag manually.
- Send the tag by email to your developer.
- Use Google Tag Manager.
Since manual installation requires developer skills, this article focuses on installing using Google Tag Manager. The latter is easier to set up, and it requires less time and effort than when a developer installs the code completely on their own.
You will need a conversion ID number to set a tag using Google Tag Manager (GTM). To get this number, go to Reinstall the tag on your website window and click Use Google Tag Manager. Then, copy the ID number.
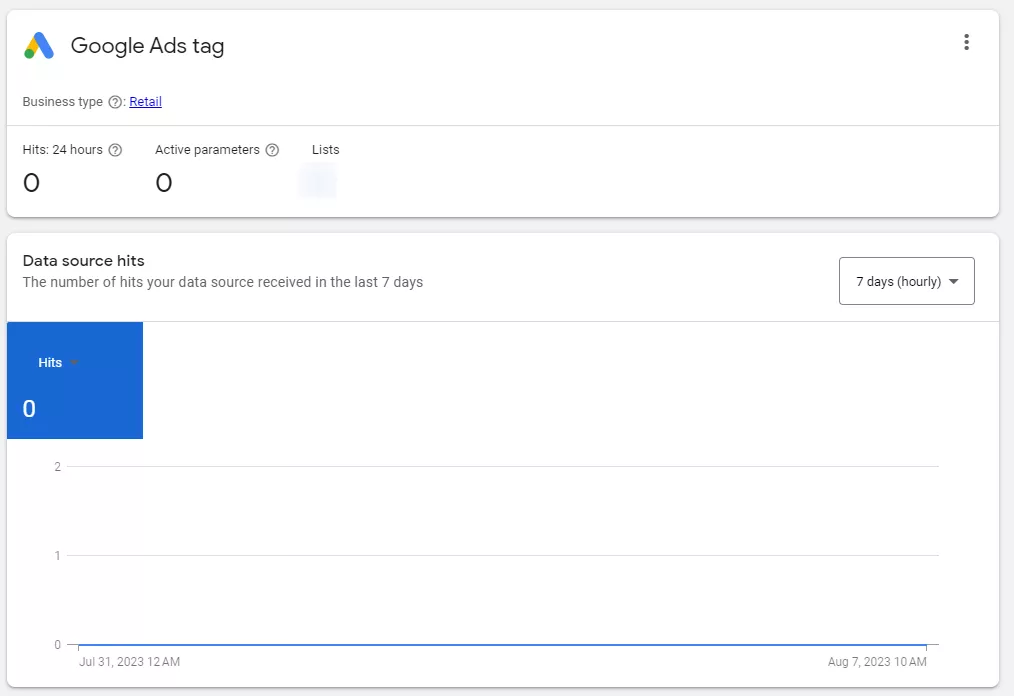
You’re all set. Clicking the Continue button will take you to the tag report. Since the tag has not been used yet, the report will be empty.
Creating a tag in Google Tag Manager without an activation trigger
Note that at this point, I’m going to create a tag without an activation trigger. I’m doing this so that I don’t accidentally publish an incompletely customized tag.
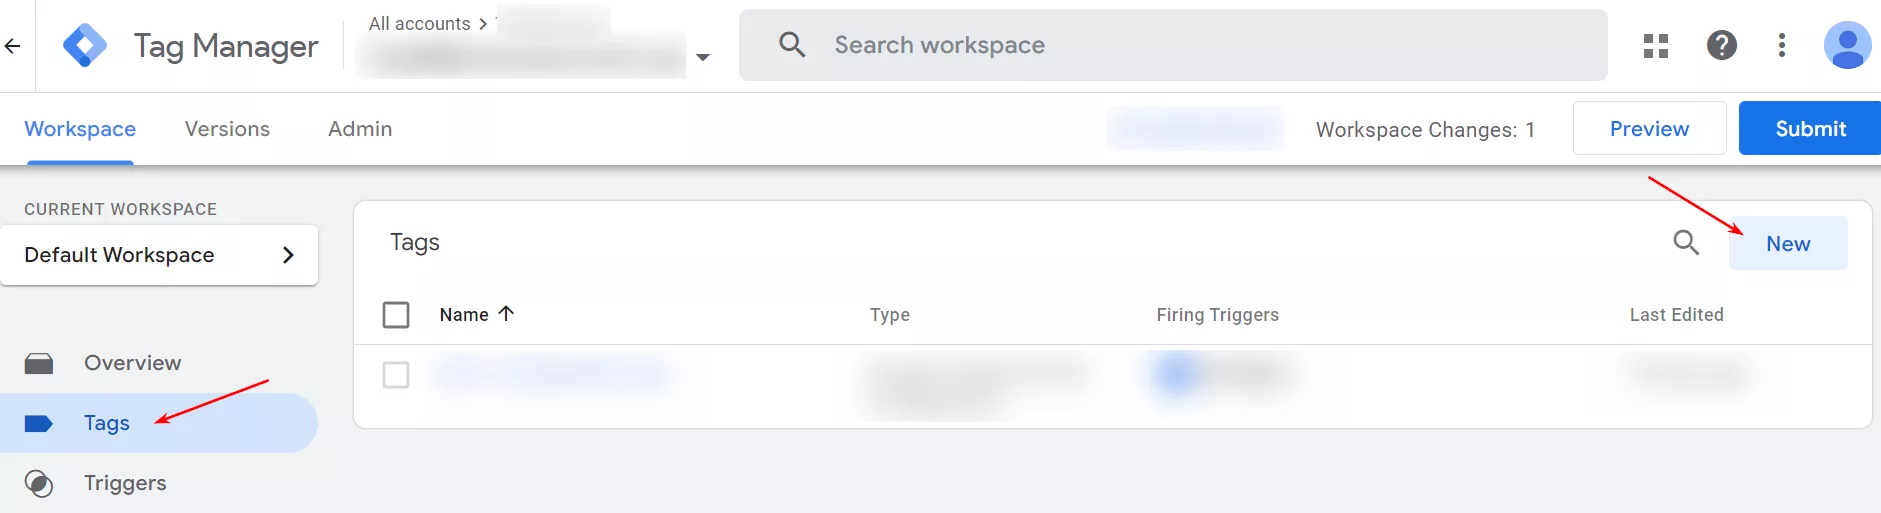
1. Go to Google Tag Manager (GTM) and select Tags > New.
2. Select Tag > Google Ads Remarketing, and add the conversion ID you copied from your Google Ads account.
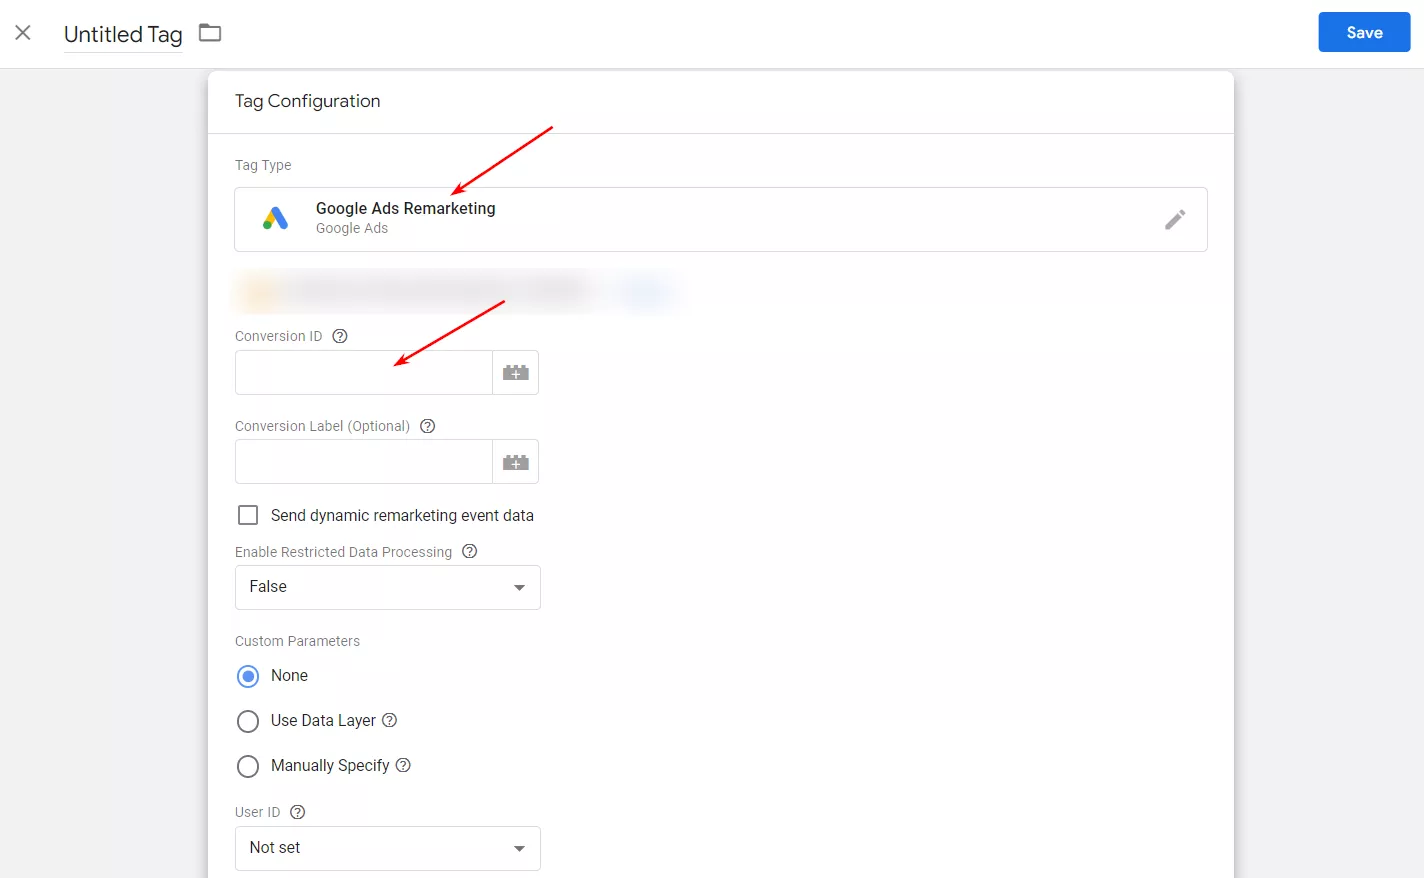
Leave the tag as it is for now, but don’t publish it. I’ll come back to this later.
To set up dynamic remarketing tags using GTM, you’ll need to prepare technical requirements (TR) for your developer. They will add small pieces of code to the dataLayer of your website. These pieces will track and transmit data about user events on the site and generate dynamic remarketing ads based on that data.
Currently, Google has only five different types of events, also known as text strings. These strings describe the collected data about the event being tracked. Google Ads uses them to automatically add users to default lists.
Google recommends using the following event names.
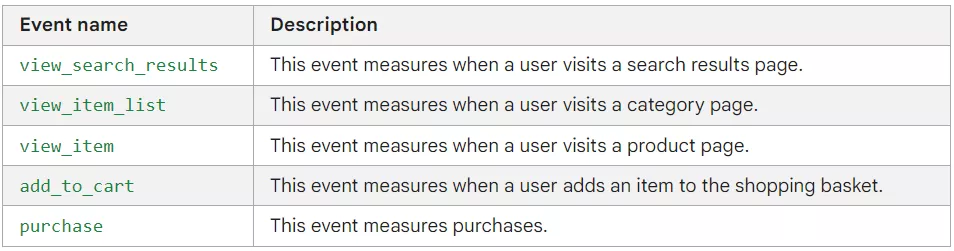
The parameters of each event are represented by a JavaScript object, which contains data about the interaction with the selected event. It is important that this object contains the items parameter, which has at least one item. Each item contains information about a specific product or service that the user has interacted with.
In addition, the item can have an optional value parameter that indicates the total cost of the goods.
When you use a code snippet to track dynamic remarketing events, you must pass at least one item. If a site visitor interacts with multiple products or services, multiple objects can be passed. For example, when a customer pays for multiple items in a shopping cart or searches for tickets to travel to several cities.
Check out our glossary for key online advertising definitions to enhance your marketing knowledge!
Item parameters for an online store
I recommend using the following item parameters when setting up remarketing for an online store. However, please note that the set of objects depends on the goals of the campaign and may change.
id — unique product ID.
Important: This attribute is required and must match the id or item group_id in the Google Merchant Center product feed.
google_business_vertical — type of feed, for a retail online store.
value — the total cost or price of the products.
Technical requirements for the developer to implement Google Ads dynamic remarketing codes
For a developer to correctly implement Google Ads dynamic remarketing codes on your website, you need to provide detailed and accurate technical requirements (TRs).
The TRs should include the following sections:
- Event name and when it should be transmitted.
- Code.
- Additional information (if necessary).
Below are examples of TRs for each of the five events offered by Google.
Product card view
The code should be triggered when the product card is uploaded.
For example, enter a link to a product here.
window.dataLayer = window.dataLayer || [];
dataLayer.push({
'event': 'view_item', // Event name. Remain unchanged.
'value':1.222, // Product price without currency. A whole number or a floating point number. If the product is on sale, pass the promotional price.
'items': [
{
'id': 11970210 , // Pass the product ID specified in the Google Merchant Center feed
'google_business_vertical': 'retail' // Remains unchanged
},
]
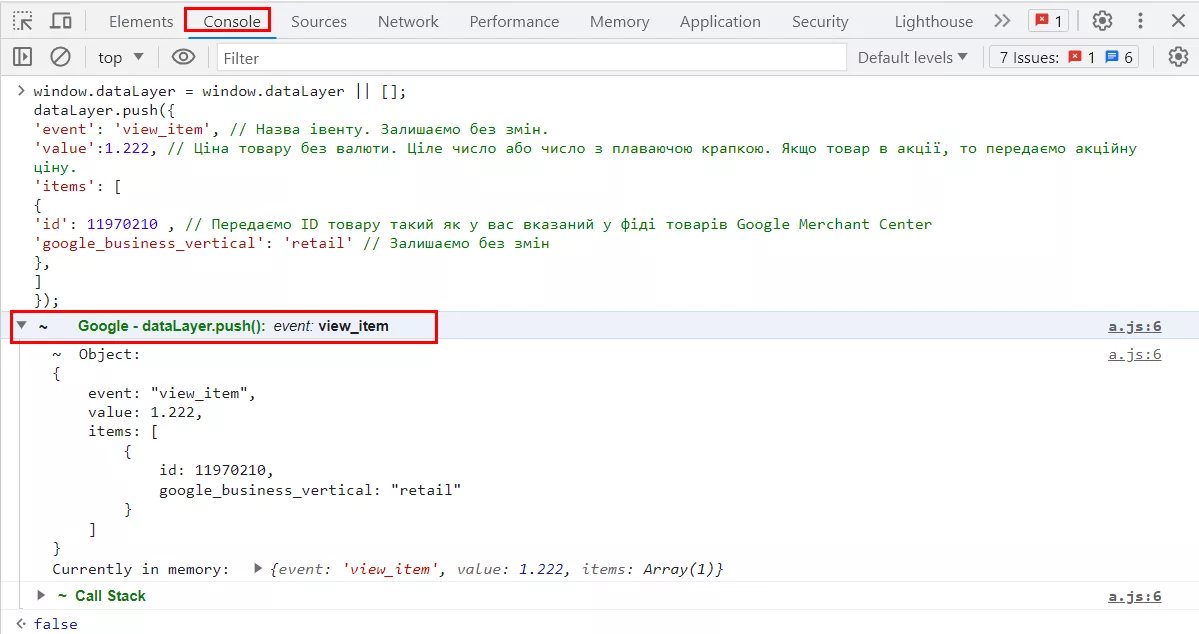
});To check whether the code is typed correctly, I open the console in my browser (with F12 or Fn+F12), add the code, and press Enter. As a result, I should get the following.
Adding an item to a shopping cart
This code should be triggered when the user adds an item to the cart.
window.dataLayer = window.dataLayer || [];
dataLayer.push({
'event': 'add_to_cart', // Event name. Remain unchanged.
'value':1.222, // Product price without currency. A whole number or a floating point number. If the product is on sale, pass the promotional price.
'items': [
{
'id': 11970210 , // Pass the product ID specified in the Google Merchant Center feed
'google_business_vertical': 'retail' // Remain unchanged
},
]
});
Transaction
The code should be triggered when the user completes the transaction and lands on the “thank you” page.
Important! The following conditions must be met:
- The code should be triggered once per request.
- The code should not be triggered again after the page reloads.
- If a user makes a transaction through a payment system (e.g., Fondy), they should be redirected to the thank you page after the purchase, where the code is triggered.
window.dataLayer = window.dataLayer || [];
dataLayer.push({
'event': 'purchase', // Event name. Remain unchanged.
'value':1.222, // Transfer the total cost of all items purchased
'items': [
{
'id': 11970210 , // Transfer all the IDs of items purchased
'google_business_vertical': 'retail' // Remain unchanged
},
]
});
Viewing the product category page (example of TRs)
The code should be triggered when products are loaded on the categories page.
For example, Main > Footwear > Sneakers. The code should work when viewing all the products in the Sneakers category.
window.dataLayer = window.dataLayer || [];
dataLayer.push({
'event': 'view_item_list', // Event name. Remain unchanged.
'value':1.222, // Transfer the total cost of all items uploaded
'items': [
{
'id': 11970210 , // Transfer all the IDs of items purchased
'google_business_vertical': 'retail' // Remain unchanged
},
]
});
Viewing products in search (example of TRs)
The code should be triggered at the moment the product loads when the user views the search results page.
window.dataLayer = window.dataLayer || [];
dataLayer.push({
'event': 'view_search_results', // Event name. Remain unchanged.
'value':1.222, // Transfer the total cost of all items uploaded
'items': [
{
'id': 11970210 , // Transfer all the IDs of items purchased
'google_business_vertical': 'retail' // Remain unchanged
},
]
});
Finalizing the setup in Google Tag Manager
After the developer has installed the codes on the site, continue the GTM tag setup.
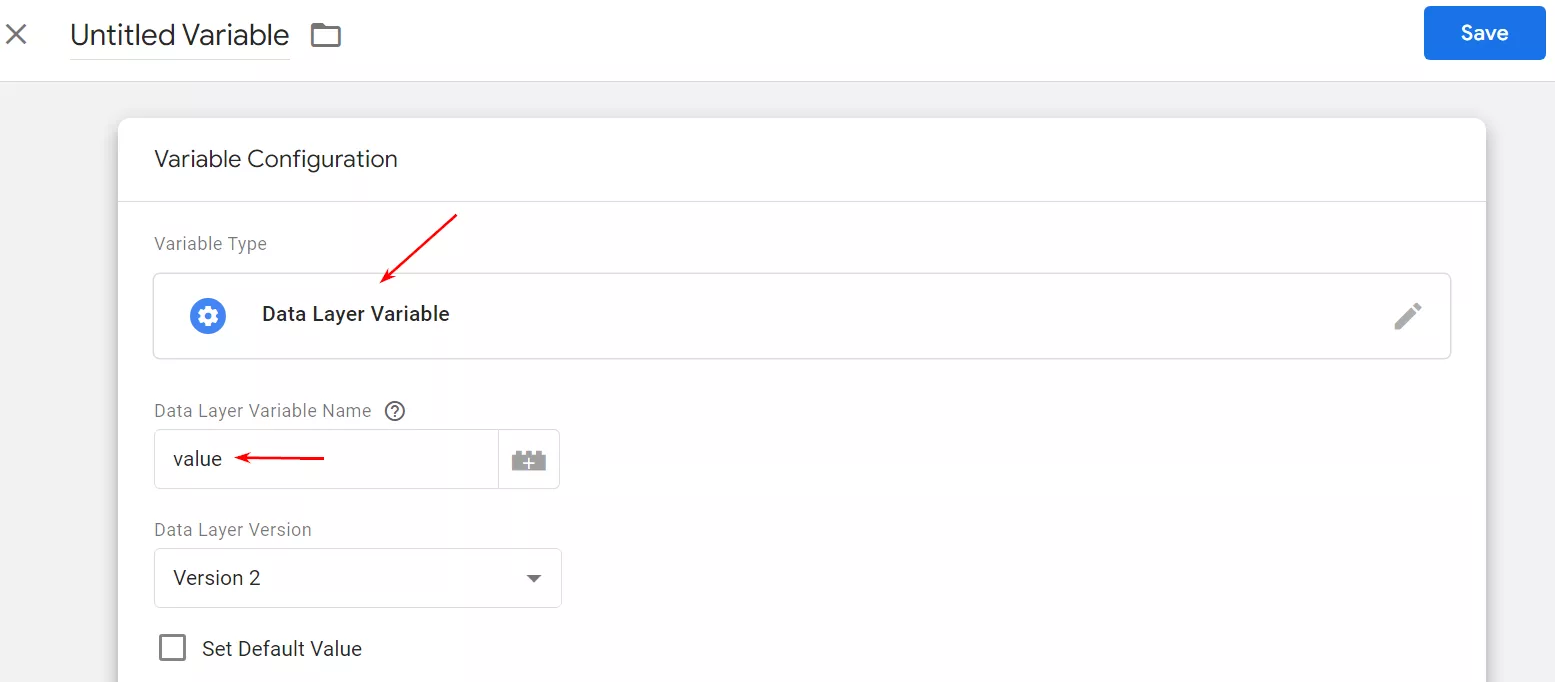
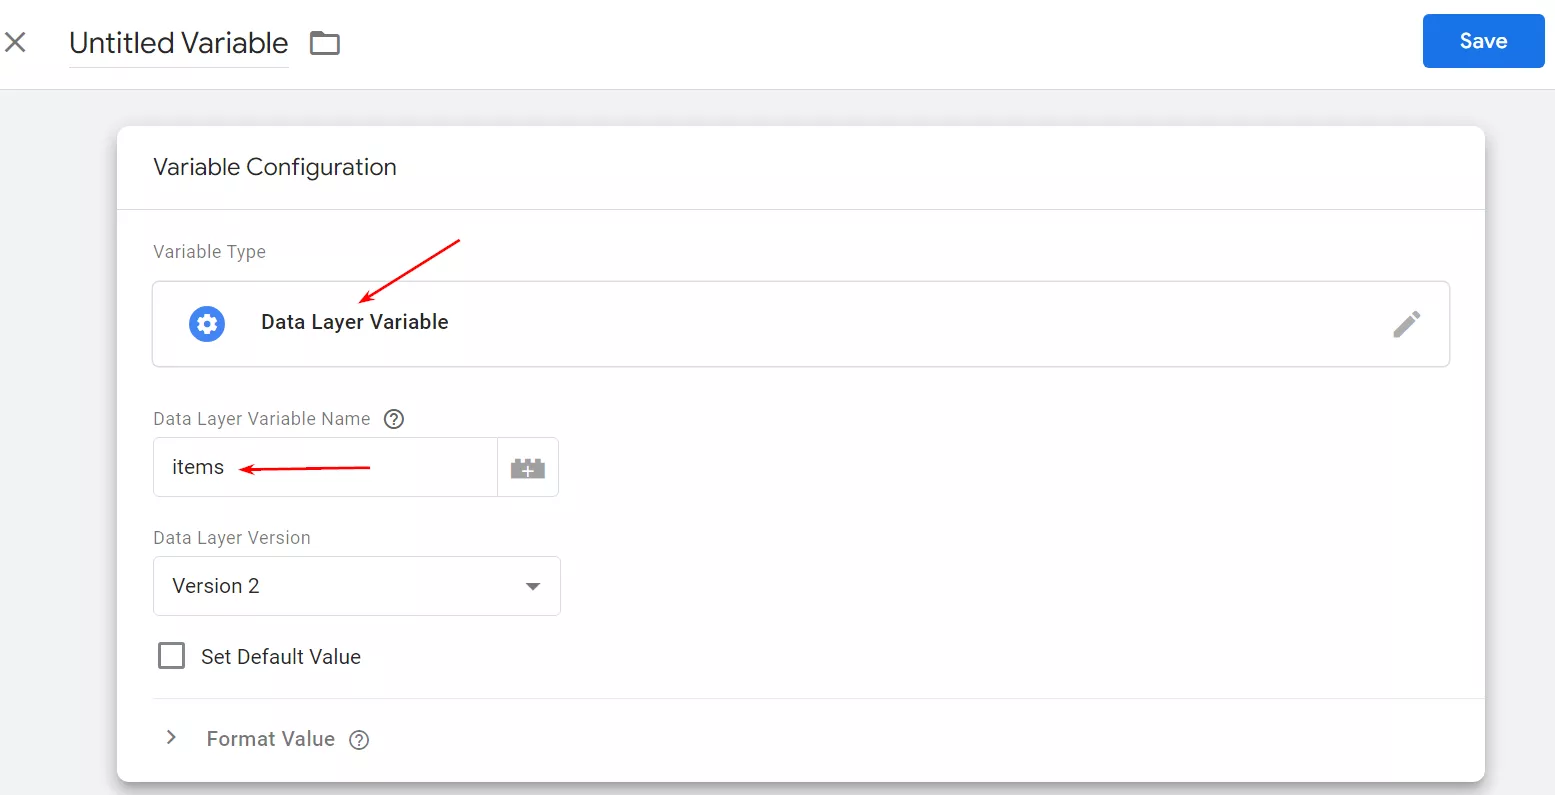
1. Choose Variables > Custom variables > New.
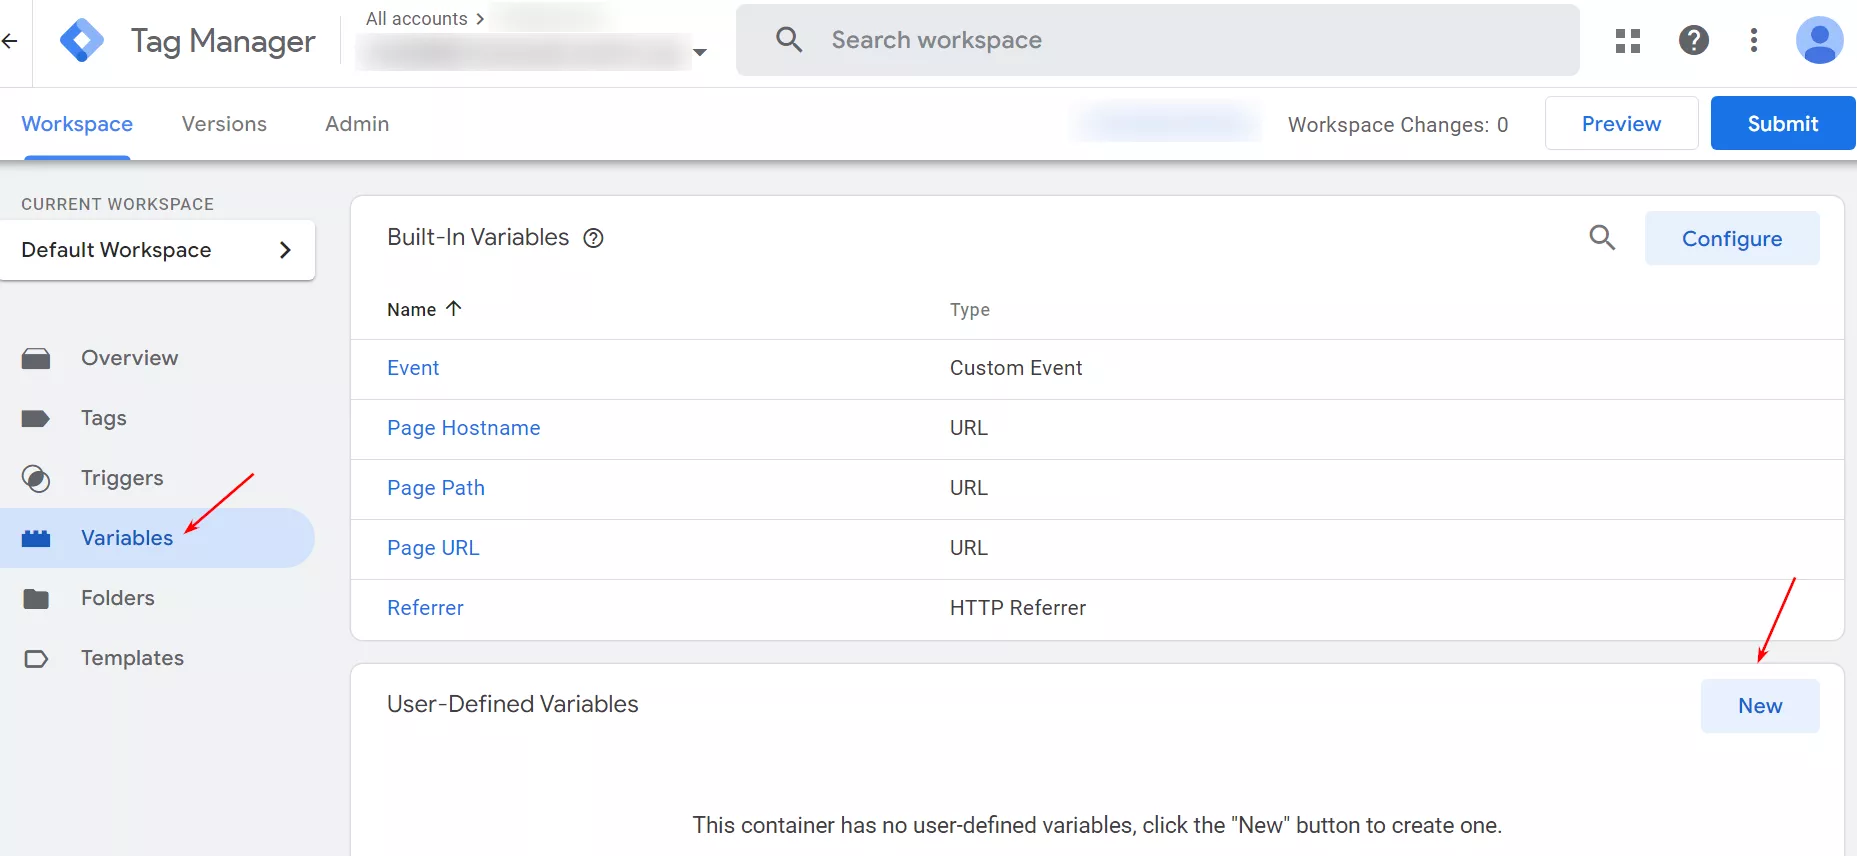
2. Create two variables: items and value.
3. Return to the Google Ads Remarketing tag and check the “Send dynamic remarketing event” data box.
To the Event Name field, add the standard Event variable (as shown in the screenshot below), which is located in GTM. In the Event Value field, add the value variable. In the Event Elements field, add the items variable.
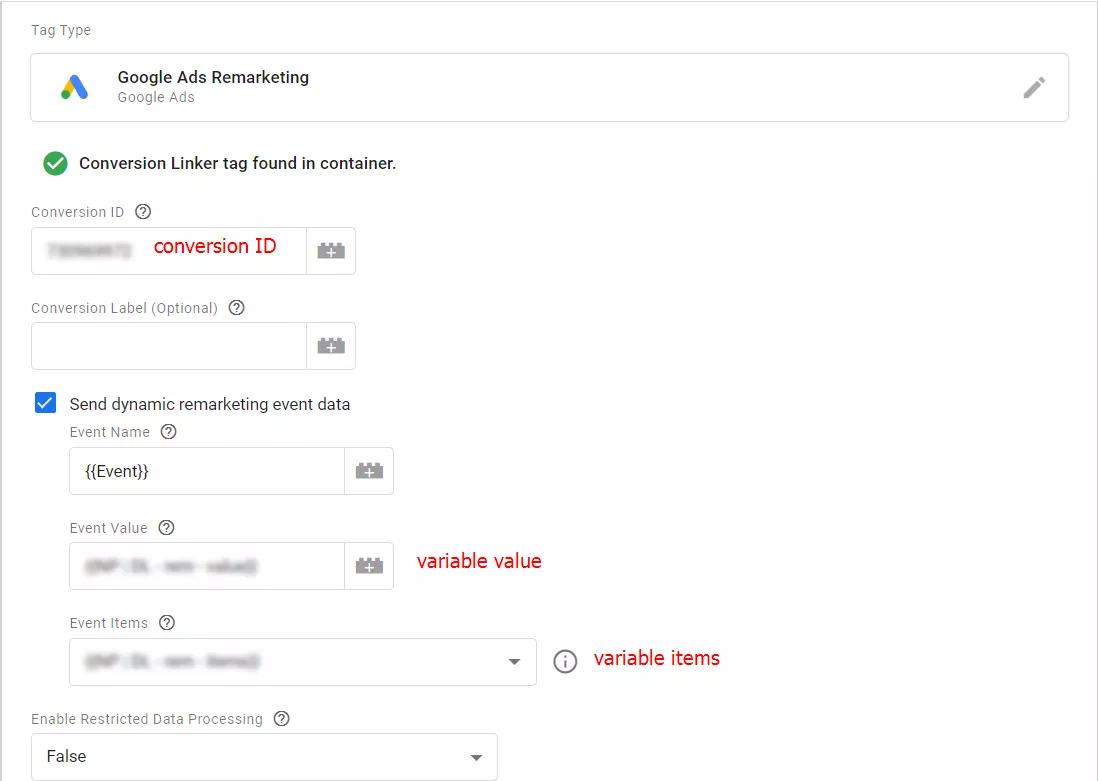
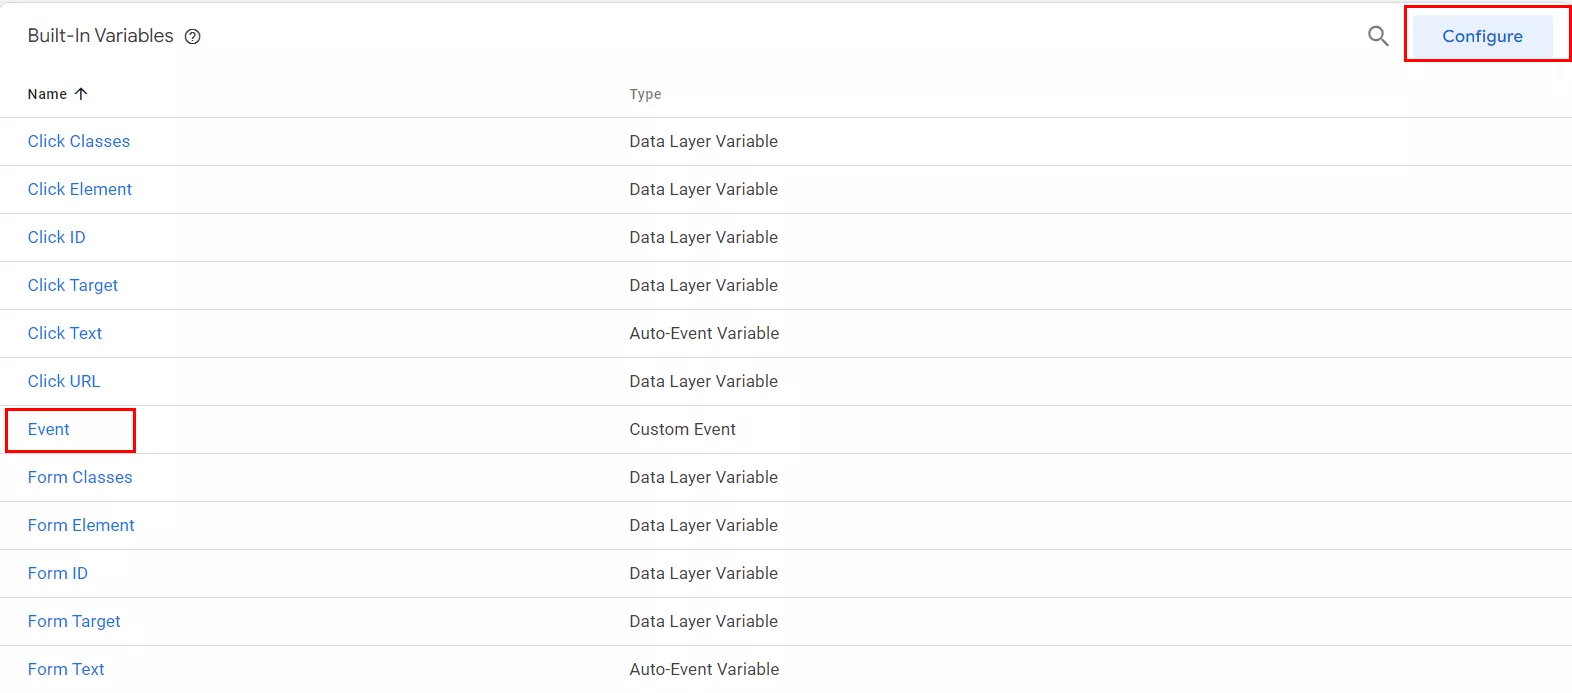
Event Name is a default variable available in GTM. If you don’t see it, click Configure in the upper right corner to enable it.
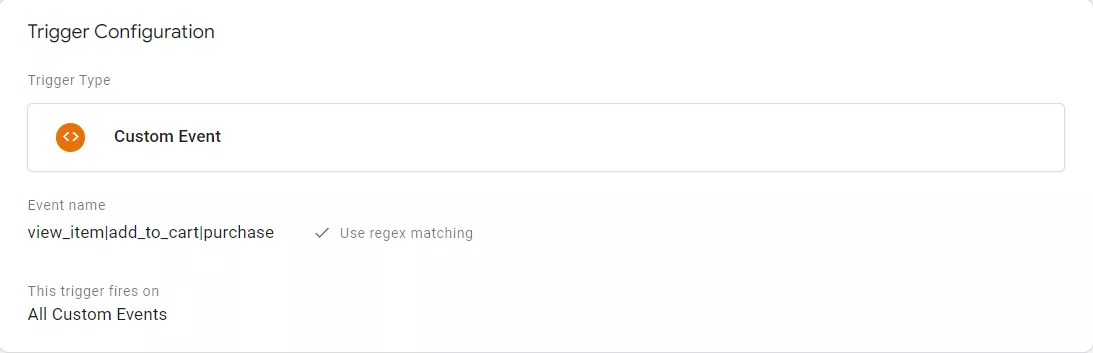
Now that everything is set up create a tag activation trigger. Check the “Use regex matching” checkbox and specify all event names with a | sign.
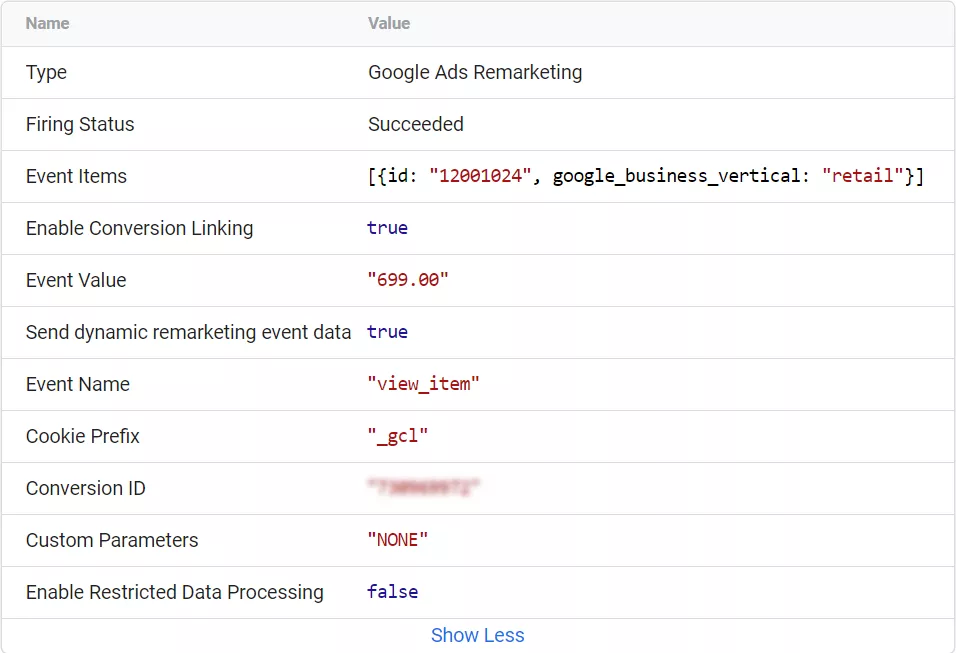
Now, test the settings. Go through all the events and check them with the GTM debugger and Tag Assistant.
Here’s an example of a successful test for view_item.
Creating audiences in Google Ads
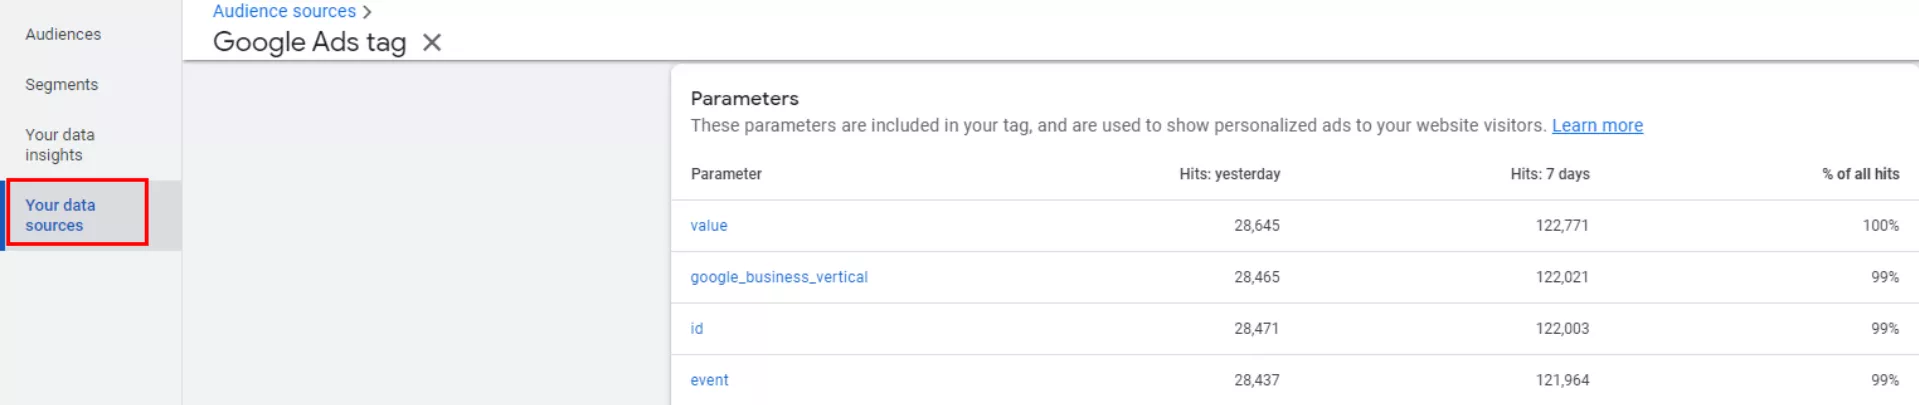
When you’re done setting up your tags, click Your data sources in the Google Ads tag to see statistics for the parameters you selected. Check the percentage (%) of all requests; it should be between 99-100%. If it is lower, it means that the tags are not processing all requests.
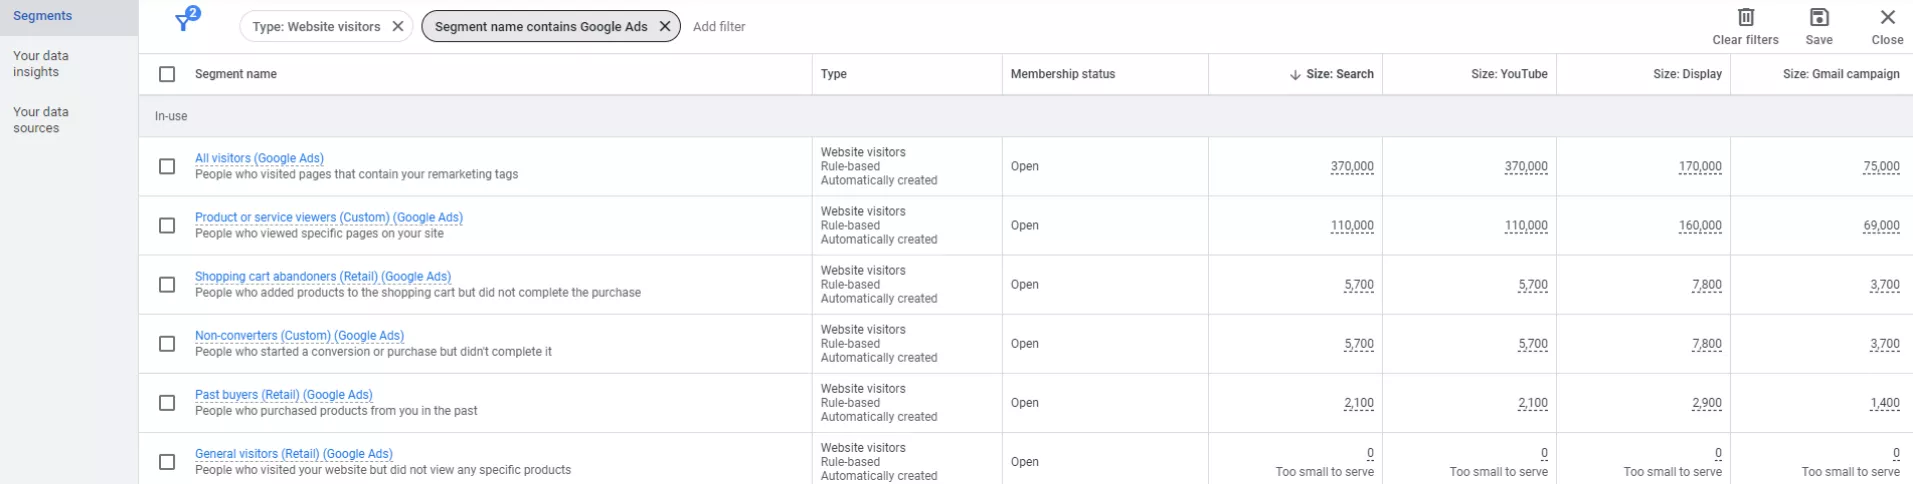
Go to the Audience Manager > Segments section to find automatically added new audiences. You can use them for your advertising campaigns.
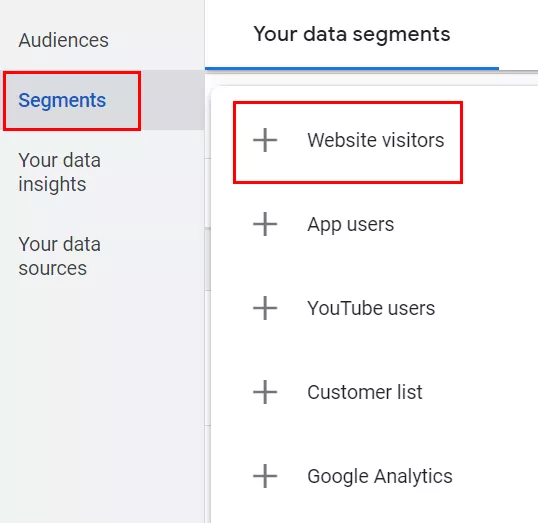
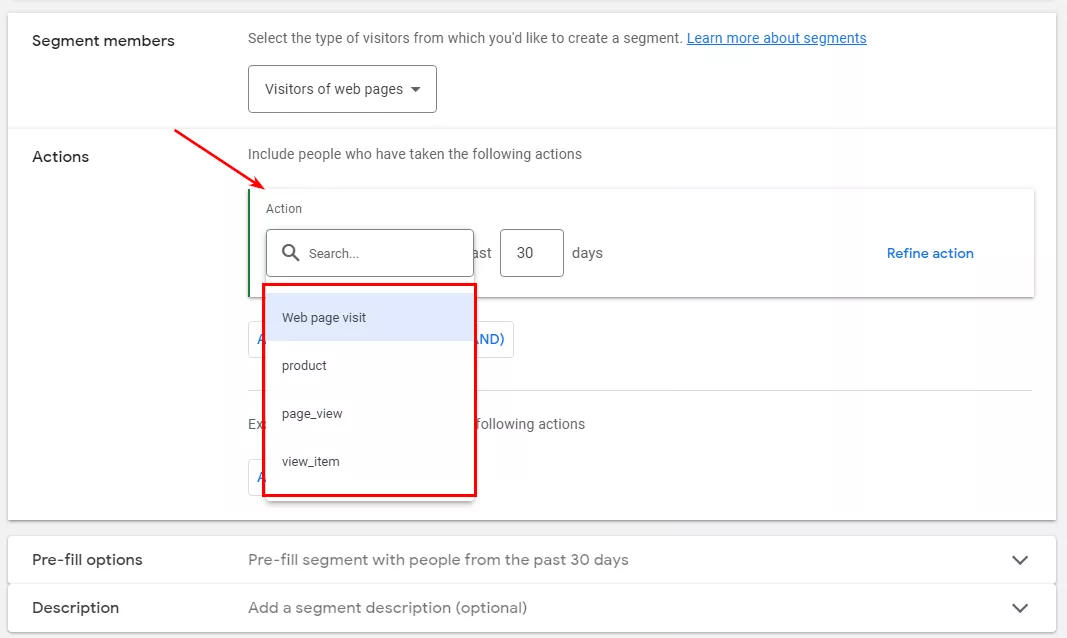
To create your audience, go to Segments > Website visitors.
Click Action, select an event, and configure the additional parameters that you may need.
The approximate size of the audience list is based on data from the previous 30 days. The accuracy of this estimate depends on several factors, including list settings and the amount of time passed since the corresponding tag was set.
Read our blog to learn more about setting up a Google Ads campaign:
- A Comprehensive Guide to Creating a Performance Max Campaign in Google Ads Editor.
- Complete Guide to Performance Max Assets and Specs
- Performance Max Campaign Optimization: 10 Steps to Maximize Efficiency
To sum up
Google Ads and Google Tag Manager enable you to create personalized ads that turn leads into loyal customers.
The best leads are those who have already shown interest in your products, making dynamic remarketing a powerful tool. You can use it to target website visitors and increase your revenue.
To set up dynamic remarketing in Google Ads, follow these six steps:
- Create and configure a remarketing tag in Google Ads.
- Install the remarketing tag on your website with GTM.
- Create the technical requirements to install dynamic remarketing codes and submit them to the website developer.
- Make the remarketing tag dynamic in GTM.
- Create a trigger for your new dynamic remarketing tag in GTM.
- Use the GTM Debugger and Tag Assistant to verify the correctness of the setup.
You can effectively create a campaign in Google Ads by setting up a dynamic remarketing tag.

 2
2
 2
2
 0
0
Related Articles
How to Set Up Consent Mode in GA4 on Your Website with Google Tag Manager
Let's explore how to properly integrate consent mode in GA4, configure it for effective data collection, and at the same time comply with GDPR and other legal regulations
Display Advertising Effectiveness Analysis: A Comprehensive Approach to Measuring Its Impact
In this article, I will explain why you shouldn’t underestimate display advertising and how to analyze its impact using Google Analytics 4
Generative Engine Optimization: What Businesses Get From Ranking in SearchGPT
Companies that master SearchGPT SEO and generative engine optimization will capture high-intent traffic from users seeking direct, authoritative answers